-
What Is Classic LVM?
-
What Is LVM-thin?
-
How Do Classic LVM and LVM-thin Work?
-
LVM vs LVM-thin Storage
-
Key Differences Between Classic LVM and LVM-thin in Proxmox
-
Choosing Between Classic and Thin-Provisioned Storage Backends
-
Setting Up Classic & Thin-Provisioned Storage in Proxmox VE
-
Protect Your Proxmox VMs with Vinchin Backup & Recovery
-
Proxmox LVM vs LVM-thin FAQs
-
Conclusion
Choosing the right storage backend is one of the most important decisions you’ll make as a Proxmox administrator. If you’re building or expanding your Proxmox VE, you will encounter two main options: LVM and LVM-thin. But which one fits your needs? This guide explains both technologies step by step—from basic concepts to advanced management—so you can confidently select the best solution for your VMs and keep them protected.
Storage management in Linux often relies on Logical Volume Manager (LVM). In Proxmox VE, both classic LVM and its extension—LVM-thin—are available as storage backends.
What Is Classic LVM?
Classic LVM lets you divide physical disks into logical volumes that can be resized or moved without reformatting your drives. It uses three core components:
Physical Volumes (PV): These are actual disk partitions or entire disks.
Volume Groups (VG): Collections of PVs pooled together.
Logical Volumes (LV): Chunks carved from VGs that act like regular partitions.
When you create a VM disk using classic LVM in Proxmox, it reserves all requested space immediately—even if little data is written inside the VM.
What Is LVM-thin?
LVM-thin builds on top of classic LVM by adding thin provisioning—a way to allocate storage only when data is actually written. Instead of reserving all space up front, it creates a “thin pool” inside an LV group:
Thin Pool: Special LV that manages space dynamically.
Thin Volumes: Virtual disks created from the thin pool; they grow as needed.
This means you can assign large virtual disks to VMs without consuming physical space until it’s used—a process called overcommitment.
How Do Classic LVM and LVM-thin Work?
Understanding how each system organizes storage helps explain their strengths—and limitations—in practice.
Classic LVM Architecture
Classic LVM layers work like this:
1. You initialize a disk as a Physical Volume (PV).
2. You combine one or more PVs into a Volume Group (VG).
3. You carve out Logical Volumes (LV) from the VG; these become VM disks or container roots.
4. Each LV reserves its full size immediately on creation.
This approach gives predictable performance since there’s no extra overhead during writes.
How Does Thin Provisioning Change Things?
With LVM-thin, after creating your PV and VG:
1. You create an LV designated as a “thin pool.”
2. From this pool, you create multiple thin-provisioned volumes (“thin volumes”).
3. Each thin volume appears large to the guest OS but only consumes real space when data is written.
4. Snapshots are fast because they use copy-on-write technology within the thin pool structure.
Because several VMs may share more virtual capacity than exists physically (“overcommit”), administrators must monitor usage closely to avoid running out of actual disk space or metadata room.
LVM vs LVM-thin Storage
Both classic and thin-provisioned storage have unique benefits—and trade-offs—that matter depending on your environment’s needs.
| Feature | Classic LVM | LVM-thin |
|---|---|---|
| Space Allocation | Reserved up front | Allocated on demand |
| Overcommit Possible | No | Yes |
| Snapshot Support | Not supported | Supported |
| Performance | Predictable | Slight overhead |
| Storage Efficiency | Lower | Higher |
| Monitoring Required | Basic | Careful |
Classic (“thick”) provisioning works well if simplicity matters most or if workloads require guaranteed performance at all times—for example, databases with heavy random writes benefit from reserved blocks with no copy-on-write overhead.
Thin provisioning shines when maximizing utilization is key—such as test/dev labs where many VMs need large disks but rarely fill them up—or when frequent snapshots are essential for backup/testing workflows.
Key Differences Between Classic LVM and LVM-thin in Proxmox
Let’s break down what sets these two approaches apart so you can make an informed decision for your infrastructure:
Provisioning Strategy
Classic LVs reserve all assigned space instantly; there’s no risk of overcommitting but also less flexibility if needs change later on.
LVM-thin allocates blocks only when needed—which enables overcommitment—but makes it possible to run out of physical capacity if not monitored carefully.
Snapshot Capabilities
Snapshots let admins capture point-in-time copies of VM disks:
With classic LVs in Proxmox VE, snapshots aren’t natively supported for VM images.
With LVM-thin, snapshots are fast and efficient thanks to internal copy-on-write mechanisms—ideal for backups or quick rollbacks during upgrades/tests.
Performance Considerations
Classic volumes offer slightly better write performance since there’s no copy-on-write logic involved.
Thin pools introduce minor overhead due to dynamic allocation—but modern hardware usually makes this negligible except under intense random-write loads.
Storage Utilization & Waste
If most VMs never fill their allocated disks fully—as is common—classic provisioning wastes significant capacity.
Thin pools maximize efficiency by allocating only what’s used; however, aggressive overcommitment increases risk if many VMs suddenly expand at once!
Metadata Management in Thin Pools
Every operation in an LVM-thin pool updates metadata stored alongside user data:
If metadata fills up—even if free data blocks remain—you cannot create new snapshots or volumes until resolved!
Always monitor both data and metadata usage via
lvs -o+metadata_percent.Plan extra headroom; running out leads to downtime while repairs occur!
Choosing Between Classic and Thin-Provisioned Storage Backends
Selecting between classic and thin-provisioned storage depends on workload patterns—and risk tolerance:
Ask yourself:
1. Do my VMs need frequent snapshots? Choose LVM-thin.
2. Is guaranteed write speed critical? Stick with classic LVM.
3. Can I actively monitor usage? If yes—and maximizing efficiency matters—go with thin pools.
4. Am I running mission-critical databases? Consider classic unless snapshot support outweighs slight performance loss from CoW operations.
5. Will my environment scale rapidly? Thin pools allow flexible growth but demand vigilance against overallocation surprises!
Still unsure? Start small by testing both types side-by-side before rolling out across production nodes!
Setting Up Classic & Thin-Provisioned Storage in Proxmox VE
Getting started with either backend involves similar initial steps—but diverges at volume creation time:
Method 1: Using The Web Interface
The graphical interface streamlines setup:
1. Log into the web console
2. Navigate through Datacenter > Node > Disks
3. Select target disk; click Wipe Disk if necessary
4a.For classic: Click Create > Volume Group, name it (e.g., vgdata), confirm
4b.For thin: Click Create > Lvm-Thin, enter pool name (nvme-thinp), pick parent VG (vgdata), set size
5.Optional: Assign new storage under Datacenter > Storage > Add
Once added here, both types appear as selectable targets when creating/moving VM disks!
Method 2: Command Line Setup
Prefer scripting everything? Here’s how:
For Classic Provisioning
lsblk                         # Identify device (/dev/sdb)
sgdisk -n 1:0:0 -t 1:8e00 /dev/sdb   # Create partition type Linux-LV
pvcreate /dev/sdb1            # Initialize physical volume
vgcreate vgdata /dev/sdb1     # Make volume group
Add this VG via GUI under Datacenter > Storage > Add > "Lvm".
For Thin Provisioning
lsblk                         # Confirm device path again!
sgdisk -n 1:0:0 -t 1:8e00 /dev/sdc   # Partition another drive/type Linux-LV
pvcreate --metadatasize 1M /dev/sdc1 # Use larger metadata area (>250k recommended)
vgcreate vmdata /dev/sdc1            # New volume group just for thin pool!
lvcreate -L 500G -T -n vmstore vmdata # Create 500GB thin pool named 'vmstore'
Then register this under Datacenter > Storage > Add > "Lvm-Thin", setting ID (vmstore), Volume Group (vmdata), Thin Pool (vmstore). Now assign new VM disks here.
Note: Always double-check devices before wiping! Increasing --metadatasize reduces risk of hitting limits early—especially important if planning lots of snapshots. Never use pvcreate --force --force unless absolutely sure about destroying existing data!
Protect Your Proxmox VMs with Vinchin Backup & Recovery
After optimizing your storage backend with solutions like classic or lvm-thin volumes in Proxmox VE, safeguarding those virtual machines becomes essential. Vinchin Backup & Recovery stands out as a professional enterprise-level backup solution supporting over 15 mainstream virtualization platforms—including first-class support for Proxmox VE alongside VMware, Hyper-V, oVirt, OLVM, RHV, XCP-ng, XenServer, OpenStack, ZStack, and more environments widely used across enterprises today.
Vinchin delivers robust protection features such as forever-incremental backup for efficient long-term retention without repeated full backups; advanced deduplication and compression technologies that minimize backup sizes; seamless cross-platform V2V migration capabilities; granular restore options; instant recovery functions; scheduled policies; archive-to-cloud/tape integration; strong encryption standards—and much more—all managed through an intuitive web console designed for ease-of-use even at scale.
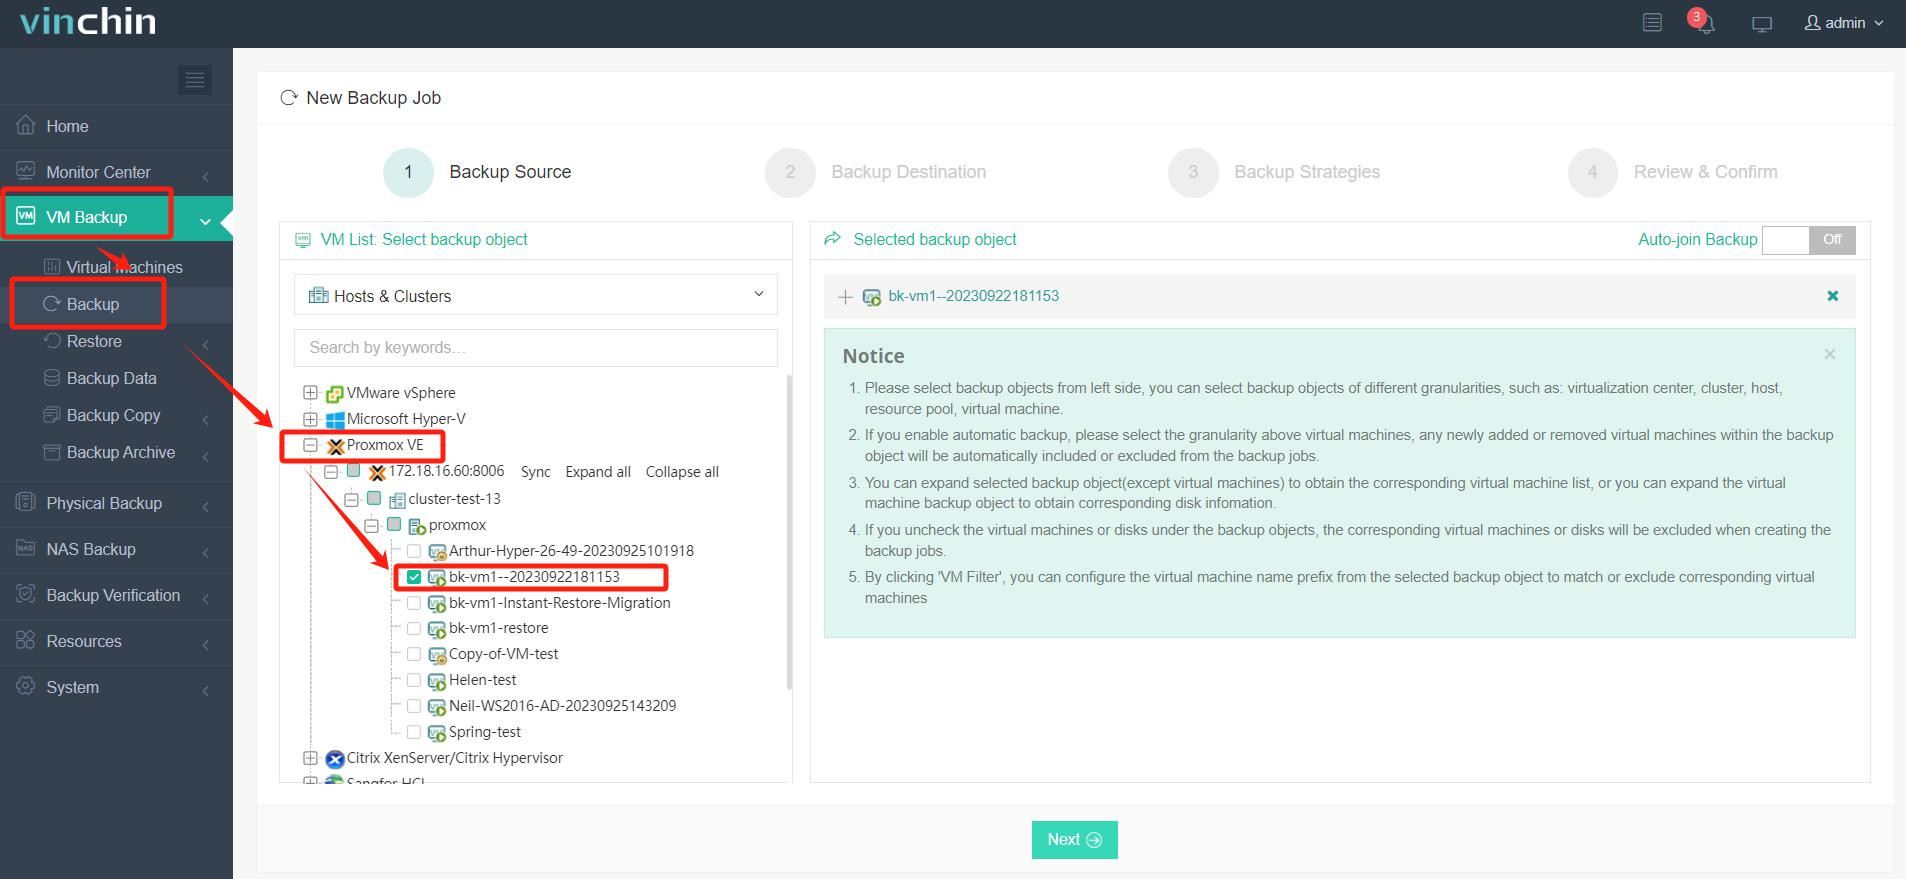
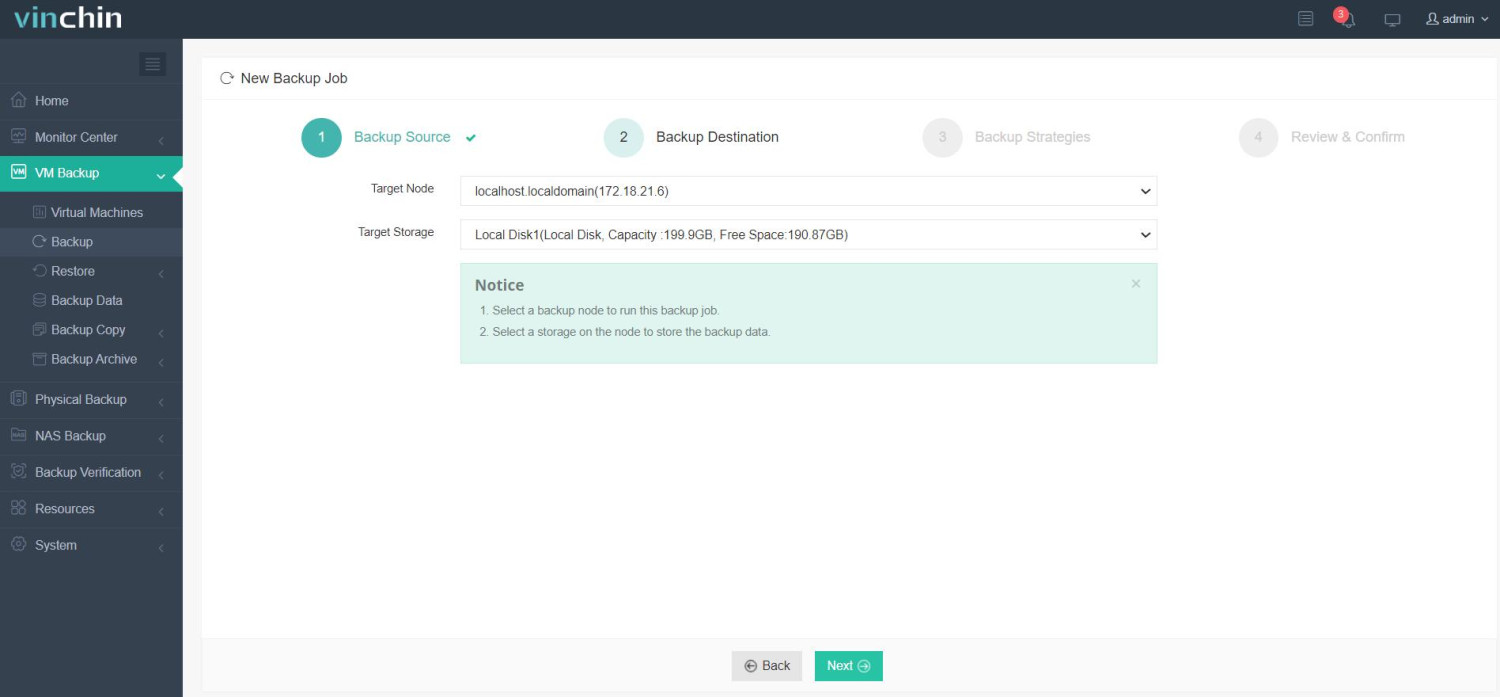
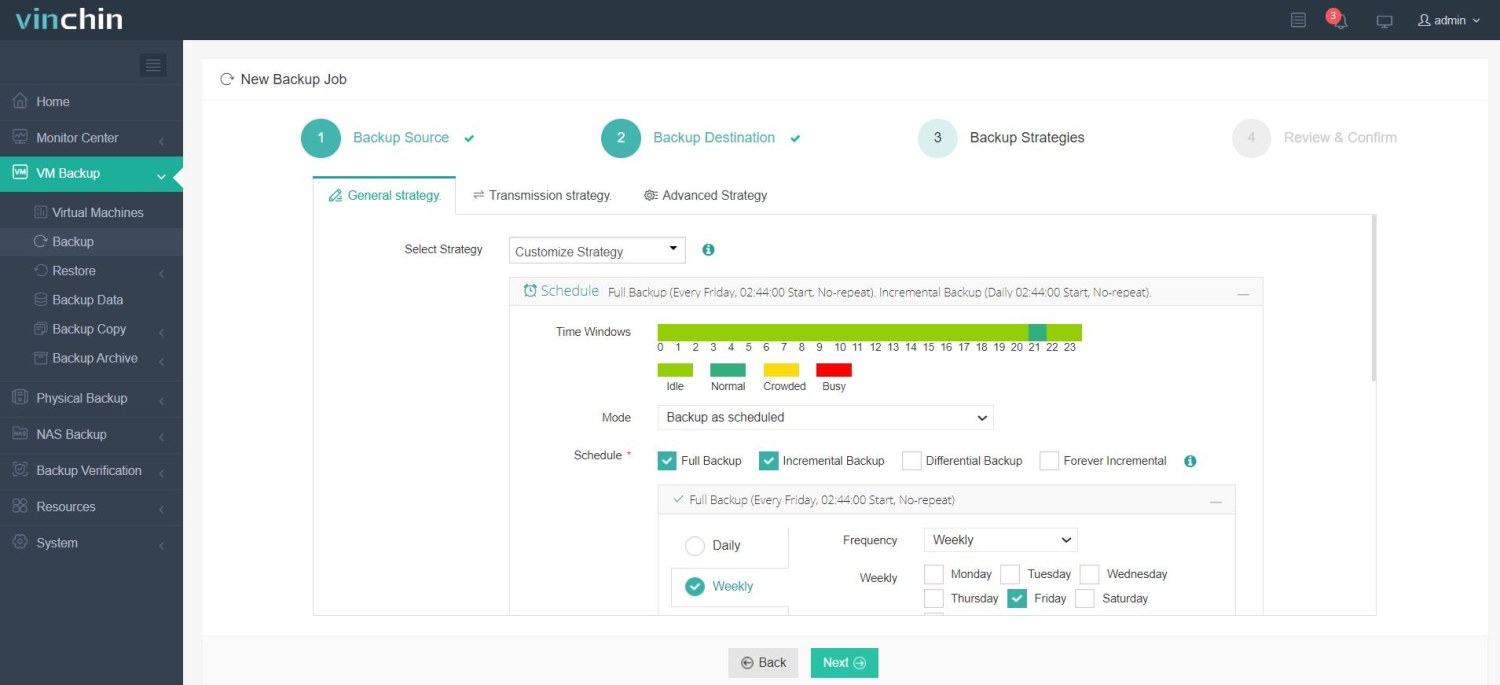
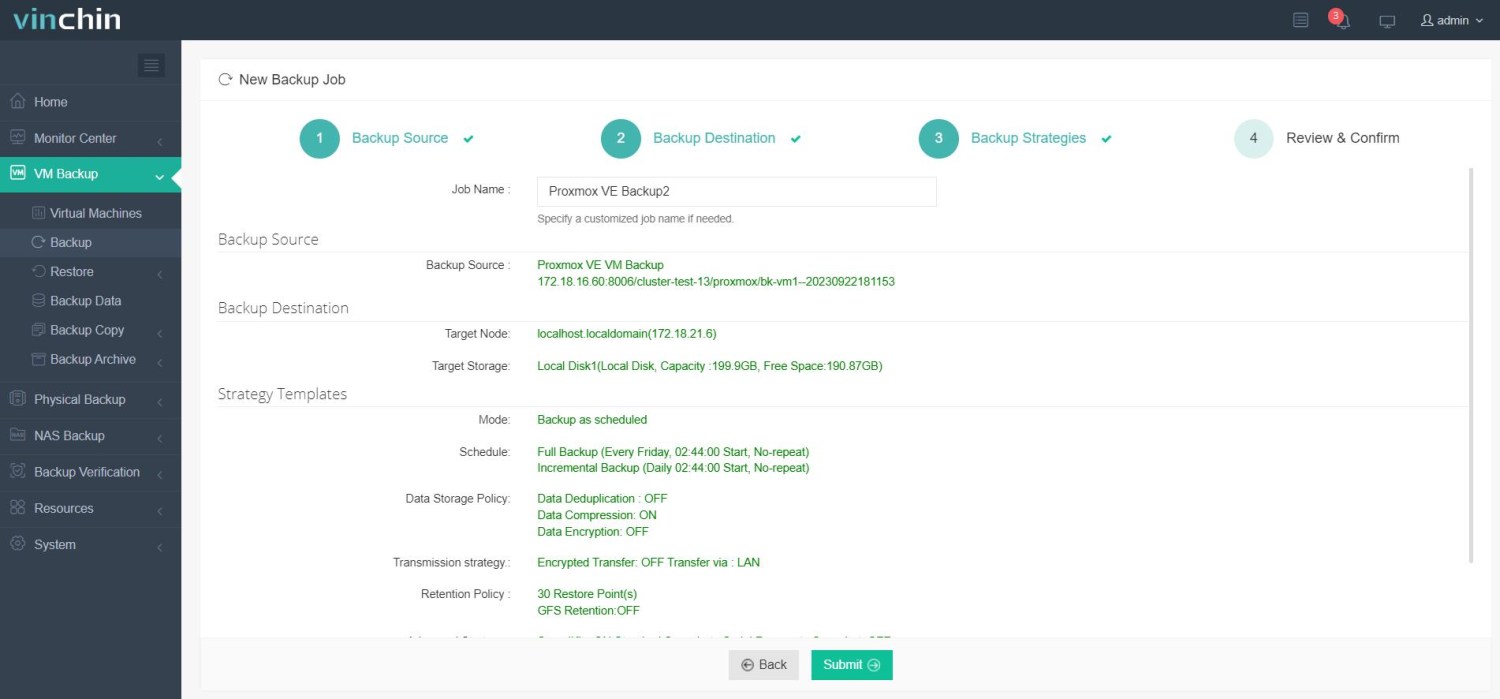
Backing up a specific Proxmox VM on your chosen platform takes just four steps:
1. Select your target Proxmox VM;

2. Choose preferred backup storage location;

3. Configure backup strategy;

4. Submit the job.

Trusted worldwide by thousands of organizations—with high ratings across industry review sites—Vinchin offers a fully-featured free trial valid for 60 days so you can experience comprehensive protection firsthand before committing long-term. Click below now to download Vinchin Backup & Recovery installer and deploy enterprise-grade defense for every critical workload today!
Proxmox LVM vs LVM-thin FAQs
Q1: Can I migrate my existing thick-provisioned VM disk onto an lvm-thin backend without downtime?
A: Back up your VM first then restore onto newly created lvm-thin storage—the migration itself requires downtime unless live migration tools are used outside standard workflows.
Q2: How do I check which VMs consume most space within my lvm-thin pool?
A: Run lvs --segments --units g then match logical volume names against assigned virtual machine IDs/names shown under Datacenter → Node → Disks menu.
Q3: What happens if my lvm-thin metadata fills completely?
A: Creation/modification operations fail until extended; increase meta area promptly using lvextend --poolmetadata +SIZE vg/pool_tmeta, then resume normal activity after confirming health status.
Conclusion
Choosing between classic and lvm-thin backends shapes how efficiently—and safely—you operate your Proxmox cluster long-term; each has strengths suited for different scenarios while requiring distinct management habits around monitoring/storage hygiene along the way! For robust protection regardless of backend chosen try Vinchin's enterprise-grade backup today—it keeps even complex environments secure without hassle.
Share on:


