Reasons to Migrate Hyper-V to KVM
Virtualization platforms continue to evolve as organizations seek greater flexibility and lower infrastructure costs. While Microsoft Hyper-V remains popular in Windows-centric environments, many enterprises are gradually moving toward Linux-based virtualization platforms such as KVM (Kernel-based Virtual Machine).
Migrate for:
Eliminating hypervisor licensing costs
Better compatibility with Linux ecosystems
Open-source flexibility
Simple cloud-native deployment
Converting Hyper-V virtual machines to KVM is entirely possible with proper planning and migration methods.
Key Differences between Hyper-V and KVM
Before migration, it’s helpful to understand how these two hypervisors differ.
Feature | Hyper-V | KVM |
Developer | Microsoft | Linux Community |
Host OS | Windows Server/Windows | Linux Kernel |
Virtual Disk | VHD/VHDX | QCOW2/RAW |
Hypervisor Type | Type-1 | Type-1 (Kernel Module) |
Management | Hyper-V Manager, SCVMM | Virsh, Cockpit, Proxmox, OpenStack |
Licensing | Commercial | Open Source |
The largest technical challenge is that Hyper-V primarily uses VHDX virtual disks, while KVM commonly uses QCOW2 or RAW images.
Method 1: Convert VHDX to QCOW2 Using qemu-img
One of the most widely used approaches is qemu-img, part of the QEMU project.
Step 1. Shut down the Hyper-V VM
Ensure the VM is powered off to avoid converting a running disk to prevent filesystem corruption.
Step 2. Export the Hyper-V VM disk
In Hyper-V Manager, right-click the target VM and select Export to get the VHDX file.
Alternatively, use PowerShell:
Export-VM -Name "MyVM" -Path "C:\Exports\"
Make sure any active snapshots/checkpoints are merged before exporting. Exporting a VM with unmerged checkpoints can result in an inconsistent disk state.
Step 3. Transfer the VHDX to your KVM host
Use SCP, SMB, or any file transfer method that fits your network.
For large disks, verify the transfer with a checksum before proceeding.
Step 4. Convert the disk
On a Linux host with qemu-utils installed:
qemu-img convert -p -f vhdx -O qcow2 /path/to/disk.vhdx /path/to/output.qcow2
The -p flag shows the conversion process.
For a legacy VHD file, replace vhdx with vpc in the -f flag.
Step 5. Create the VM and attach the disk
On a KVM host managed by libvirt, create a new VM configuration using virt-install or a GUI like virt-manager, then attach the converted QCOW2 as the primary disk.
If the source was a Generation 2 Hyper-V VM (UEFI-based), configure the KVM VM with OVMF firmware rather than legacy BIOS.
Step 6. Install VirtIO drivers (Windows guests)
Install VirtIO drivers before conversion, or boot the VM with an emulated IDE controller first, install the drivers from the VirtIO ISO, and then switch to VirtIO.
Without them, Windows may fail to boot or detect storage devices.
Method 2: Use virt-v2v for Automated Conversion
For Linux environments, virt-v2v provides a more automated migration process.
Advantages include:
Typical example:
virt-v2v -i disk Server01.vhdx -o local -os /var/lib/libvirt/images
virt-v2v is especially useful when migrating multiple Windows virtual machines.
Method 3. Restore Hyper-V Backup to KVM by Vinchin Backup & Recovery
Disk conversion is only one part of enterprise migration. Organizations also need:
Vinchin Backup & Recovery can provide the needs above, and also enable:
Protect Hyper-V workloads with image-based backups
Restore Hyper-V virtual machines to KVM-based platforms
Reduce migration complexity
Preserve application consistency
Support large-scale migration projects
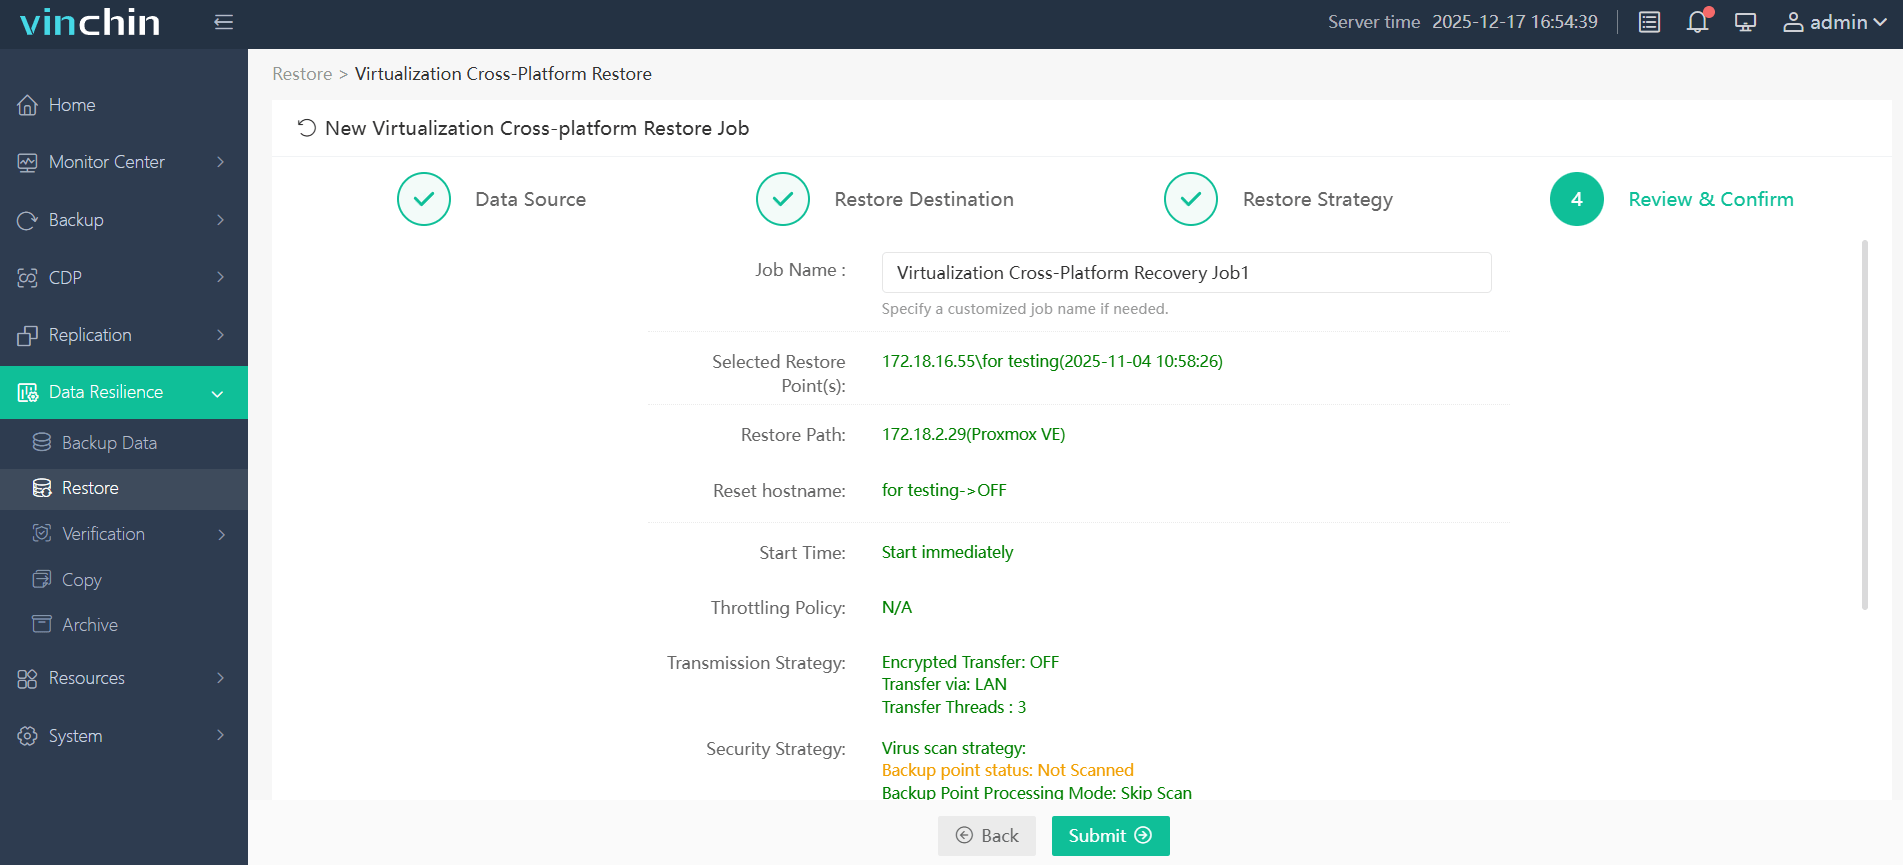
Simple migration steps are as follows (take Proxmox as an example):
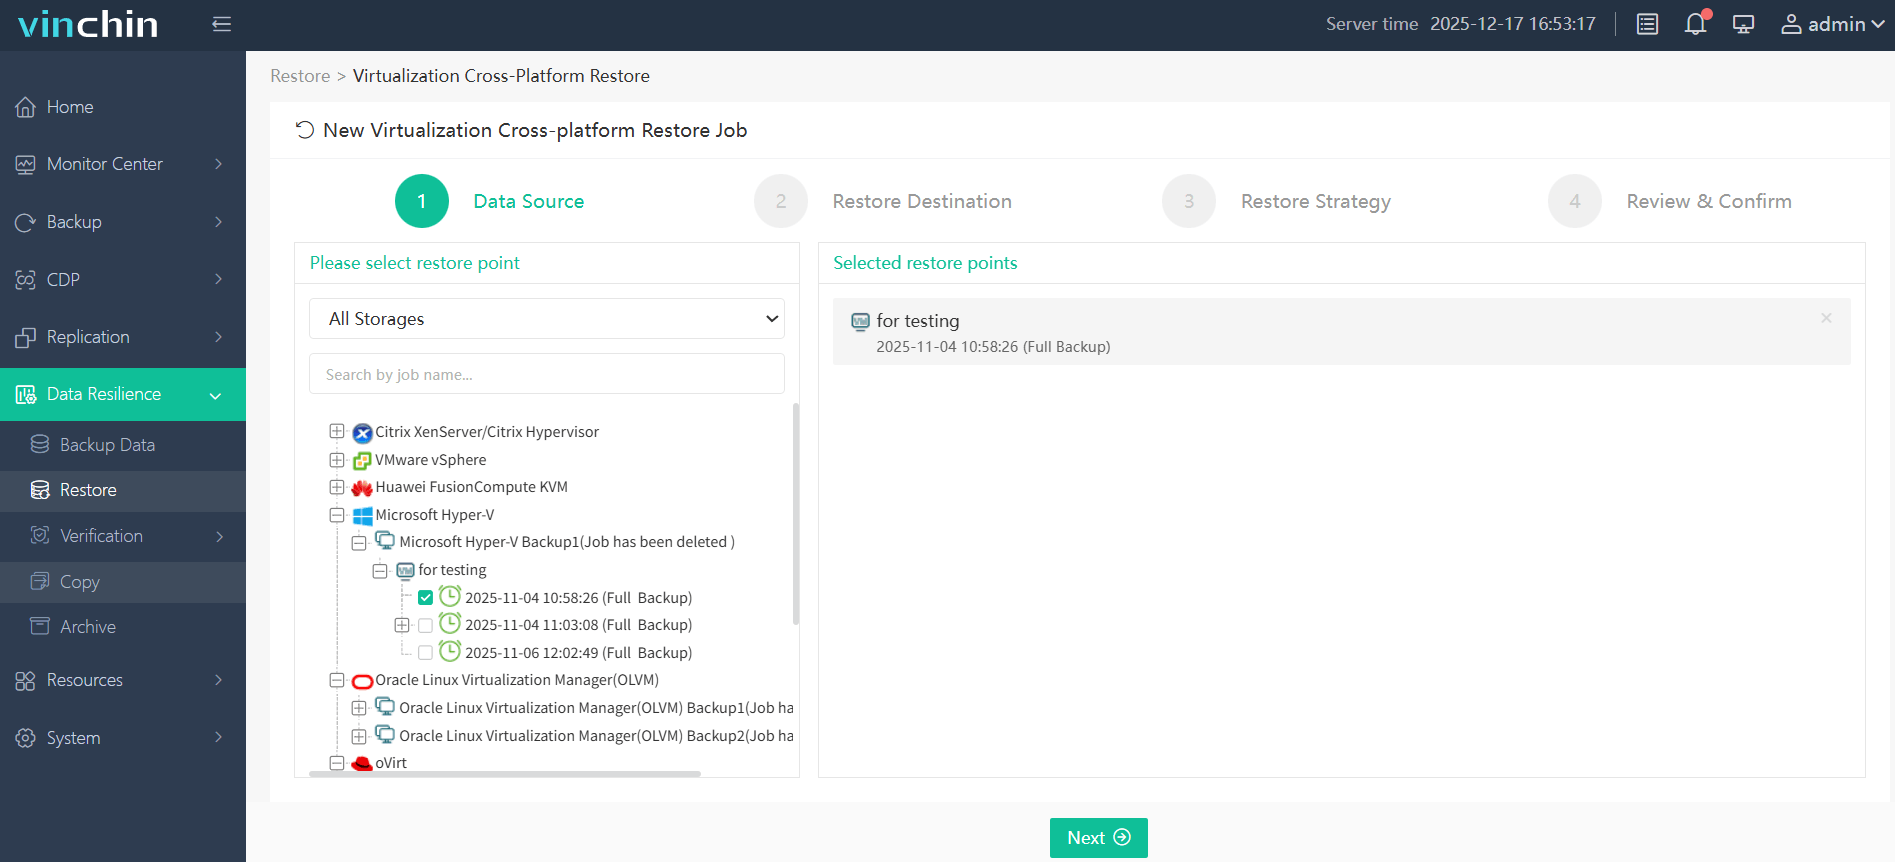
Step 1. Go to Data Resilience > Restore and choose Hyper-V as the restore point.
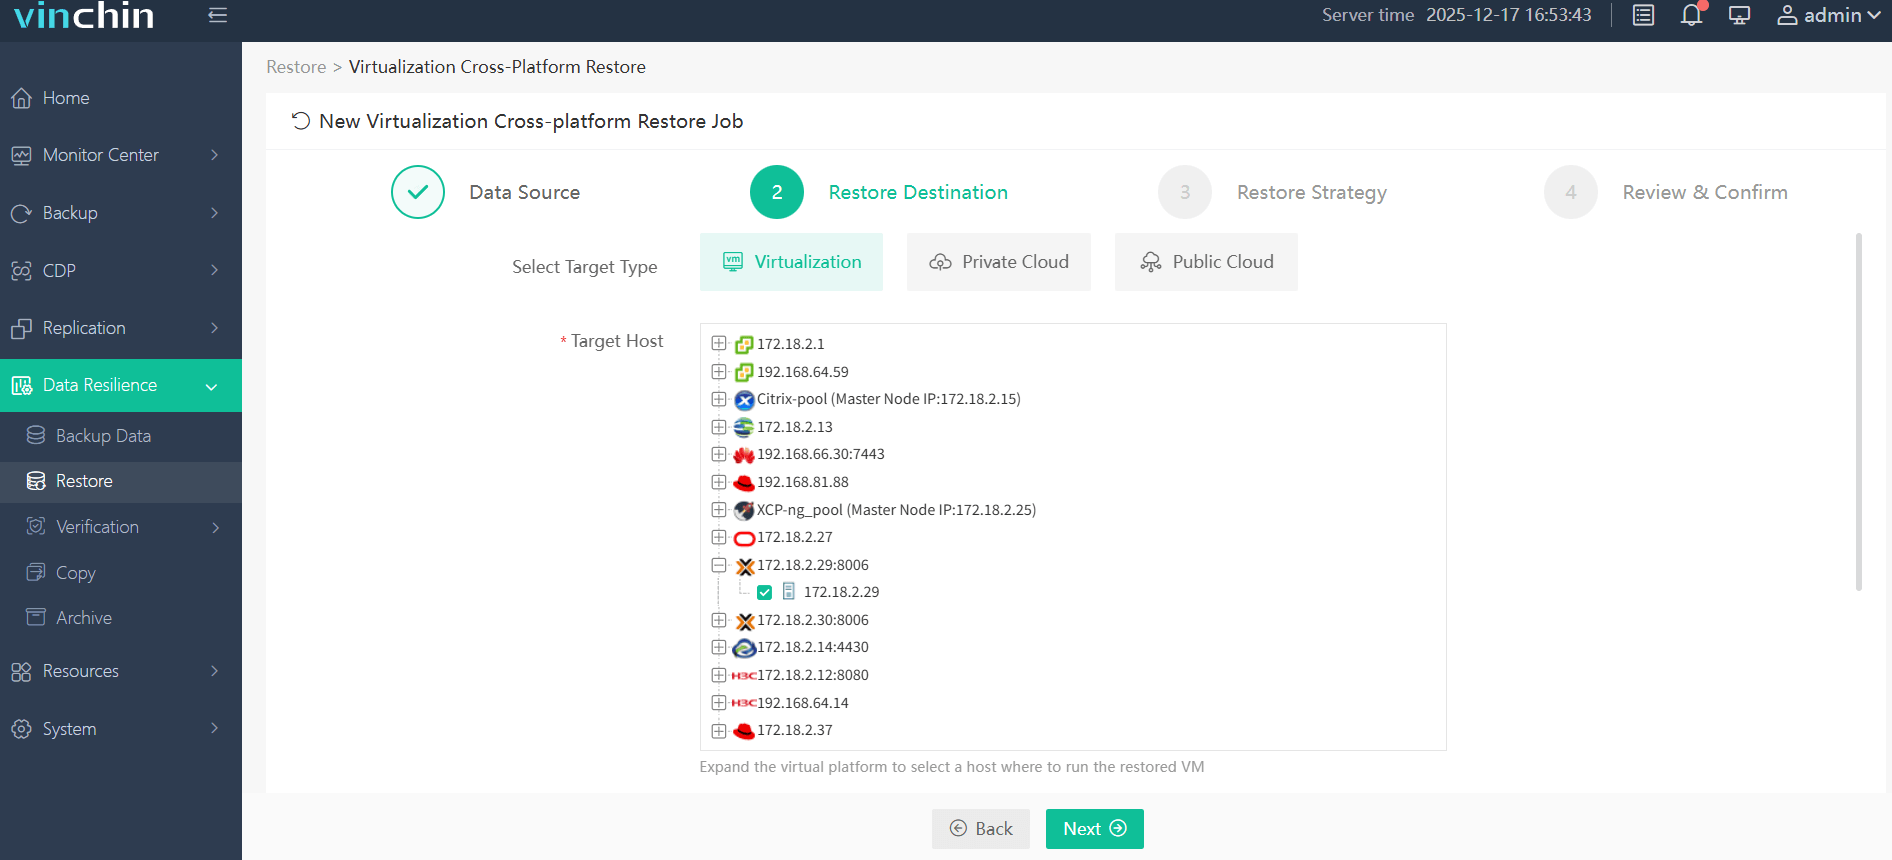
Step 2. Choose Proxmox as the target host.
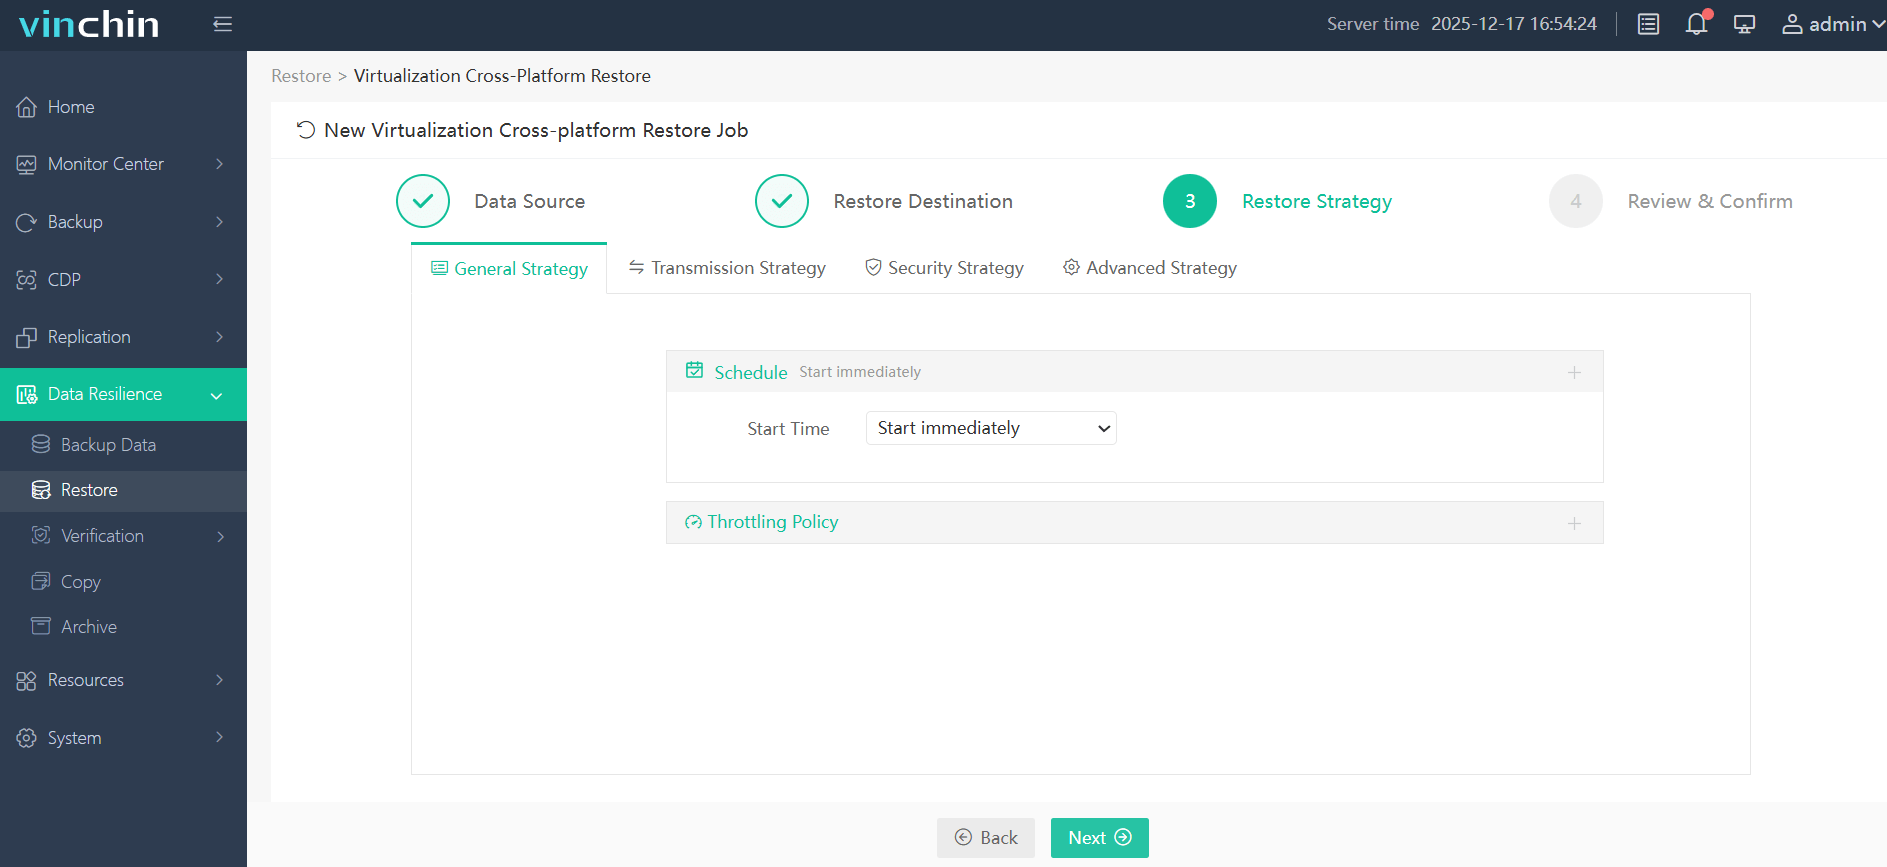
Step 3. Set the restore strategy, like the schedule and transfer methods.
Step 4. Review and confirm that all settings are correct, then click Submit.
Wanna try the Vinchin method? Click the button below to have a 60-day full-featured trial!
Common Problems and How to Avoid Them
1. Blue screen on first boot (Windows guest)
Almost always a VirtIO driver issue.
Set the disk controller to IDE for the initial boot, install drivers from the VirtIO, then switch to VirtIO.
2. Network interface name changes
Both Linux and Windows guests may come up with different NIC names post-migration.
Have console access ready and plan for a network reconfiguration step after the VM boots.
3. Gen 2 Hyper-V VMs with UEFI
KVM needs to be configured with OVMF (UEFI) firmware for these VMs. On Proxmox, this also means adding an EFI disk and temporarily disabling Secure Boot.
4. Snapshots not carrying over
qemu-img converts the disk state at a point in time, Hyper-V snapshots don’t transfer.
Merge all snapshots in Hyper-V before exporting.
FAQs about Hyper-V to KVM
Q1: Can I convert a running Hyper-V VM to KVM without shutting it down?
It’s not recommended, as it is not safe with manual disk conversion. qemu-img works on a static image, if the VM is actively writing to the disk during conversion, you risk data corruption.
Q2: What’s the difference between Hyper-V Generation 1 and Generation 2 VMs for KVM migration?
Generation 1 VMs use legacy BIOS firmware and are generally simpler to migrate, creating a standard KVM VM with SeaBIOS.
Generation 2 VMs use UEFI firmware, which requires configuring the KVM VM with OVMF (UEFI) firmware, adding an EFI disk, and potentially disabling Secure Boot temporarily.
Conclusion
Migrating Hyper-V virtual machines to KVM is more than a simple disk conversion, it requires careful planning, compatible firmware settings, and proper driver preparation. Whether you choose qemu-img for manual conversion, virt-v2v for automated migration, or Vinchin Backup & Recovery for enterprise-scale cross-platform restoration, selecting the right approach helps minimize downtime and ensures a smooth transition to your new KVM environment.