When you open the Windows Features window (you can launch it by running optionalfeatures.exe, or going to Settings > APPs > Optional Features > More Windows Features) and Hyper-V is completely missing, not grayed out, not just unchecked, it means your Windows system does not have the Hyper-V installation package available, or your hardware and software setup does not support this feature.
Common Causes of a Missing Hyper-V Option
The Hyper-V not showing in Windows features can stem from some reasons, and the following lists the most common causes:
1. You are using Windows Home Edition
Hyper-V is an exclusive feature for Windows Pro, Enterprise and Education editions. Microsoft does not offer Hyper-V as an official option for Windows 10 or 11 Home. Even if you adjust BIOS settings, Hyper-V will never show up in Windows Features on Home editions.
To check your Windows version: press Win + R, type winver and check the pop-up windows, or go to Settings > System > About.
2. Hardware virtualization is disabled in BIOS/UEFI
Even on supported Windows editions, Windows will hide Hyper-V if CPU virtualization technology (Intel VT-x or AMD-V, plus SLAT function) is turned off in your device's firmware.
This is very common on laptops, as manufactures often disable virtualization bu default at the factory.
3. Another virtualization program is already running
If you use third-party virtualization tools (VMware Workstation, old versions of VirtualBox, or certain security software) these will occupy the system's virtualization resources. Windows will detect an existing hypervisor and hide the Hyper-V option to avoid conflicts.
4. Corrupted WMI system database or component store
Windows Features relies on two cores system components: Windows Management Instrumentation (WMI) and the system component store (managed by DISM/CBS). If these get damaged, Hyper-V will disappear from the features list even on fully licensed Windows Pro devices.
Methods to Fix Hyper-V Not Showing in Windows Features
Already know the causes of Hyper-V not available, let's walk through the most effective solutions.
Fix 1. Enable CPU Virtualization in BIOS/UEFI
Hyper-V requires hardware virtualization support.
1. Restart your computer.
2. Enter BIOS/UEFI (usually by pressing F2, F10, F12, DEL, or ESC during startup).
3. Locate virtualization settings:
4. Enable the setting.
5. Save changes and restart Windows.
Verify
1. Open Task Manger, select Performance > CPU
2. Check:
Virtualization: Enabled
Fix 2. Repair Corrupted Windows Components
A damaged component store can prevent Hyper-V features from appearing.
Run Command Prompt as Administrator:
DISM /Online /Cleanup-Image /RestoreHealth
After completion:
sfc /scannow

Restart Windows and recheck Windows Features.
Fix 3. Reset the Windows Features Store
1. Open Command Prompt as Administrator:
DISM /Online /Cleanup-Image /StartComponentCleanup
2. Then run:
DISM /Online /Cleanup-Image /RestoreHealth
3. Restart the computer.
This repairs the components store that controls optional Windows features.
Fix 4. Check Group Policy Restrictions
In managed or corporate environments, Hyper-V may be hidden through policy settings.
1. Press Win+R
2. Run:
gpedit.msc
3. Navigate through Windows administrative templates and virtualization-related settings.
4. Ensure Hyper-V or virtualization features are not disabled.
5. Set restrictive policies to Not Configured or Enabled, depending on your organization's requirements.
How to Enable Hyper-V on Windows 10/11
To enable Hyper-V on Windows 10/11 (Pro, Enterprise, or Education editions), use one of the following methods.
Method 1. Enable Hyper-V from Windows Features
1. Press Win + R
2. Type:
optionalfeatures
3. In Windows Features, check:
Hyper-V
Hyper-V Management Tools
Hyper-V Platform

4. Click OK.
5. Restart the computer when prompted.
Method 2. Enable Hyper-V with PowerShell
1. Open PowerShell as Administrator.
2. Run:
Enable-WindowsOptionalFeature -Online -FeatureName Microsoft-Hyper-V -All

3. When prompted, restart the computer:
Restart-Computer
Method 3. Enable Hyper-V with DISM
1. Open Command Prompt as Administrator.
2. Run:
DISM /Online /Enable-Feature /All /FeatureName:Microsoft-Hyper-V

3. Restart Windows after the installation completes.
Verify Hyper-V is Enabled
Open PowerShell and run:
Get-Service vmms
The Hyper-V Virtual Machine Management service should be running.
You can also open:
Start Menu > Hyper-V Manager
If Hyper-V Manger launched successfully, Hyper-V has been enabled.
Protecting Hyper-V Virtual Machines after Enabling
Many administrators focus on enabling Hyper-V but overlook VM protection. Whether you’re running Windows Server VMs, Linux VMs, development environments, or production workloads, a hardware failure, ransomware attack, or accidental deletion can result in significant downtime.
This is where professional Hyper-V backup solutions become essential. Vinchin Backup & Recovery provides agentless backup and recovery for Hyper-V environments.
Granular restore: Recover single files or folders from VM backups without restoring the entire virtual machine.
Instant VM recovery: Boot a faulty VM directly from its latest backup to minimize downtime.
Data compression & deduplication: Reduce backup file size and save storage space.
Cross-platform migration: More VMs between different virtual platforms easily.
Here are the simple steps to protect Hyper-V VMs:
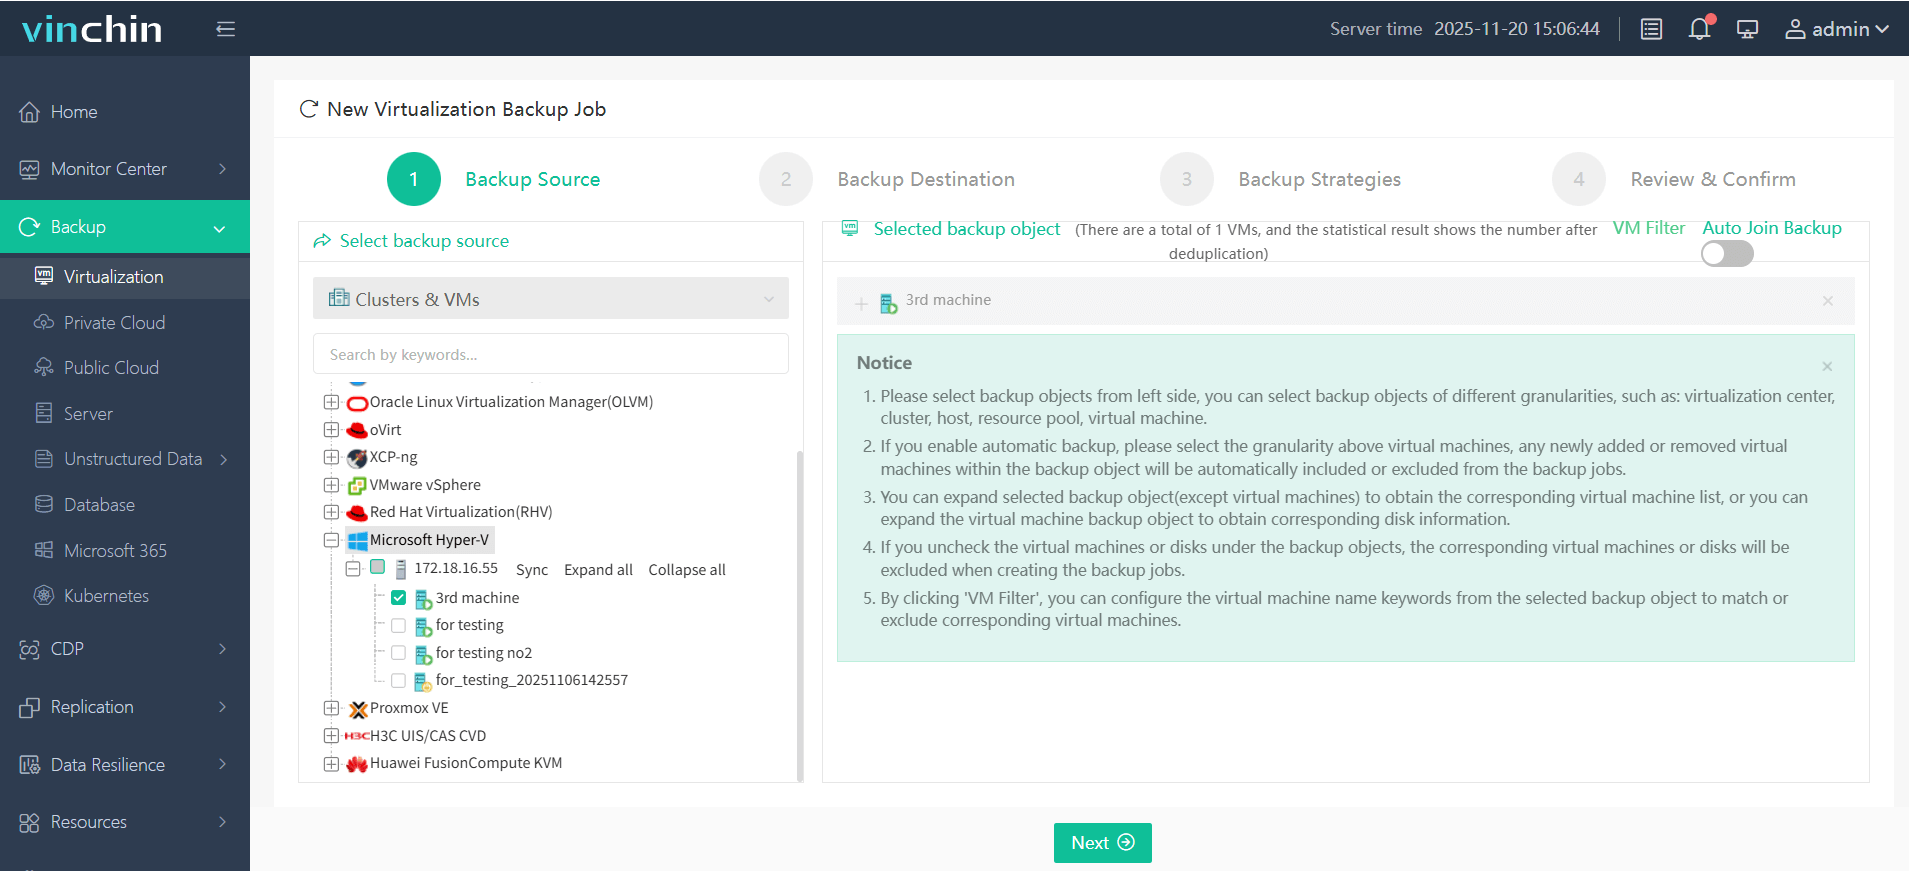
Step 1: Go to Backup > Virtualization, choose the Hyper-V VM you need to backup.
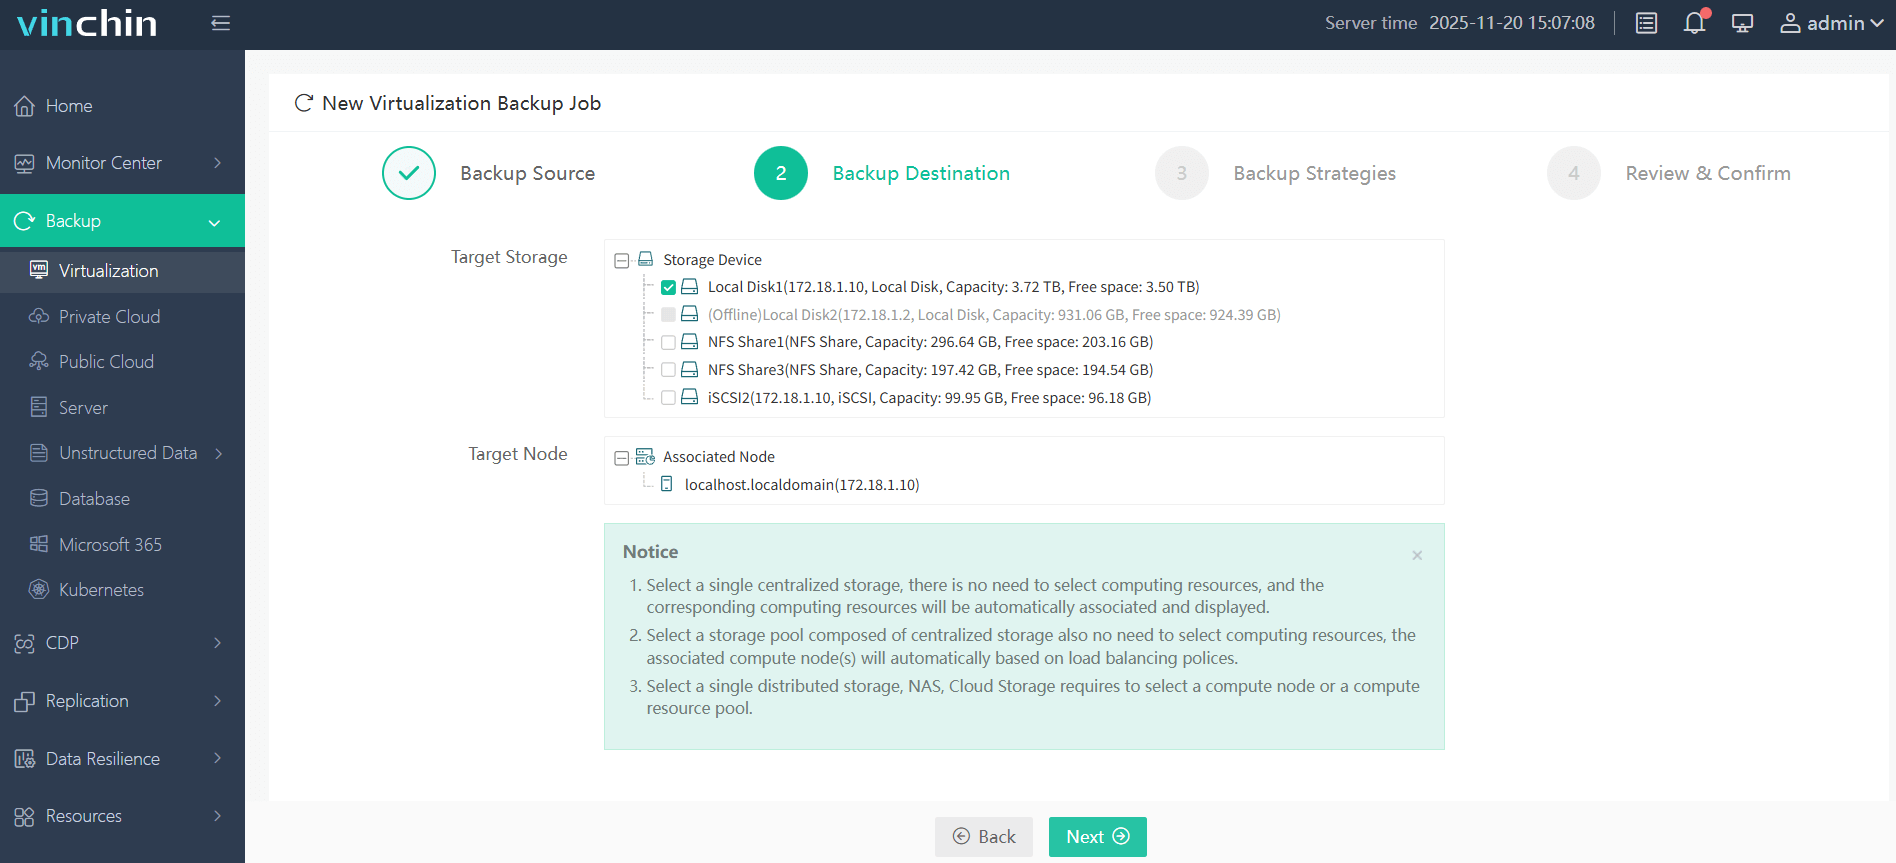
Step 2: Choose your target storage (local disk, NFS share, iSCSI) and target node.
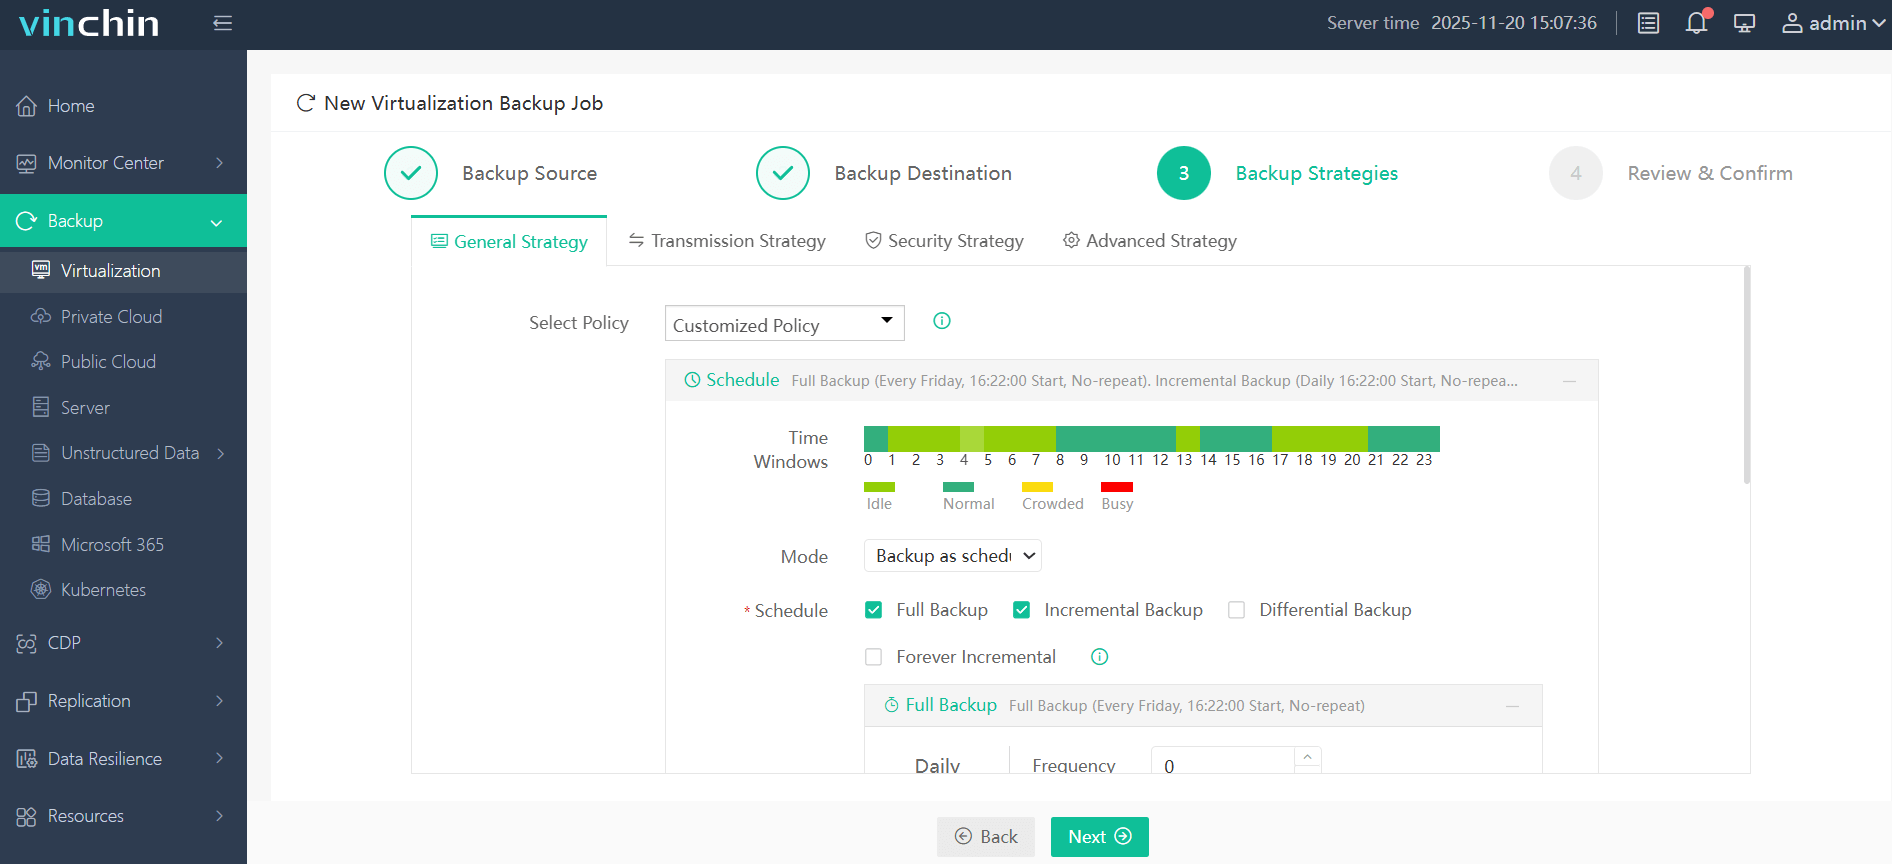
Step 3: Set your backup mode and schedule, you can also set the advances strategy.
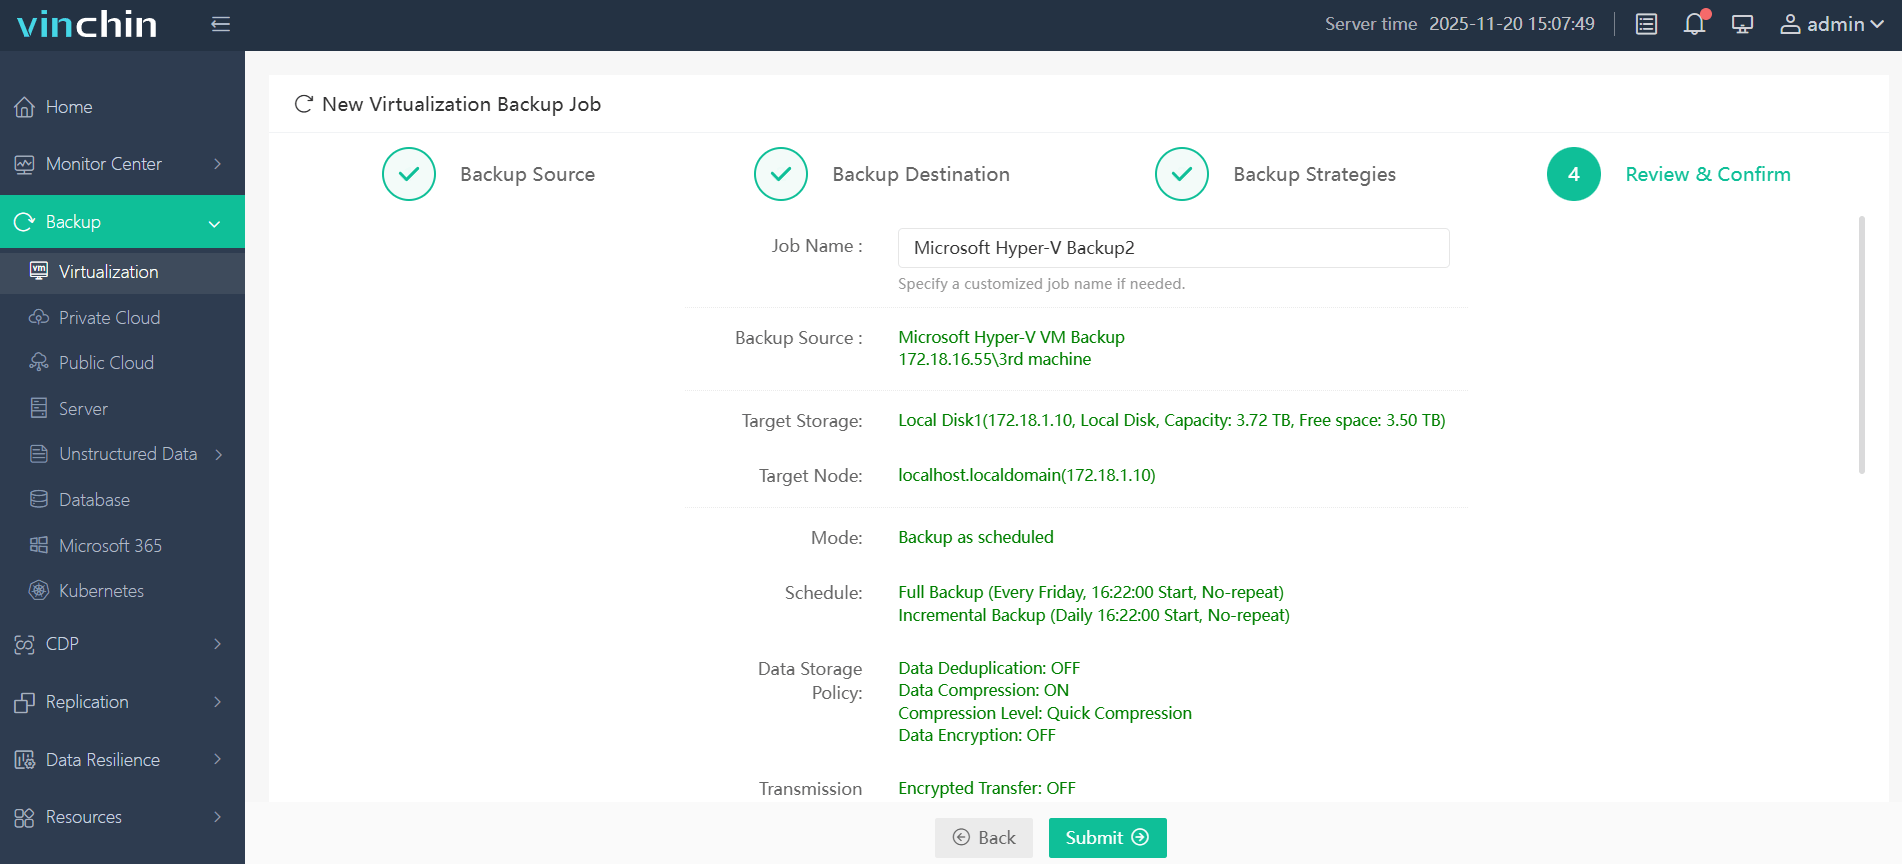
Step 4. Confirm your Hyper-V backup settings and click Submit to begin back up.
By combing Hyper-V virtualization with a reliable backup strategy, business can significant improve resilience and disaster recovery readiness. Come and try Vinchin Backup & Recovery for 60-day full-featured free trial!
FAQs
Q1: Why is the Hyper-V checkbox grayed out instead of missing?
A grayed-out option usually means a Group Policy restriction or an unfinished system task.
Q2: Other virtual machine software won't launch after enabling Hyper-V. Why?
After Hyper-V is turned on, Windows runs on a hypervisor layer, which changes how virtualization resources are used. Update VirtualBox, VMware and other tools to their latest versions to fix compatibility issues.
Q3: Will enabling Hyper-V affect gaming performance?
Yes, Hyper-V and related virtualization features occupy CPU and memory resources, which may lower game frame rates and cause input lag. If gaming is your priority, turn off Hyper-V, Virtual Machine Platform and Windows Hypervisor Platform, then restart your PC.
Sum Up
If Hyper-V is not showing in Windows Features, checking your Windows edition, virtualization settings, and system components can usually resolve the issue. After enabling Hyper-V, protecting your virtual machines with a reliable backup solution like Vinchin Backup & Recovery helps ensure business continuity and fast recovery from unexpected failures.


