-
What Is a Kubernetes Cluster?
-
Why Backup Kubernetes Cluster Matters
-
Method 1: Using Velero for Backup
-
Method 2: Manual Etcd Backup
-
How Vinchin Backup & Recovery Protects Your Kubernetes Cluster
-
Backup Kubernetes Cluster FAQs
-
Conclusion
Kubernetes powers modern applications across industries. Its flexibility lets you scale fast and deploy anywhere—but it also means data loss can happen in a flash. A failed upgrade, accidental deletion, or ransomware attack can bring business to a halt if you lack a backup plan. So how do you back up your Kubernetes cluster simply and reliably? Let’s walk through proven methods that keep your workloads safe.
What Is a Kubernetes Cluster?
A Kubernetes cluster is a group of computers working together to run containerized applications. At its heart is the control plane—this manages scheduling, scaling, networking, and health checks for everything running in your environment. The control plane stores its state in etcd—a distributed key-value database that tracks every resource in your cluster.
Worker nodes are the machines that actually run your application containers (called pods). These nodes talk to the control plane constantly so they know what work to do next.
Your cluster holds not just code but also configurations (like secrets), persistent data (in volumes), and custom resources created by users or operators. This complexity makes backing up Kubernetes different from traditional servers—there’s no single “backup everything” button.
Main Components of a Cluster
Control Plane: Manages overall system state.
etcd: Stores configuration data and cluster state.
Nodes: Run workloads; each node hosts one or more pods.
Workloads & Resources: Deployments, services, config maps, secrets—all essential parts of your apps.
Understanding these building blocks helps you decide what needs protection when planning backups.
Why Backup Kubernetes Cluster Matters
Backing up your Kubernetes cluster isn’t just smart—it’s critical for business continuity. Even if you use Infrastructure as Code tools like Helm or Terraform to rebuild clusters quickly after failure, those tools don’t capture live application data or runtime changes made by users.
According to the Cloud Native Computing Foundation (CNCF), nearly half of organizations have suffered downtime or data loss due to issues with their clusters. Backups protect against hardware failures, human mistakes (like deleting resources by accident), cyberattacks such as ransomware—and help meet compliance requirements for regulated industries.
Without reliable backups:
Recovery may be slow or incomplete
You risk losing customer trust
Regulatory fines could follow if sensitive data disappears
Method 1: Using Velero for Backup
Velero is an open-source tool designed specifically for backing up and restoring Kubernetes clusters—including both metadata (like deployments) and persistent volumes via snapshots when supported by your storage provider.
Before starting with Velero:
You’ll need kubectl access with sufficient privileges on your target cluster plus credentials for object storage compatible with S3 APIs (such as AWS S3 itself). Make sure any CSI drivers needed for volume snapshots are installed too—otherwise only metadata will be backed up!
Installing Velero
Download the latest CLI release from Velero's official site. For Linux:
tar -xvf velero-vX.Y.Z-linux-amd64.tar.gz
sudo mv velero-vX.Y.Z-linux-amd64/velero /usr/local/bin/
For macOS:
brew install velero
Check which version fits your environment; commands may change slightly between releases.
Configuring Storage Credentials
Create a file named velero-creds containing access keys:
[default]
aws_access_key_id = <your_access_key>
aws_secret_access_key = <your_secret_key>
Install Velero into your cluster using:
velero install \
  --provider aws \
  --plugins velero/velero-plugin-for-aws:v1.x.x \
  --bucket <your-bucket> \
  --backup-location-config region=<your-region> \
  --snapshot-location-config region=<your-region> \
  --secret-file ./velero-creds
Replace plugin version (v1.x.x) with the latest stable release per Velero docs.
Creating Backups
To back up everything in the cluster:
velero backup create full-cluster-backup
For specific namespaces only:
velero backup create finance-ns-backup --include-namespaces finance
You can fine-tune further using --include-resources or --exclude-resources flags—for example,
to skip large logs or test workloads not worth saving.
Monitor progress anytime with:
velero backup describe full-cluster-backup
Restoring From Backups
Restore all resources from a backup:
velero restore create --from-backup full-cluster-backup
Or just one namespace:
velero restore create --from-backup finance-ns-backup --include-namespaces finance
Always test restores in non-production environments before relying on them during emergencies!
Method 2: Manual Etcd Backup
Etcd holds all core configuration data about your cluster—the “brain” behind scheduling decisions,
networking rules, RBAC settings… almost everything except actual application files stored in persistent volumes.
Backing it up regularly ensures you can recover quickly after corruption events affecting control-plane logic itself.
However: etcd snapshots alone won’t save user-generated files inside PVCs—you’ll need additional strategies there!
Taking an Etcd Snapshot Safely
First log into any control-plane node hosting etcd directly.
Paths below assume kubeadm defaults; adjust if using managed services:
Check health before proceeding:
ETCDCTL_API=3 etcdctl endpoint health \
    --endpoints=https://127.0.0.1:2379 \
    --cacert=/etc/kubernetes/pki/etcd/ca.crt \
    --cert=/etc/kubernetes/pki/etcd/server.crt \
    --key=/etc/kubernetes/pki/etcd/server.key
Then save a snapshot while load is low:
ETCDCTL_API=3 etcdctl snapshot save /tmp/snapshot.db \
    --endpoints=https://127.0.0.1:2379 \
    --cacert=/etc/kubernetes/pki/etcd/ca.crt \
    --cert=/etc/kubernetes/pki/etcd/server.crt \
    --key=/etc/kubernetes/pki/etcd/server.key
Verify integrity afterward:
ETCDCTL_API=3 etcdctl snapshot status /tmp/snapshot.db
Store these files securely offsite whenever possible—they’re small but vital!
Restoring Etcd Snapshots After Failure
If disaster strikes:
1. Stop API Server
Shut down all instances of kube-apiserver on affected nodes.
2. Restore Snapshot
ETCDCTL_API=3 etcdctl snapshot restore /tmp/snapshot.db --data-dir /var/lib/etcd-restored
Update manifest YAMLs so etcd points at /var/lib/etcd-restored.
3. Restart Services
Bring up etcd first; then restart kube-apiserver processes normally.
Limitations of Manual Etcd Backups
Manual snapshots cover only internal state—not external app files stored elsewhere!
Combine this method with regular PVC-level backups using either cloud-native tools,
CSI driver features,
or solutions like Velero described above.
How Vinchin Backup & Recovery Protects Your Kubernetes Cluster
Beyond open-source options and manual methods, enterprise environments often require advanced capabilities tailored for complex production needs. Vinchin Backup & Recovery stands out as a professional-grade solution purpose-built for comprehensive Kubernetes backup at scale. It delivers robust features including fine-grained backup and restore by cluster, namespace, application, PVC, or resource; policy-based automation; cross-cluster/cross-version recovery; high-speed multithreaded transfers; and strong encryption with WORM protection—all designed to maximize resilience while simplifying management across diverse infrastructures.
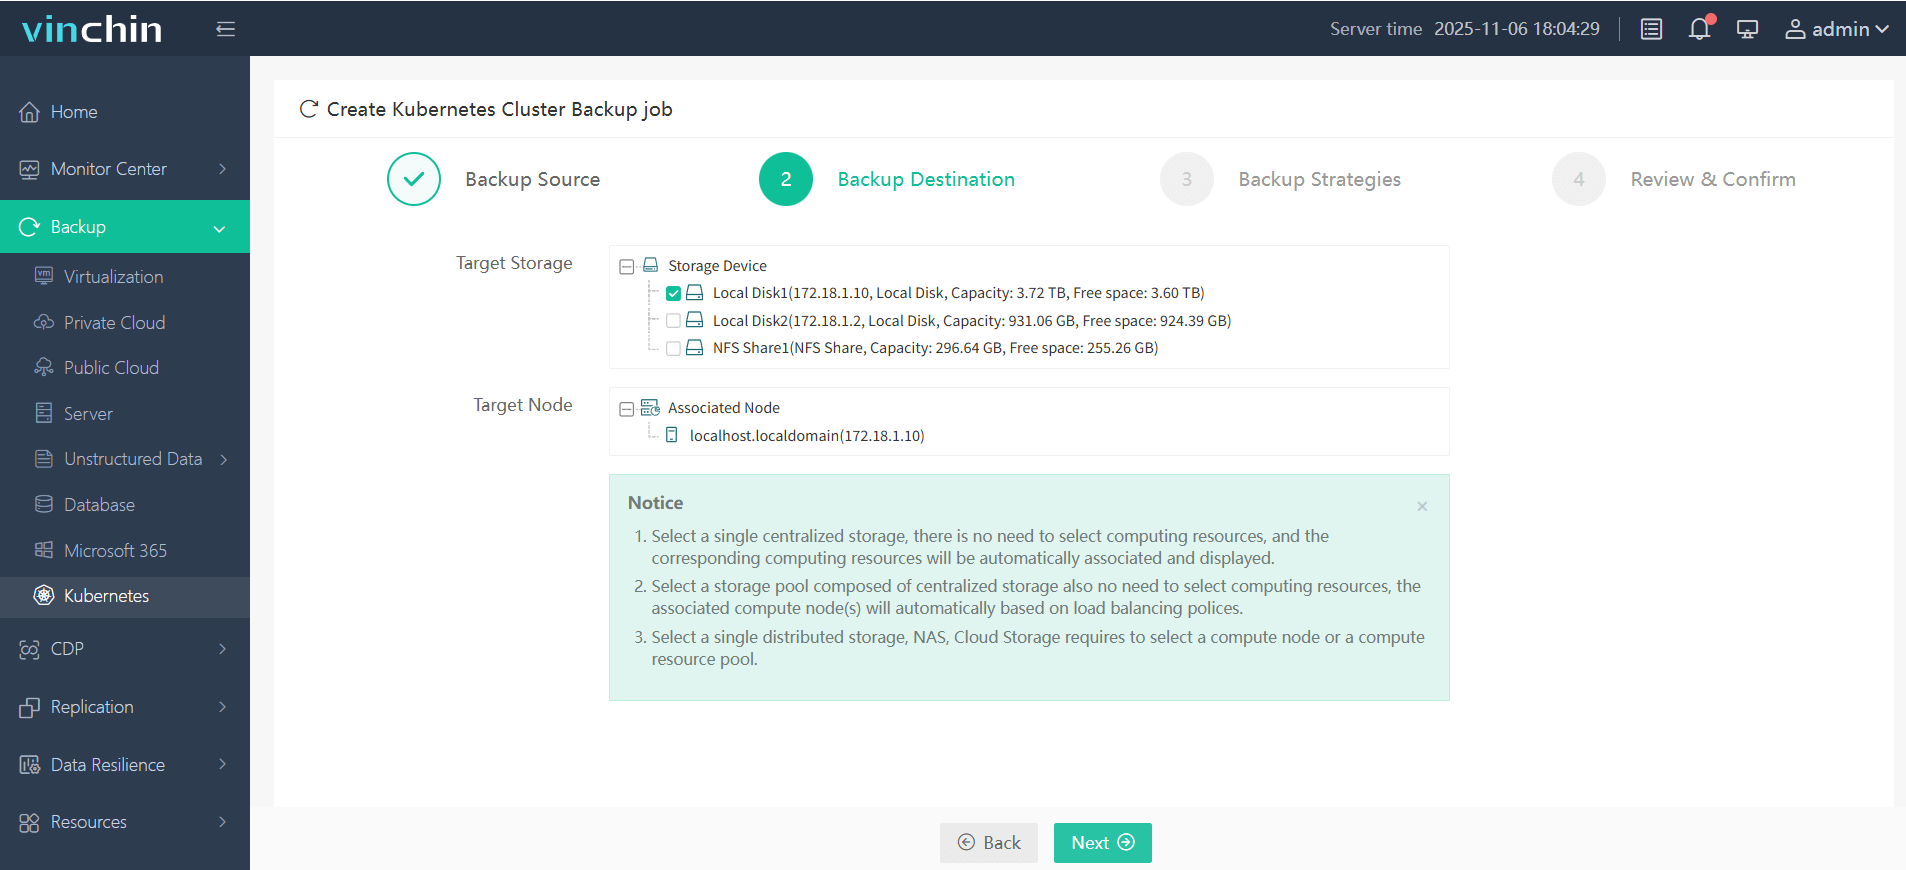
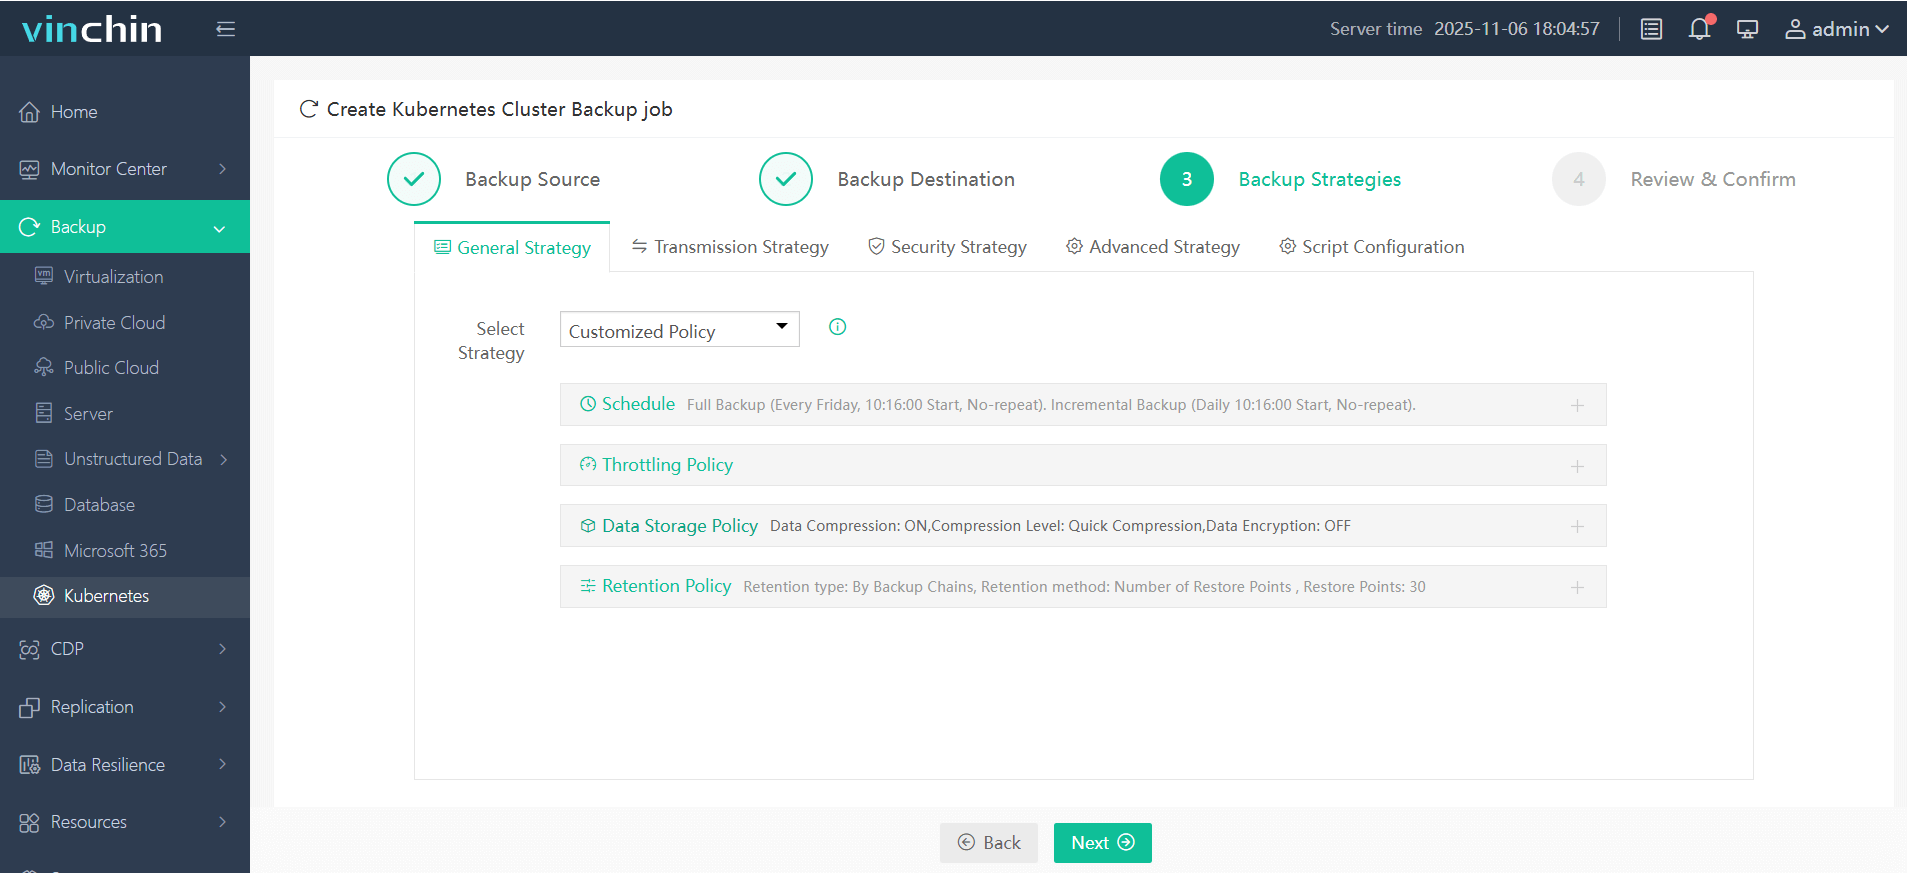
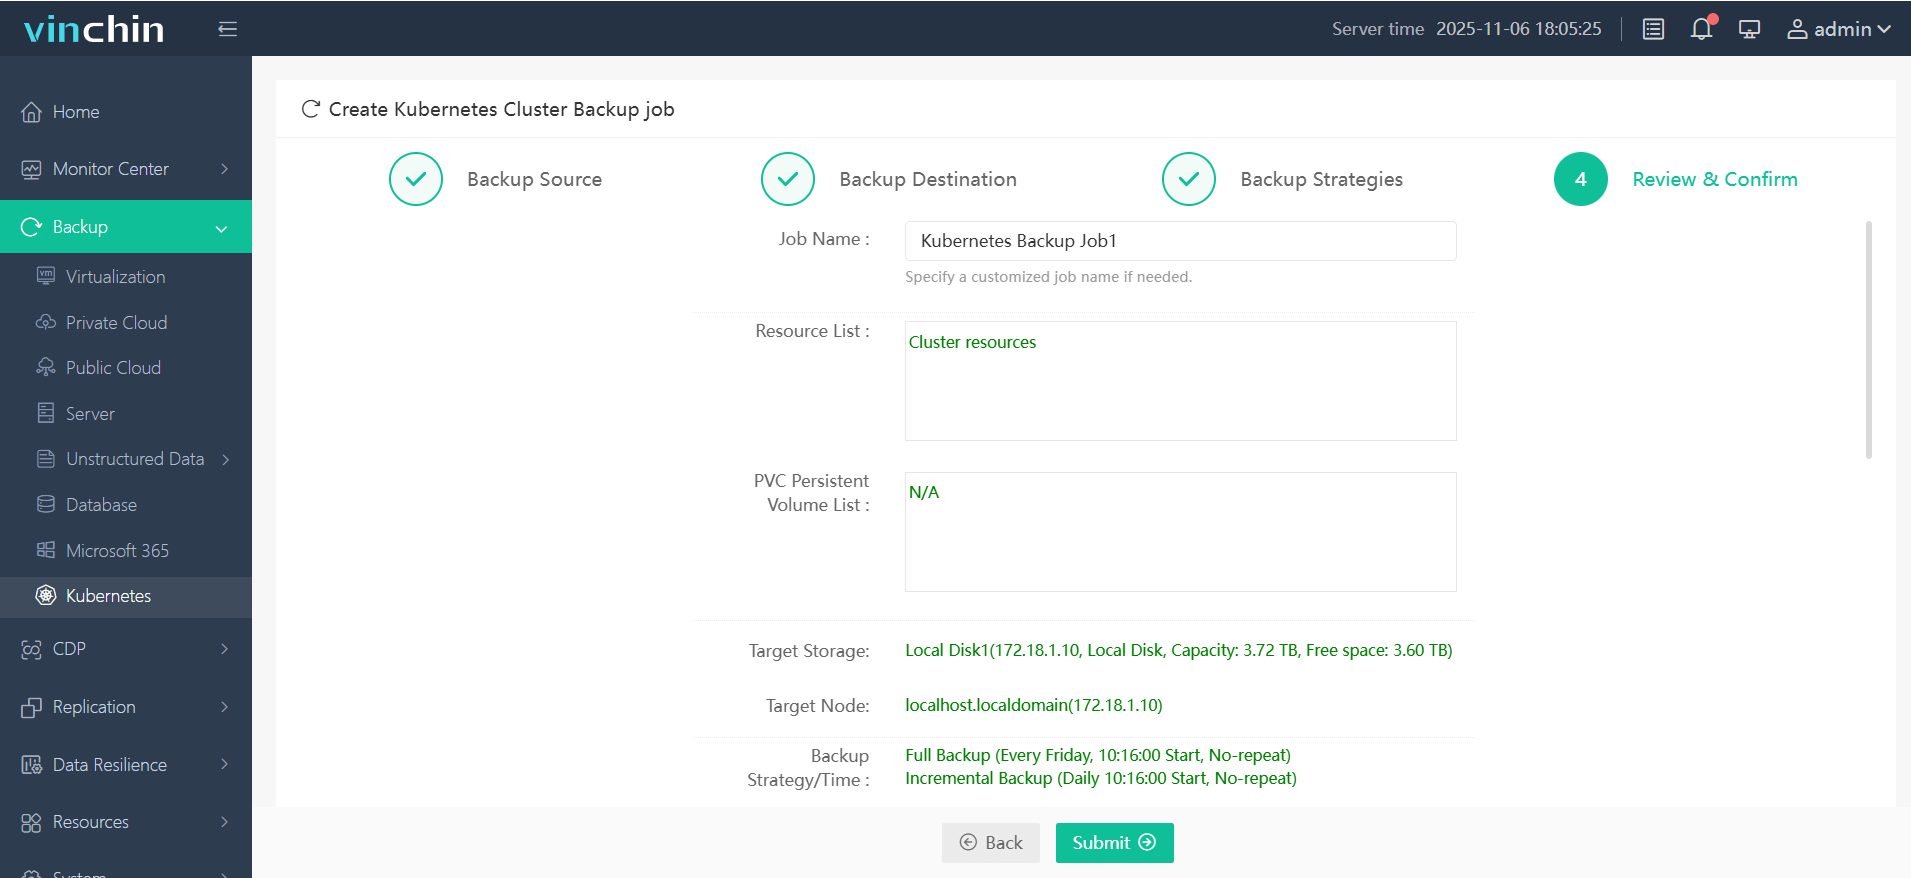
With Vinchin Backup & Recovery’s intuitive web console, safeguarding your entire Kubernetes environment typically takes just four steps:
1. Select the backup source

2. Choose the backup storage location

3. Define the backup strategy

4. Submit the job

Trusted globally by enterprises large and small—with top ratings for reliability—Vinchin Backup & Recovery offers a fully featured free trial valid for 60 days so you can experience its power firsthand before committing further.
Backup Kubernetes Cluster FAQs
Q1: How do I handle failed scheduled backups due to network outages?
A1: Check connectivity between nodes/storage endpoints; retry jobs manually via CLI; set alerts on repeated failures so issues get fixed promptly before risking data loss.
Q2: What steps should I take if my restored workload fails health checks?
A2: Inspect pod logs immediately after restore;
verify secrets/configmaps were included;
check compatibility between restored objects/Kubernetes version;
roll back selectively if needed.
Q3: How can I secure my offsite backup storage against unauthorized access?
A3: Use encrypted buckets/cloud vaults;
restrict IAM roles/service accounts used by tools like Velero/Vinchin;
enable audit logging wherever possible.
Conclusion
Kubernetes backup keeps businesses resilient through outages big small Test often choose right mix open-source enterprise-grade solutions Vinchin delivers comprehensive automated protection Try it free safeguard clusters today
Share on:


