-
What Is a Hadoop Backup Node?
-
How Backup Node Differs from Checkpoint Node?
-
Why Use Backup Nodes in Hadoop?
-
How to Set Up a Hadoop Backup Node?
-
How to Use Standby NameNode as an Alternative for High Availability in Hadoop?
-
Introducing Vinchin Backup & Recovery for Enterprise Database Protection
-
Hadoop Backup Node FAQs
-
Conclusion
Hadoop powers some of the world’s largest data lakes by storing massive amounts of information across many servers. But what if you lose your cluster’s metadata—the map that tells Hadoop where every file lives? Without this data structure (which includes file names, directories, permissions, and block locations), your entire system could become unreadable or even unusable.
That’s why protecting the NameNode—the keeper of this vital metadata—is so important in any Hadoop deployment. One traditional way to do this is with a Hadoop backup node. In this article, we’ll explain what a backup node does, why it matters for business continuity at every skill level, how you can set one up step by step—and how modern solutions like Vinchin help keep your big data safe from disaster.
What Is a Hadoop Backup Node?
A Hadoop backup node is a special server within your Hadoop Distributed File System (HDFS) cluster designed to protect critical metadata managed by the NameNode. Its main job is to maintain an always-up-to-date copy of the file system namespace in memory—mirroring changes made on the active NameNode as soon as they happen.
Unlike other protective nodes such as checkpoint nodes—which periodically fetch metadata snapshots—the backup node receives a continuous stream of edits from the NameNode in real time via Remote Procedure Calls (RPC). This means it can create new checkpoints quickly without downloading large files or merging logs after-the-fact.
How Backup Node Differs from Checkpoint Node?
It helps to understand how these two roles compare:
Backup Node: Keeps an exact mirror of current namespace state in memory at all times; applies edits instantly; creates checkpoints rapidly since no download/merge is needed.
Checkpoint Node: Periodically downloads both
fsimage(the full namespace snapshot) andeditslog from NameNode; merges them locally before uploading back—a process that takes more time and network bandwidth.High Availability (HA): Uses multiple NameNodes with shared edit logs via JournalNodes for seamless failover—now considered best practice for most production clusters.
So while checkpoint nodes reduce risk compared to having only one NameNode copy available anywhere in your cluster—backup nodes offer faster recovery but require more RAM because they hold everything live in memory.
Why Use Backup Nodes in Hadoop?
Early versions of Hadoop had one big weakness: if your single NameNode failed or its storage was corrupted or lost due to hardware problems or human error—all access to files stopped immediately until you restored from backups or rebuilt manually.
The backup node was created as insurance against this scenario by providing a synchronized copy ready for quick failover or restoration when needed. If disaster strikes your primary NameNode server—for example due to disk failure—you can recover almost instantly using data held by the backup node rather than waiting hours for manual intervention or risking permanent loss.
This approach reduces downtime dramatically while lowering risk of unrecoverable data loss—a major concern when running mission-critical analytics workloads on top of HDFS storage pools containing petabytes of information.
How to Set Up a Hadoop Backup Node?
Setting up a backup node requires careful planning since only one such node—or checkpoint node—can exist per cluster at any given time. Before starting:
1. Ensure no other checkpoint/backup nodes are registered with your active NameNode.
2. Confirm that you have enough free RAM on your intended backup server—it should match what’s allocated on your primary NameNode machine because both hold identical namespaces fully loaded into memory.
3. Back up existing configuration files before making changes!
Now let’s walk through each step:
First open your hdfs-site.xml configuration file on all relevant hosts—including both primary NameNode and intended backup server—and set these properties:
<property>
    <name>dfs.namenode.backup.address</name>
    <value>backupnode01.example.com:50100</value>
</property>
<property>
    <name>dfs.namenode.backup.http-address</name>
    <value>backupnode01.example.com:50105</value>
</property>
Replace backupnode01.example.com with your actual hostname/IP address; choose unused ports above 50000 if possible for security reasons.
Next restart affected services so new settings take effect:
1. Stop any running instance of checkpoint/backup nodes ($HADOOP_HOME/sbin/stop-dfs.sh)
2. Start core services again ($HADOOP_HOME/sbin/start-dfs.sh)
3. On designated server run:
$HADOOP_HOME/bin/hdfs namenode -backup
This command launches the process which connects directly with active NameNode over RPC channels—receiving every change made across distributed filesystem clients instantly into its own memory space.
To create a manual checkpoint at any time:
$HADOOP_HOME/bin/hdfs dfsadmin -saveNamespace
This writes out current state into local fsimage file plus resets edits log automatically—making future recovery much faster than relying solely on periodic checkpoints elsewhere in network topology.
How to Use Standby NameNode as an Alternative for High Availability in Hadoop?
While legacy clusters relied heavily on single-point-of-failure mitigation strategies like backup/checkpoint nodes—the modern gold standard is deploying two fully redundant NameNodes, known respectively as Active and Standby roles within an HA framework.
In this model:
1. Both Active and Standby communicate continuously with three (or more) dedicated JournalNodes spread across separate physical servers—to maximize fault tolerance through quorum voting mechanisms;
2. Every change processed by Active gets written first into JournalNodes’ shared transaction log;
3. Standby reads these updates immediately then applies them locally so its namespace matches perfectly at all times;
4. If Active fails unexpectedly—for example due hardware crash—the Standby takes over seamlessly thanks automatic failover scripts managed via ZooKeeper ensemble coordination service;
To configure HA mode properly:
1) Edit hdfs-site.xml specifying addresses/namespaces used by both primary/secondary instances;
2) Deploy minimum three JournalNodes each running independently;
3) Update DataNodes’ configs so they report status/block info simultaneously towards both masters;
4) Use command-line tool (hdfs haadmin) checking health/status/failover readiness anytime needed;
Advanced users often automate switchover logic further using fencing scripts preventing split-brain scenarios during rare edge cases where network partitions might otherwise confuse leadership election processes.
Introducing Vinchin Backup & Recovery for Enterprise Database Protection
Beyond built-in HDFS features, organizations seeking robust protection often turn to specialized solutions tailored for enterprise environments supporting mainstream databases such as Oracle, MySQL, SQL Server, MariaDB, PostgreSQL, PostgresPro, and TiDB alongside big data platforms like Hadoop itself. Vinchin Backup & Recovery stands out as a professional-grade database backup solution designed specifically for today’s heterogeneous IT landscapes—including support for Oracle database environments commonly found alongside Hadoop deployments.
Key features include incremental backups, batch database backups, GFS retention policies management, restore-to-new-server capability, and comprehensive storage protection against ransomware threats—all working together to ensure fast recovery times while minimizing operational risks across diverse workloads.
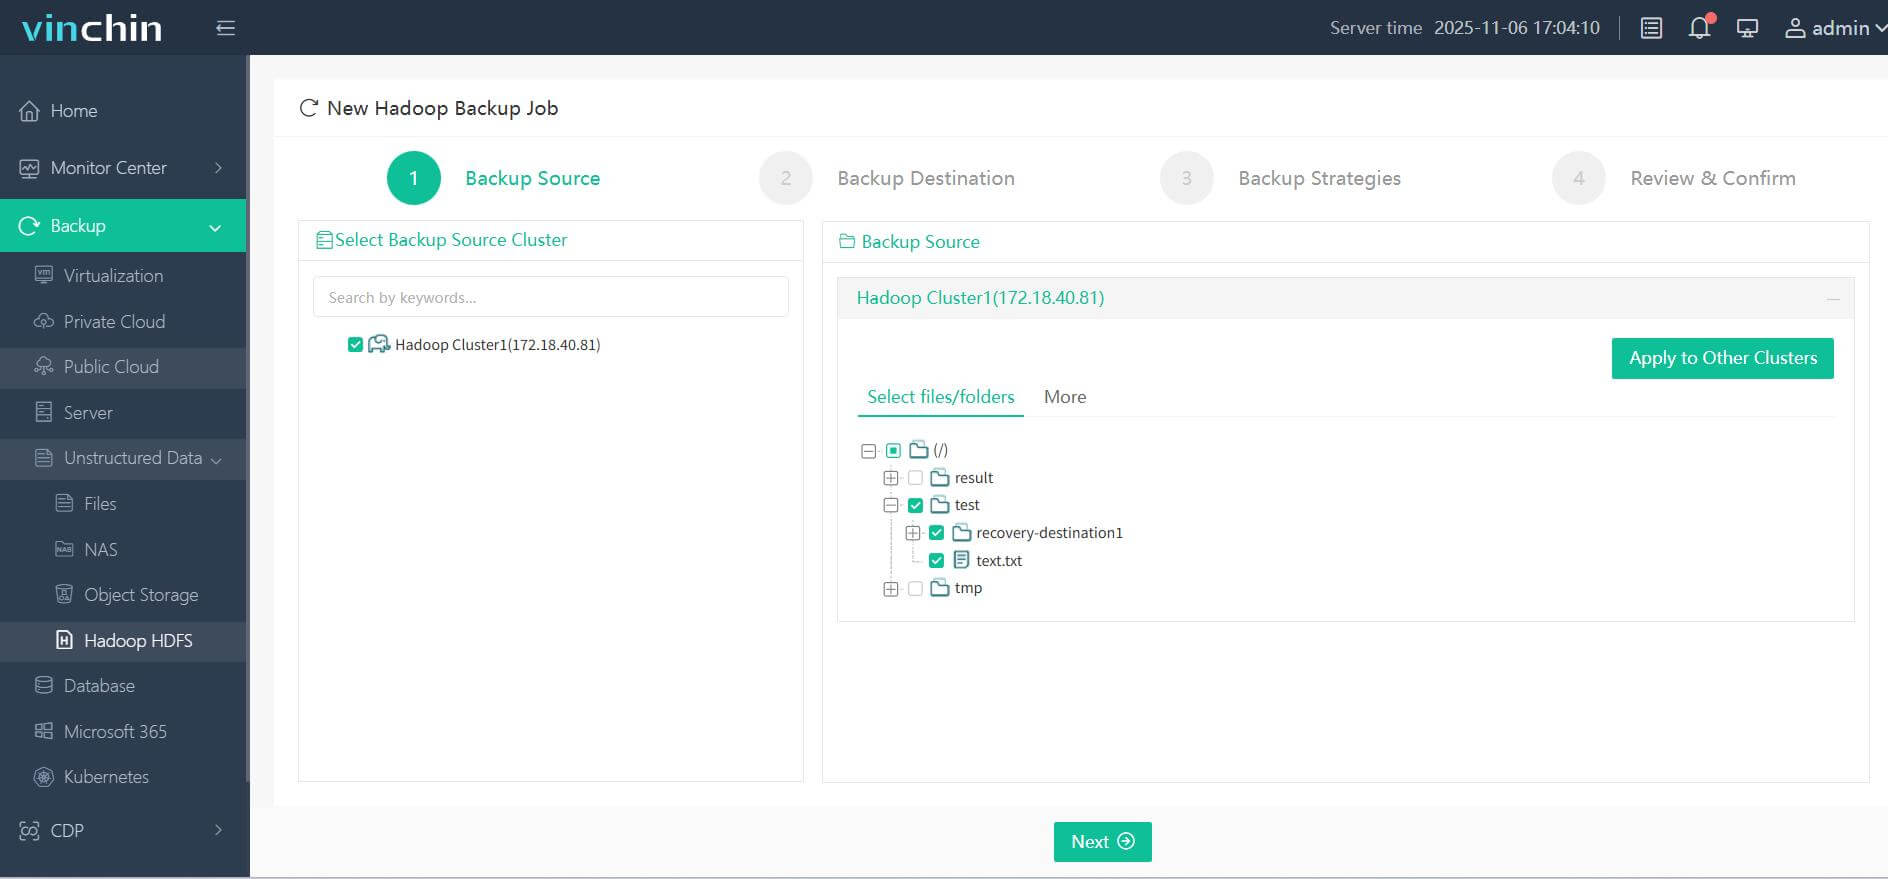
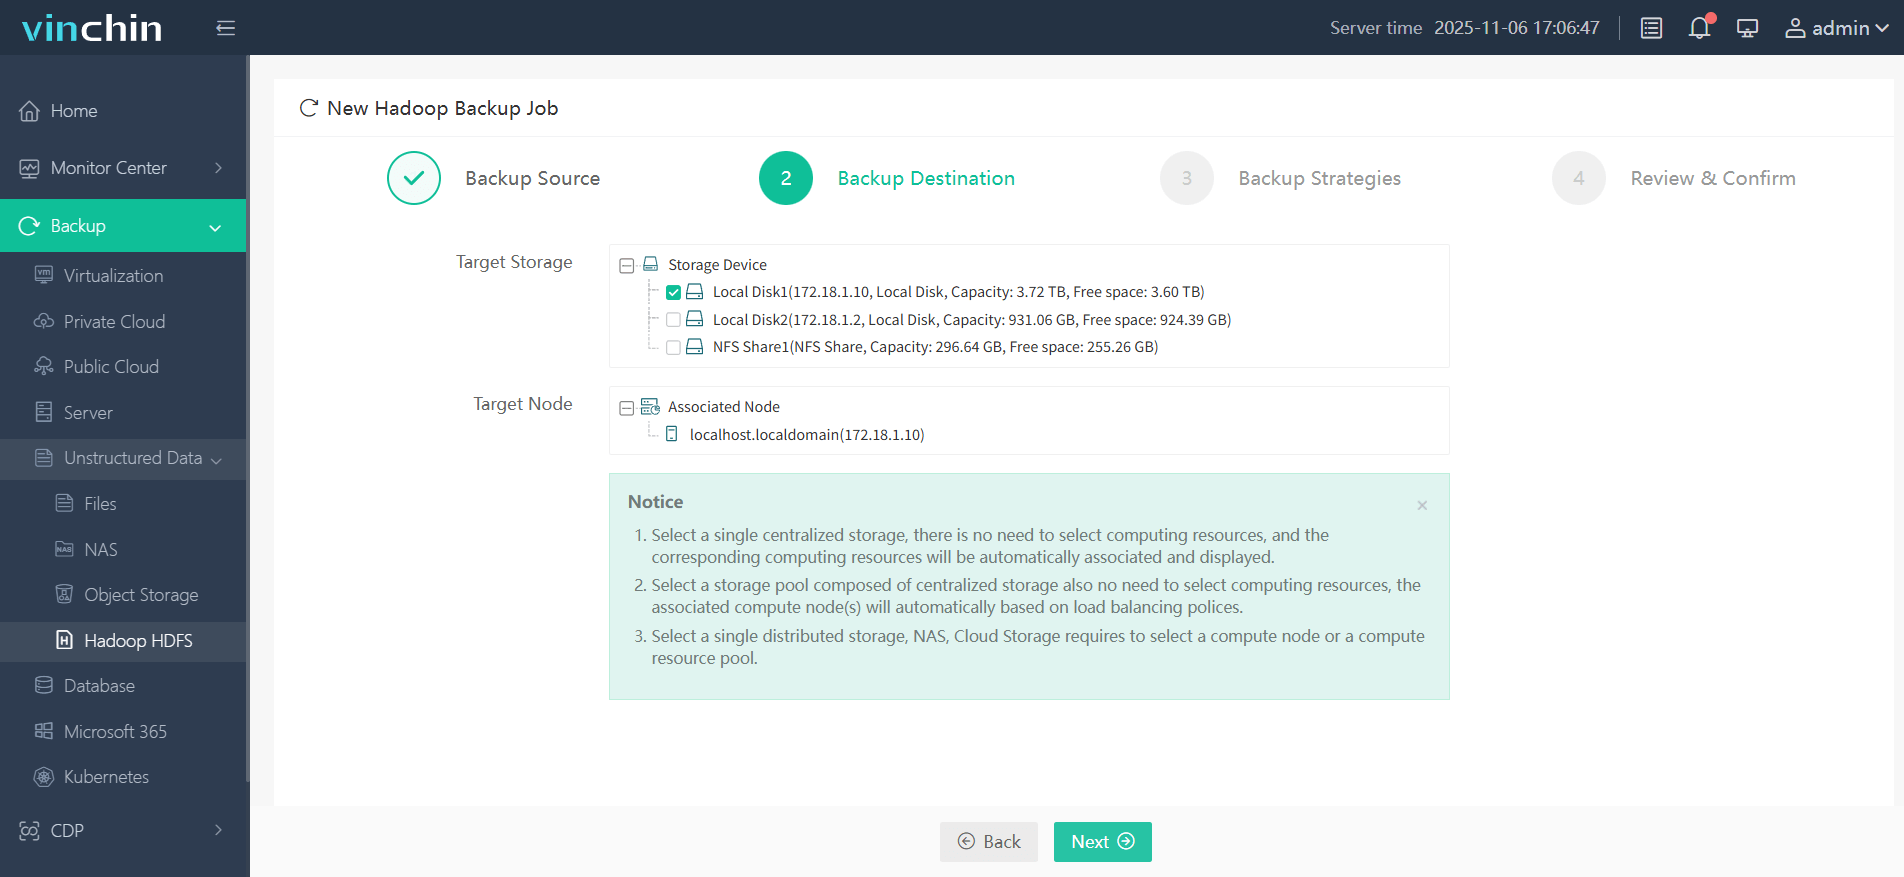
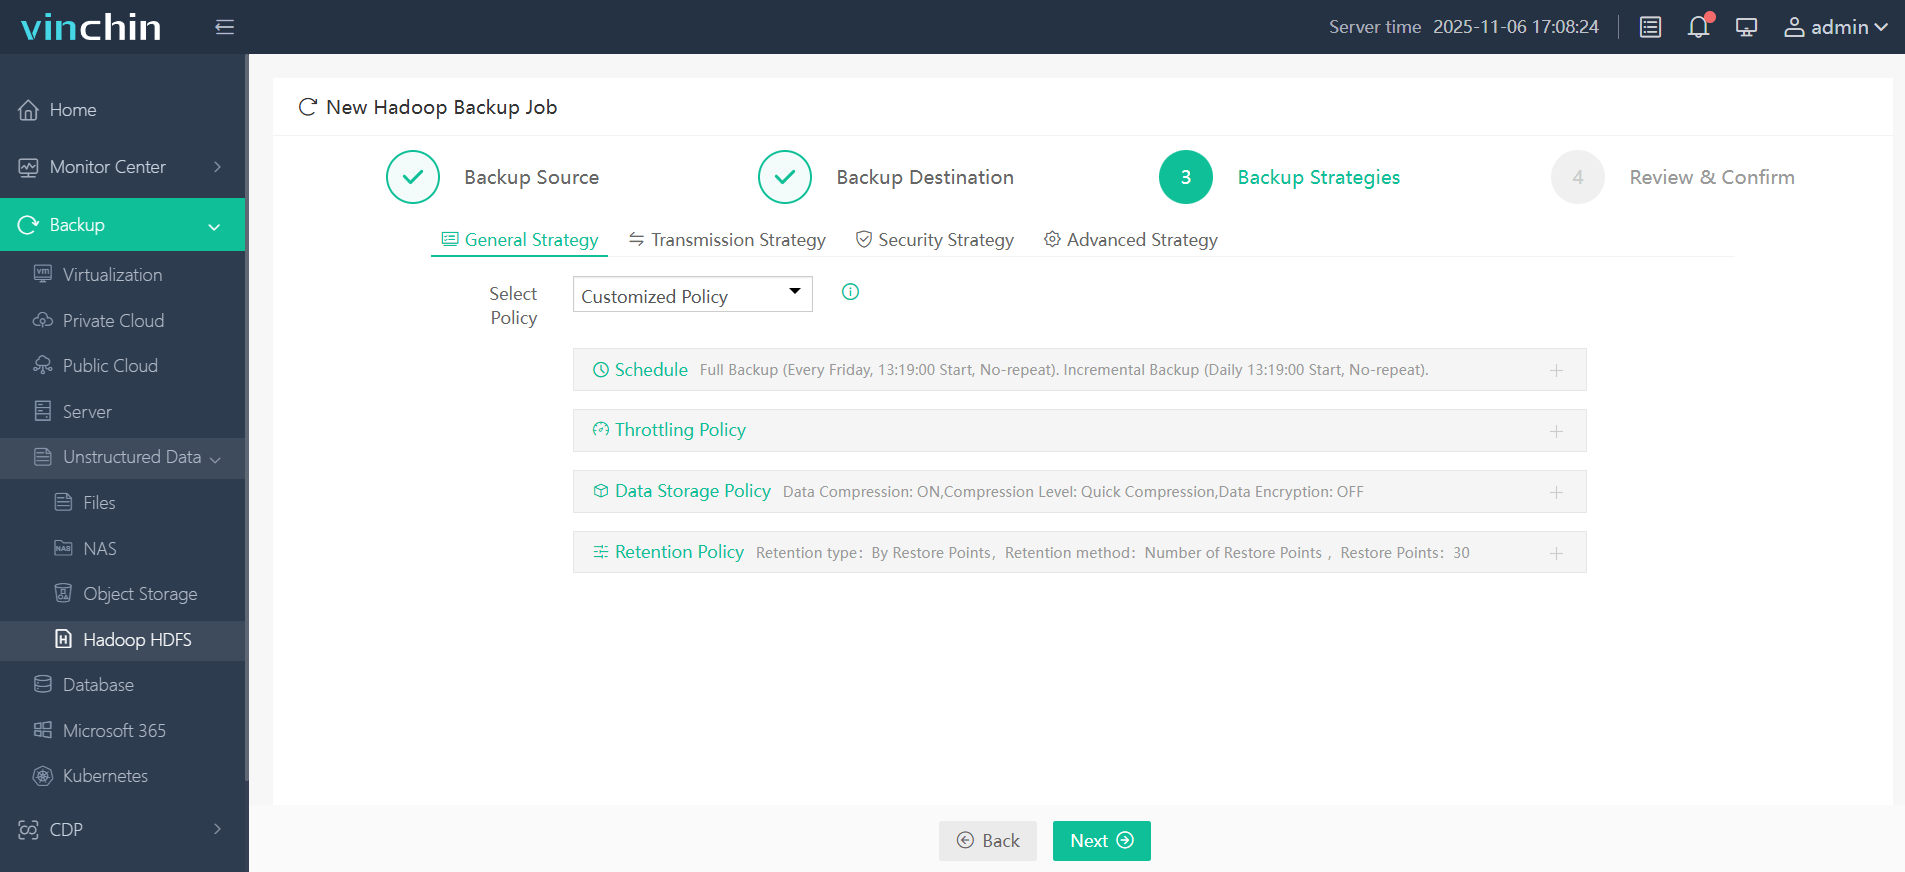
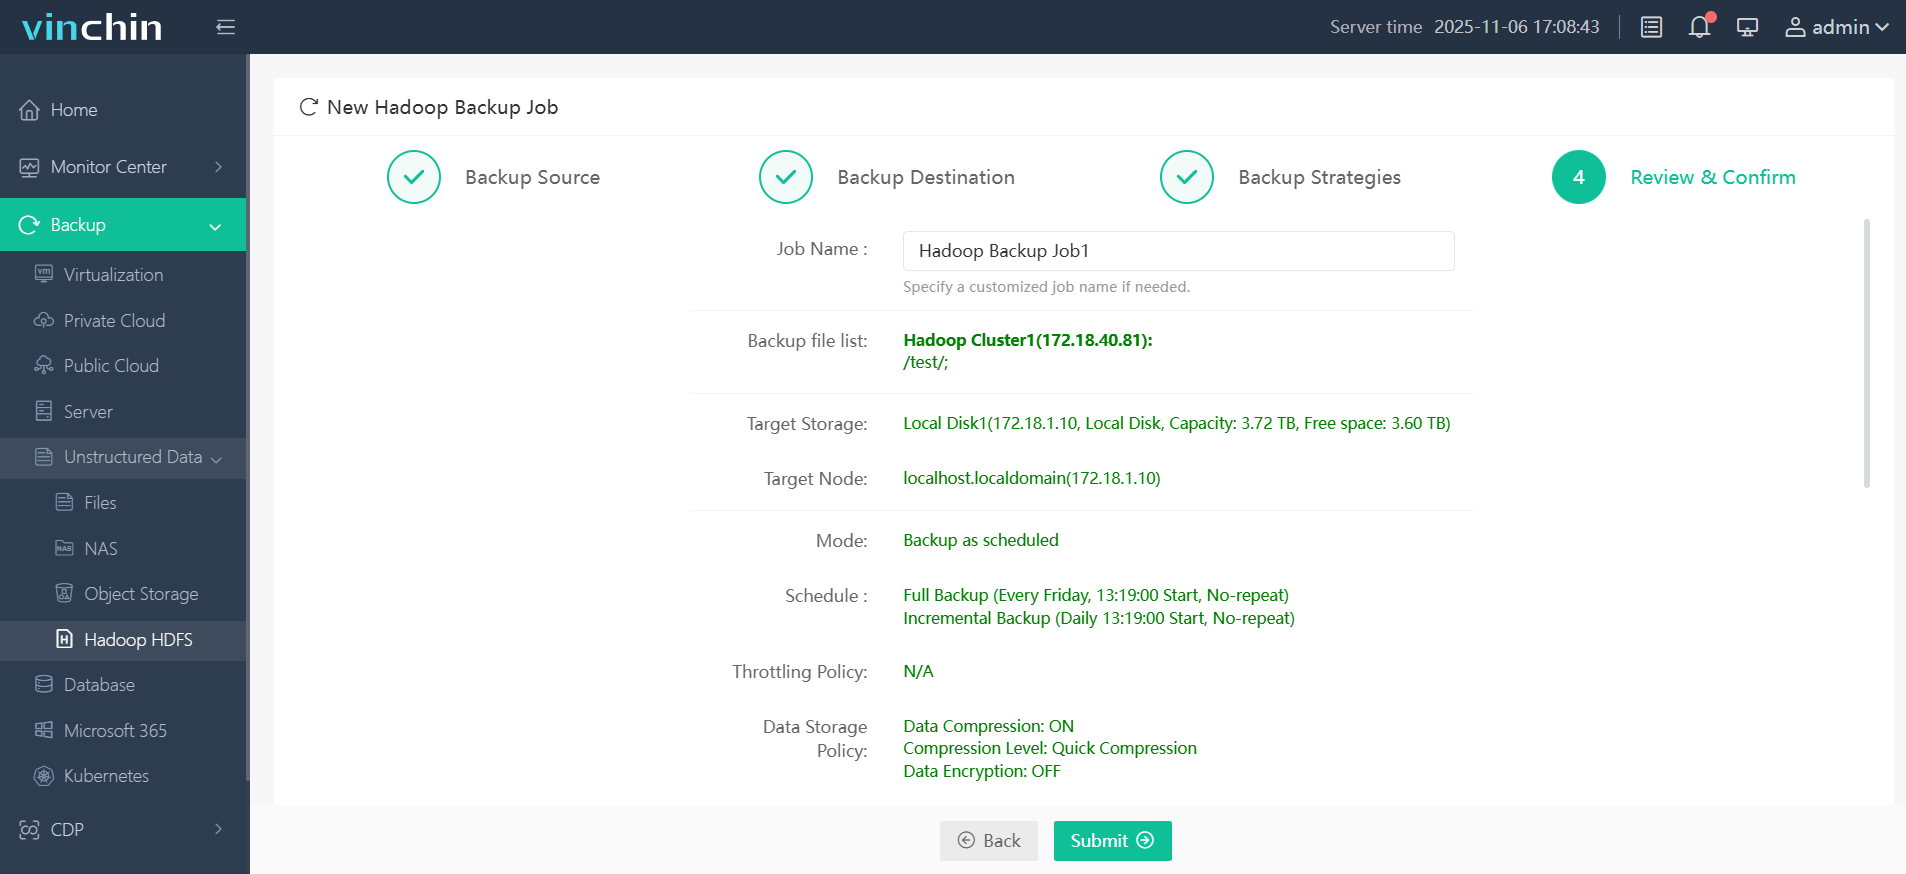
The intuitive web console makes safeguarding Oracle databases simple—just follow four easy steps:
Step 1. Select the Hadoop HDFS files you wish to back up

Step 2. Choose your desired backup destination

Step 3. Define backup strategies tailored for your needs

Step 4. Submit the job

Recognized globally by thousands of enterprises—with top ratings and proven reliability—Vinchin Backup & Recovery offers a full-featured free trial valid for 60 days; click below to get started today!
Hadoop Backup Node FAQs
Q1: Can I migrate my legacy cluster from using a single backup node directly into high availability mode?
Yes—you must first remove/disconnect existing checkpoint/backup services before enabling dual-name-node HA configurations according official migration guides; always test thoroughly before going live!
Q2: What happens if my designated backup node crashes during normal operation?
Restart it promptly then check logs/status reports ensuring it re-synchronizes fully with current active NameNode state without missing recent edits transactions.
Q3: How do I monitor ongoing health/sync status between my main NameNode & its associated backup?
Use commands like hdfs dfsadmin –report, review relevant logfiles under $HADOOP_HOME/logs/, schedule periodic audits confirming no drift exists between copies.
Conclusion
Protecting critical metadata remains central whether running classic clusters or adopting modern high availability designs—with robust backups still forming last line defense against catastrophic loss events! Vinchin makes safeguarding even complex multi-petabyte environments straightforward—try their free trial today if you need peace-of-mind coverage built specifically around enterprise-scale workloads worldwide!
Share on:


