-
What Is vCenter Server?
-
Why Upgrade vCenter Server?
-
Method 1: Upgrade via GUI
-
Method 2: Upgrade Using CLI
-
How to Migrate vCenter with Vinchin?
-
Upgrade vcenter FAQs
-
Conclusion
Upgrading vCenter Server is a critical job for any VMware administrator who wants to keep their virtual infrastructure secure, stable, and ready for new features. If you manage a growing environment or need to stay compliant with vendor support policies, learning how to upgrade vCenter is essential.
This guide explains what vCenter Server does, why upgrades matter, how to plan your upgrade project, and step-by-step methods using both GUI and CLI tools. You’ll also learn about migration options with Vinchin and get answers to common upgrade questions.
What Is vCenter Server?
vCenter Server acts as the command center of your VMware vSphere environment. It lets you control multiple ESXi hosts from one place—provisioning virtual machines (VMs), monitoring performance, automating tasks, allocating resources efficiently, and managing clusters.
With vCenter Server at the core of your setup, you can use advanced features like vMotion (for live VM migration), High Availability (HA) (to reduce downtime), Distributed Resource Scheduler (for load balancing), templates for rapid deployment, role-based access control for security management—and much more.
Why Upgrade vCenter Server?
Keeping your vCenter Server up-to-date brings many benefits that go beyond just having the latest interface or features:
Security patches close vulnerabilities that could put your data at risk.
Bug fixes improve stability so your workloads run smoothly.
New releases often support newer hardware models or operating systems.
Upgrades unlock new features that boost efficiency or simplify management tasks.
If you delay upgrades too long? You may face compatibility problems when adding new ESXi hosts or integrating other VMware products into your stack. Regular upgrades are vital to maintain a healthy virtual infrastructure.
Method 1: Upgrade via GUI
Upgrading through the graphical user interface (GUI) is the most common approach because it’s intuitive, reliable, and suitable for both beginners and experienced administrators.
Preparation
Download the latest supported ISO file from VMware Customer Connect onto your workstation or a jump server with local administrator rights.
Take a snapshot of your existing vCenter Server appliance for rollback if needed.
Mount the downloaded ISO locally.
Stage 1: Deploy the New Appliance
Open the mounted ISO folder vcsa-ui-installer that matches your operating system.
Launch installer.exe (Windows) or the equivalent installer for Linux/Mac.
From the main menu, click Upgrade.
Accept the license agreement and click Next.
Enter the details of your source (current) vCenter Server appliance and click Connect to Source.
Provide SSO administrator credentials (e.g.,
administrator@vsphere.local) and click Next.Specify the ESXi host that manages this source appliance, enter host credentials, then click Next.
Accept the certificate warning by clicking Yes.
Enter the details of the target ESXi host where the new appliance will be deployed, then click Next.
Set a unique VM name for the new appliance and provide a root password.
Choose the deployment size (Small/Medium/Large) based on the number of VMs/hosts managed, then click Next.
Select the destination datastore, enable thin provisioning if storage space is limited, and click Next.
Choose the network port group and assign a temporary IP address (different from the production IP) until the cutover is completed. Click Next.
Review the summary and click Finish to start Stage 1 deployment.
Stage 2: Data Migration
After Stage 1 completes, take a snapshot of the newly deployed appliance.
On the completion screen, click Continue.
Review any warnings about extensions or plugins.
Select which data sets to migrate:
Configuration only
Configuration + Inventory + Historical Data
Decide whether to join the Customer Experience Improvement Program (CEIP).
Confirm that you have a valid backup of the source system.
Click Finish to begin data migration.
Post-Upgrade
The wizard migrates configuration and data from the old appliance to the new one while preserving settings wherever possible.
Once migration is complete, log in to the new vCenter Server using its updated FQDN or IP address.
Verify that all services, permissions, and inventory are intact.
After validation, remove the snapshots taken earlier to free resources.
Method 2: Upgrade Using CLI
For advanced users—or those managing many sites at once—the command-line interface offers flexibility plus automation potential that GUIs cannot match.
CLI-based upgrades rely on JSON configuration files describing every detail of source/target appliances plus networking info needed during cutover phases:
First steps mirror GUI method:
Back up/snapshot current appliance
Download/mount latest ISO locally
Then proceed as follows:
1. Open terminal window/cmd prompt
2. Navigate into mounted ISO directory called vcsa-cli-installer
3. Prepare JSON config file specifying parameters such as source hostname/IPs/SAML domain/admin credentials/network settings/deployment size/datastore choice/etc.—see sample below:
{
  "source": {
    "hostname": "old-vcenter.domain.local",
    "username": "administrator@vsphere.local",
    "password": "your_password"
  },
  "target": {
    "esxi_host": "esxi-host.domain.local",
    "datastore": "datastore1",
    "network": "VM Network",
    "ip_address": "192.xxx.xxx.xxx"
  },
  ...
}
Validate JSON syntax using tools like jq if available (jq . <filename.json>).
4. Run main deploy command:
vcsa-deploy upgrade <path-to-json-file>
5. Accept license agreements when prompted onscreen
6. Monitor output logs closely—Stage 1 deploys new VM while Stage 2 handles data migration/configuration transfer
7. Respond interactively if errors appear (e.g., certificate mismatches); correct issues then rerun step above
Post-Upgrade Validation Steps
Completing an upgrade isn't enough—you must validate everything works before returning systems back into production use:
Begin by logging into both:
The web-based vSphere Client (https://<new-vcenter-fqdn>/ui)
The Appliance Management Interface (https://<new-vcenter-ip>:5480)
Check these key areas:
All ESXi hosts show connected status under Hosts & Clusters view
Datastores mount correctly without warning icons
Existing VMs power-on/off successfully
Networking functions normally across distributed switches
Custom certificates display valid dates/trusted chains
Test core workflows such as creating/deleting test VMs—or migrating workloads between hosts using live migration features like DRS/vMotion if licensed/enabled in cluster settings!
Review event logs under Monitor > Tasks & Events tab for hidden errors/warnings missed during initial walkthroughs—and confirm scheduled backup jobs resume running normally after cutover completes!
If anything fails validation? Roll back quickly using tested backups/snapshots created earlier—or consult official documentation/forums for targeted troubleshooting advice.
How to Migrate vCenter with Vinchin?
When planning an upgrade project involving virtual machine migrations, choosing an efficient solution can greatly reduce operational risks and downtime. Vinchin Backup & Recovery is a professional enterprise-grade backup platform that also provides agentless virtual machine migration capabilities, enabling businesses to move seamlessly between different virtual environments while minimizing disruption to production workloads.
Vinchin Backup & Recovery supports a broad range of virtualization platforms—including VMware, Hyper-V, Proxmox VE, oVirt, OLVM, RHV, XCP-ng, XenServer, and OpenStack—as well as additional VM types not listed here. This extensive compatibility ensures organizations can migrate their critical workloads regardless of underlying hypervisor architecture.
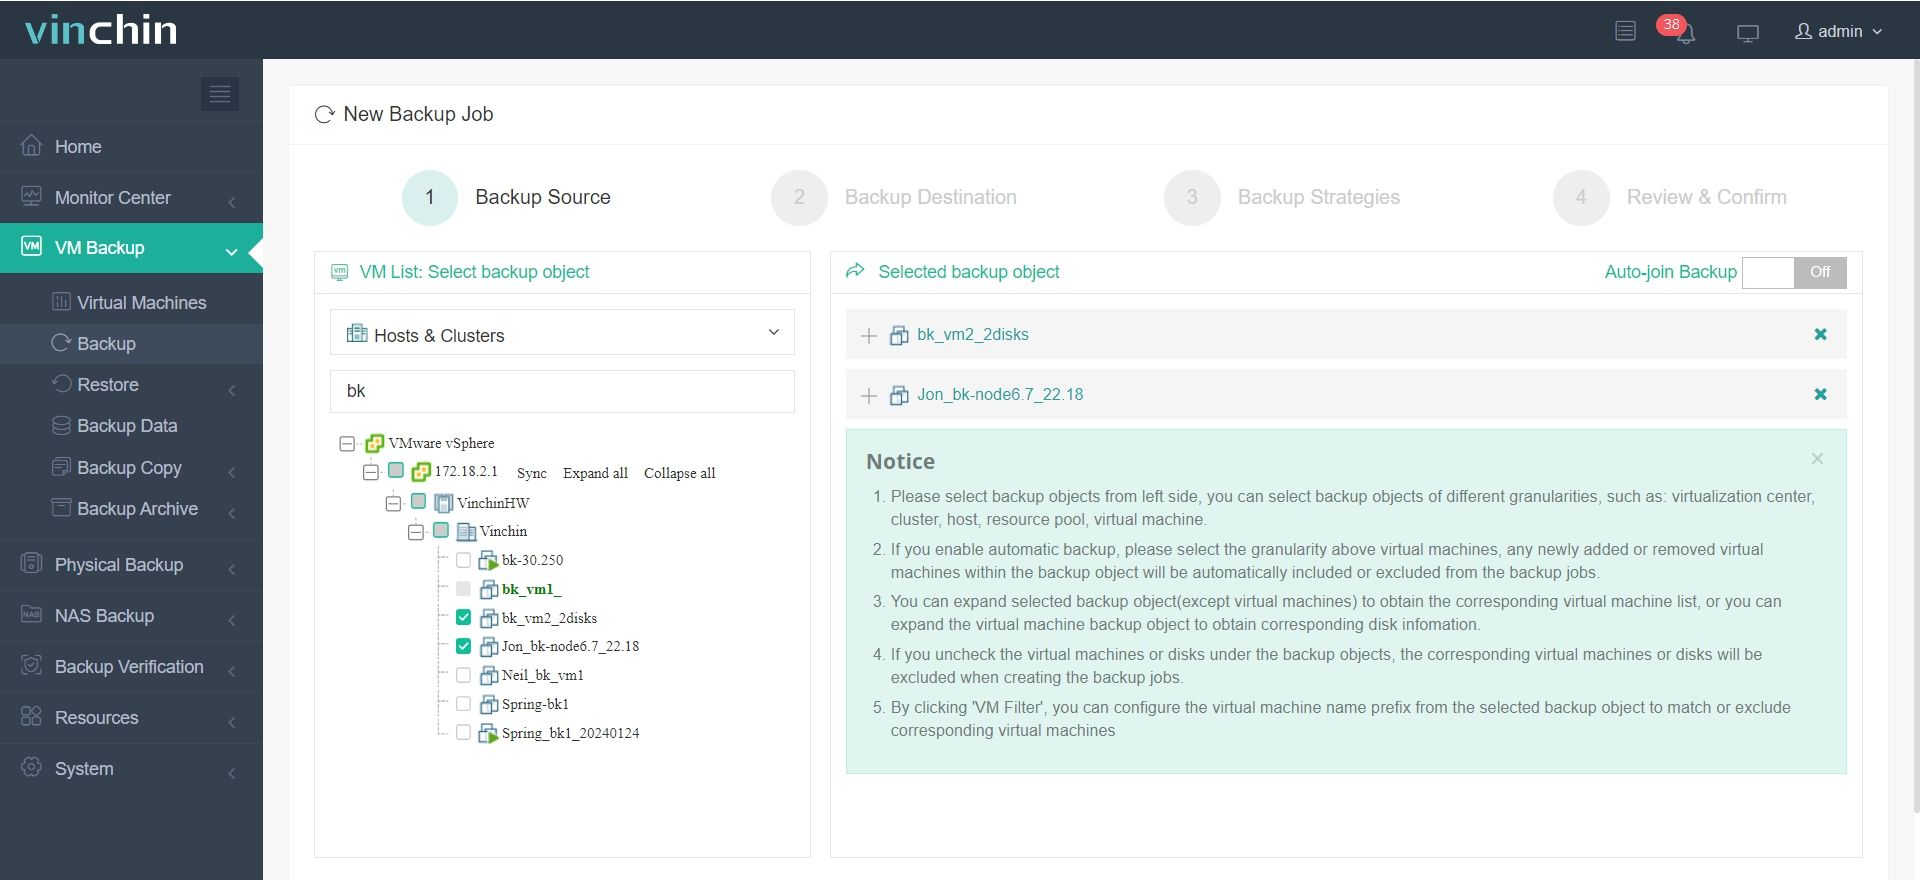
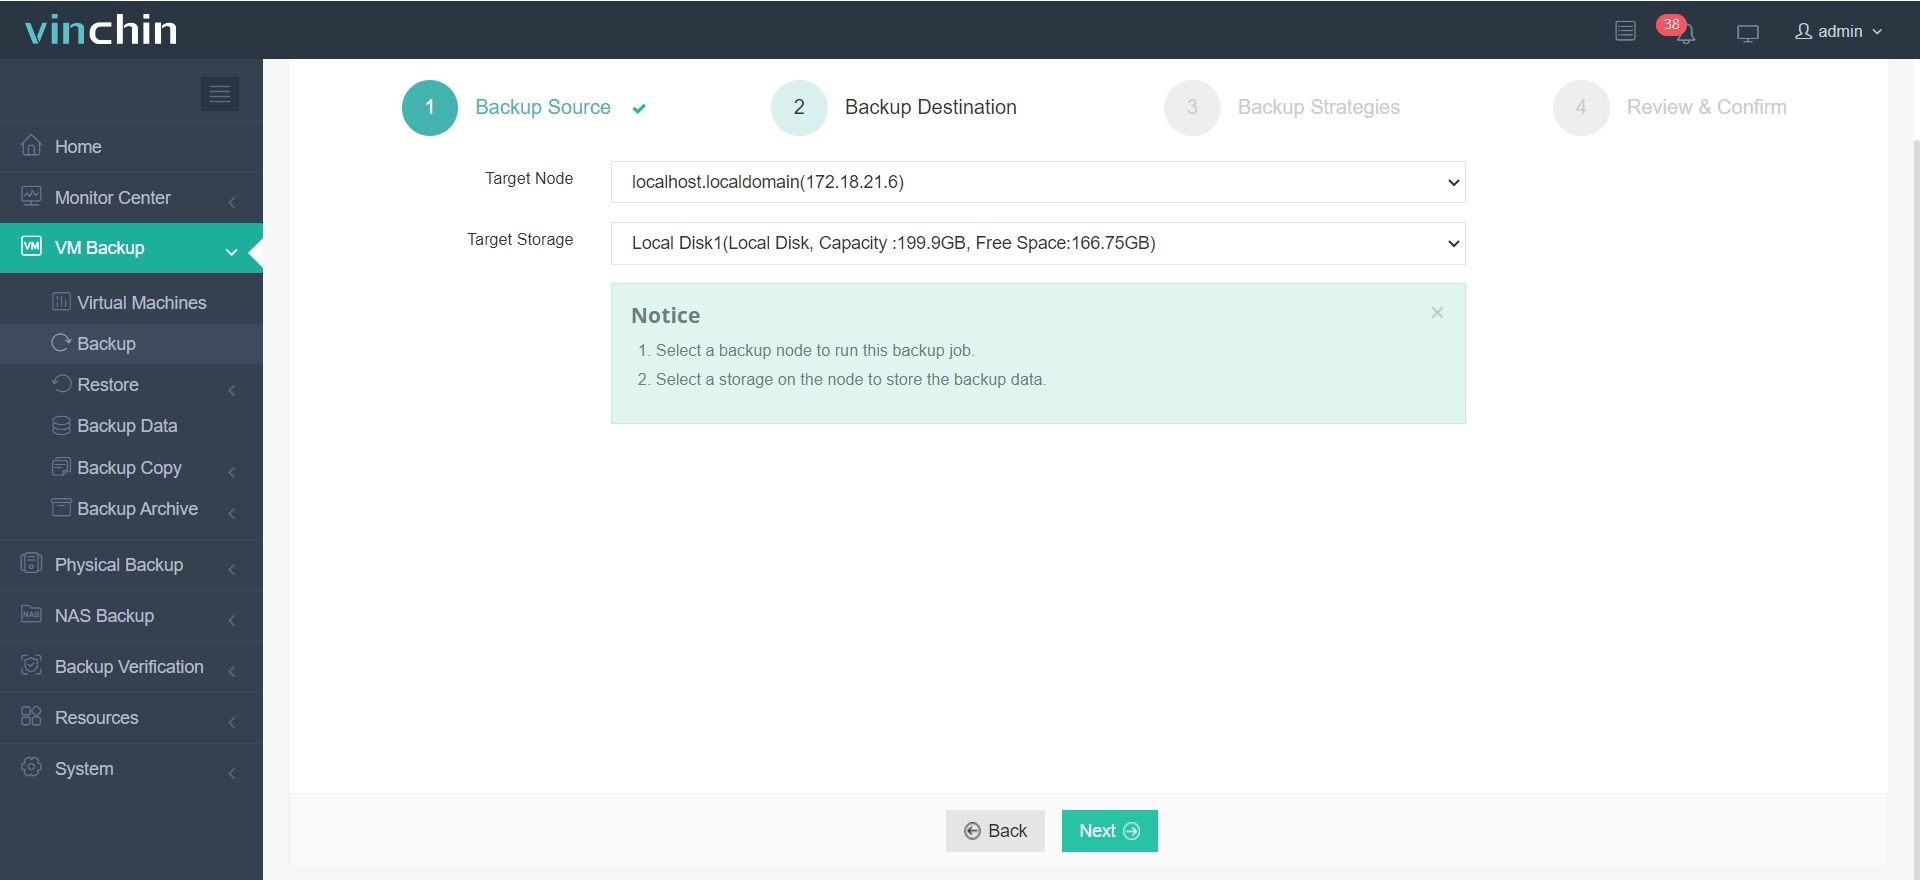
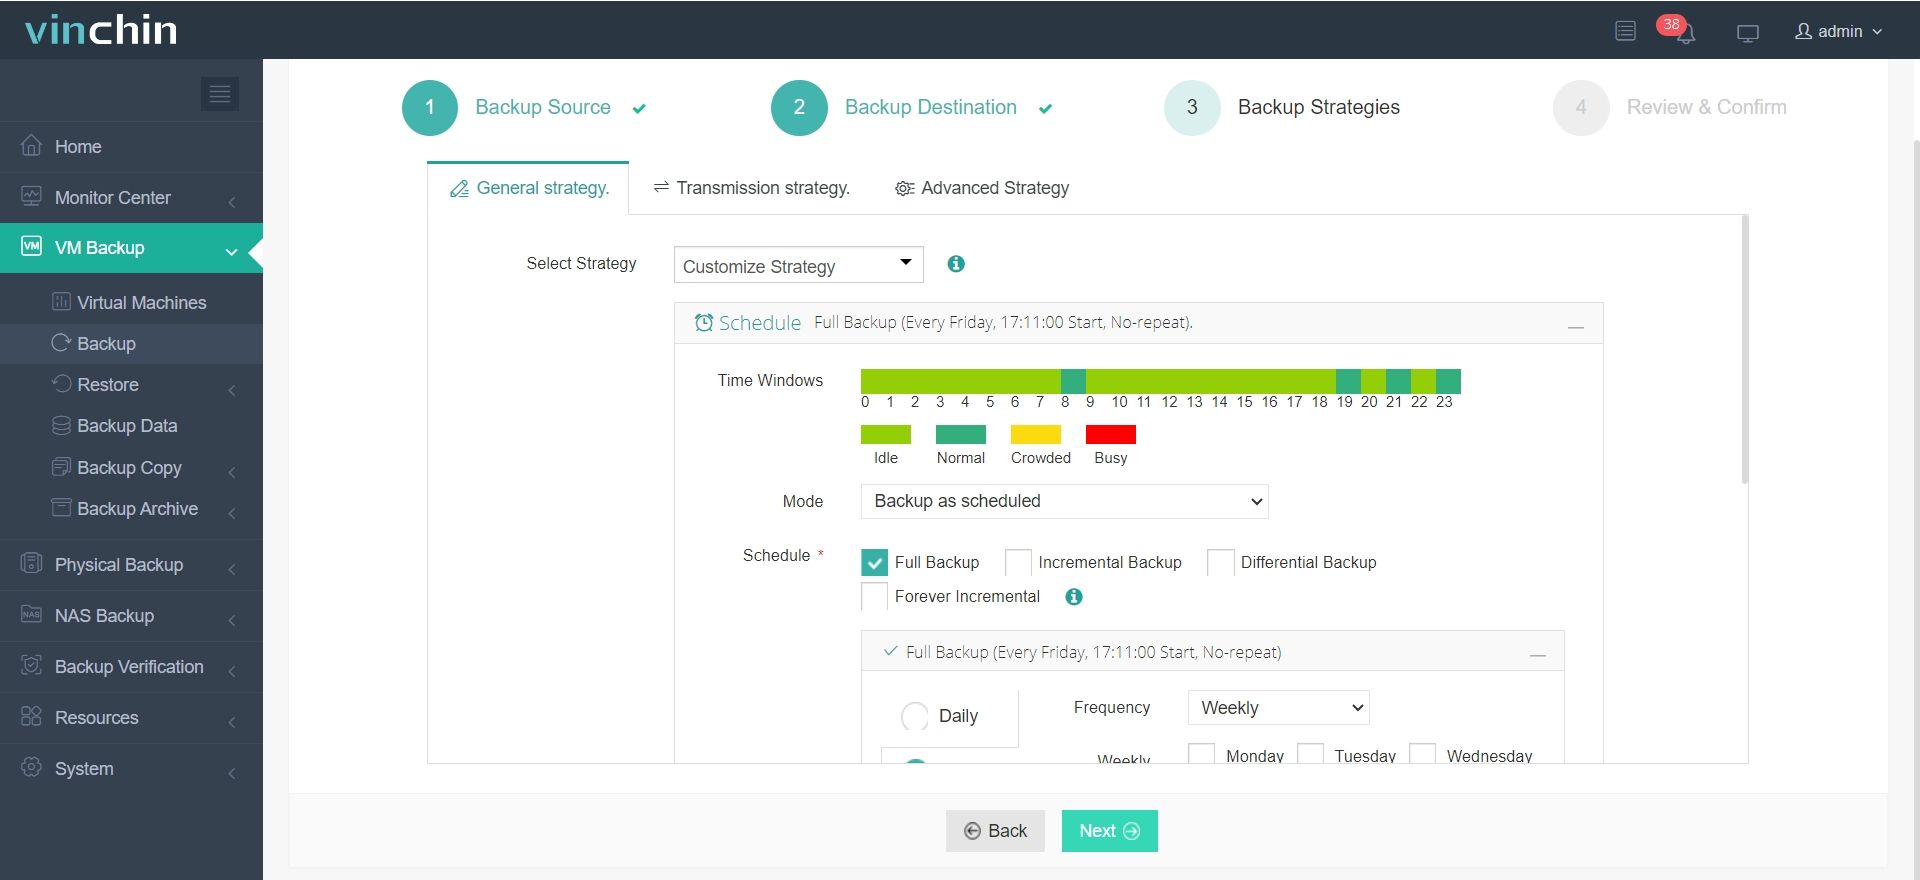
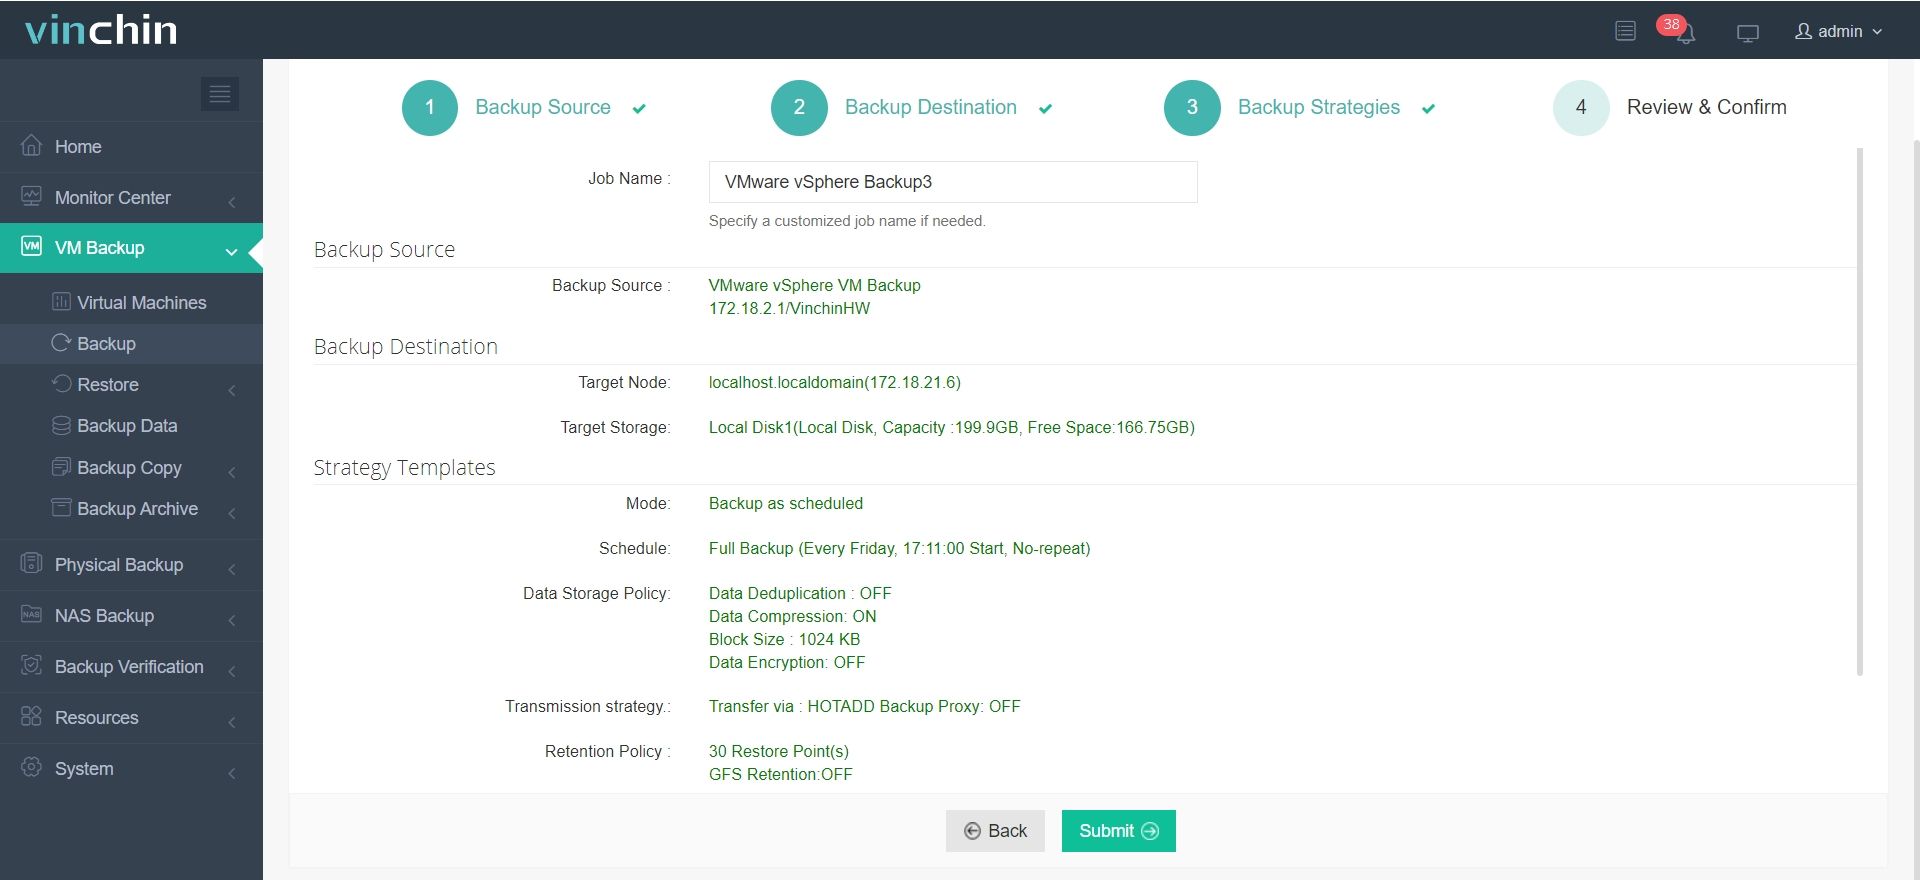
The migration process with Vinchin Backup & Recovery is extremely simple:
Step 1. Select Backup Source

Step 2. Select Backup Destination

Step 3. Select Backup Strategies

Step 4. Review and submit the job

Thousands of global customers trust Vinchin Backup & Recovery for reliable backup and seamless migrations—with consistently high product ratings worldwide. Start today with a full-featured free trial valid for 60 days, and download the installer now for quick deployment.
Upgrade vcenter FAQs
Q1: What should I do if my custom SSL certificate stops working after upgrading?
A1: Reinstall or reimport custom certificates through Appliance Management Interface > Certificates page following vendor guidelines.
Q2: Can I automate multiple site upgrades without manual intervention?
A2: Yes—use scripting tools compatible with CLI deployments along with validated JSON configs per site location for batch execution.
Q3: How do I fix failed plugin registrations after an upgrade?
A3: Remove broken plugins from Administration > Solutions > Client Plugins menu then reinstall updated versions compatible with current release level.
Conclusion
Upgrading vCenter keeps environments secure and efficient while unlocking powerful features IT teams depend on daily—for best results combine careful planning with proven methods described here! Vinchin makes migrations seamless no matter which virtualization platform powers your business today.
Share on:


