Reliable virtual machine monitoring is critical to maintain stable, high-performance VMware ESXi hosts. The Simple Network Management Protocol (SNMP) offers a standardized method to collect infrastructure performance metrics and receive real-time alerts. Proper ESXi SNMP configuration lets you monitor hardware health, network status, resource utilization and more, all through a centralized monitoring platform.
This guide covers ESXi SNMP core functions, key benefits for operation teams, step-by-step setup via CLI and GUI, post-configuration verification, and essential security tips to protect your virtual workloads.
What Is SNMP in ESXi?
SNMP (Simple Network Management Protocol) is a universal standard for centralized monitoring of servers, switches, storage and network devices. On ESXi, the built-in SNMP agent responds to monitoring system requests and sends alert traps for critical events.
It delivers key metrics including CPU load, memory consumption, storage status and hardware faults to authorized management tools. Lightweight in resource and bandwidth usage, SNMP remains a foundational monitoring tool for enterprise IT environments.
Why Configure SNMP on ESXi Hosts?
Configuring EXSI SNMP settings connects your hosts directly with existing monitoring platforms, so you always know what’s happening across your environment without logging into each server individually. Once enabled:
- You can track CPU load trends or sudden spikes.
- Memory consumption becomes visible at a glance.
- Storage capacity warnings arrive before disks fill up.
- Hardware failures trigger instant alerts.
- All this data flows into dashboards or alerting systems you already trust.
If you manage many hosts or want centralized visibility across sites or clusters, even if they’re remote, SNMP makes life easier by automating routine checks and surfacing problems early.
How to Configure SNMP on ESXi via CLI?
The command-line interface delivers full control over ESXi SNMP configuration and is widely favored by experienced administrators for fast deployment and automation.
Prerequisites
Enable SSH access on the target ESXi host.
In vSphere Client: Select the host > Configure > Services > Start the SSH service.
Connect to the host via SSH with the root account.
Step-by-Step CLI Configuration
1. Check current SNMP status
esxcli system snmp get
View the SNMP enable status and existing community configurations.
2. Set a secure SNMP community string
esxcli system snmp set --communities COMMUNITY_NAME
Use a custom, unique string. Avoid weak default values such as public.
3. Configure SNMP trap target
esxcli system snmp set --targets=X.X.X.X@161/COMMUNITY_NAME
Example:
esxcli system snmp set --targets=192.168.10.50@161/mycommunity
4. Add system location and contact information
esxcli system snmp set --syslocation "Data Center A"
esxcli system snmp set --syscontact admin@example.com
5. Enable the SNMP agent
esxcli system snmp set --enable true
6. Allow SNMP traffic through the ESXi firewall
esxcli network firewall ruleset set --ruleset-id snmp --enabled true
7. Verify all configurations
esxcli system snmp get
8. Test SNMP trap delivery
esxcli system snmp test
Note: This test requires a valid trap target to work properly.
Troubleshooting Tip
If configuration fails, verify the community string (case-sensitive) and firewall rules:
esxcli network firewall ruleset list | grep snmp
How to Configure SNMP on ESXi Using vSphere Client
For graphical operation, use the vSphere Client to complete SNMP setup without CLI commands.
1. Log in to vSphere Client and select the target ESXi host.
2. Navigate to Configure > System > SNMP.
3. Click Edit in the upper-right corner.
4. Fill in community strings, trap targets, system location and contact details.
5. Save the settings.
6. Go to System > Services, confirm the SNMP Server is running; start it manually if stopped.
7. Accept firewall exception prompts, or enable rules via CLI if needed.
8. Restart the SNMP Server service to apply all changes.
Testing and Verifying Your SNMP Configuration
Complete end-to-end verification to ensure stable SNMP communication.
1. Run a local trap test on the ESXi host:
esxcli system snmp test
Check your monitoring server for incoming alert notifications.
2. Run external SNMP query from a permitted device:
snmpwalk -v2c -c COMMUNITY_NAME <ESXI_HOST_IP>
A valid output starting with SNMPv2-MIB indicates normal operation.
Common checkpoints for errors
Correct and case-sensitive community string
Enabled SNMP agent and firewall rules
Accurate target IP addresses
Reachable UDP 161 port between nodes
Enterprise-Level Backup Solution: Vinchin Backup & Recovery
Effective ESXi monitoring is critical, and reliable backup is essential for full virtual environment protection.Vinchin Backup & Recovery is an enterprise-grade backup solution supporting ESXi, Hyper-V, Proxmox, oVirt, OLVM, RHV, XCP-ng, XenServer, OpenStack and more than 15 mainstream virtualization platforms.
Core Features for VMware
Application-consistent quiesced snapshots
CBT-powered incremental backup
LAN-free backup to reduce production network pressure
Granular file-level VM restore
Ransomware-resistant backup storage protection
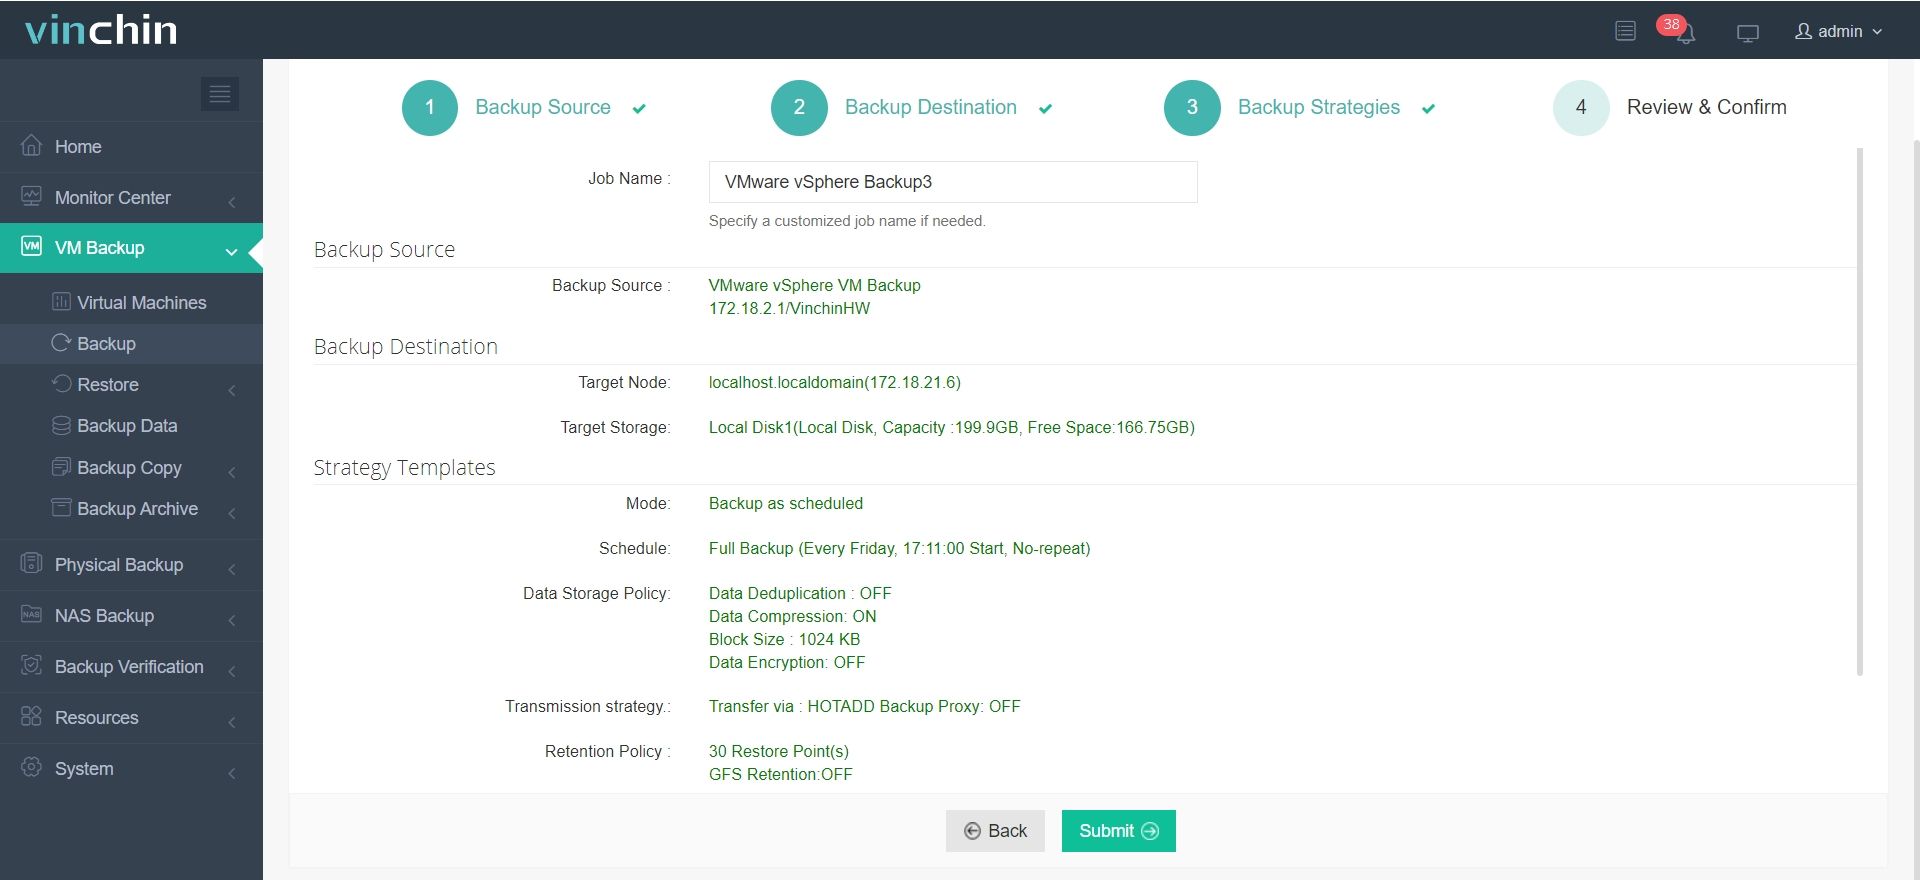
4-Step Simple Backup Workflow
1. Select VMware VMs for backup
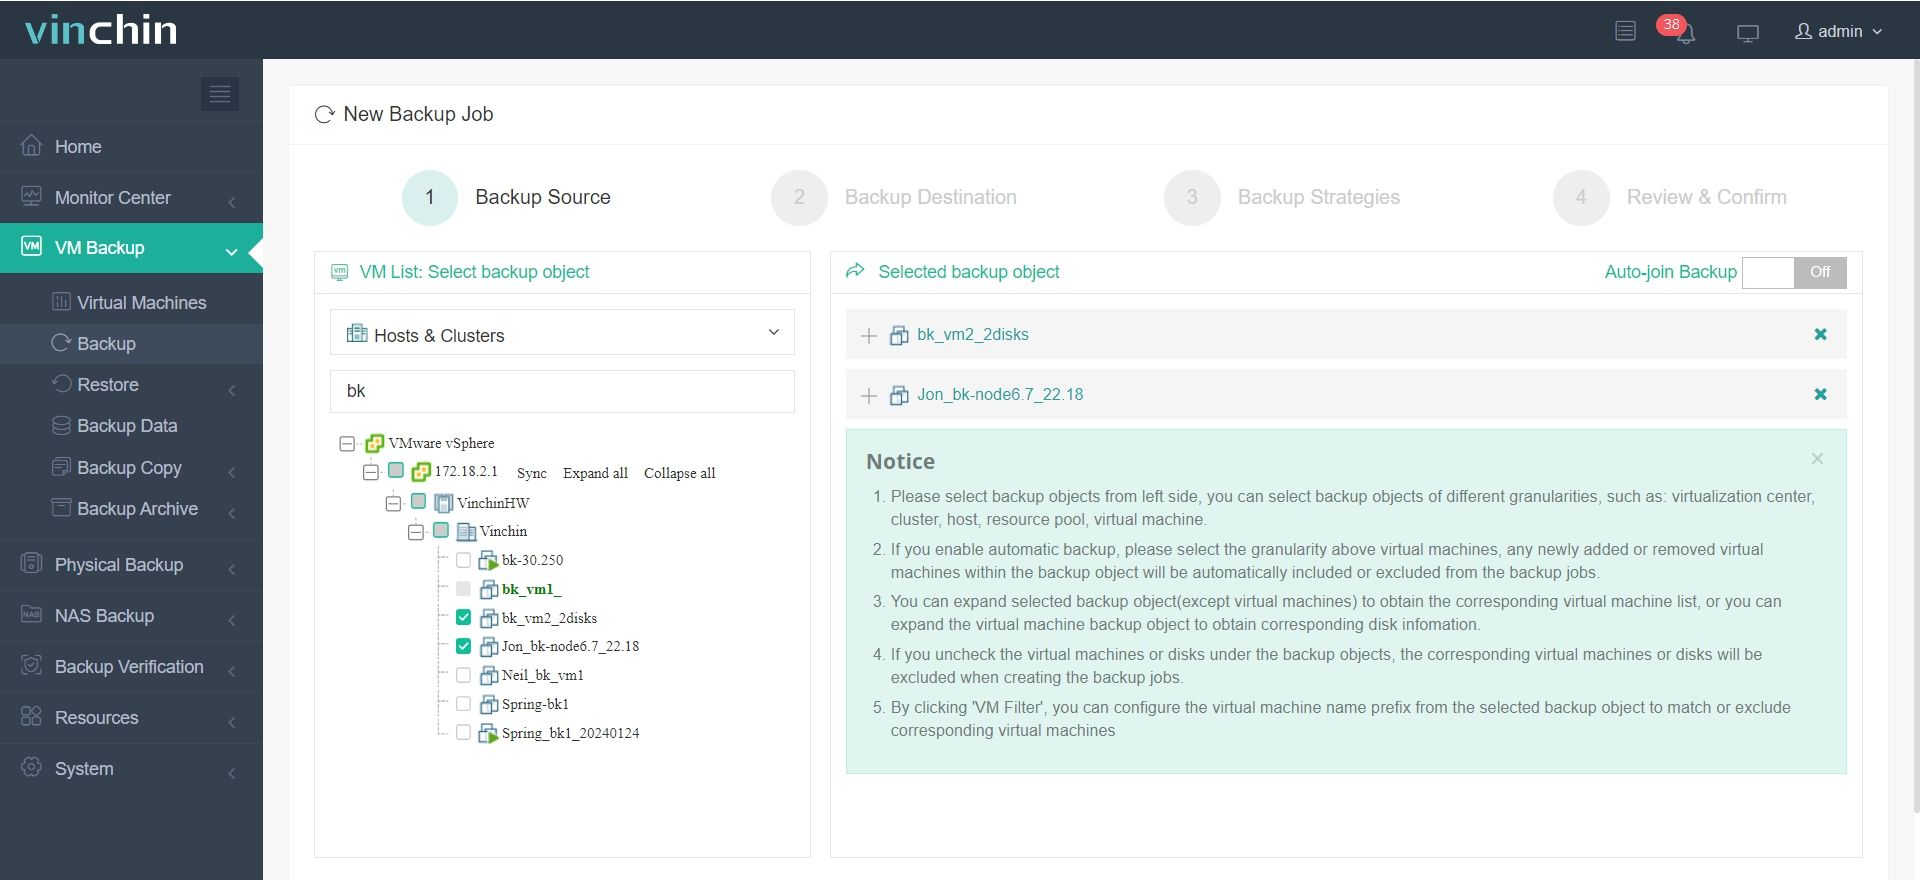
2. Assign backup storage
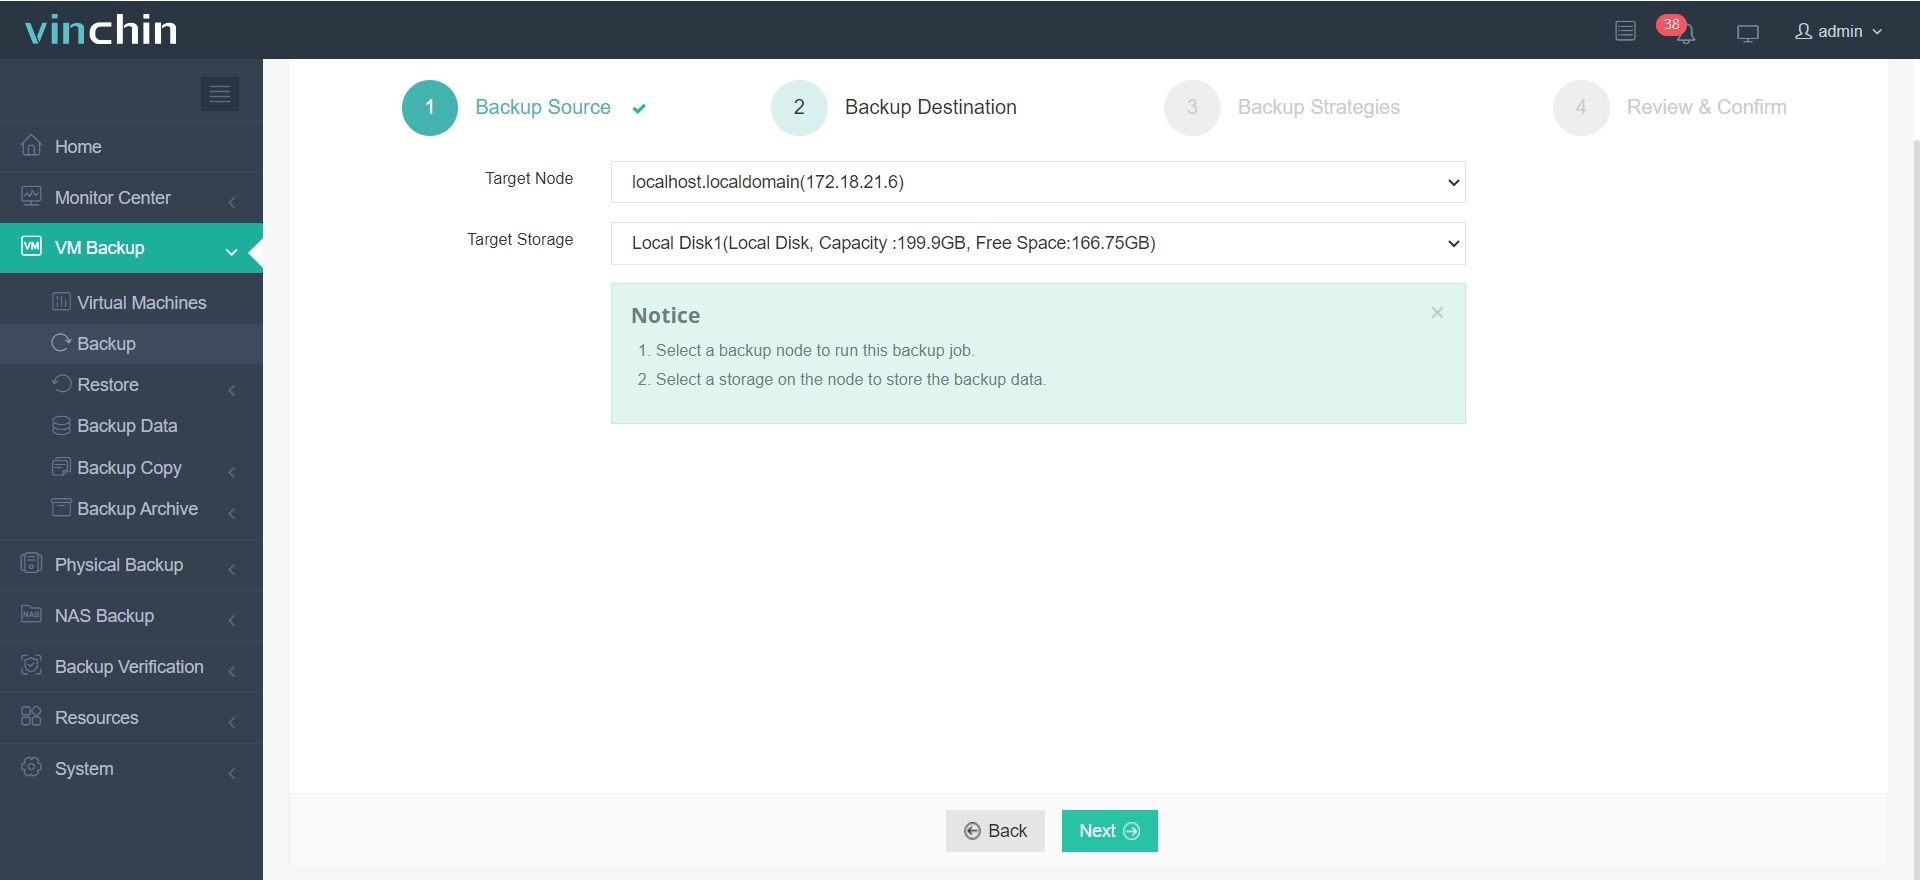
3. Customize backup strategies
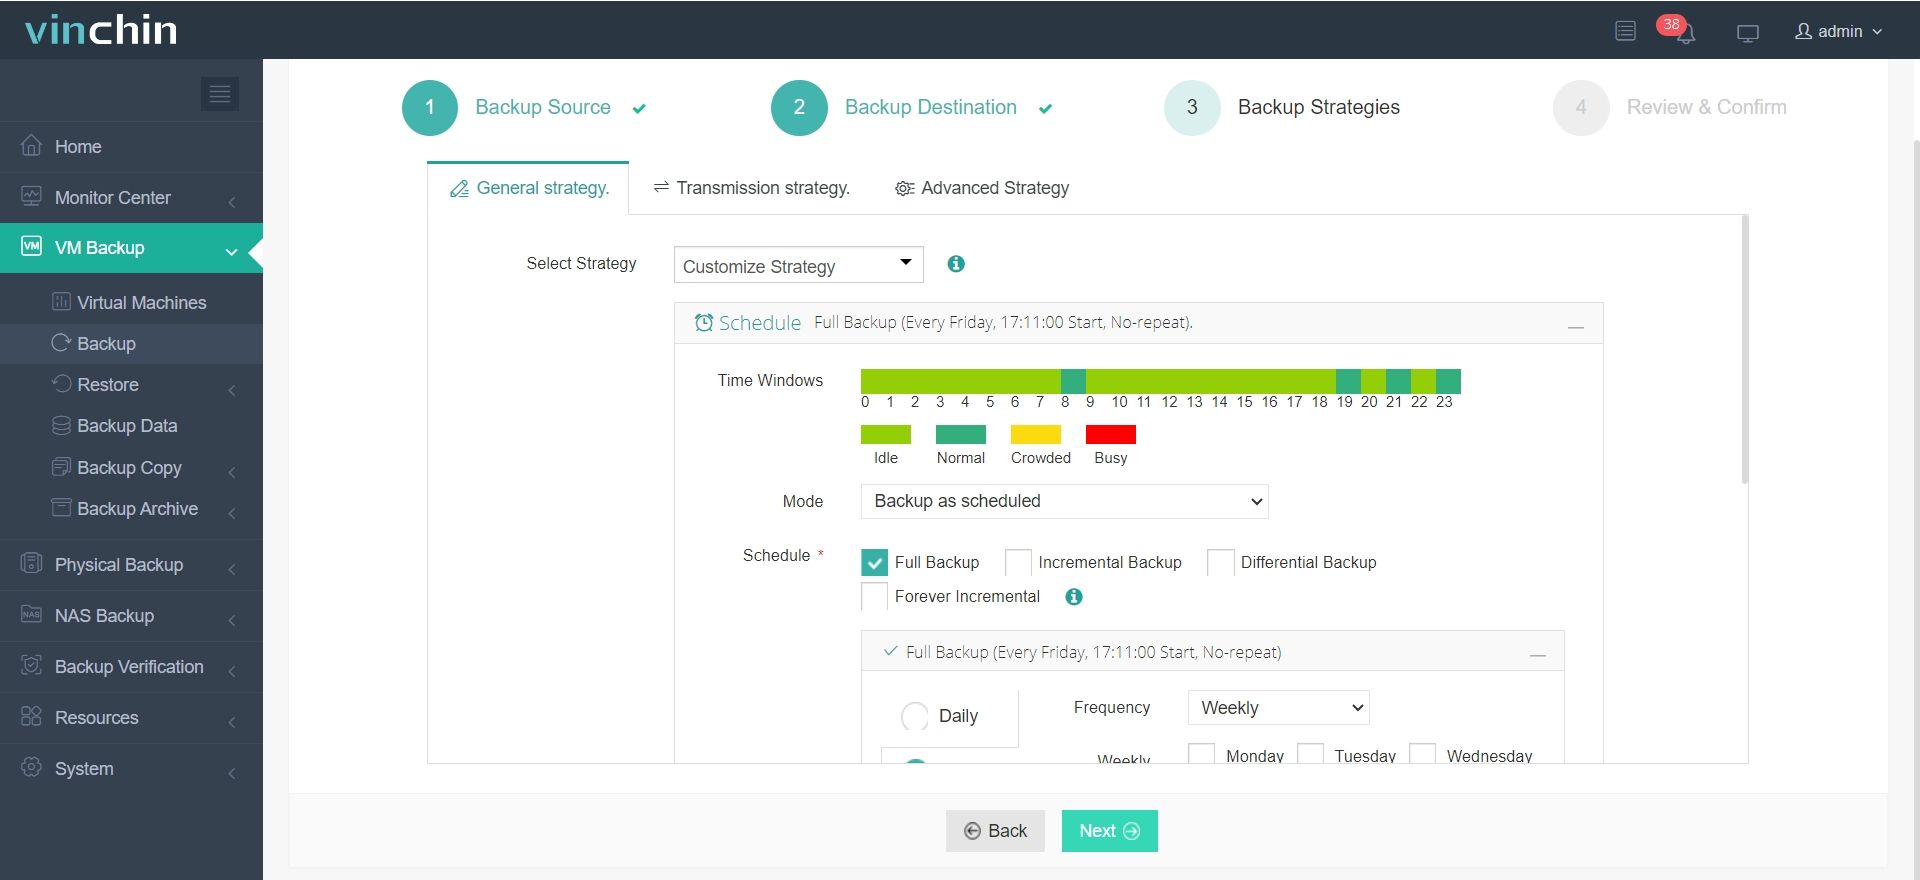
4. Submit and run the job
Start a 60-day full-featured free trial to protect your virtual workloads.
ESXi SNMP Configuration FAQs
Q1: How to restore SNMP default settings?
Execute this command via SSH as root:
esxcli system snmp set --reset
Q2: Can I add multiple trap destinations?
Yes, separate multiple targets with commas:
--targets=192.168.10.50@161,my.monitor.local@162
Q3: Why cannot the monitoring server connect to ESXi?
Enable the SNMP firewall ruleset to open 161/162 ports.
Conclusion
Standardized ESXi SNMP setup ensures stable infrastructure monitoring, real-time alerts and efficient daily operation. To defend virtual environments against data loss and threats, deploy Vinchin enterprise backup for comprehensive, all-around workload protection.