-
What is vSphere Client?
-
What are Virtual Machines in vSphere?
-
How to Create VMs with vSphere Client?
-
Managing VMs Using vSphere Client
-
How to Backup VMware VM with Vinchin Backup & Recovery
-
VMware vSphere Client FAQs
-
Conclusion
Virtualization has changed how IT teams manage servers and applications. At the heart of this shift is the vm vsphere client—a powerful tool that lets you control your virtual machines with ease. Whether you're deploying new services or keeping critical workloads running smoothly, mastering the vSphere Client is essential for any operations administrator.
What is vSphere Client?
The vSphere Client is VMware's main graphical interface for managing virtual infrastructure. It connects to either a vCenter Server or directly to an ESXi host so you can handle installations, monitor resources, configure settings, and manage inventory objects—all from one place.
Originally released as a Windows application (“vSphere Client”), it has evolved into a modern HTML5 web client accessible through your browser by entering your vCenter Server or ESXi host address followed by /ui. This shift means you no longer need to install extra software on your workstation; just open Chrome or Firefox and log in securely.
With the vm vsphere client interface, you can:
Create new VMs
Allocate CPU/memory resources
Monitor performance metrics
Manage storage and networking
Set permissions and roles
This flexibility makes it a central hub for daily operations in any VMware-powered data center.
What are Virtual Machines in vSphere?
A virtual machine within vSphere acts like a physical server but runs entirely as software on an ESXi host. Each VM contains its own operating system (OS), applications, disks, memory allocation—and operates independently from other VMs on the same hardware.
You create VMs to run different workloads: file servers, databases, test environments—the possibilities are endless. With vm vsphere client tools at your fingertips, you can quickly deploy new VMs when business needs change or scale up existing ones without buying more physical hardware.
VMs are managed through resource pools that let you allocate CPU cycles or RAM based on priority or workload type—giving fine-grained control over performance and cost efficiency.
How to Create VMs with vSphere Client?
Creating a new VM is often your first step when rolling out new services or testing software updates. The vm vsphere client streamlines this process while offering plenty of customization options along the way.
Before starting:
Make sure you have permission to create VMs on your chosen cluster or host.
Check available datastore space.
Decide which OS version you'll install later; this affects compatibility choices during setup.
Here's how to create a VM using the latest HTML5-based vSphere Client:
1. Log In: Open your browser and enter https://<your-vcenter-or-esxi>/ui. Enter credentials then click LOGIN.
2. Navigate Inventory: Click Hosts and Clusters in the left pane.
3. Start New VM Wizard: Right-click your target host/cluster > select New Virtual Machine under Actions.
4. Select Creation Type: Choose Create a new virtual machine, then click NEXT.
5. Name & Location: Enter a unique name; pick destination folder/datacenter; click NEXT.
6. Select Compute Resource: Choose which ESXi host/cluster will run this VM; click NEXT.
7. Select Storage: Pick a datastore with enough free space; click NEXT.
8. Select Compatibility Level: Here's where operational nuance matters! Choosing newer hardware versions (like “ESXi 8.x”) unlocks features such as NVMe controllers—but restricts migration to older hosts lacking support (VMware Docs). Always verify all hosts’ compatibility before selecting higher versions if live migration is important for your environment.
9. Select Guest OS Family/Version: Pick Windows/Linux/Other plus specific version—this sets optimal defaults for drivers/devices.
10. Customize Hardware Settings: Adjust CPUs/RAM/disk size/network adapters as needed; add devices if required.
11. Configure CD/DVD Drive for OS Installations: Attach ISO image from datastore/content library if installing an OS now; check “Connect At Power On.”
12. Review Settings & Finish Setup: Double-check everything then click FINISH
13. After creation completes:
Select newly created VM > Click toolbar's green triangle (Power On)
Open console via "Launch Web Console"
14. Proceed with standard OS installation steps inside guest console window just like physical hardware setup
15. When done installing OS:
From summary page select "Install VMware Tools"
Follow prompts inside guest OS installer window
Your new virtual machine is now ready!
Managing VMs Using vSphere Client
Managing VMs goes beyond powering them up—it includes monitoring health/performance metrics, adjusting resources dynamically as needs change, taking snapshots before risky changes—and troubleshooting problems fast when they arise.
Task1: Power Operations
To power on/off/restart any VM:
1) Select desired VM from inventory tree
2) Use toolbar icons (Power On, etc.) OR right-click > choose appropriate option under "Power"
For graceful shutdowns always use "Shut Down Guest OS", not hard power-off unless absolutely necessary!
Task2: Editing Resources & Settings
Need more CPU cores? Want to attach another disk?
1) Right-click target VM > select "Edit Settings"
2) Adjust CPUs/memory/disks/networks/etc.; some changes require powering off first
3) Click "OK"
Task3: Snapshot Management
Snapshots capture exact state of both disk/memory at one moment—useful before upgrades/config changes so rollback is easy if something breaks later!
To take snapshot:
1) Right-click target VM > choose "Snapshots → Take Snapshot"
2) Name it clearly + add description
3) Click "OK"
Important best practice: Avoid keeping snapshots longer than 72 hours—they grow dynamically over time which can fill datastores unexpectedly leading to outages! Regularly review via "Snapshot Manager."
To revert back after issues:
Right-click > Snapshots → Revert To Latest Snapshot
Task4: Accessing Console Remotely
For direct interaction with guest desktop:
1) Select desired VM
2) Click "Launch Web Console"
This opens browser-based session suitable for most tasks—but note USB passthrough/multi-monitor setups require standalone "VMware Remote Console"
Task5: Monitoring Performance Metrics
Stay ahead of bottlenecks by checking resource usage regularly:
1) Select any running VM
2) Go to top tabs → choose "Monitor"
See live graphs/tables showing CPU/RAM/disk/network stats at-a-glance!
Task6: Managing Files & Storage Locations
Sometimes you need direct access to underlying files—for example uploading ISOs/logs/scripts:
1) Navigate left pane → select relevant Host
2) Under "Related Objects," find Datastores section
3) Launch "Datastore Browser," navigate folders/upload/download files easily
Task7: Cloning/Migrating Virtual Machines
Need identical copy elsewhere? Or want to move workload between hosts/datastores?
Right-click source VM → choose either "Clone To Virtual Machine" OR "Migrate"
Follow wizard prompts carefully—ensure destination supports selected compatibility/hardware level!
How to Backup VMware VM with Vinchin Backup & Recovery
When considering robust backup strategies for VMware environments managed via vm vsphere client, Vinchin Backup & Recovery stands out as an enterprise-level solution supporting over 15 mainstream virtualization platforms—including VMware, Hyper-V, Proxmox, oVirt, OLVM, RHV, XCP-ng, XenServer, OpenStack, ZStack and more—making it highly versatile across diverse infrastructures.
Vinchin Backup & Recovery delivers advanced features tailored for efficient protection of VMware workloads such as quiesced snapshot support for consistent backups during active operations; Changed Block Tracking (CBT), which accelerates incremental backups by transferring only modified data blocks; instant recovery capabilities that minimize downtime after failures; granular restore options down to individual files within guests; and built-in deduplication/compression technologies that optimize storage utilization while reducing backup windows overall.
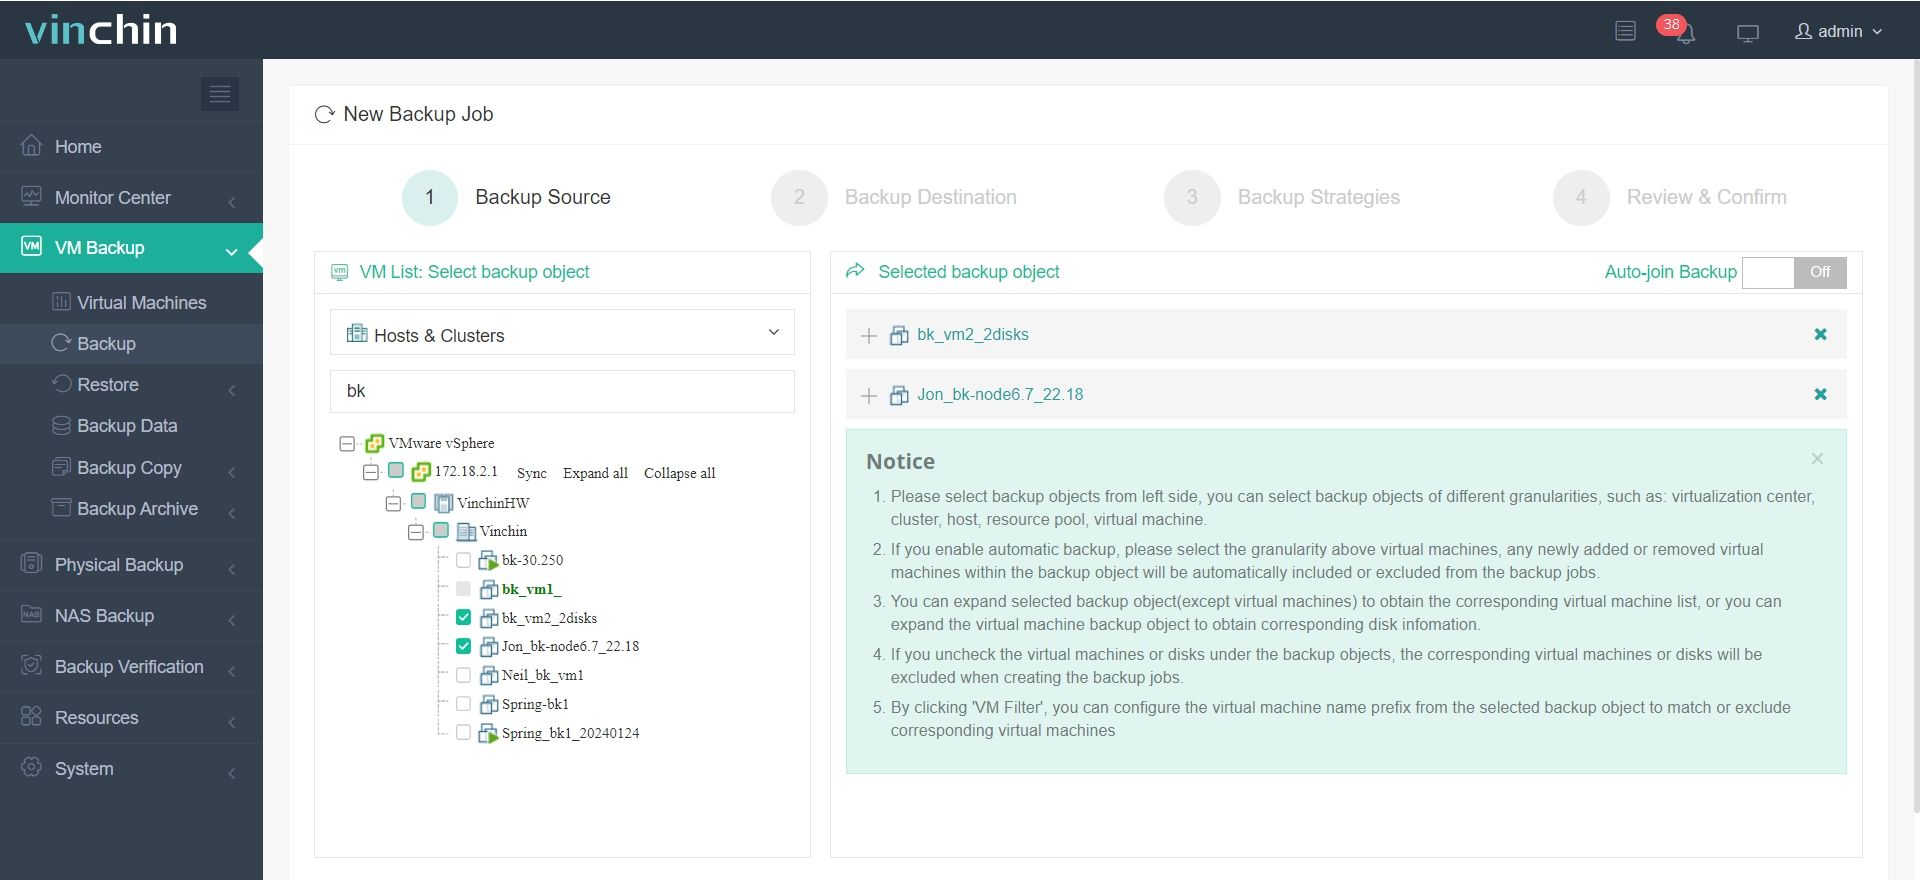
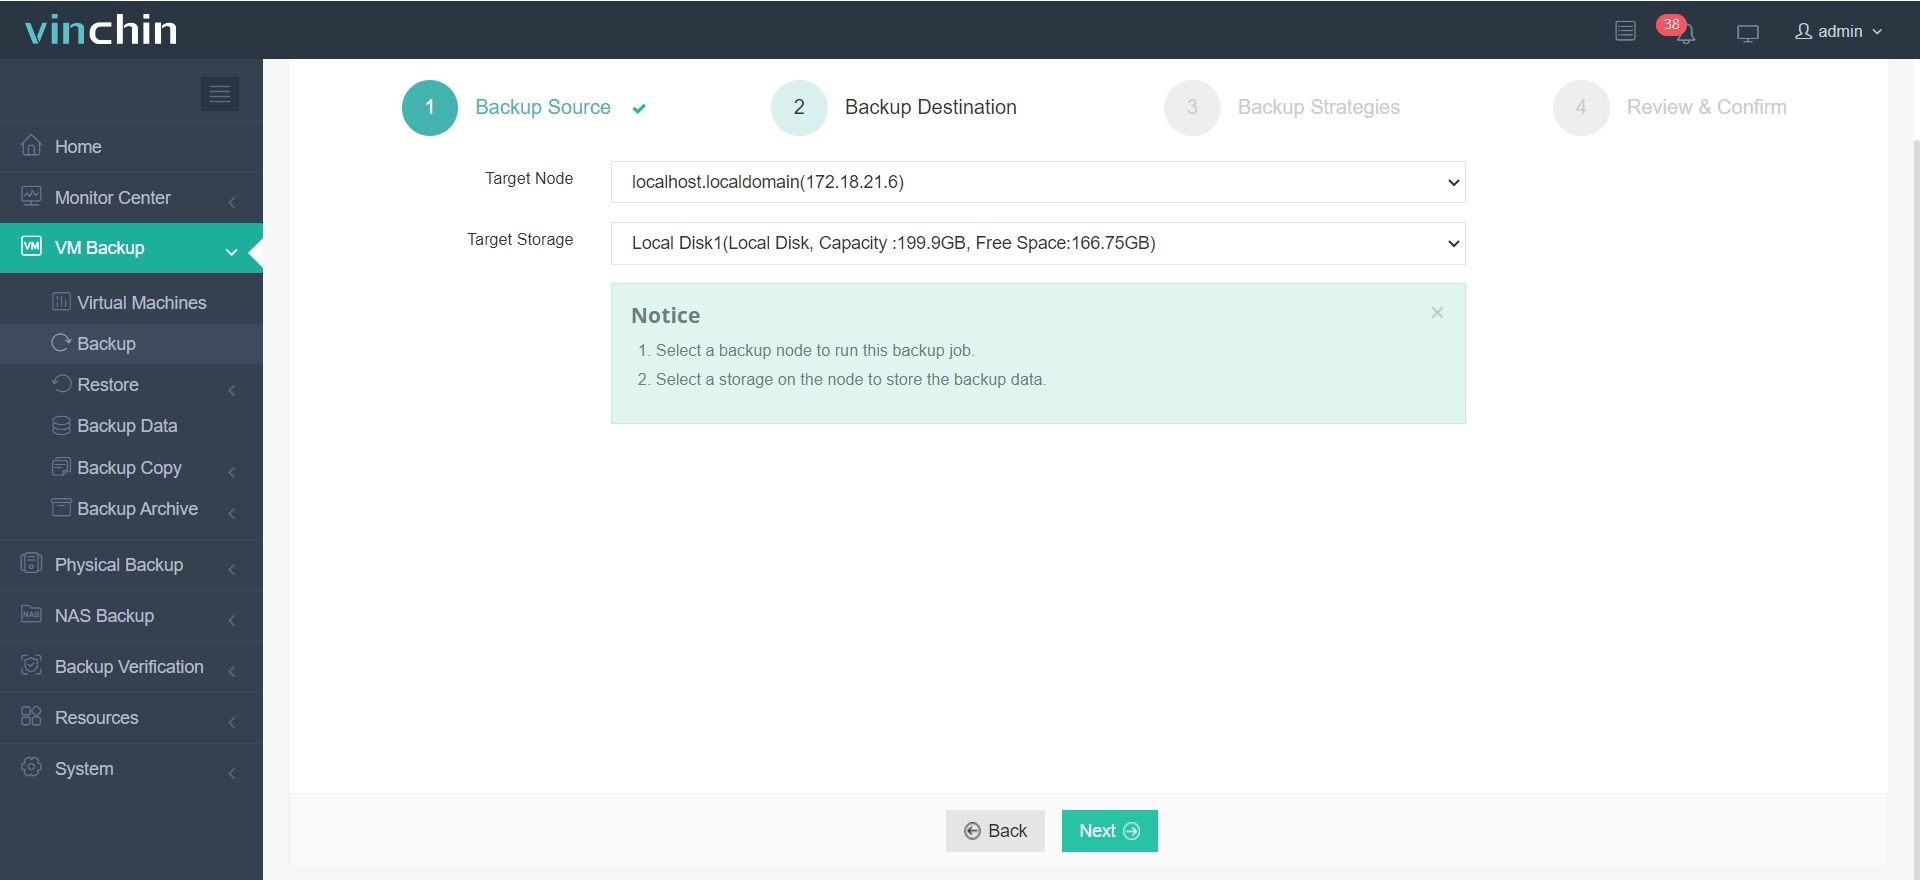
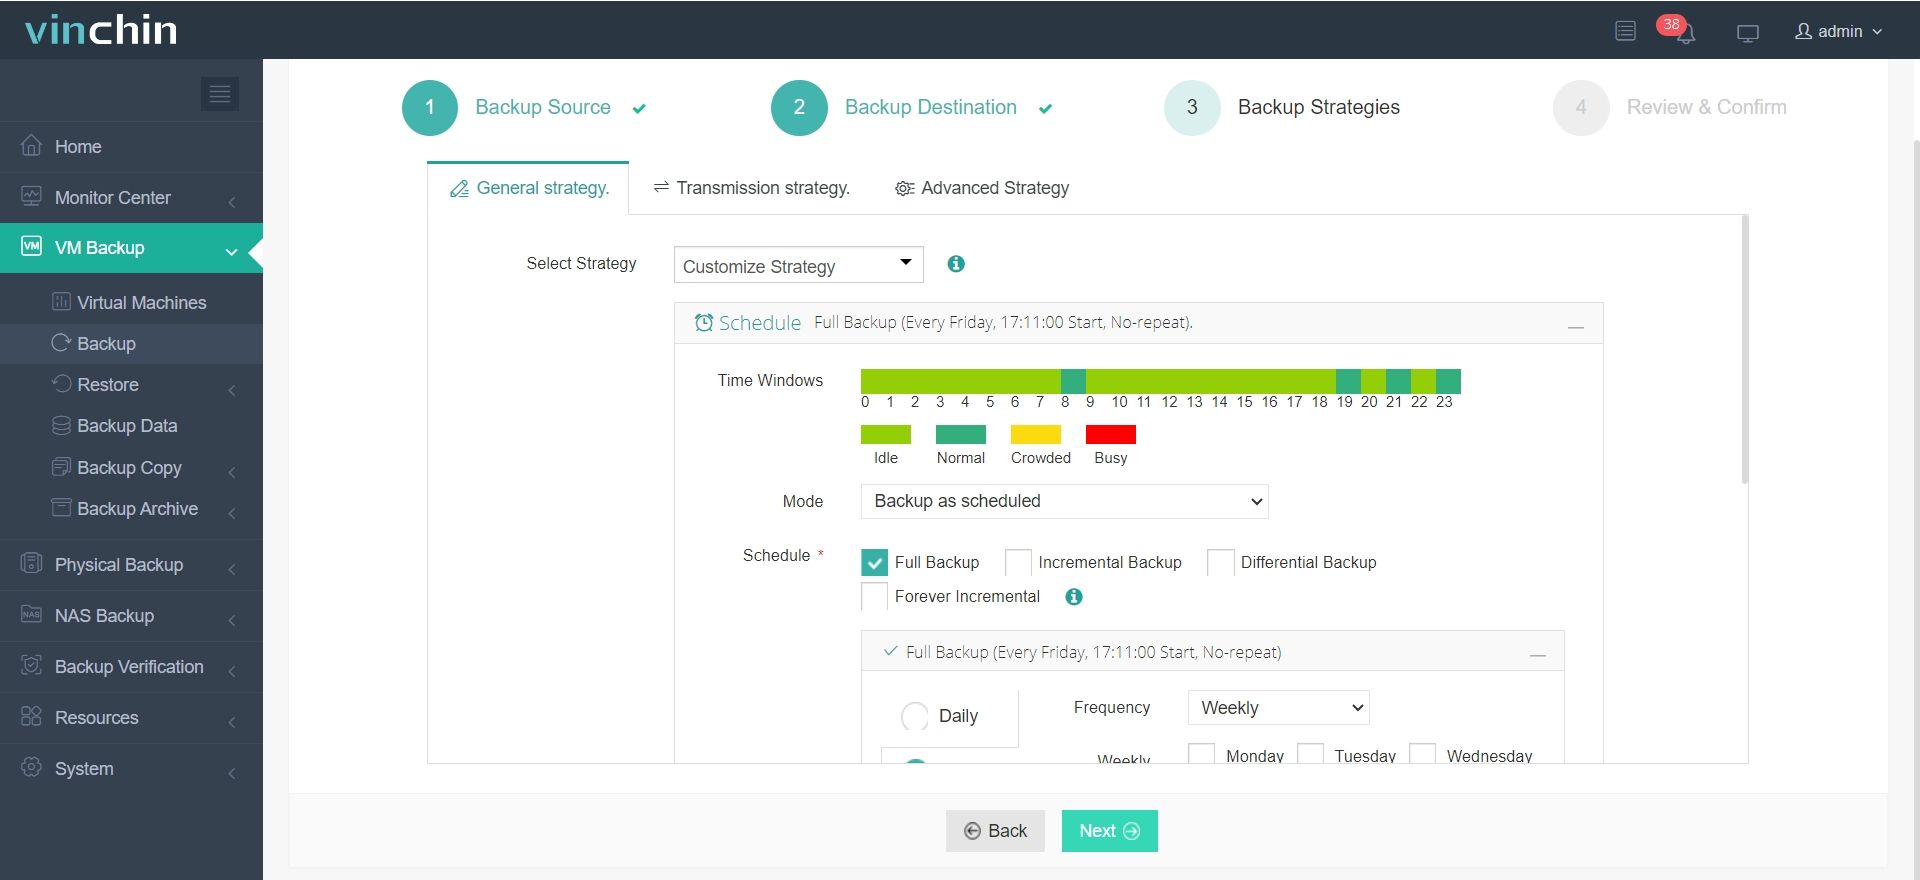
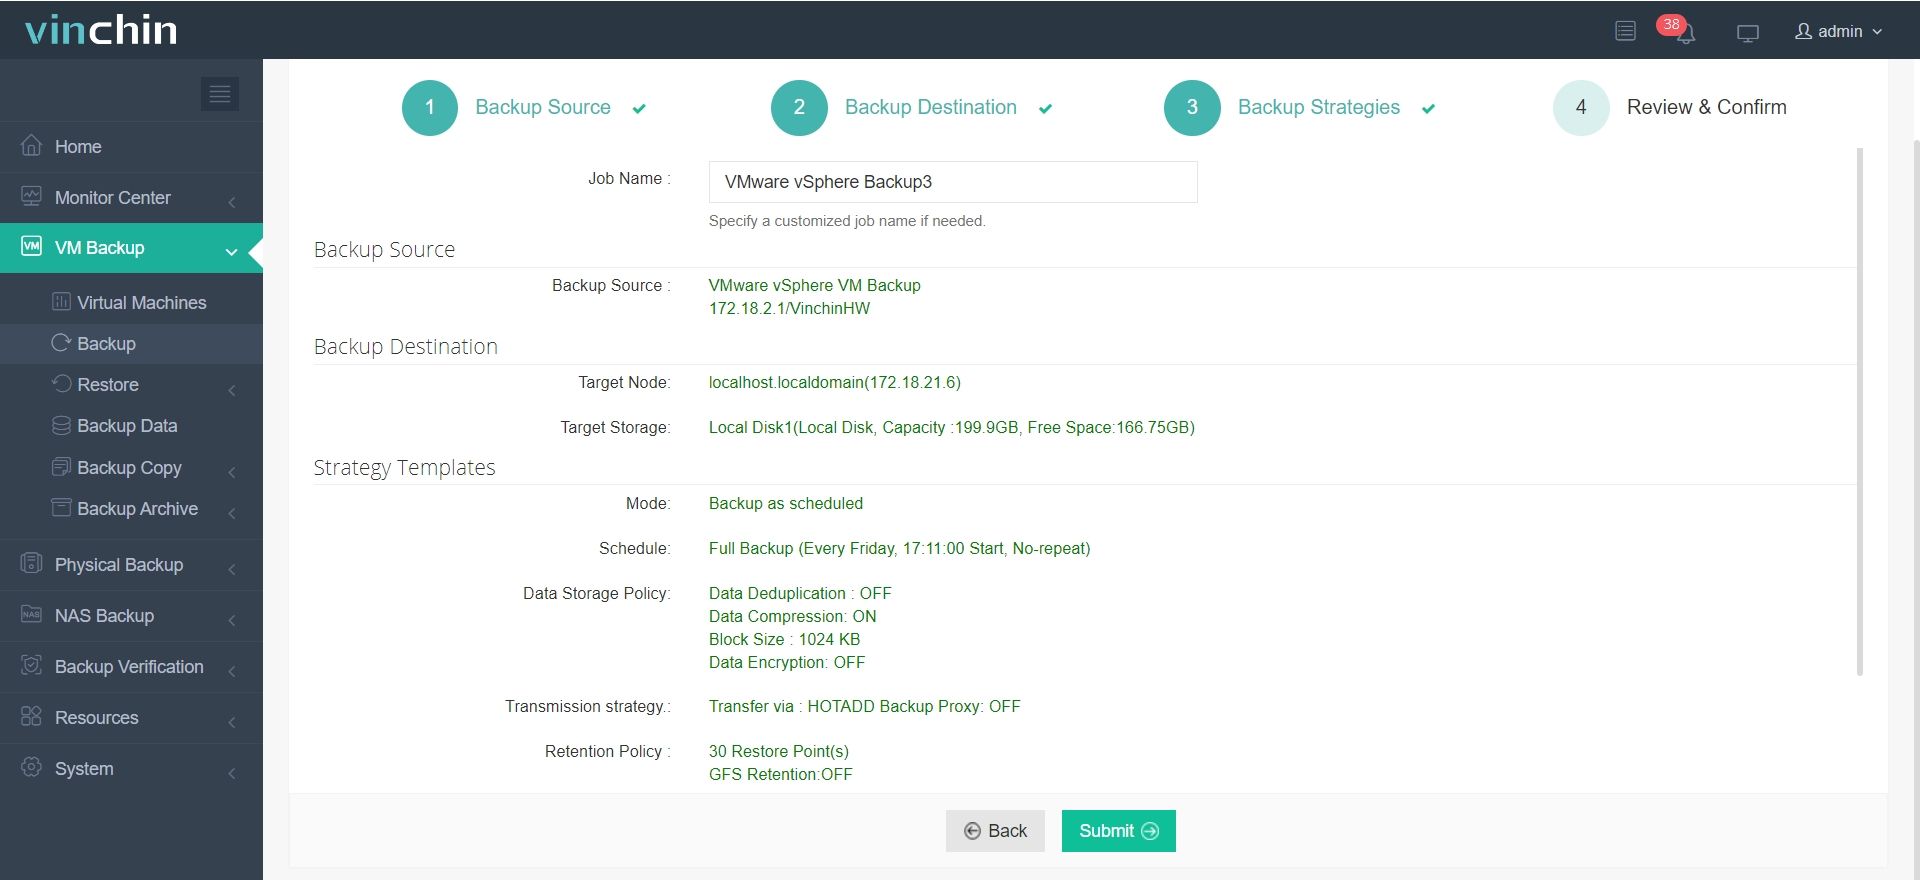
The intuitive web console of Vinchin Backup & Recovery simplifies backup management into four straightforward steps:
1.Just select VMware VMs on the host

2.Then select backup destination

3.Select strategies

4.Finally submit the job

Recognized globally among enterprise users—with strong customer satisfaction ratings—Vinchin Backup & Recovery offers a fully-featured 60-day free trial so you can experience comprehensive data protection firsthand before committing further.
VMware vSphere Client FAQs
Q1: How do I recover access if my browser says Flash Player is required?
A1: Use modern HTML5 interface by browsing directly to https://<vcenter-server>/ui then logging in normally with supported browsers like Chrome or Firefox.
Q2: Why can't I migrate my powered-on virtual machine even though compatibility looks correct?
A2: Check that Enhanced vMotion Compatibility (EVC) mode matches across all cluster hosts via Cluster→Configure→VMware EVC tab—mismatched baselines block migrations despite matching hardware levels elsewhere!
Q3: What should I do if my newly created virtual machine doesn't appear in inventory after setup?
A3: First check Recent Tasks/events logs for errors during creation process—in case of silent failure browse Datastore manually then right-click missing .vmx file choosing Add To Inventory option if present.
Conclusion
Mastering vm vsphere client skills empowers administrators at every stage—from deployment through daily management/troubleshooting—to deliver reliable IT services efficiently at scale! For robust protection across all major virtualization platforms consider Vinchin's proven enterprise backup solution today.
Share on:


