-
Prerequisites for Proxmox live migration
-
How to perform live migration in Proxmox?
-
Enhancing Proxmox live migration with Vinchin Backup & Recovery
-
Proxmox Live Migration FAQs
-
Conclusion
Live Migration is a crucial feature offered by Proxmox VE, enabling the seamless transfer of running VMs between cluster nodes without service interruption. This technology plays a vital role in ensuring high availability (HA), load balancing, and planned hardware maintenance. With live migration, administrators can perform node maintenance and resource optimization without disrupting the VM's operation, ensuring continuous and stable service delivery. In this guide, it will cover how to configure and execute live migration in Proxmox, helping you leverage this feature to enhance the reliability and scalability of your virtualized environment.
Prerequisites for Proxmox live migration
1. Cluster Configuration
Live migration relies on a Proxmox cluster. Here's how to create one:
Create a cluster on the primary node:
pvecm create my-cluster
Join other nodes to the cluster:
pvecm add <primary-node-ip>
Verify cluster status:
pvecm status
2. Configure Shared Storage
Shared storage ensures that all nodes have access to the VM disk images. Common options include:
NFS Share:
apt install nfs-common
mount <nfs-server-ip>:/shared-storage /mnt/nfs
iSCSI + LVM:
iscsiadm -m discovery -t sendtargets -p <iscsi-server-ip>
iscsiadm -m node --login
pvcreate /dev/sdX
vgcreate vg_iscsi /dev/sdX
Ceph RBD:
pveceph install
ceph-deploy new <node-names>
Shared storage can be added via the web interface: Datacenter > Storage > Add
3. Ensure Resource Availability
The target node must have sufficient CPU, memory, and storage resources. Proxmox automatically checks these requirements before initiating migration.
How to perform live migration in Proxmox?
Step 1: Initiate Live Migration
1. Using the Web Interface
Select the VM you want to migrate
Click Migrate
Choose the target node from the list
Click Start migration
2. Using the Command Line
qm migrate <vmid> <target-node>
Example: Migrate VM 103 to node2
qm migrate 103 node2
Step 2: Understanding the Migration Process
1. Pre-Copy Phase
Most memory pages are copied from the source node to the target node while the VM continues to run.
2. Synchronization and Pause Phase
The VM is paused for a few milliseconds to synchronize the remaining memory pages and CPU state.
3. Resume Phase
The VM resumes operation on the target node with minimal downtime.
Step 3: Advanced Configuration and Optimization
1. Optimize Migration for Large VMs
Use high-speed networks (e.g., 10GbE) to accelerate data transfer.
Enable compression to improve transfer efficiency:
qm migrate --with-local-disks --online --compress <vmid> <target-node>
2. Migrate Local Disks
If the VM uses local storage, add the following parameter:
qm migrate <vmid> <target-node> --with-local-disks
Step 4: Post-Migration Verification
1. Check VM Status via Web Interface or CLI
qm status <vmid>
2.Check Resource Distribution
3.Ensure that resources are properly balanced across nodes.
Step 5: Troubleshooting Common Issues
1. Shared Storage Inaccessible
Ensure all nodes can access the shared storage.
Test the NFS mount:
ls /mnt/nfs
Verify iSCSI Session
iscsiadm -m session
2. CD/DVD Drive Mounting Causes Failure
qm set <vmid> -ide2 none
3. CPU Compatibility Issue
Enable CPU flag in the configuration file:
/etc/pve/qemu-server/<vmid>.conf
cpu: host
Step 6. High Availability and Automated Migration
1. Enable High Availability (HA)
Assign the HA role and set policies through the Web interface: Datacenter > HA > Add
restart: Automatically restart the VM after node failure
migrate: Automatically migrate to another node
disabled: Do not enable HA
Check HA status:
ha-manager status
2. Automated Migration Script
Used to migrate all running VMs within the maintenance window:
!/bin/bash
SOURCE_NODE="node1"
TARGET_NODE="node2"
for VMID in $(qm list | grep running | awk '{print $1}'); do
    echo "Migrating VM $VMID from $SOURCE_NODE to $TARGET_NODE..."
    qm migrate $VMID $TARGET_NODE --onlinedone
Enhancing Proxmox live migration with Vinchin Backup & Recovery
During the live migration of virtual machines, although Proxmox VE provides an efficient mechanism, data integrity and system security throughout the migration process remain key concerns for IT administrators. To ensure a smooth migration and minimize potential risks, leveraging a reliable VM protection solution is essential.
Vinchin Backup & Recovery supports real-time backup and recovery of virtual machines, offering strong protection for migration operations within Proxmox virtualized environments. Before initiating a migration task, administrators can use Vinchin to create consistent backups, ensuring that in the event of unexpected issues—such as migration interruptions or system failures—the VM can be quickly rolled back and restored, minimizing the risk of business disruption. Additionally, Vinchin’s centralized management, task automation, and pre-migration backup capabilities enable IT teams to efficiently handle large-scale migration tasks, making it particularly suitable for enterprise environments with high demands for business continuity.
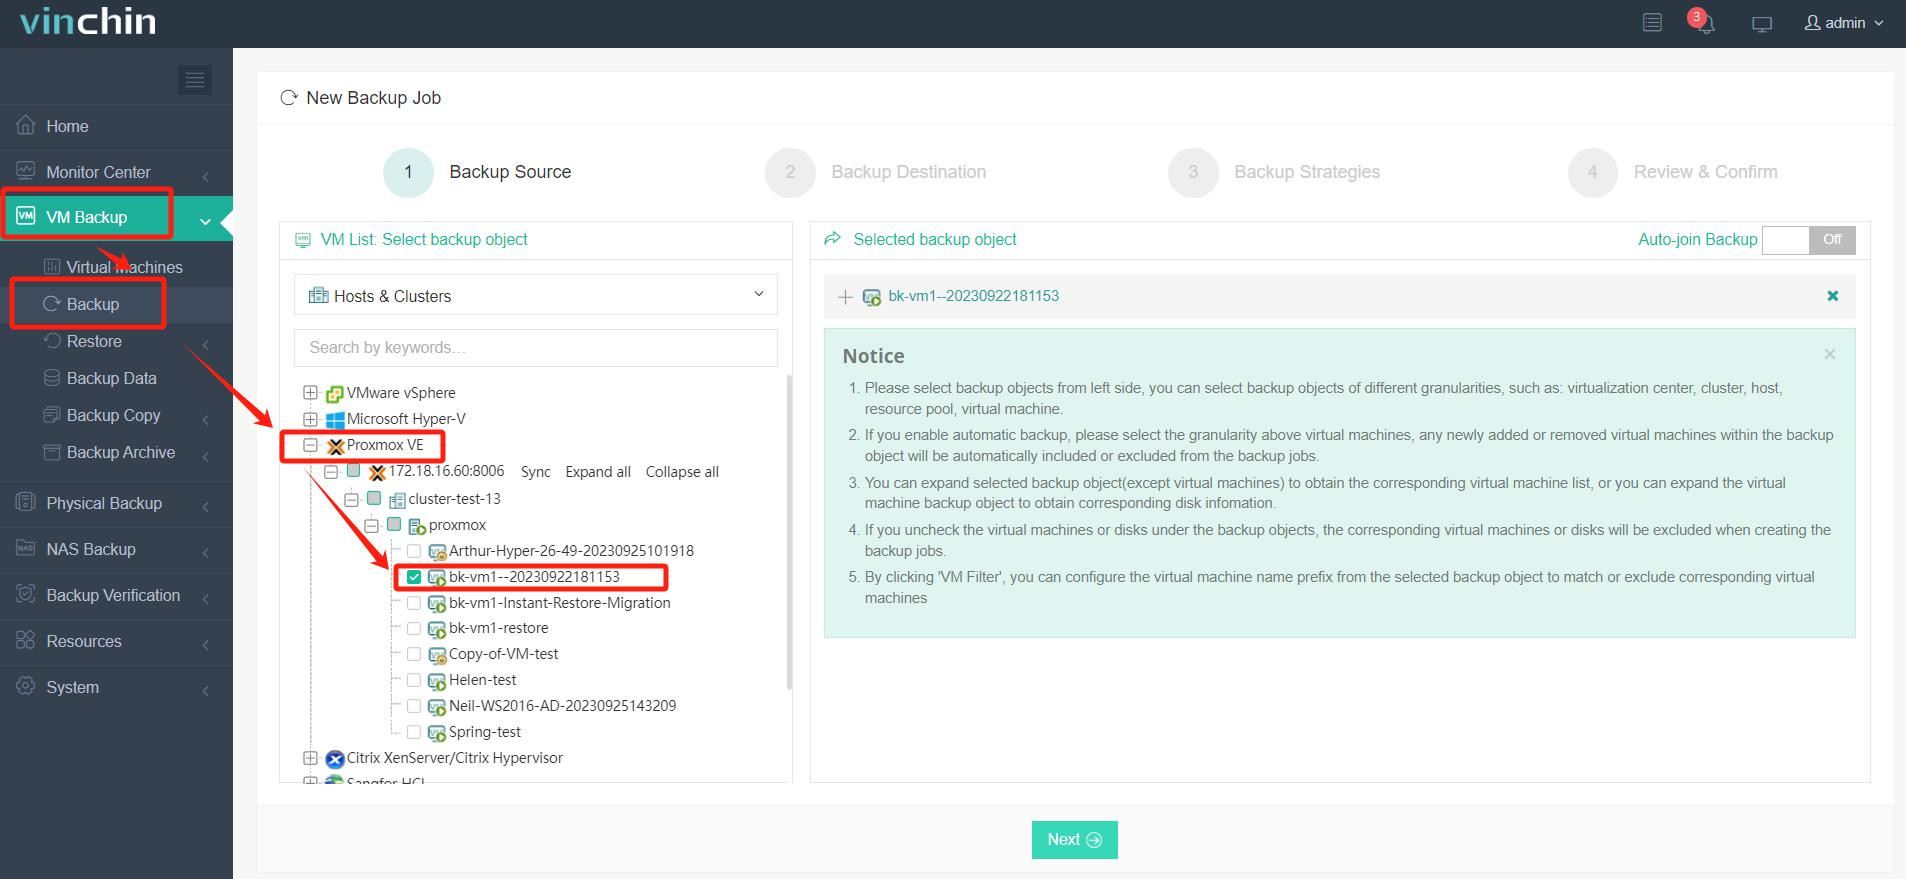
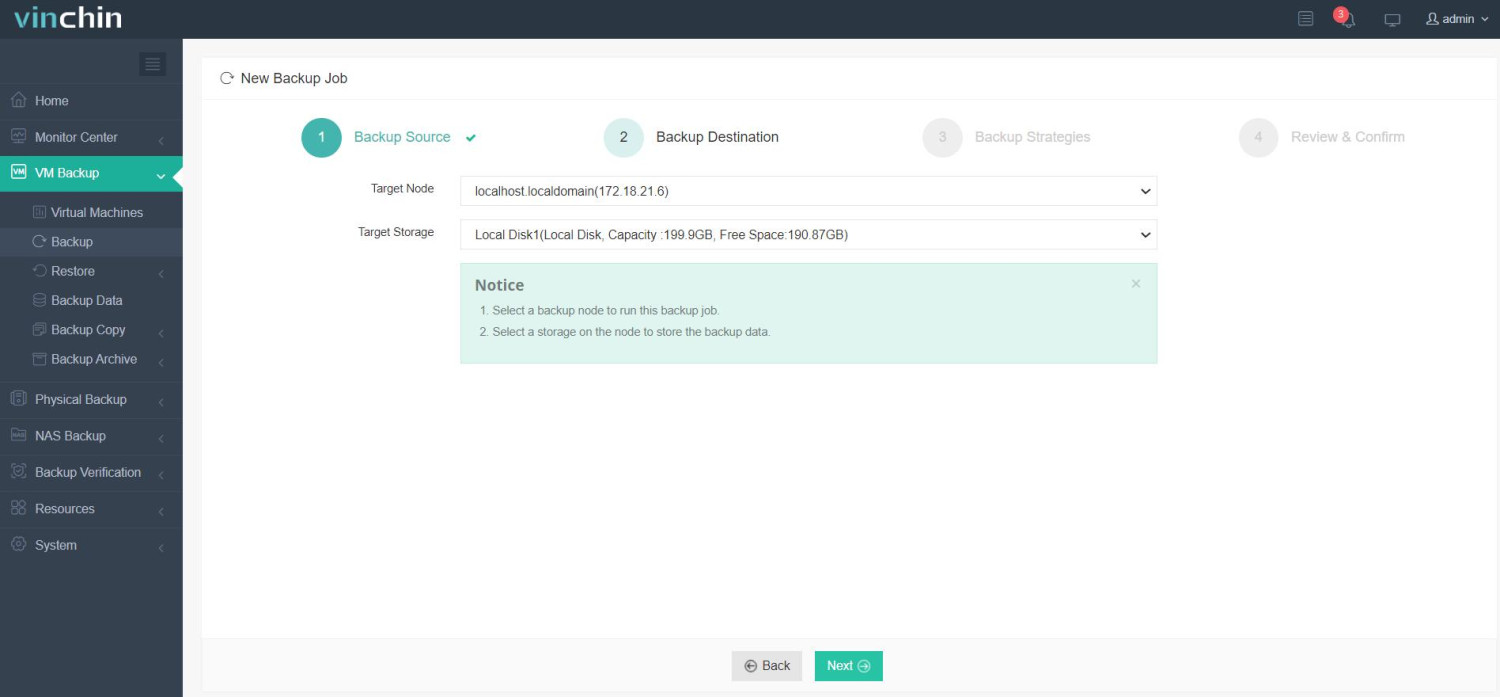
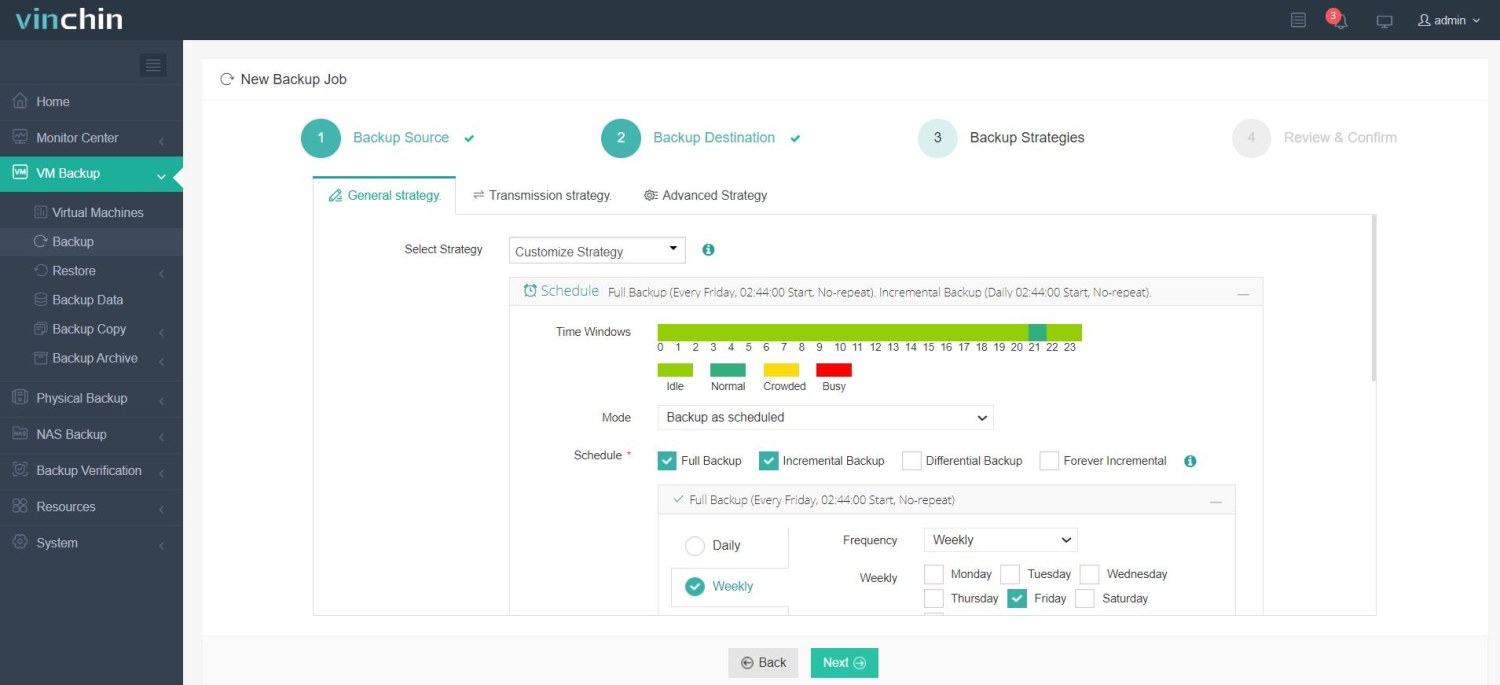
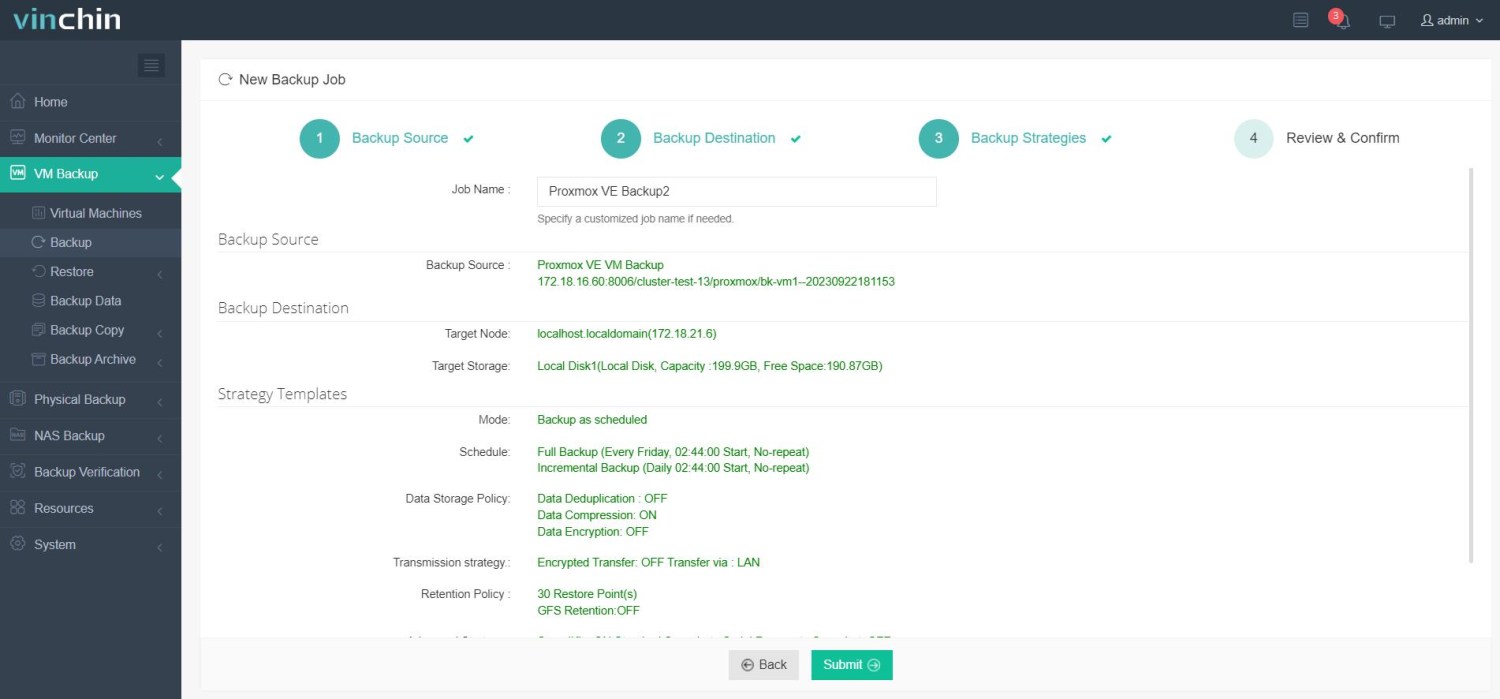
Vinchin Backup & Recovery's operation is very simple, just a few simple steps.
1.Just select VMs on the host

2.Then select backup destination

3.Select strategies

4.Finally submit the job

Vinchin Backup & Recovery not only ensures secure and efficient live VM backup during migration but also supports V2V migration, enabling seamless workload transfer across different virtualization platforms. This makes it an ideal solution for businesses undergoing infrastructure upgrades or platform transitions. Vinchin offers a free 60-day trial for users to experience the full functionality in a real-world setting. For more information, please contact Vinchin directly.
Proxmox Live Migration FAQs
Q1: What types of live migration does Proxmox support?
A1: Proxmox supports:
Regular live migration (for VMs)
Storage live migration (changing storage while migrating)
Local live migration (between nodes in the same cluster)
Q2: What is the difference between migration and live migration?
A2: Regular migration requires the VM to be stopped, while live migration keeps the VM running with minimal downtime (typically <1 second).
Conclusion
Proxmox live migration ensures seamless VM transfer with minimal downtime, supporting high availability and resource optimization. By integrating Vinchin Backup & Recovery, administrators can enhance migration reliability and minimize risks, ensuring smooth transitions and business continuity across virtualized environments.
Share on:


