-
What is XCP-ng live migration?
-
How to perform XCP-ng live migration using XenCenter?
-
How to migrate XCP-ng VM without downtime using the CLI?
-
Optimization and troubleshooting during XCP-ng live migration
-
How to easily migrate to XCP-ng with Vinchin?
-
XCP-ng live migration FAQs
-
Conclusion
Live migration is a critical capability in modern virtualization. It allows administrators to move active virtual machines between hosts without downtime. This ensures continuous service availability during maintenance, load balancing, or hardware upgrades. In XCP-ng, live migration leverages XenMotion to transfer a VM’s memory, CPU state, and device context over the network, enabling seamless transitions between hosts.
What is XCP-ng live migration?
XCP-ng’s live migration feature, known as XenMotion, enables the transfer of running VMs between hosts within a resource pool. This process involves copying the VM’s memory pages and CPU state to the target host while the VM continues to operate. Once the majority of the memory is synchronized, the VM is briefly paused to transfer the remaining state, then resumed on the destination host. This brief pause is typically imperceptible to users.
Storage Considerations
Live migration requires careful planning of storage configurations:
Shared Storage: Utilizing shared storage solutions like NFS or iSCSI allows both source and destination hosts to access the same storage repository (SR). This simplifies migration, as only the VM’s memory and state need to be transferred.
Local Storage: If VMs reside on local storage, both hosts must have identically named SRs with matching UUIDs. This ensures that the VM’s disk references remain valid post-migration. Mismatched configurations can lead to migration failures or data inconsistency.
Network Requirements
A robust network infrastructure is essential for efficient live migration:
Bandwidth: A minimum of 1 Gbps is required, but 10 Gbps is recommended for larger VMs to reduce migration time.
Latency: Low-latency networks minimize the duration of the VM’s pause during the final synchronization phase.
Isolation: Implementing a dedicated migration network or VLAN can prevent migration traffic from impacting regular network operations.
How to perform XCP-ng live migration using XenCenter?
XenCenter provides a graphical interface for managing XCP-ng environments. To perform a live migration:
1. Select the VM in the Resources pane.
2. Click on Migrate to Server in the VM menu.
3. In the Migrate VM wizard, choose the destination host.
4. If necessary, select the appropriate storage repository.
5. Confirm the settings and initiate the migration.
How to migrate XCP-ng VM without downtime using the CLI?
For environments where scripting and automation are preferred, the xe command-line interface offers powerful capabilities:
1. Identify the VM and Host UUIDs:
xe vm-list name-label="VM_Name"
xe host-list name-label="Target_Host"
2. Check VM State:
xe vm-param-get uuid=<VM_UUID> param-name=power-state
3. Initiate Live Migration:
xe vm-migrate vm-uuid=<VM_UUID> host-uuid=<HOST_UUID> live=true
4. Monitor Migration Progress:
xe task-list
5. Verify VM Location:
xe vm-param-get uuid=<VM_UUID> param-name=resident-on
Optimization and troubleshooting during XCP-ng live migration
CPU Compatibility
Migrating VMs between hosts with different CPU models can lead to compatibility issues. XCP-ng uses CPU masking to present a uniform CPU feature set across hosts. Administrators can configure CPU features using:
xe host-set-cpu-features host-uuid=<HOST_UUID> features=<FEATURES>
It’s important to note that masking CPUs to the lowest common denominator may impact performance.
Network Optimization
To enhance migration performance:
Enable Jumbo Frames: Configure the network to use an MTU of 9000 bytes to reduce overhead. Ensure all network devices along the path support this setting.
xe network-param-set uuid=<NETWORK_UUID> MTU=9000
Dedicated Migration Network: Isolate migration traffic by configuring a separate network interface:
xe pif-reconfigure-ip uuid=<PIF_UUID> mode=static IP=<IP_ADDRESS> netmask=<NETMASK> gateway=<GATEWAY>
Troubleshooting Common Issues
Migration Failures: Check for sufficient resources on the destination host and ensure network connectivity.
CPU Incompatibility: Use xe host-cpu-info to compare CPU features between hosts.
Network Timeouts: Validate MTU settings with:
ping -s 8972 <DESTINATION_IP>
A successful ping indicates proper jumbo frame configuration.
How to easily migrate to XCP-ng with Vinchin?
To streamline your migration workflow beyond native tools, consider Vinchin Backup & Recovery, a solution trusted by enterprises worldwide.
Vinchin is a professional, enterprise-grade backup solution that also supports agentless virtual machine migration, helping businesses seamlessly move to new virtual environments while minimizing impact on production systems. Combined with its CDP functionality, it can perform live migrations with the help of an agent. Vinchin supports a wide range of virtualization platforms, including VMware, Hyper-V, Proxmox, oVirt, OLVM, RHV, XCP-ng, XenServer, and OpenStack, and enables migrations between on-premise servers and cloud environments such as VMware to AWS EC2.
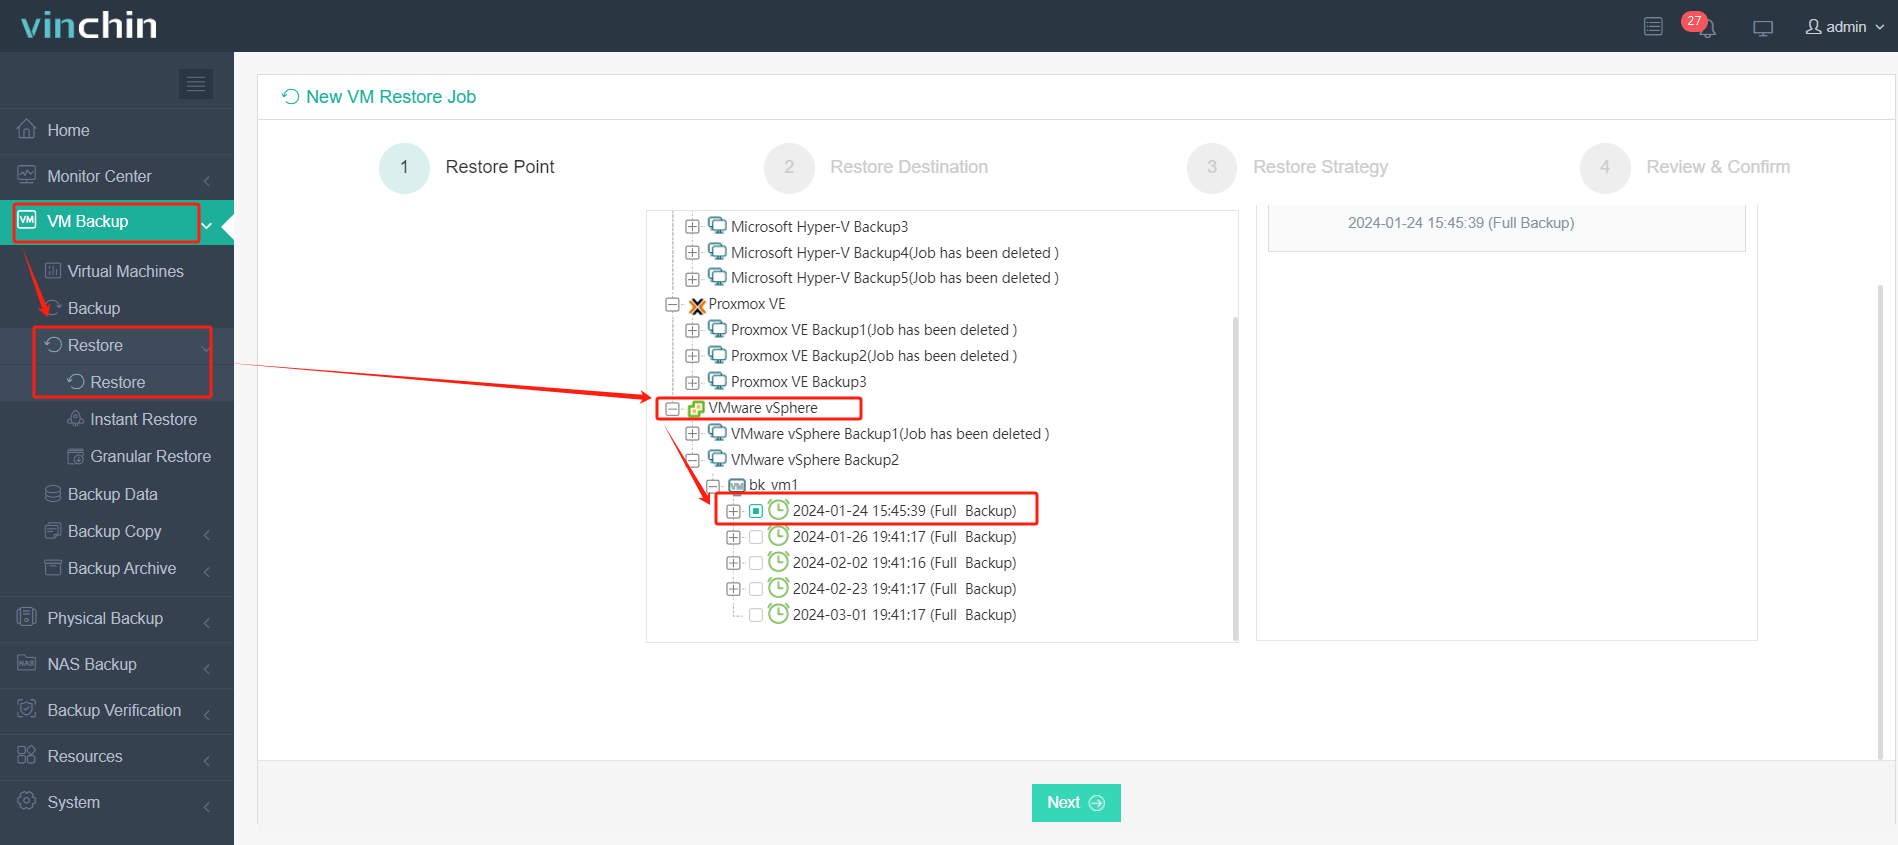
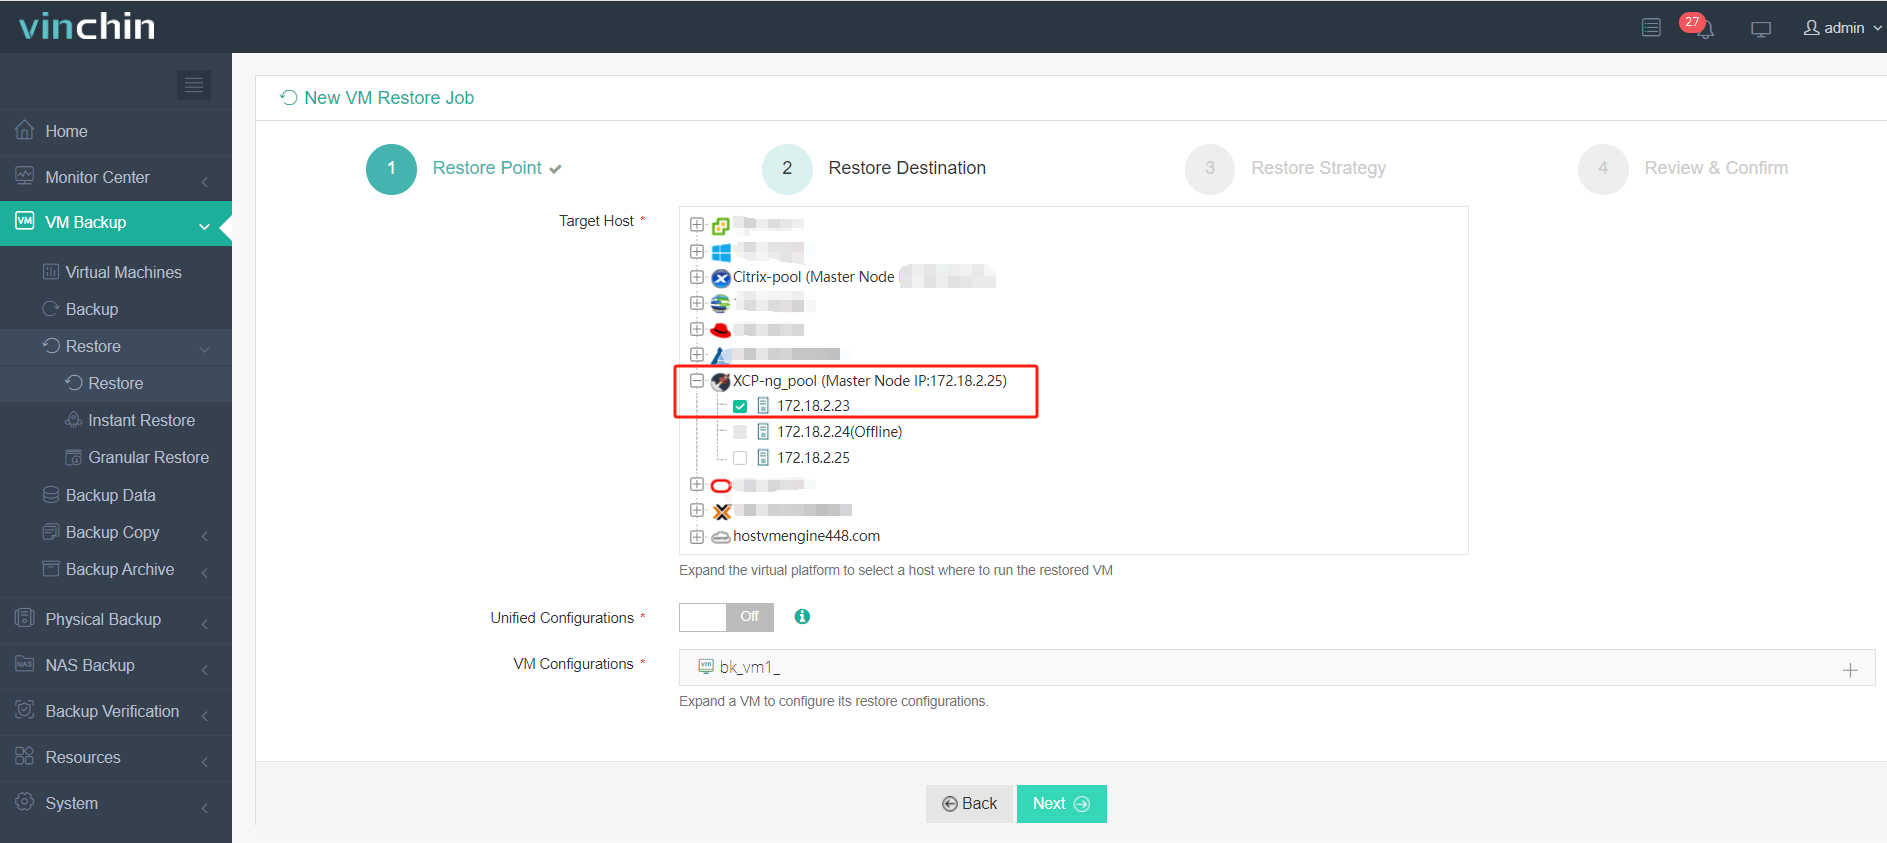
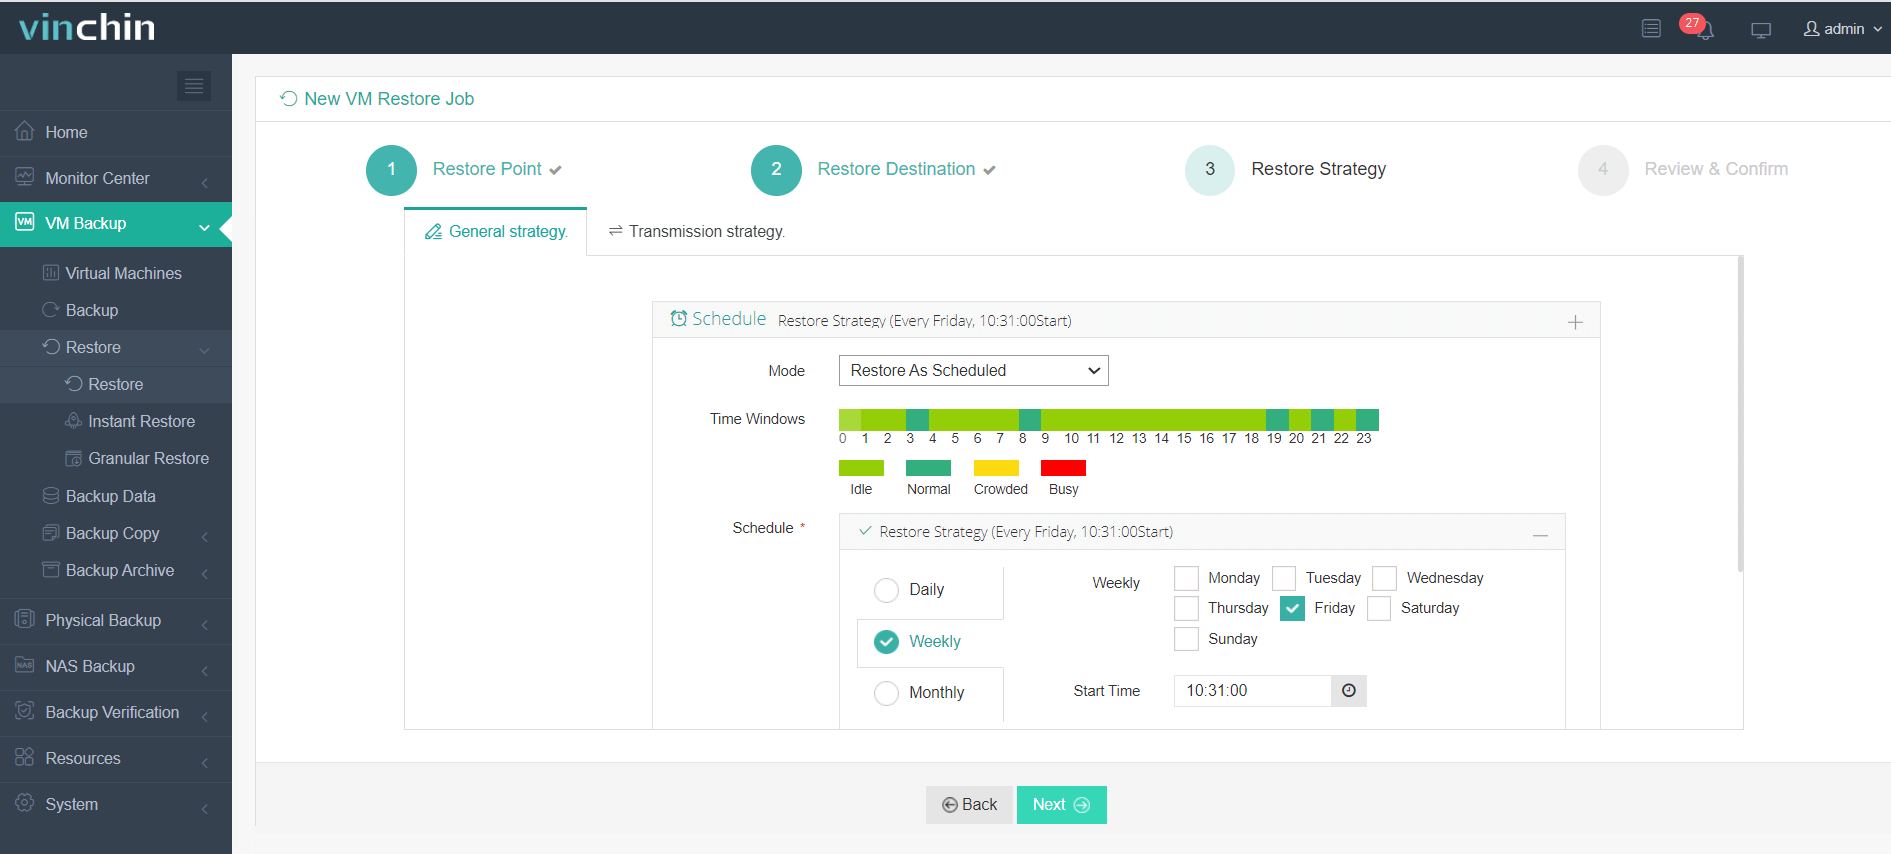
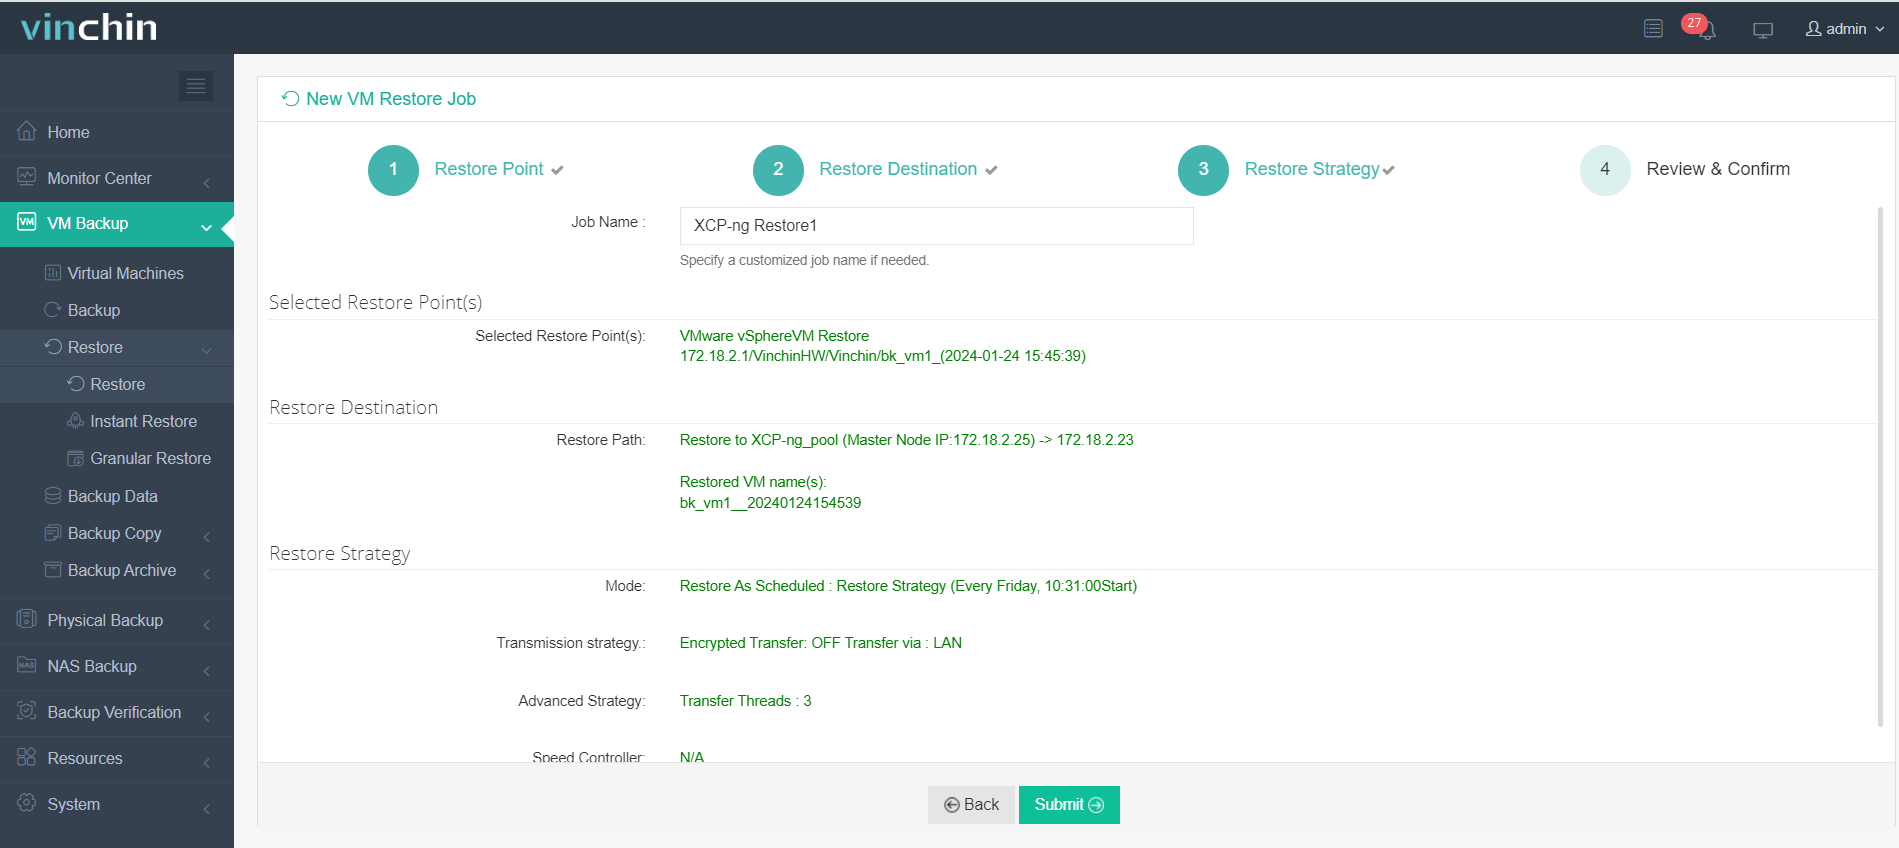
Vinchin’s VM migration process is extremely simple: just backup the source VM and then restore it to the target host to power it on. You can easily create VM backup tasks in Vinchin’s user-friendly web console and then migrate VMs to your chosen target host. Let's take VMware to XCP-ng as an example.
1. Select the backed-up VMware virtual machine.

2. Select the target XCP-ng host.

3. Select the migration strategies.

4. Submit the job.
With over 30,000 customers in 170+ countries and top industry ratings, Vinchin offers a 60-day full-featured free trial to test all features risk-free.
XCP-ng live migration FAQs
Q1: How can I estimate the time required for live migration?
A1: Divide the total data size by the network speed; for example, migrating 100 GB over a 10 Gbps network takes approximately 80 seconds.
Q2: What causes live migration to fail due to CPU incompatibility?
A2: Differences in CPU instruction sets between hosts can prevent migration; use xe host-cpu-info to compare features.
Q3: How do I configure a dedicated migration network in XCP-ng?
A3: Use xe pif-reconfigure-ip to assign a static IP to a separate network interface for migration traffic.
Conclusion
Live migration in XCP-ng is a powerful feature that ensures high availability and flexibility in virtualized environments. By understanding the requirements and best practices, administrators can effectively manage VM migrations with minimal disruption. Vinchin complements this by offering an enterprise-grade, agentless solution that handles backup-based migrations and CDP for live cutovers. Start your migration journey today with Vinchin’s 60-day free trial—see how easy it can be to migrate, protect, and manage VMs across platforms.
Share on:


