-
What Are Azure and Proxmox?
-
Why Connect Azure With Proxmox?
-
Method 1: Migrating VMs From Proxmox to Azure using qemu-img and AzCopy
-
Method 2: Migrating VMs From Azure To Proxmox using VHD Export and qemu-img
-
How To Migrate Proxmox Virtual Machines With Vinchin?
-
Migrating Between Azure And Proxmox FAQs
-
Conclusion
Cloud platforms like Microsoft Azure and virtualization solutions such as Proxmox Virtual Environment (Proxmox VE) have become essential tools for modern IT teams. Many organizations use both to balance cost, control, scalability, or compliance needs. But what if you need to move virtual machines between these two platforms? This guide explains how to migrate VMs from Proxmox to Azure—and back again—with practical steps for every skill level.
What Are Azure and Proxmox?
Azure is Microsoft's public cloud platform. It provides scalable compute power, storage options, networking features, managed databases, and global reach for running Windows or Linux workloads.
Proxmox VE is an open-source virtualization platform that combines KVM-based virtual machines with LXC containers under a single web-based management interface. It's popular among businesses seeking flexibility without high licensing costs.
Both platforms are powerful but serve different purposes: Azure excels at cloud workloads with worldwide access; Proxmox shines in on-premises or private cloud deployments where you want full control over infrastructure.
Why Connect Azure With Proxmox?
Why would you want to connect these two environments? Many businesses run hybrid setups—some workloads stay on-premises for security or performance reasons while others move to the cloud for scale or disaster recovery. Sometimes you need temporary migrations for testing; other times you want permanent moves due to cost savings or regulatory demands.
By connecting Azure with Proxmox, you gain flexibility: migrate VMs as business needs change without being locked into one environment. You can test new software in the cloud before rolling it out locally—or quickly restore services on-premises if there’s a problem in the cloud.
Method 1: Migrating VMs From Proxmox to Azure using qemu-img and AzCopy
Moving a VM from Proxmox to Azure involves several key steps: preparing your VM so it works well in the cloud; converting its disk image into a format supported by Azure; uploading it; then creating a new VM in your target environment.
✅ Step 1. Preparing the Proxmox VM for Migration
Before starting any migration process, always shut down your source VM from within its operating system—not just through the hypervisor—to avoid data corruption.
For Linux VMs, check that your kernel supports Hyper-V drivers (most modern distributions do). Install the Azure Linux Agent (waagent) if possible—it helps manage networking and diagnostics after migration:
sudo apt-get update
sudo apt-get install walinuxagent
Make sure networking is set to DHCP unless you plan static assignments later.
For Windows VMs, uninstall any guest tools specific to KVM/Proxmox if present (such as QEMU Guest Agent). Install the Azure VM Agent before migration if possible—it enables password resets and diagnostics in Azure:
Download from Microsoft’s official site.
Run installer inside Windows.
Set network adapters to DHCP mode so they pick up addresses automatically after migration.
Check your boot method: For most migrations using uploaded disks (VHD), Azure expects BIOS boot (Generation 1) rather than UEFI (Generation 2). If your VM uses UEFI/OVMF firmware in Proxmox, consider switching it back to BIOS before exporting—or consult Microsoft documentation about Generation 2 support via managed disks.
✅ Step 2. Converting the Disk Image
Proxmox stores VM disks as QCOW2 or RAW files by default—but Azure requires fixed-size VHDs (“page blobs”). Use qemu-img on your Proxmox server:
qemu-img convert -f qcow2 -O vpc -o subformat=fixed /path/to/source.qcow2 /path/to/target.vhd
If your disk is already RAW:
qemu-img convert -f raw -O vpc -o subformat=fixed /path/to/source.raw /path/to/target.vhd
Add -p at the end of either command above if you want progress output during conversion—a good idea with large disks!
Important: Only fixed-size VHDs work—dynamic ones will fail upload! Also check that your disk size meets minimum requirements: at least 30 GB for Linux OS disks; at least 127 GB for Windows OS disks.
After conversion completes, verify file integrity using checksums:
sha256sum /path/to/target.vhd
✅ Step 3. Uploading Disk Image To Azure Storage
Next step: upload this .vhd file into an Azure Blob Storage account as a page blob.
In Azure Portal, create a new Storage Account if needed.
Create a container within that account.
You can use either AzCopy CLI tool or upload directly via browser—but AzCopy is faster and more reliable:
azcopy copy '/path/to/target.vhd' 'https://<storageaccount>.blob.core.windows.net/<container>/target.vhd<SAS-token>' --blob-type PageBlob --overwrite=true
Replace <storageaccount>, <container>, SAS-token accordingly (generate SAS token from portal).
AzCopy compresses data during transfer by default when possible—helpful over slow links!
✅ Step 4. Creating Managed Disk And New VM In Azure
Once upload finishes:
1. In Azure Portal, go to Storage Accounts > [your account] > Containers > [your container].
2. Find your uploaded .vhd.
3. Click on it; select Create Managed Disk.
4. Fill out required fields (resource group/location must match intended VM).
5. After creation completes: go to Disks, select new managed disk.
6. Click Create VM from this disk.
7. Configure CPU/memory/network settings per original specs.
8. Complete wizard; wait until deployment finishes.
Method 2: Migrating VMs From Azure To Proxmox using VHD Export and qemu-img
Migrating an existing VM out of Microsoft's cloud back onto local hardware follows similar principles but reversed order—you export its disk image then import it into Proxmox VE as a new machine.
✅ Step 1. Preparing The Source Azure VM
First step is always powering off/shutting down cleanly from inside guest OS—not just stopping instance via portal—to ensure consistent state!
For Windows VMs, consider generalizing image using Sysprep tool before shutdown:
1. Open Command Prompt as Administrator inside Windows guest,
2. Run sysprep.exe,
3. Choose “Enter System Out-of-Box Experience”,
4. Tick “Generalize” box,
5. Select “Shutdown”.
This removes unique identifiers so cloned images don’t conflict later on multiple hosts—but isn’t strictly required unless making templates/clones downstream.
For Linux VMs, deprovision agent data by running:
sudo waagent -deprovision+user
Then shut down system completely (sudo shutdown now).
✅ Step 2. Exporting And Downloading The Disk Image From Azure
In Azure Portal:
1. Go to target virtual machine,
2. Under “Settings”, click on “Disks”,
3. Select OS disk,
4. At top menu bar choose “Export”,
5. Generate download URL valid typically one hour only!
6. Copy link immediately;
7a) Download directly onto workstation/server using browser/cURL/wget;
7b) Or download straight onto destination server using command line:
wget "<exported-url>" -O /tmp/source.vhd
Large files may take hours depending on bandwidth—use screen/tmux sessions so downloads aren't interrupted by lost connections!
After download completes verify checksum matches original value shown in portal properties pane if available (sha256sum /tmp/source.vhd).
✅ Step 3. Converting The Disk For Use With Proxmox VE
Now convert downloaded .vhd file into QCOW2 format preferred by most modern KVM setups:
qemu-img convert -f vpc -O qcow2 /tmp/source.vhd /var/lib/vz/images/<vmid>/vm-${vmid}-disk-0.qcow2Or use RAW instead of QCOW2 depending on storage backend type/configuration:
qemu-img convert -f vpc -O raw /tmp/source.vhd /var/lib/vz/images/<vmid>/vm-${vmid}-disk-0.rawSet correct permissions afterward:
chmod +rw /var/lib/vz/images/<vmid>/vm-${vmid}-disk-0.qcow2If transferring over network instead of local storage attach converted file using SCP/Rsync etc., e.g.:
scp user@host:/tmp/source.qcow2 root@proxmox:/var/lib/vz/images/<vmid>/
✅ Step 4. Importing Into A New Or Existing Proxmox Virtual Machine
In web interface (Datacenter > Node > Create VM) create empty shell matching original specs (CPU/memory/disk size). When prompted about hard drive choose option "Do not create disk now".
Once created attach imported drive manually:
1) Go under newly created VM entry (Hardware tab)
2) Click "Add > Existing Disk"
3) Browse/select /var/lib/vz/images/<vmid>/...qcow2
4) Set bus type = VirtIO Block Device ("virtio")
5) Save changes
Start up machine! For best results install latest VirtIO drivers inside guest OS after first boot especially important for Windows guests:
Attach ISO via CD-ROM device then run setup.exe inside guest system after logging in normally through console/VNC session provided by web GUI interface ("Console" button).
Test all critical services/applications thoroughly before declaring success!
How To Migrate Proxmox Virtual Machines With Vinchin?
Vinchin Backup & Recovery provides an easy and reliable way to migrate virtual machines from Proxmox VE to other platforms—such as VMware, or another Proxmox node—through its agentless backup and cross-platform migration capabilities.
Unlike traditional manual migration methods involving disk image conversion and complex reconfiguration, Vinchin simplifies the process into two key steps: backup and restore. You can back up your Proxmox VM to a variety of storage targets, including Azure Blob Storage, and then restore it directly onto a different platform—all through an intuitive web interface.
Backup Proxmox VM
✅ Step 1: Back Up the Proxmox VM
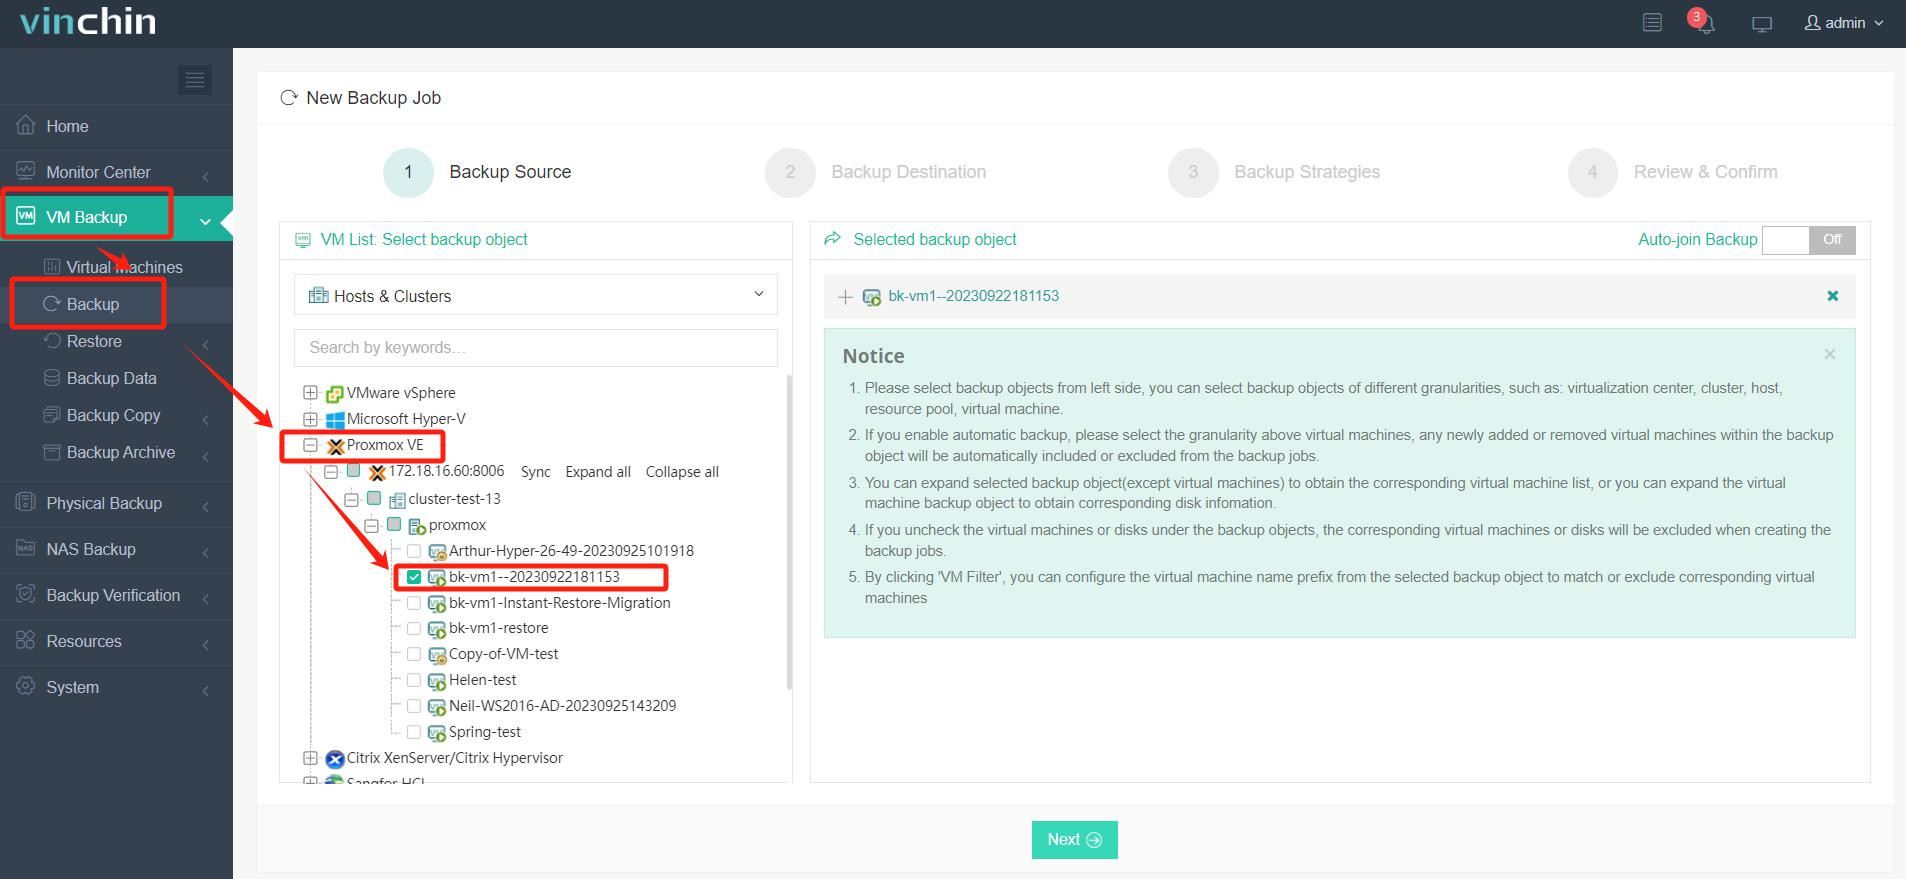
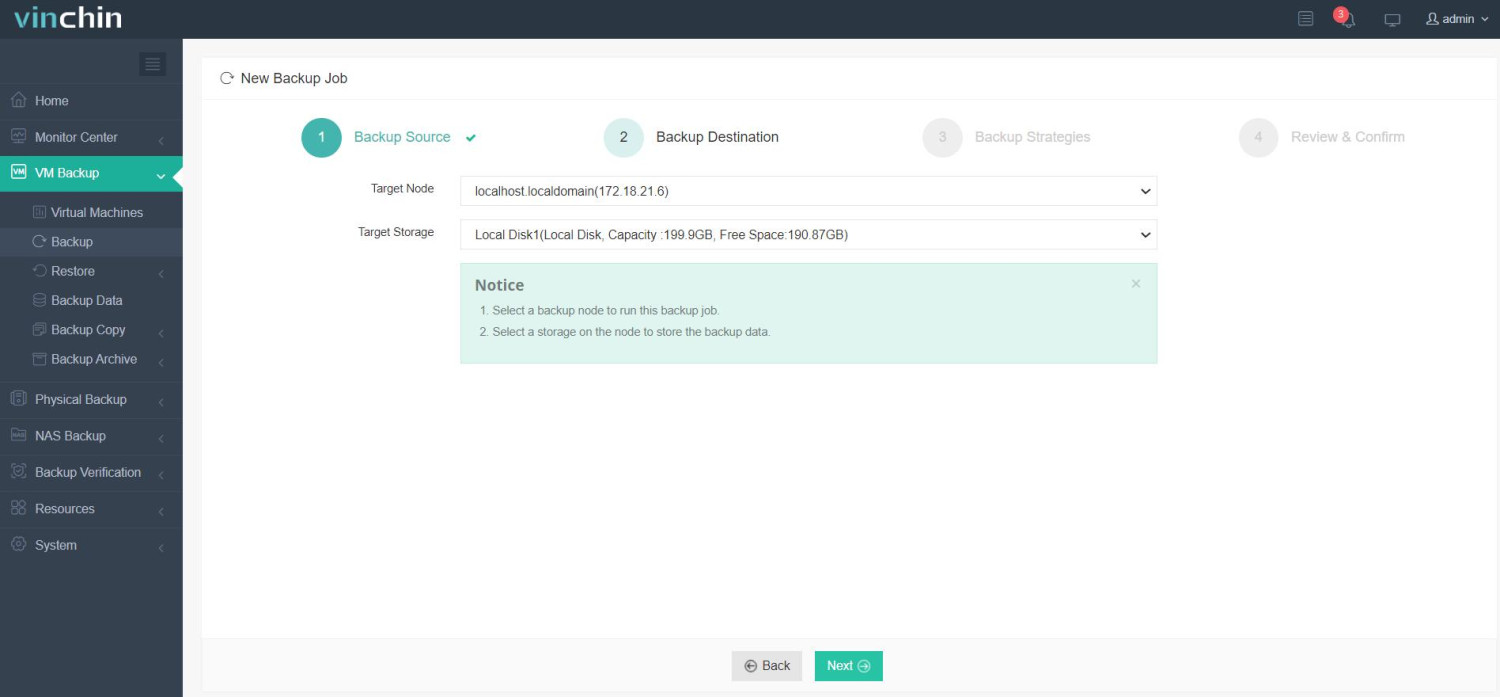
✅ Step 2: Restore to Target Platform (e.g., Azure or VMware)
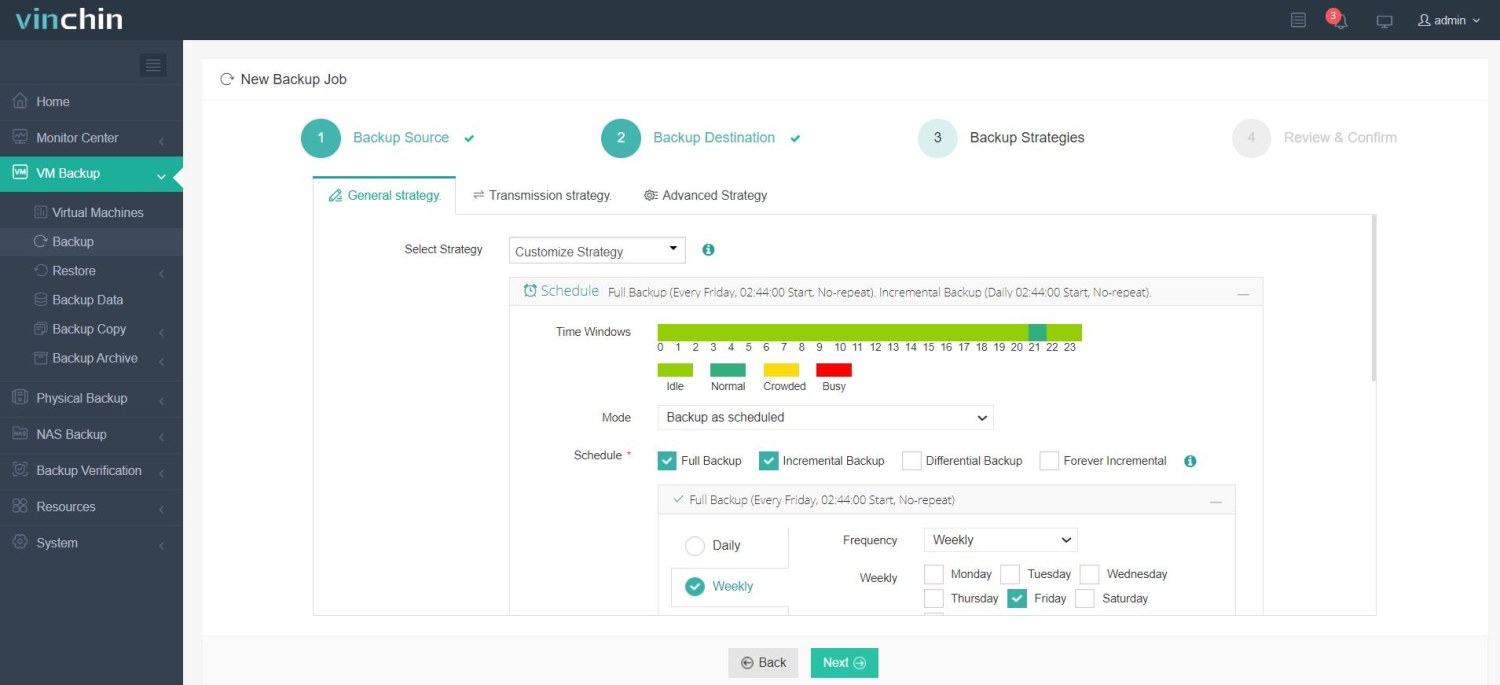
✅ Step 3: Configure backup strategies;
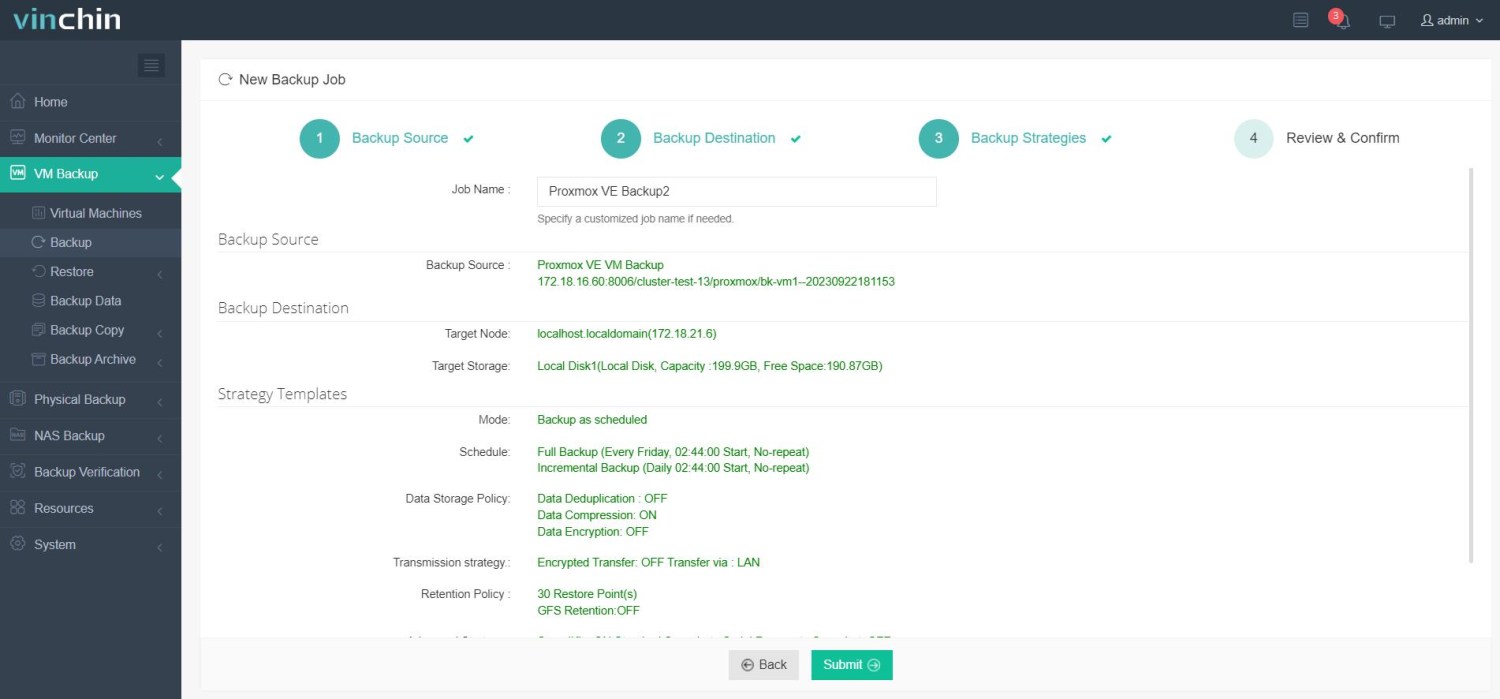
✅ Step 4: Submit the job.
Restore Proxmox VM
✅ Step 1. Select Restore Point
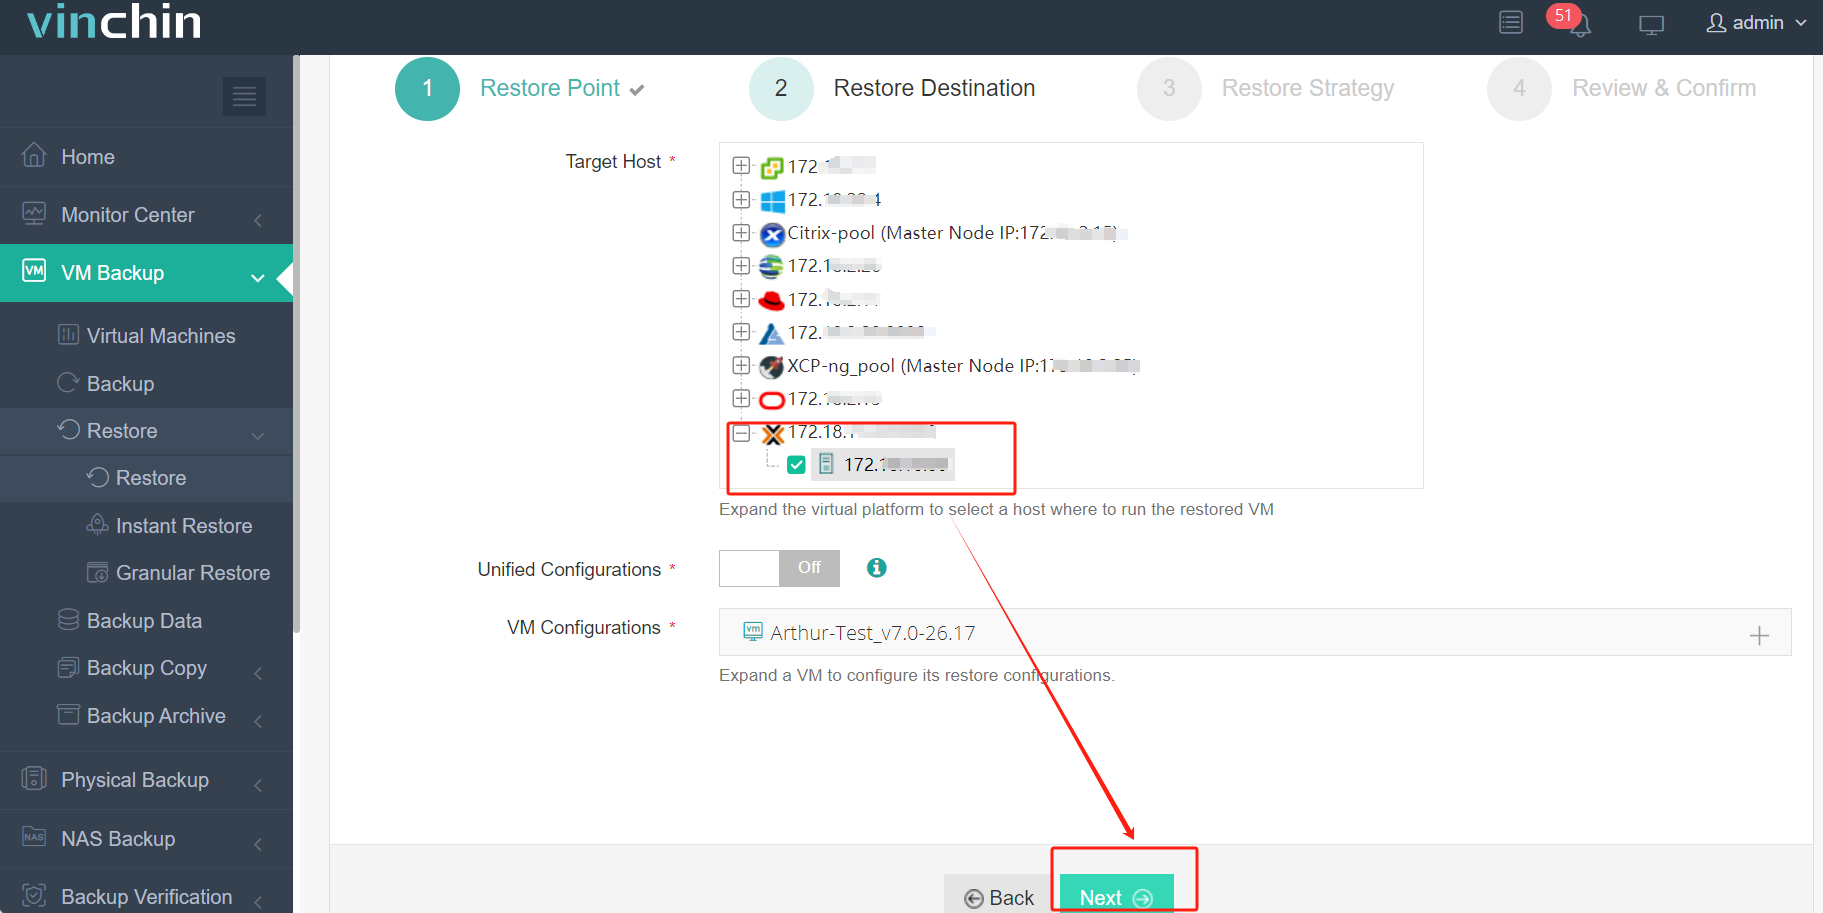
✅ Step 2. Select Restore Destination
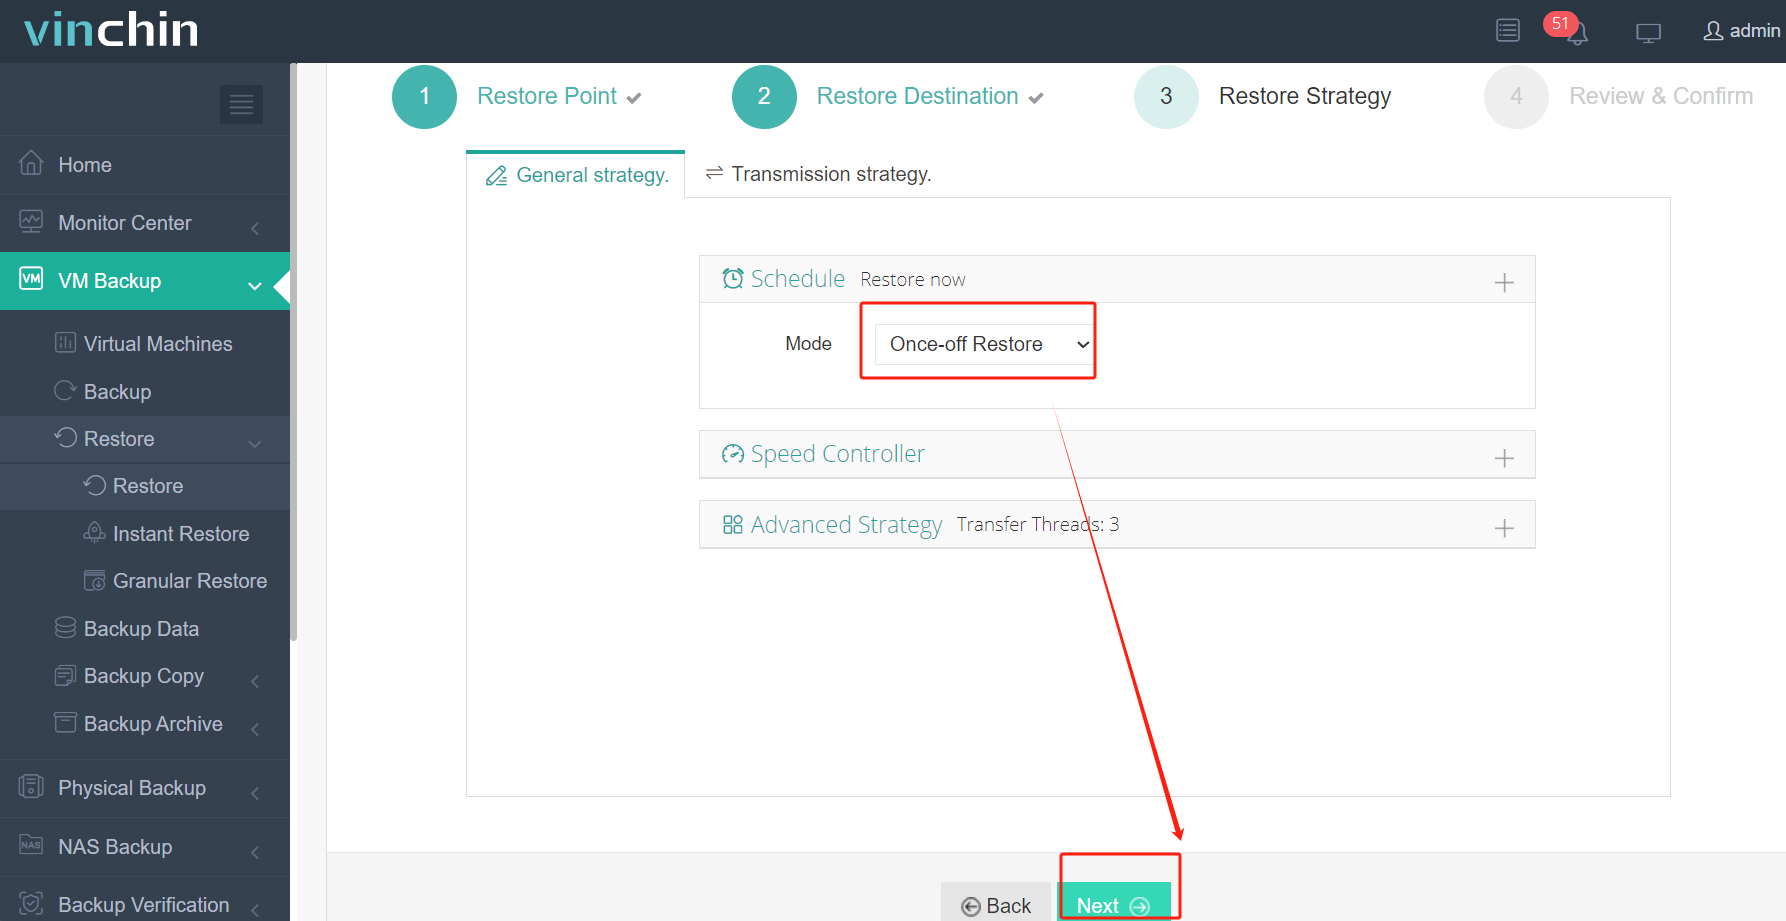
✅ Step 3. Select Restore Strategies
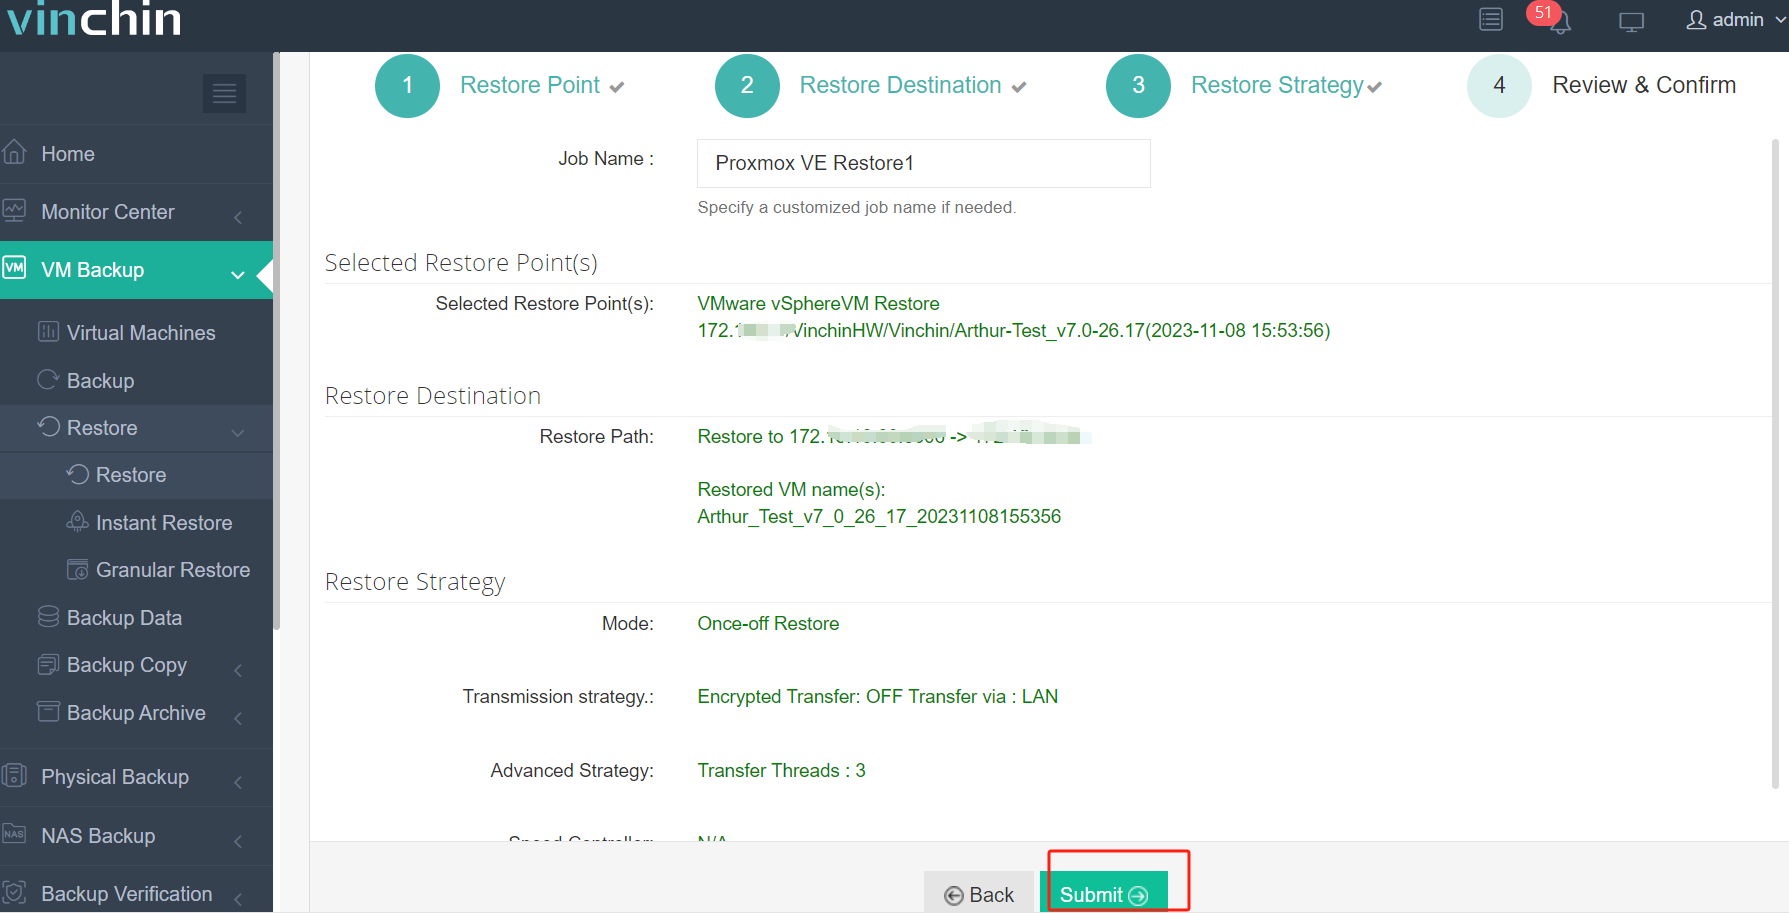
✅ Step 4. Review and submit the job

With thousands of satisfied customers worldwide and consistently high product ratings for reliability and ease of use, Vinchin Backup & Recovery offers a fully functional free trial valid for 60 days. Download the installer today for quick deployment—and experience seamless cross-platform backup and migration firsthand!
Migrating Between Azure And Proxmox FAQs
Q1: Can I run nested virtualization by installing Proxmox VE inside an Azure virtual machine?
A1: Yes—on supported instance types—but this setup isn't recommended for production due to limited performance/stability guarantees from Microsoft.
Q2: How do I back up my entire fleet of local/on-premises VMs directly into my organization's existing Blob Storage account?
A2: Configure backup jobs within your hypervisor/export toolset then use AzCopy CLI utility pointing at appropriate container/SAS credentials.
Q3: My imported virtual machine boots but has no network connectivity—is there an easy fix?
A3: Remove persistent net rules file /etc/udev/rules.d/70-persistent-net.rules then reboot—the interface should be detected afresh.
Conclusion
Migrating virtual machines between Microsoft Azure and Proxmox gives IT teams unmatched flexibility across hybrid environments—from rapid scaling in public clouds down through granular control onsite.Vinchin makes cross-platform migrations easier,minimizing risk while maximizing uptime.Try their free trial today—and see how seamless hybrid management can be!
Share on:


