-
What Is a vSphere 7 Home Lab?
-
Why Build a vSphere 7 Home Lab?
-
Method 1: Setting Up vSphere 7 Home Lab on Physical Hardware
-
Method 2: Creating a vSphere 7 Home Lab Using VMware Workstation
-
How to Backup vSphere 7 Home Lab Virtual Machines with Vinchin Backup & Recovery
-
vSphere 7 Home Lab FAQs
-
Conclusion
Building a vSphere 7 home lab is one of the best ways to learn virtualization hands-on. Whether you’re just starting out or have years of experience as an admin, a home lab lets you experiment safely and gain real skills with VMware’s platform. But how do you set up your own? Let’s walk through it together—from basics to advanced tips.
What Is a vSphere 7 Home Lab?
A vSphere 7 home lab is a private environment where you install VMware vSphere 7 components on your own hardware or desktop PC. This usually means setting up one or more ESXi hosts—the hypervisors that run virtual machines—and deploying a vCenter Server instance for centralized management tasks like clustering or automation. By building this kind of lab at home or in your office, you can simulate enterprise IT environments on a small scale without risking production systems.
You can use dedicated servers, repurposed desktops, laptops—or even run everything virtually using nested virtualization on your main computer. This flexibility makes it easy to try new features or test upgrades before rolling them out at work.
Why Build a vSphere 7 Home Lab?
Why invest time in building a vsphere 7 home lab? First off: safety and freedom to learn by doing—break things without fear! You can practice troubleshooting common issues or test patches before applying them at work. A home lab also lets you explore advanced features like vMotion (live migration), High Availability (HA), Distributed Resource Scheduler (DRS), storage policies like vSAN, or even network virtualization with NSX—all without touching production resources.
For those aiming for VMware certifications such as VCP-DCV or VCAP-DCV Deploy, nothing beats hands-on practice in your own sandboxed environment. Plus—it keeps your skills sharp as technology evolves fast!
Method 1: Setting Up vSphere 7 Home Lab on Physical Hardware
Running vSphere 7 directly on physical hardware gives you the most realistic experience possible—just like managing servers in an enterprise data center.
Hardware Requirements and Compatibility
Before buying anything new—or reusing old gear—check VMware's. While labs are more forgiving than production environments when it comes to hardware support, using compatible parts saves headaches later on:
A modern 64-bit CPU with Intel VT-x/EPT or AMD-V/RVI support (2011+ recommended)
At least 32 GB RAM; more if running multiple VMs
SSDs preferred over HDDs for speed; minimum total storage should be at least 128 GB
One or more supported network adapters; Intel chipsets are safest
USB stick (8 GB+) or SSD/HDD for installing ESXi itself
Some consumer-grade parts may need community drivers—for example Realtek NICs often require custom packages. Unsupported devices might not work at all, so always check first!
Step-by-Step Installation Process
Once confident your hardware works:
1. Download the official ESXi 7 ISO from VMware’s website.
2. Use Rufus (Windows) or dd (Linux/macOS) to create a bootable USB installer.
3. Boot target server from USB stick; follow prompts until reaching disk selection screen.
4. Pick destination disk for ESXi installation.
5. Set root password when prompted; complete install process.
6. Configure basic networking via Direct Console User Interface (DCUI)—set static IP address/DNS/hostname under Configure Management Network.
7. Enable SSH & ESXi Shell under Troubleshooting Options within DCUI—or later via web client under Host > Actions > Services menu.
8. Access host remotely by browsing https://<your-esxi-ip> from another device on same LAN.
Method 2: Creating a vSphere 7 Home Lab Using VMware Workstation
Not everyone has spare servers lying around—but that shouldn’t stop you! Nested virtualization lets you build an entire vsphere 7 home lab inside VMware Workstation Pro/Fusion right on your desktop PC/laptop.
Host System Requirements
To run nested ESXi smoothly:
A recent quad-core+ CPU supporting Intel VT-x/EPT (“Virtualization Technology”) enabled in BIOS
At least 32 GB RAM minimum; ideally more if running several nested hosts + VMs
Fast SSD drive(s) with at least ~200 GB free space
Windows/Linux/macOS host OS capable of running latest version of VMware Workstation/Fusion software
The better/faster your workstation—the smoother things go!
Critical Configuration Tweaks for Nested ESXi
Nested labs require some special tweaks:
When creating each virtual machine intended as an “ESXi host,” edit its .vmx file before first power-on:
Add vhv.enable = "TRUE" — this enables “virtualized hardware-assisted virtualization” required by modern guest hypervisors.
Change default network adapter type by adding ethernet0.virtualDev = "vmxnet3" — since e1000 isn’t supported natively by ESXi 7 anymore.
These changes ensure smooth operation—including advanced features like live migration between nested hosts!
Step-by-Step Setup Process
Here’s how most admins build their virtualized vsphere lab:
1. Install latest version of VMware Workstation/Fusion onto host system.
2. Create new VM:
Click File > New Virtual Machine
Choose Custom configuration path
Set highest available hardware compatibility level
Select “Installer disc image file” option pointing at downloaded ESXi ISO file
Name VM something descriptive (“ESXi01”), pick fast local SSD folder as location
Assign minimum four virtual CPUs + sixteen gigabytes RAM per nested host VM
Set network mode (Bridged preferred if testing real routing/DHCP; otherwise use NAT)
Use Paravirtual SCSI controller type when prompted
Allocate small disk (~20GB) just for OS plus larger data disk(s) as needed per workload plans
3. Edit .vmx file manually:
Add
vhv.enable = "TRUE"Add
ethernet0.virtualDev = "vmxnet3"
4. Power on VM & proceed through standard ESXi installation steps outlined above—as if working with physical server!
5. Repeat process above if simulating multi-host cluster setups—each gets unique MAC/IP/etc.
6. Deploy VCSA appliance into one of these nested hosts once base installs complete—it manages everything centrally!
7. Configure virtual networking using built-in Virtual Network Editor tool within Workstation/Fusion UI—for example create isolated management/storage/test segments mapped via different VMnets/subnets/VLAN tags as desired.
8. For shared storage simulation: spin up FreeNAS/OpenMediaVault Linux-based NAS appliance inside another VM then present iSCSI/NFS shares back out over internal networks so all nested hosts see same datastores simultaneously—a must-have for testing HA/vMotion scenarios!
How to Backup vSphere 7 Home Lab Virtual Machines with Vinchin Backup & Recovery
Protecting the valuable data and configurations in your vsphere home lab requires reliable backup software designed specifically for virtual environments such as VMware platforms.
Vinchin Backup & Recovery is an enterprise-level solution purpose-built for professional virtual machine backup across more than fifteen mainstream platforms—including leading options like VMware, Hyper-V, Proxmox, oVirt, OLVM, RHV, XCP-ng, XenServer, OpenStack, ZStack and others worldwide coverage ensures broad compatibility no matter which infrastructure powers your homelab environment.
For users running vsphere-based labs specifically, Vinchin Backup & Recovery delivers robust capabilities including quiesced snapshot support, HotAdd transport mode integration, CBT-enabled efficient backups and LAN-free backup options—all tailored toward maximizing performance while minimizing impact on production workloads during protection operations.
Among its many advanced functions are forever-incremental backup jobs that reduce storage needs over time; granular restore options enabling precise recovery down to individual files within guest systems; data deduplication and compression technologies that optimize both speed and capacity usage; scheduled automated backups ensuring regular protection without manual intervention; and secure encryption safeguarding sensitive information throughout every stage of the backup lifecycle—all managed through one unified web console interface designed with simplicity in mind.
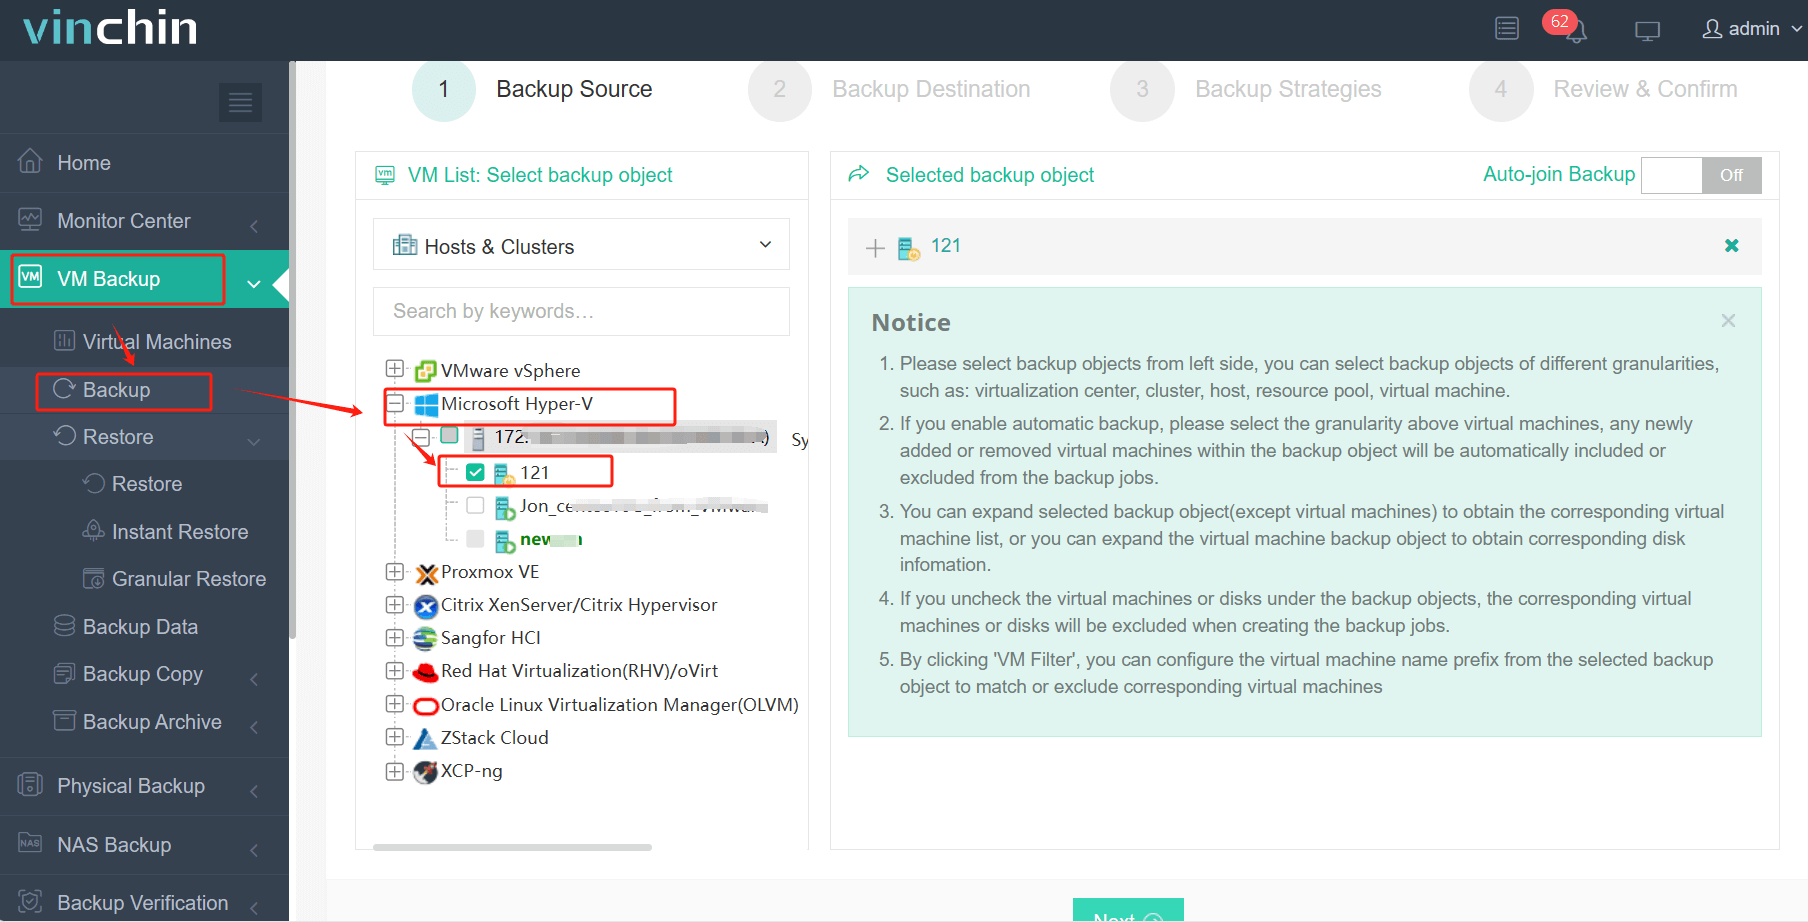
Step 1: Select the Hyper‑V VM(s) you wish to back up

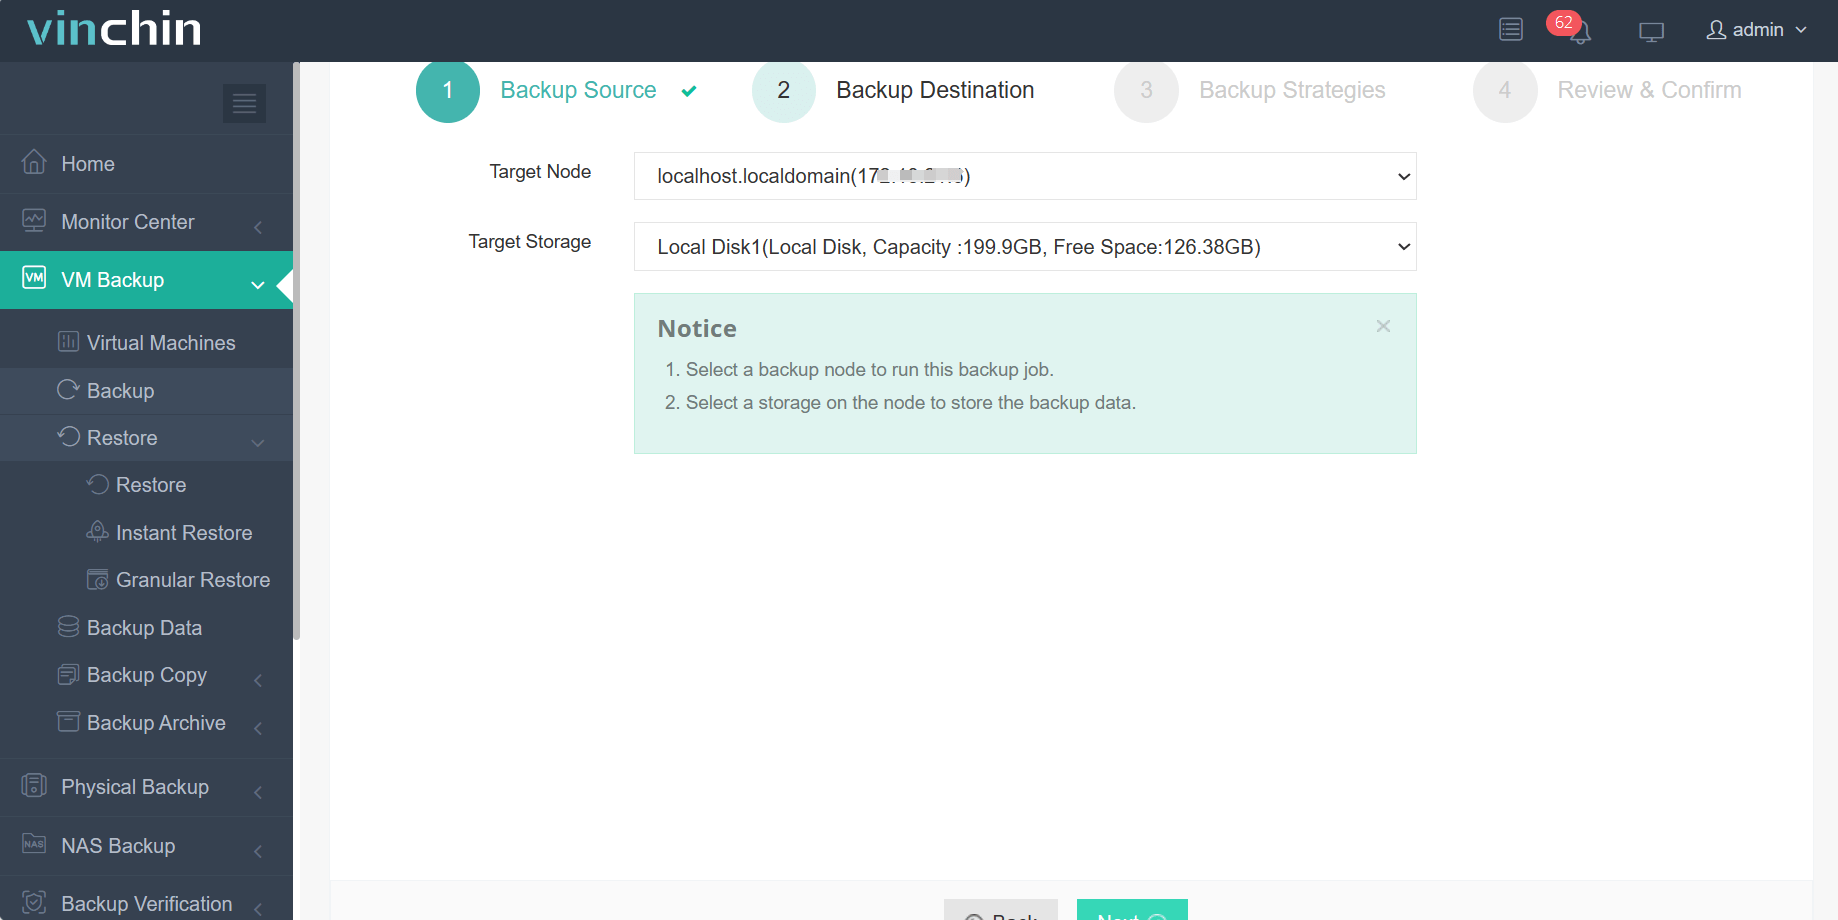
Step 2: Choose a suitable backup storage destination

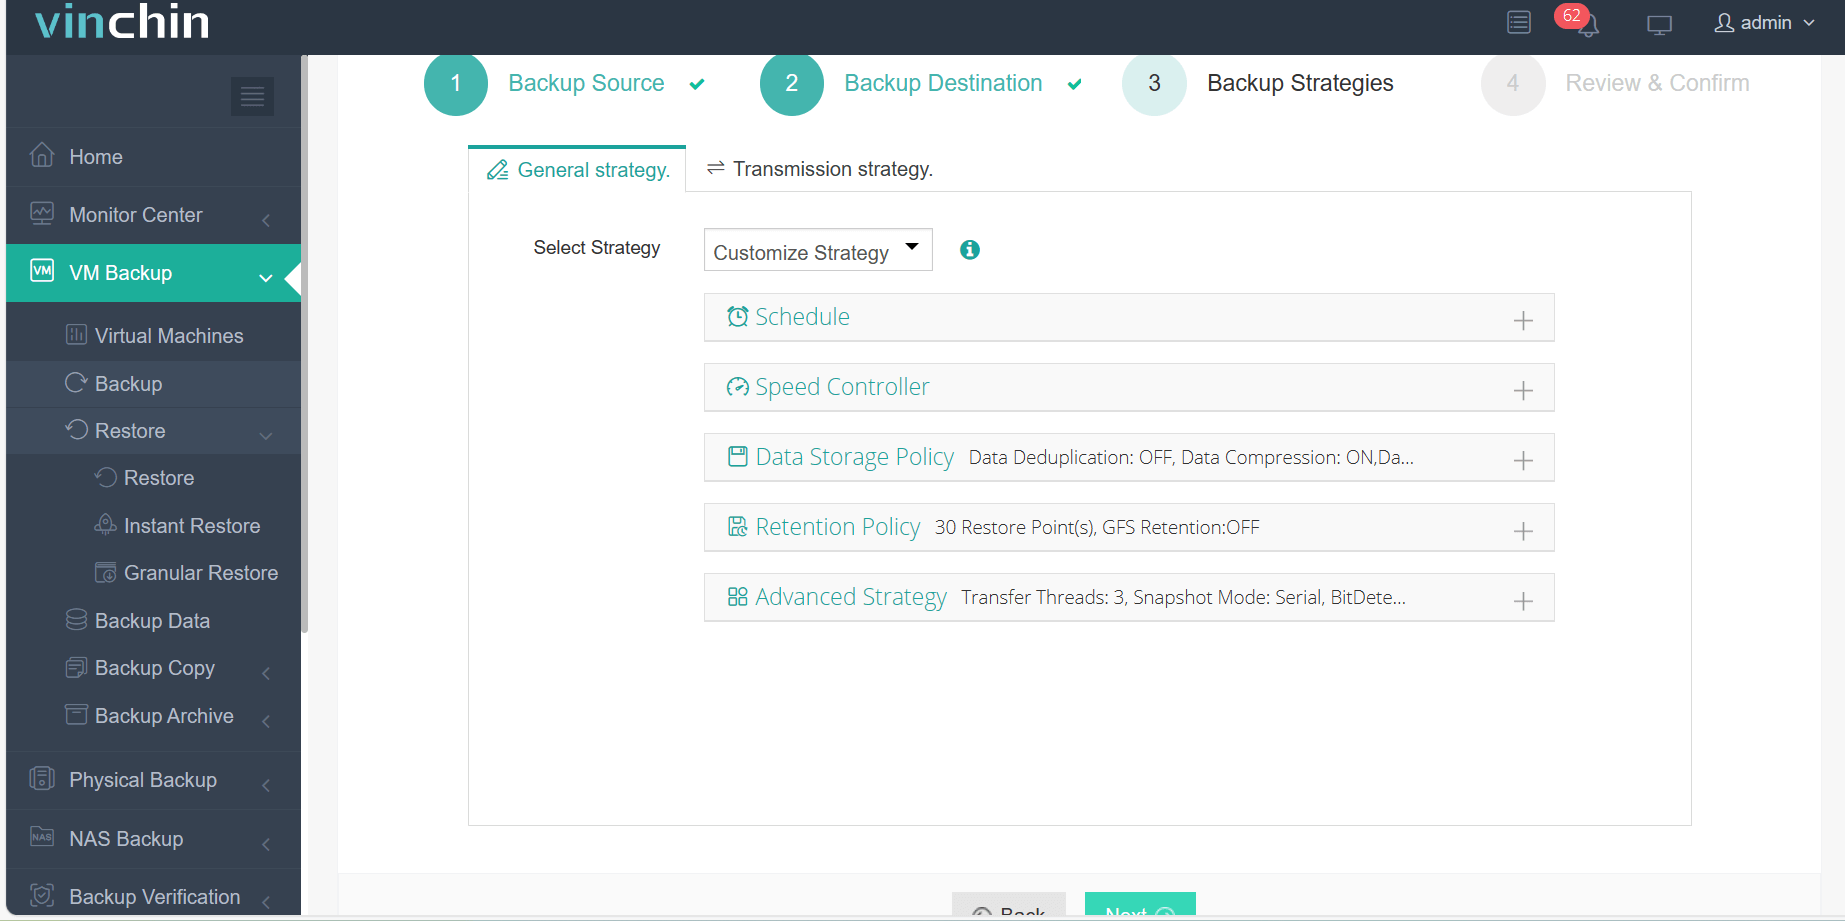
Step 3: Configure backup strategy parameters such as schedule and retention

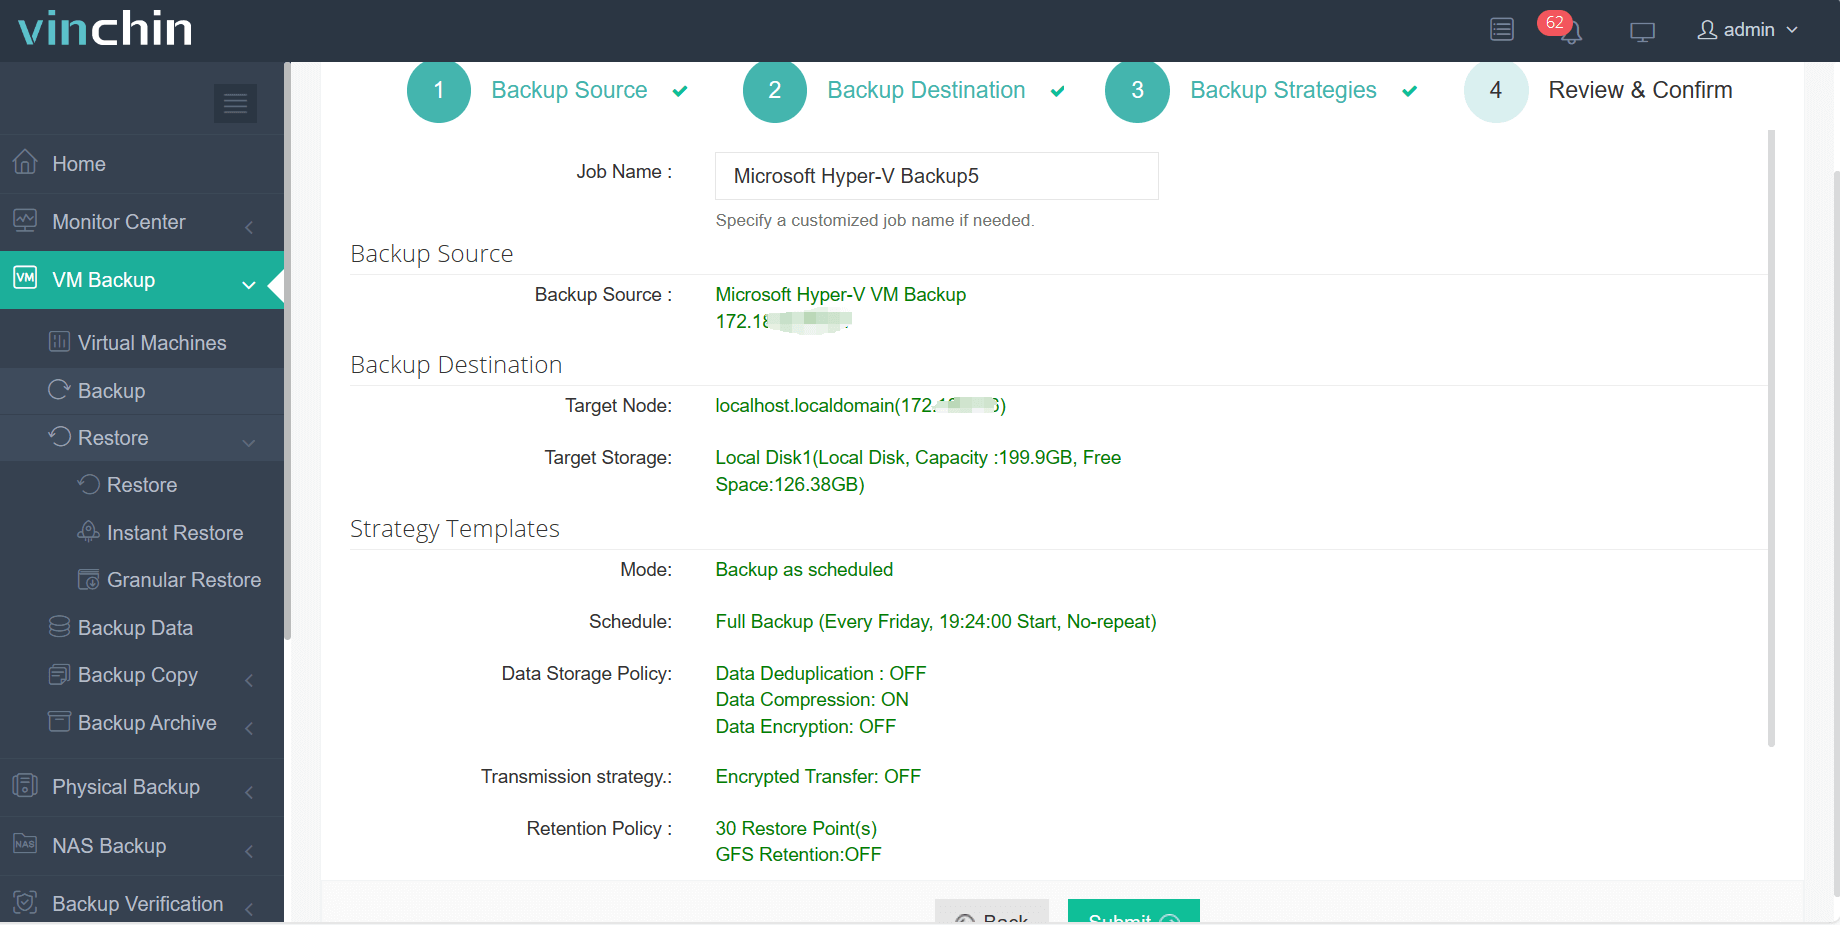
Step 4: Submit the job

Recognized globally among enterprise customers—with top ratings across industry review sites—Vinchin Backup & Recovery offers a full-featured free trial valid for sixty days so you can evaluate every capability risk-free before making any commitment.
vSphere 7 Home Lab FAQs
Q1: Can I upgrade my existing physical homelab from older versions of ESXi directly to version seven?
A1: Yes—but always check HCL first since some legacy CPUs/NICs lose support after version six-five/seven releases; backup configs beforehand just in case rollback needed later!
Q2: My nested ESXi shows no compatible NIC during install—is there any workaround?
A2: Edit .vmx file adding ethernet0.virtualDev = "vmxnet3" line then retry installer—it should detect interface properly next attempt!
Q3: How do I simulate power failure testing across multiple nodes safely?
A3: Pause/shutdown individual host VMs sequentially within Workstation UI while monitoring cluster behavior via VCSA dashboard—restore order afterward simply by powering back online again.
Conclusion
Setting up a vsphere seven homelab builds deep expertise through direct experimentation—from basic installs through complex clustering/networking/storage designs alike! Whether leveraging spare physical gear/nested virtualization approaches both paths deliver valuable insights transferable straight into workplace roles/projects ahead. For reliable automated backups/protection trust Vinchin’s proven solutions today!
Share on:


