-
What Are OpenStack and Kubernetes?
-
Why Combine OpenStack With Kubernetes
-
Method 1: Deploying Kubernetes on OpenStack Using Magnum
-
Method 2: Integrating External Kubernetes Clusters With OpenStack Using Cloud Provider OpenStack
-
Vinchin Backup & Recovery for Enterprise Kubernetes Protection
-
OpenStack Kubernetes FAQs
-
Conclusion
OpenStack Kubernetes integration is a hot topic for IT teams building private clouds or hybrid environments. Many organizations want flexible infrastructure but face hurdles: complex setup processes, networking headaches, persistent storage issues, or backup gaps that threaten business continuity. Whether you’re starting fresh or connecting existing systems, this guide walks through deploying Kubernetes on OpenStack—or linking external clusters—and shows how to protect your workloads at every stage.
What Are OpenStack and Kubernetes?
OpenStack is an open-source cloud platform that manages compute (Nova), networking (Neutron), storage (Cinder), images (Glance), identity (Keystone), orchestration (Heat), and more—all through APIs or a self-service dashboard. It lets you pool hardware resources into virtual machines, networks, or volumes for any team in your organization.
Kubernetes is an open-source container orchestration engine designed to automate application deployment across clusters of servers—physical or virtual. It groups containers into pods managed by controllers like Deployments or StatefulSets; it handles scaling up/down automatically based on demand while keeping applications healthy with built-in self-healing features.
Here’s a quick comparison:
| Platform | Main Focus | Key Components |
|---|---|---|
| OpenStack | Infrastructure | Nova (compute), Neutron (networking), Cinder (block storage) |
| Kubernetes | Application Layer | Pods, Deployments, Services |
While OpenStack provides robust infrastructure management—including VM lifecycle control—Kubernetes focuses on running modern apps inside containers efficiently at scale.
Why Combine OpenStack With Kubernetes
Pairing OpenStack with Kubernetes unlocks powerful benefits for enterprise IT:
First, you can run scalable Kubernetes clusters atop reliable OpenStack VMs—using advanced networking features like floating IPs or security groups alongside automated app orchestration from K8s itself.
Second, this combination supports hybrid cloud strategies: burst workloads into public clouds when needed while keeping sensitive data on-premises using multi-tenancy controls built into both platforms.
Third, cost optimization becomes easier since you maximize hardware utilization without vendor lock-in—and can leverage specialized resources such as GPUs for AI/ML jobs right inside your private cloud environment.
A real-world example? Many research institutions run AI training pipelines using GPU-enabled VMs provisioned by OpenStack while orchestrating model deployments via Kubernetes pods—all within secure campus boundaries but ready to scale out if needed.
Of course there are challenges too: configuring overlay networks between VMs/pods can get tricky; ensuring persistent storage works seamlessly requires careful planning; integrating authentication across both layers takes attention to detail—but these hurdles are manageable with good tools and process discipline.
Method 1: Deploying Kubernetes on OpenStack Using Magnum
Magnum is the official OpenStack service for automating container cluster creation—including native support for openstack kubernetes deployments atop your own infrastructure.
Prerequisites
Before starting:
Ensure core services (Keystone, Heat, Magnum) are enabled
You have admin/project-level permissions
At least one SSH keypair exists
Networks/subnets/security groups are set up
Sufficient quota exists for VMs/storage/network ports
Step 1: Prepare Your Environment
Log in to your OpenStack dashboard as a user with access rights to the Container Infrastructure service (Magnum). Confirm that required quotas aren’t exhausted—you may need extra floating IPs or block storage depending on cluster size!
Step 2: Create a Cluster Template
Navigate to Container Infrastructure > Cluster Templates then click Create Cluster Template:
Set template name
Choose COE as Kubernetes
Select an image preloaded with kubeadm/kubelet
Pick node flavor matching expected workload size
Assign network/subnet IDs
Attach SSH keypair for later access
Save changes once complete—the template defines how future clusters will look!
Step 3: Launch Your First Cluster
Go back to Clusters, hit Create Cluster, select your new template:
Name your cluster clearly (“prod-k8s-west”, etc.)
Specify master/worker node counts based on expected load
Assign correct network/keypair again if prompted
Click Create—Magnum now spins up all necessary VMs/networks/disks behind-the-scenes! This usually takes several minutes depending on resource availability.
Step 4: Access Your New Cluster
Once active:
1. Download the generated kubeconfig file from cluster details page
2. On your workstation/server export its path:
export KUBECONFIG=/path/to/kubeconfig.yaml
kubectl get nodes
You should see all master/worker nodes listed as Ready!
Step 5: Manage & Scale Clusters Easily
To add/remove worker nodes later:
1. Go back to Clusters list
2. Click desired cluster
3. Use "Resize" option—enter new worker count
4. Confirm changes
Magnum handles VM provisioning/deletion automatically so you don’t have to touch Nova directly!
Method 2: Integrating External Kubernetes Clusters With OpenStack Using Cloud Provider OpenStack
Sometimes you already have production-grade openstack kubernetes clusters running elsewhere—but want them consuming block storage/load balancers provided by your private cloud’s APIs instead of public ones! That’s where Cloud Provider OpenStack comes in handy—it bridges external K8s clusters with internal resources securely over API calls.
Prerequisites
Before proceeding:
Confirm compatibility between K8s version (>v1.18 recommended) & target OpenStack release
Ensure outbound connectivity from all K8s nodes/workers toward Keystone/Cinder/Neutron endpoints over TCP/IP firewalls/VPN tunnels if needed!
Have admin credentials/API tokens ready
Step 1: Prepare Credentials File (cloud.conf)
Gather these values from Horizon dashboard/API docs:
[Global]
auth-url=https://your-openstack.example.com/v3/
username=YOUR_USERNAME
password=YOUR_PASSWORD
tenant-name=YOUR_PROJECT_NAME
domain-name=default
region=RegionOne
Store this securely as cloud.conf.
Step 2: Install Cloud Provider Components
On any control-plane node:
kubectl create secret -n kube-system generic cloud-config --from-file=cloud.conf
Then deploy controller manager roles/bindings/daemonset:
kubectl apply -f https://raw.githubusercontent.com/kubernetes/cloud-provider-openstack/master/manifests/controller-manager/cloud-controller-manager-roles.yaml
kubectl apply -f https://raw.githubusercontent.com/kubernetes/cloud-provider-openstack/master/manifests/controller-manager/cloud-controller-manager-role-bindings.yaml
kubectl apply -f https://raw.githubusercontent.com/kubernetes/cloud-provider-openstack/master/manifests/controller-manager/openstack-cloud-controller-manager-ds.yaml
Note
Always verify pod logs (kubectl logs) after install—look out for authentication errors due to typos in cloud.conf!
Step 3: Enable Storage & Load Balancer Integration
For persistent volumes attachable via Cinder CSI plugin:
# Example install command varies by distribution/version; see linked doc above!
To expose services externally just set their type field:
apiVersion: v1
kind: Service
metadata:
 name: my-app-lb
spec:
 type: LoadBalancer
 ports:
   - port: 80
 selector:
   app=my-app
The controller provisions Neutron-based load balancers automatically.
Step 4: Validate Everything Works
Deploy test apps/services/PVC claims then check via both kubectl output and Horizon dashboard whether corresponding resources show up under Compute > Instances / Network > Load Balancers / Volume > Volumes sections.
Vinchin Backup & Recovery for Enterprise Kubernetes Protection
After deploying and integrating openstack kubernetes environments, safeguarding critical data becomes essential. Vinchin Backup & Recovery stands out as a professional enterprise-level solution purpose-built for comprehensive protection of Kubernetes workloads at scale. Among its extensive feature set, five highlights include fine-grained backup and restore capabilities down to namespace/application/PVC level; cross-cluster and cross-version recovery supporting migrations across different environments; intelligent policy-driven automation; encrypted transmission with WORM protection; and high-speed multithreaded PVC backup acceleration. Together these features deliver robust data safety, operational flexibility during upgrades or disaster recovery scenarios, compliance assurance, and performance suited even for demanding enterprise use cases.
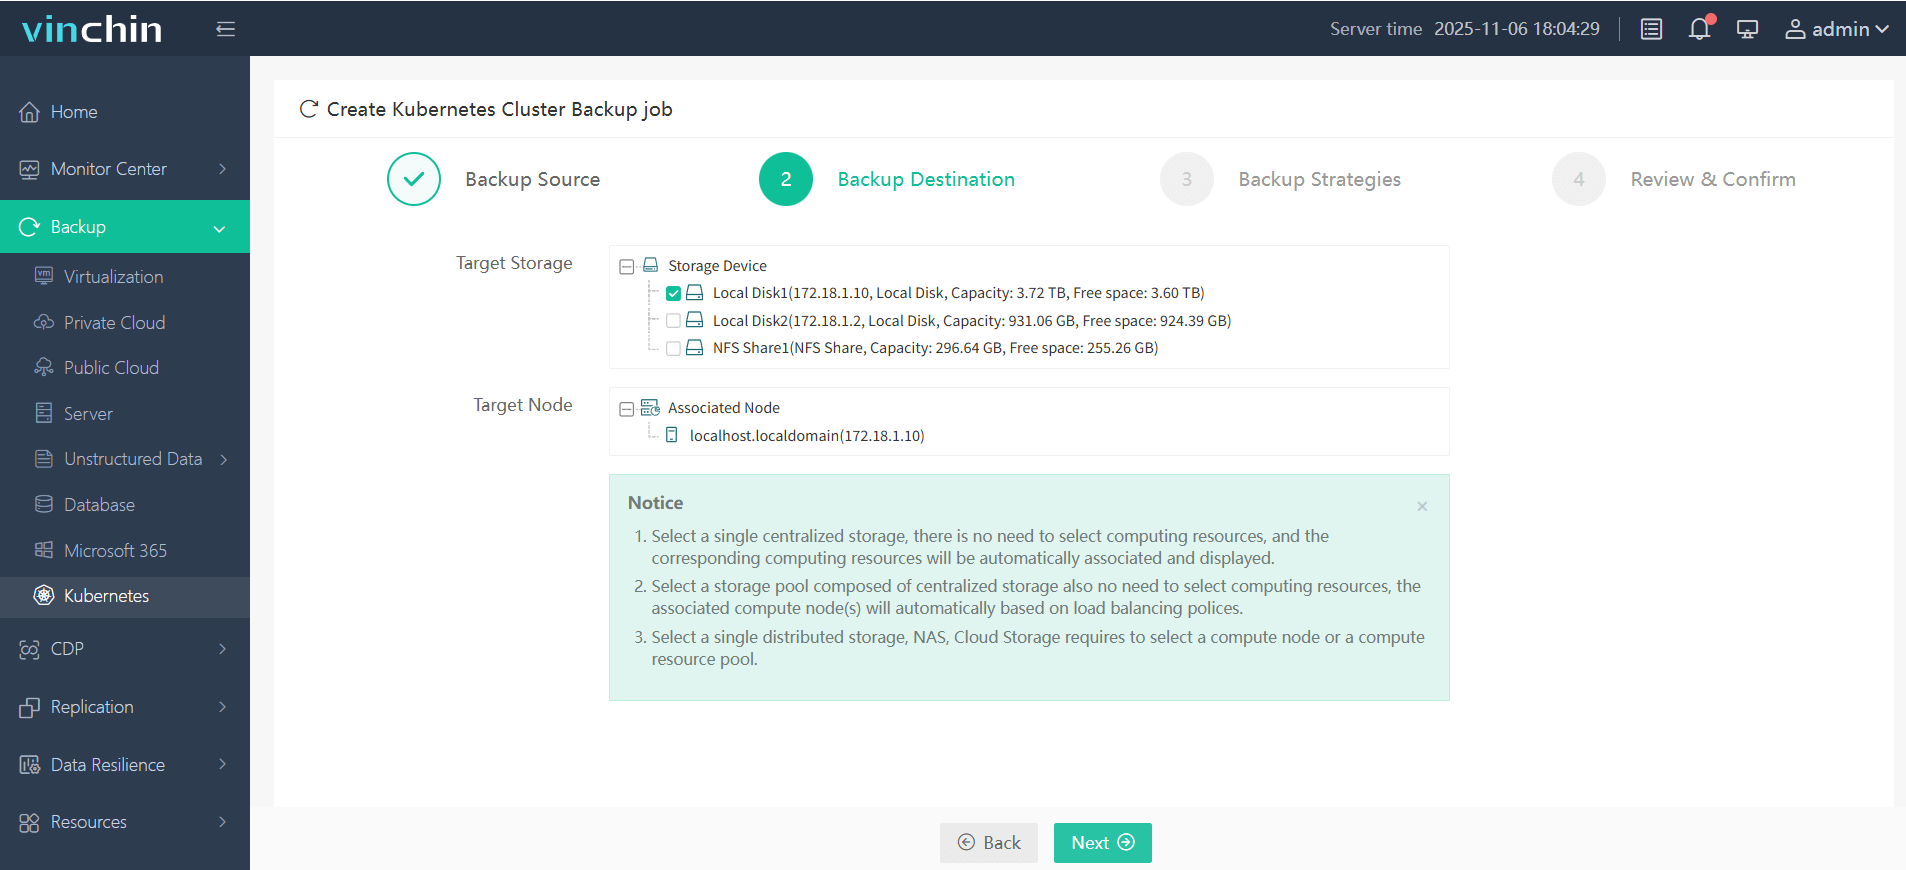
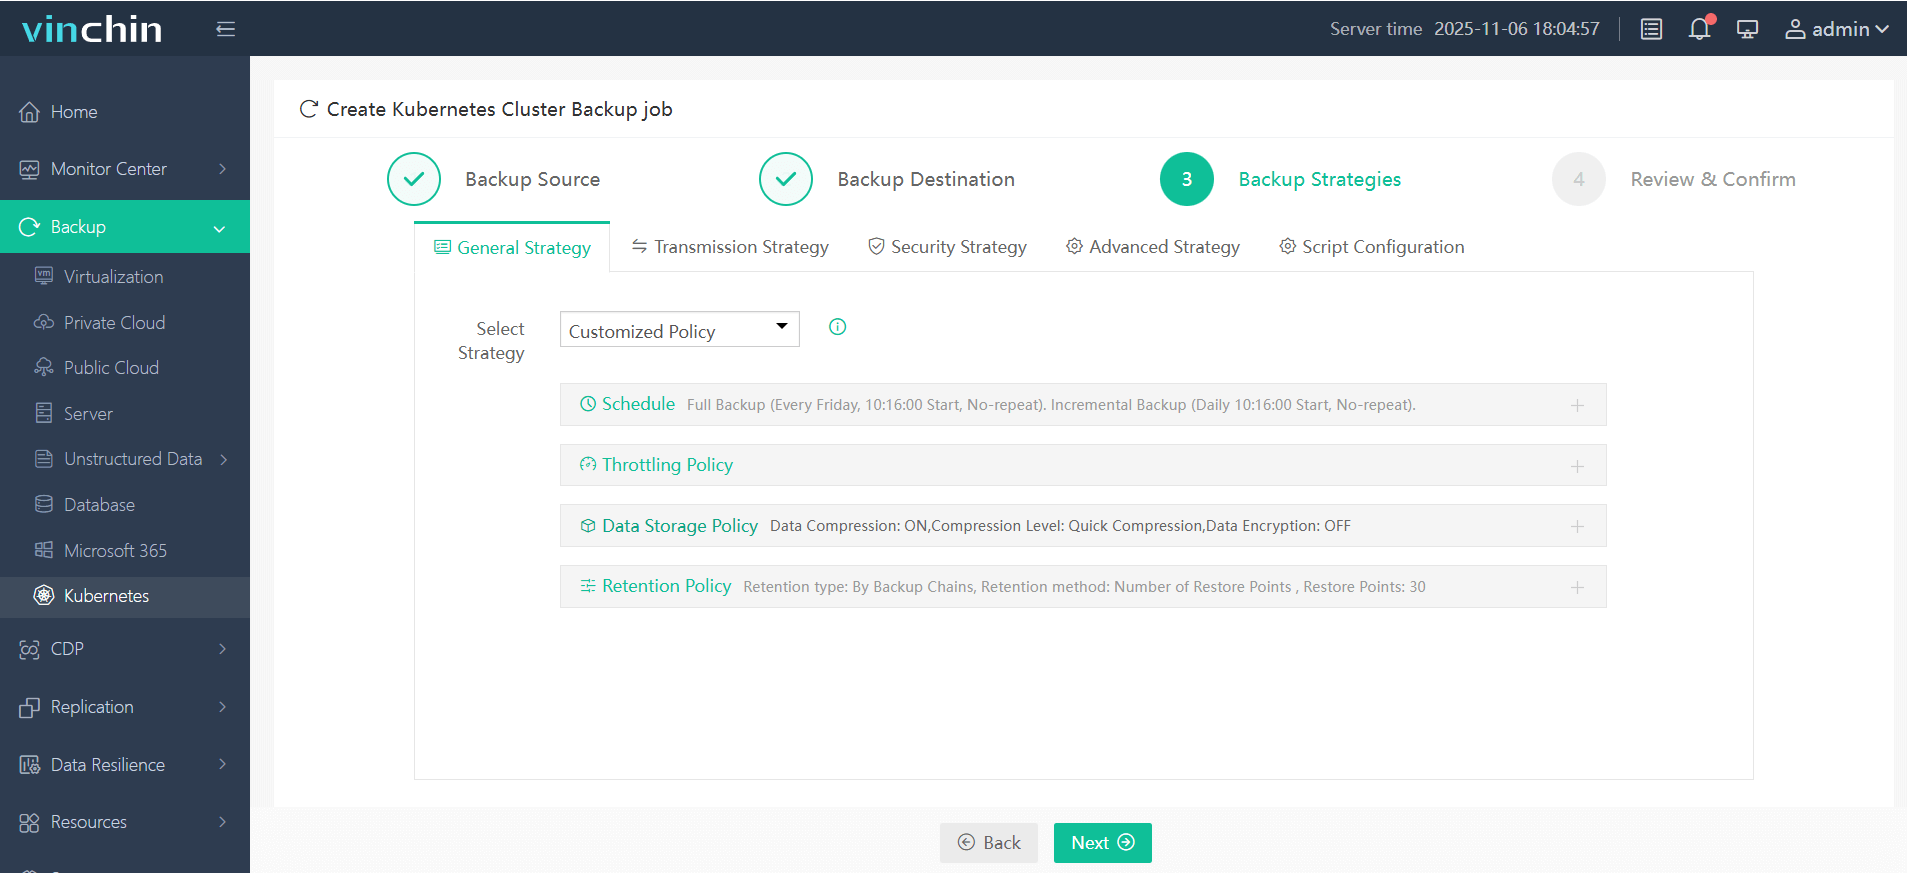
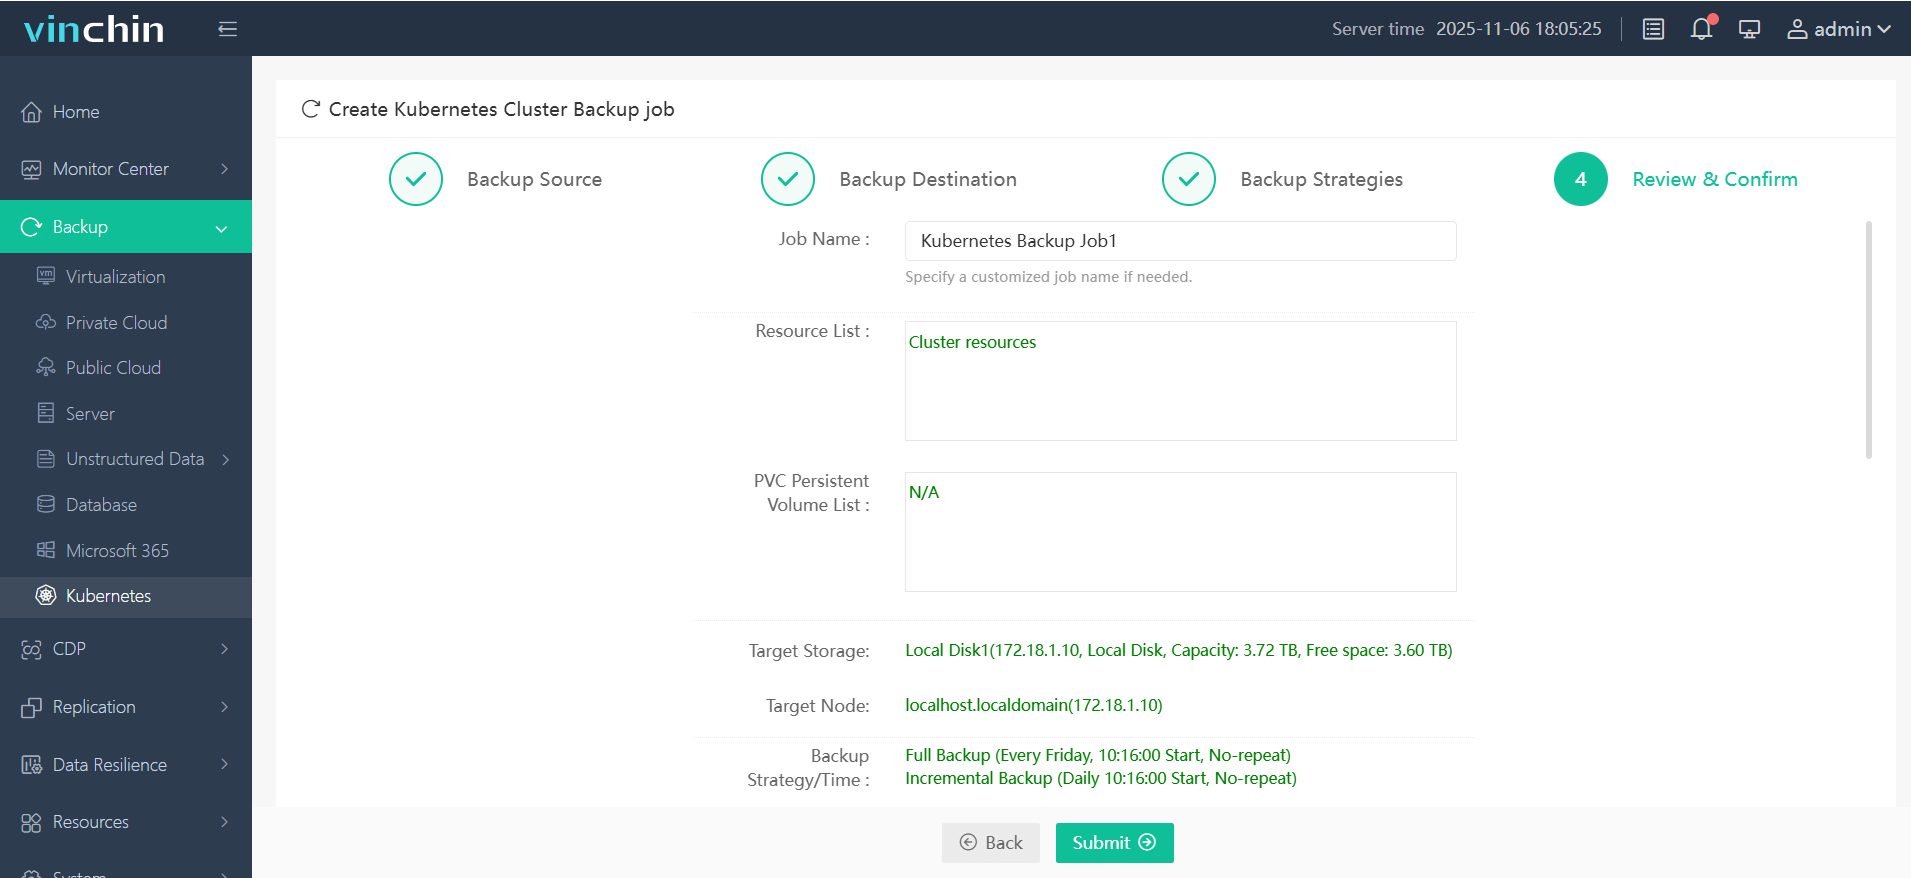
Vinchin Backup & Recovery offers an intuitive web console where backing up any Kubernetes environment typically takes just four steps:
Step 1 — Select the backup source;

Step 2 — Choose backup storage;

Step 3 — Define backup strategy;

Step 4 — Submit the job.

Trusted globally by enterprises of all sizes—with top ratings and thousands of customers worldwide—Vinchin Backup & Recovery delivers proven data protection excellence for mission-critical systems everywhere. Experience every feature risk-free with a full-featured 60-day trial; click below to download now!
OpenStack Kubernetes FAQs
Q1: Can I run both virtual machines and Kubernetes workloads side-by-side in one cloud?
A1: Yes—you can deploy traditional VMs alongside openstack kubernetes clusters within the same project/network space without conflict.
Q2: How do I ensure data persistence for stateful apps running in openstack kubernetes?
A2: Use Cinder CSI plugin-backed PersistentVolumeClaims mapped directly onto block devices managed by Cinder service.
Q3: What are best practices for securing my openstack kubernetes environment?
A3: Apply strict Network Policies within K8s namespaces; enforce Pod Security Standards; configure tight Security Groups/firewall rules at VM level via Neutron/OpenStack APIs.
Conclusion
Combining openstack kubernetes delivers unmatched agility plus deep infrastructure control—whether deploying greenfield clusters using Magnum or integrating legacy setups via Cloud Provider plugins! For peace of mind around data protection try Vinchin’s enterprise-ready solution today—it makes safeguarding critical workloads simple yet powerful.
Share on:


