-
What Is SQLBackupAndFTP?
-
Why Use SQLBackupAndFTP?
-
How to Backup SQL Database with SQL Server Management Studio (SSMS)?
-
How to Backup SQL Database with SQLBackupAndFTP?
-
Enterprise-Level Protection for Your Databases
-
sqlbackupandftp FAQs
-
Conclusion
Backing up your SQL databases is not just a best practice—it’s essential. Data loss can happen at any time from hardware failure, human error, or cyberattacks. Reliable backup solutions help you avoid disaster. In this article, we’ll explore what SQLBackupAndFTP is, why it’s popular among admins worldwide, and how to use it alongside native tools like SQL Server Management Studio (SSMS). We’ll also cover advanced backup strategies and show how Vinchin can further protect your databases.
What Is SQLBackupAndFTP?
SQLBackupAndFTP is a Windows-based tool that simplifies backing up and restoring SQL Server, MySQL, and PostgreSQL databases. It automates full, differential, and transaction log backups. The software compresses and encrypts backups before sending them to local folders, network shares, FTP/SFTP servers, or cloud storage such as Amazon S3 or Google Drive. Both free and paid versions exist; the free edition supports manual backups for unlimited databases but limits scheduled jobs to two databases.
Why Use SQLBackupAndFTP?
Many administrators choose SQLBackupAndFTP because it saves time while reducing risk. Its interface lets you set up backup jobs in minutes—no scripting needed. You can schedule regular backups so you never forget one again. Email notifications alert you if something goes wrong or when jobs succeed.
The tool supports AES-256 encryption—a strong standard trusted by banks—for compliance with regulations like GDPR or HIPAA. Compression reduces storage needs without sacrificing speed or reliability.
For small businesses or teams with limited database expertise, its straightforward setup removes barriers to good data protection habits.
How to Backup SQL Database with SQL Server Management Studio (SSMS)?
SSMS is Microsoft's official tool for managing SQL Server databases on Windows systems. It provides a built-in way to create reliable backups without extra software.
First open SQL Server Management Studio and connect to your server instance. In Object Explorer, right-click your target database then select Tasks > Back Up. In the Back Up Database window choose your backup type—Full, Differential, or Transaction Log—from the Backup type dropdown menu.
Under Destination, click Remove to clear any existing paths; this ensures your backup only goes where you intend it—avoiding confusion later if multiple files exist in different places! Click Add, specify where you want the file saved (for example C:\Backups\MyDatabase.bak), then click OK twice: once in each dialog box.
After completion SSMS will display a confirmation message if successful.
While this method works well out-of-the-box on Windows servers—and doesn’t require third-party tools—it lacks advanced scheduling options unless you set up custom scripts or agent jobs yourself. Also remember: always test your backups by performing periodic restores!
If you manage Linux-based environments or need command-line automation across platforms try sqlcmd. For example:
BACKUP DATABASE YourDB TO DISK = '/backups/YourDB.bak' WITH COMPRESSION;
This approach helps ensure coverage even outside Windows-only shops.
How to Backup SQL Database with SQLBackupAndFTP?
SQLBackupAndFTP streamlines database protection through automation and an easy-to-use interface—even for complex environments.
Step 1: Connect to Your Database Server
Start by launching SQLBackupAndFTP from your Start menu. The main window opens with a new job ready for configuration. Click the gear icon in the Connect to Database Server section at top left.
In the connection form select your server type (such as “SQL Server”), enter host details plus authentication credentials (Windows Authentication or username/password), then click Test Connection before saving changes with Save & Close.
A successful test means communication between tool and server works as expected—a vital first step before proceeding!
Step 2: Select Databases for Backup
Next move down to the Select databases area; click its gear icon too. Check boxes beside each database you wish backed up—or check “Backup all non-system databases” if protecting everything except system DBs like master/model/msdb/tempdb makes sense in your environment (these system DBs are usually rebuilt during reinstall).
You may exclude specific user DBs by adding them under “Exclude databases.” This flexibility helps tailor jobs precisely around business needs while avoiding unnecessary storage use.
Tip: Exclude system databases unless specifically required—they are often recoverable via other means after disaster recovery events!
Step 3: Configure Backup Destinations
Click “Add destination” under "Select destinations".
Choose from local folders, network paths, FTP/SFTP, cloud services like Amazon S3, Azure Blob, Google Drive, etc.
Enter destination credentials/settings as needed, and save.
Set up multiple destinations if needed (e.g., one local + one cloud) for redundancy.
Following the 3-2-1 rule: keep 3 copies, on 2 different media, with 1 offsite.
Step 4: Configuring Compression and Encryption
Look for the “Compression & Encryption” section.
Enable ZIP compression (Level 5 is a good balance).
Turn on AES-256 encryption, and set a strong password (ideally 16+ characters with a mix of symbols, numbers, upper/lowercase letters). Store it safely.
This protects your backups even if storage media or cloud credentials are compromised.
Step 5: Set Up Notifications and Scheduling
Enable email notifications to get alerts on job success or failure. Enter email addresses and configure SMTP settings as needed.
Then, turn on Schedule Backups, and choose a schedule—daily, weekly, or custom. Use the advanced scheduler (via gear icon) for detailed timing control.
Match your backup frequency to how often your data changes and your business SLA requirements.
Enterprise-Level Protection for Your Databases
Beyond traditional tools like SSMS and SQLBackupAndFTP, organizations seeking comprehensive protection should consider Vinchin Backup & Recovery—a professional enterprise-level solution supporting mainstream platforms including Oracle, MySQL, SQL Server, MariaDB, PostgreSQL/PostgresPro, and MongoDB. If you're focused on protecting Microsoft SQL Server environments specifically—as discussed throughout this guide—you'll benefit from features such as batch database backup management, granular data retention policies including GFS rotation schemes, ransomware protection mechanisms, cloud/tape archiving integration, and robust any-point-in-time recovery capabilities. Together these features deliver streamlined operations while maximizing security and compliance across diverse infrastructures.
Vinchin Backup & Recovery offers an intuitive web console designed for simplicity:
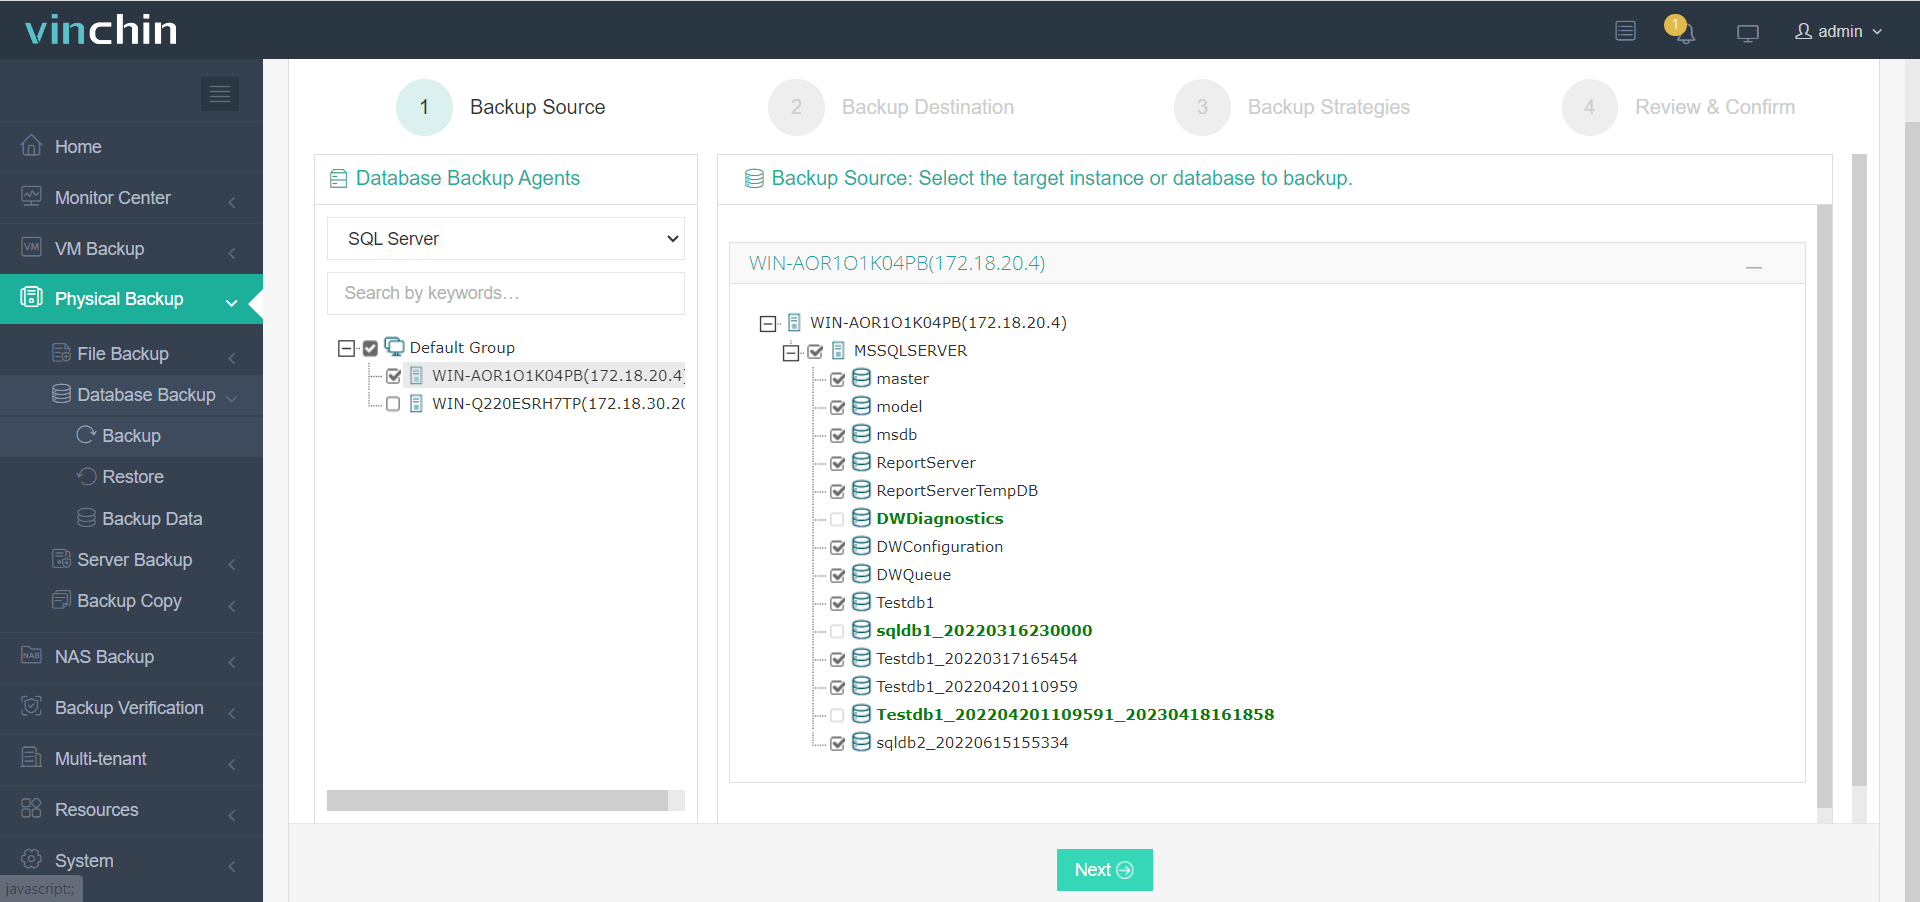
1.Just select databases on the host

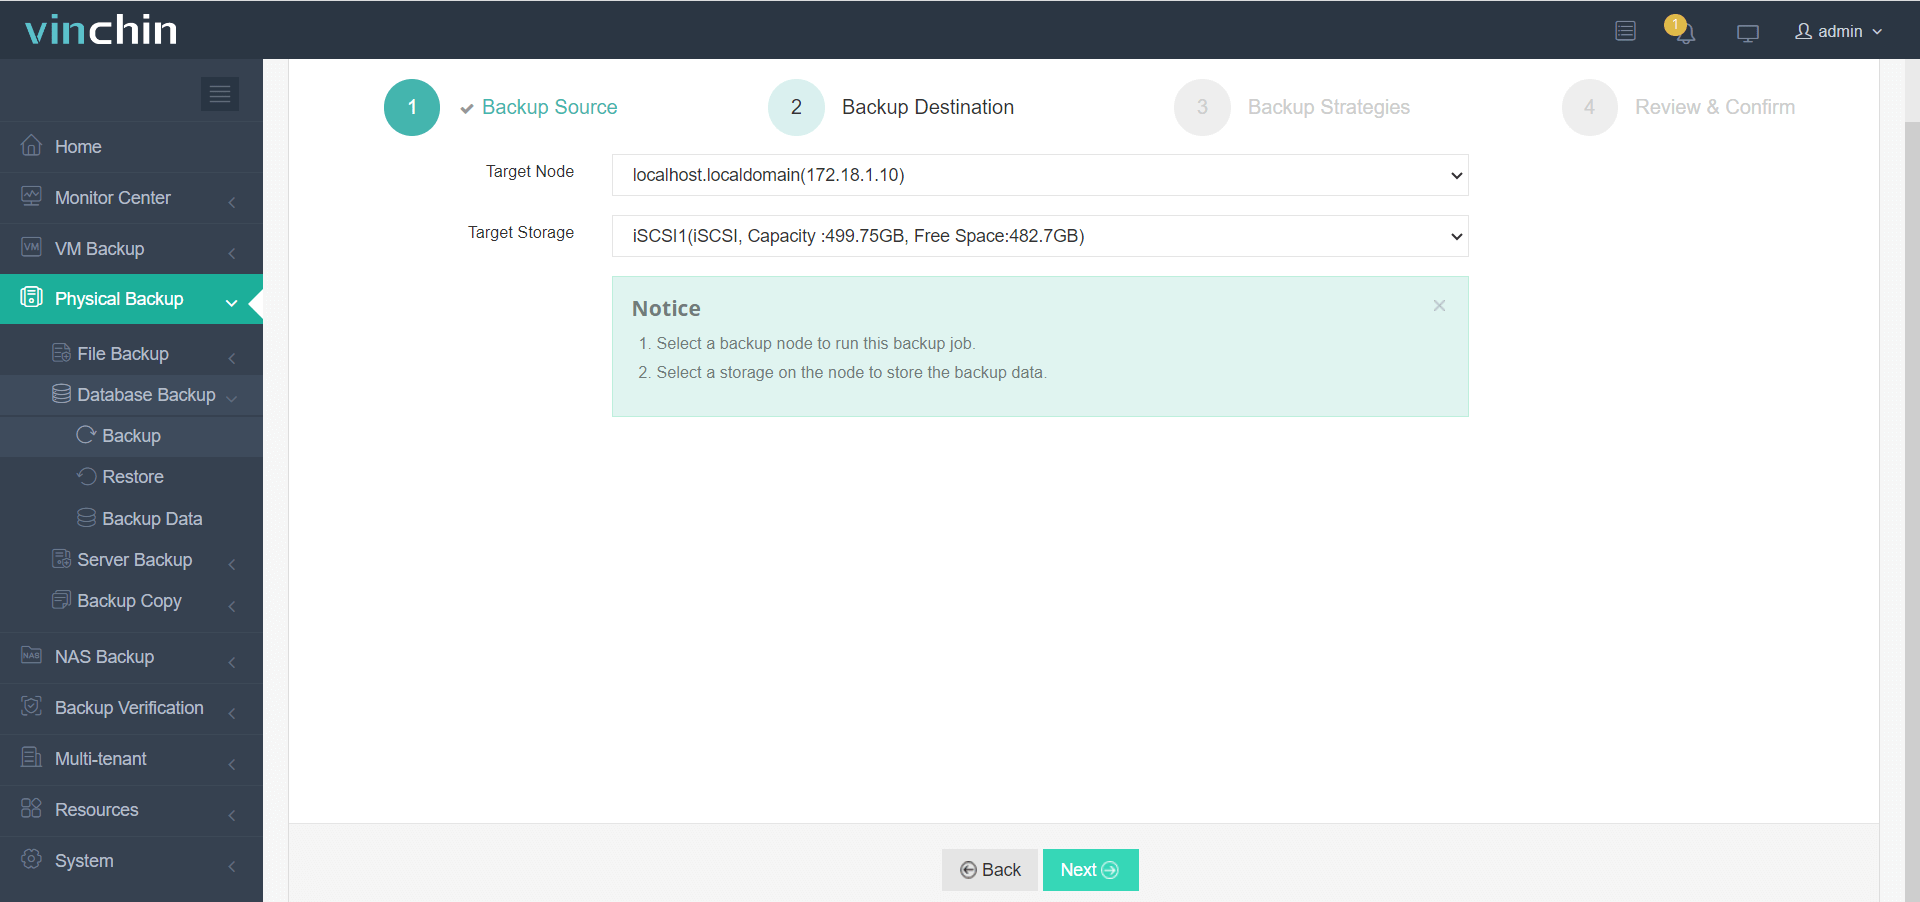
2.Then select backup destination

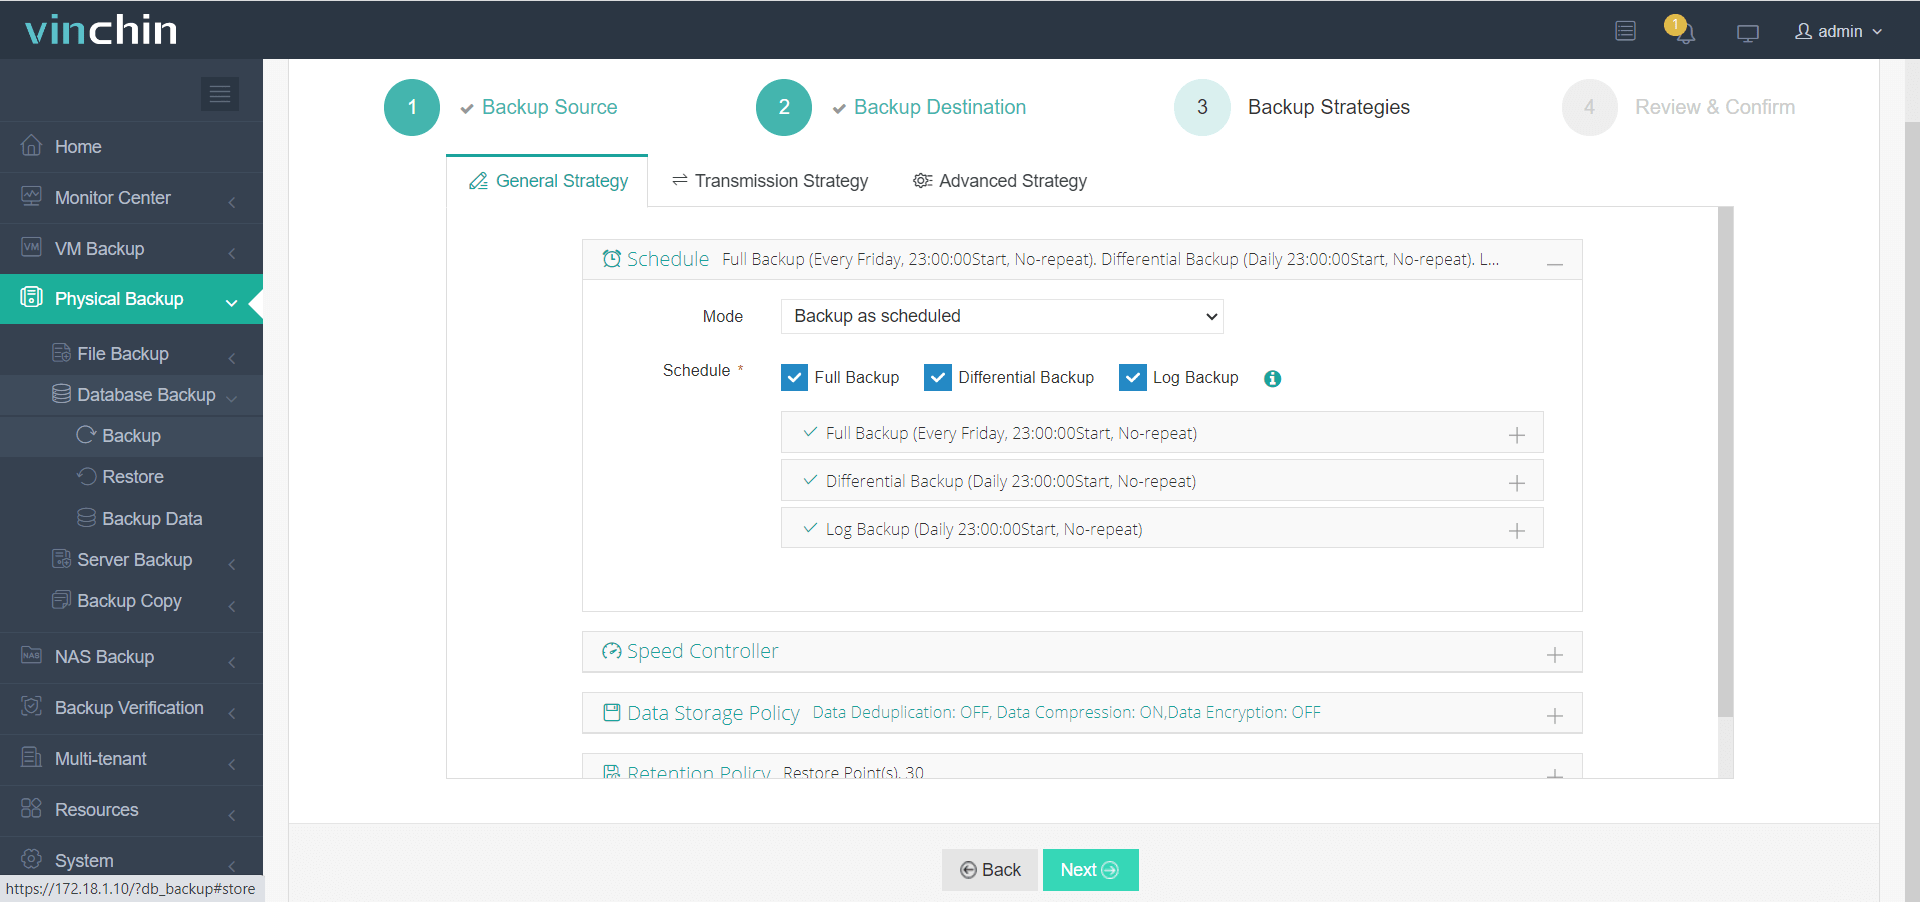
3.Select strategies

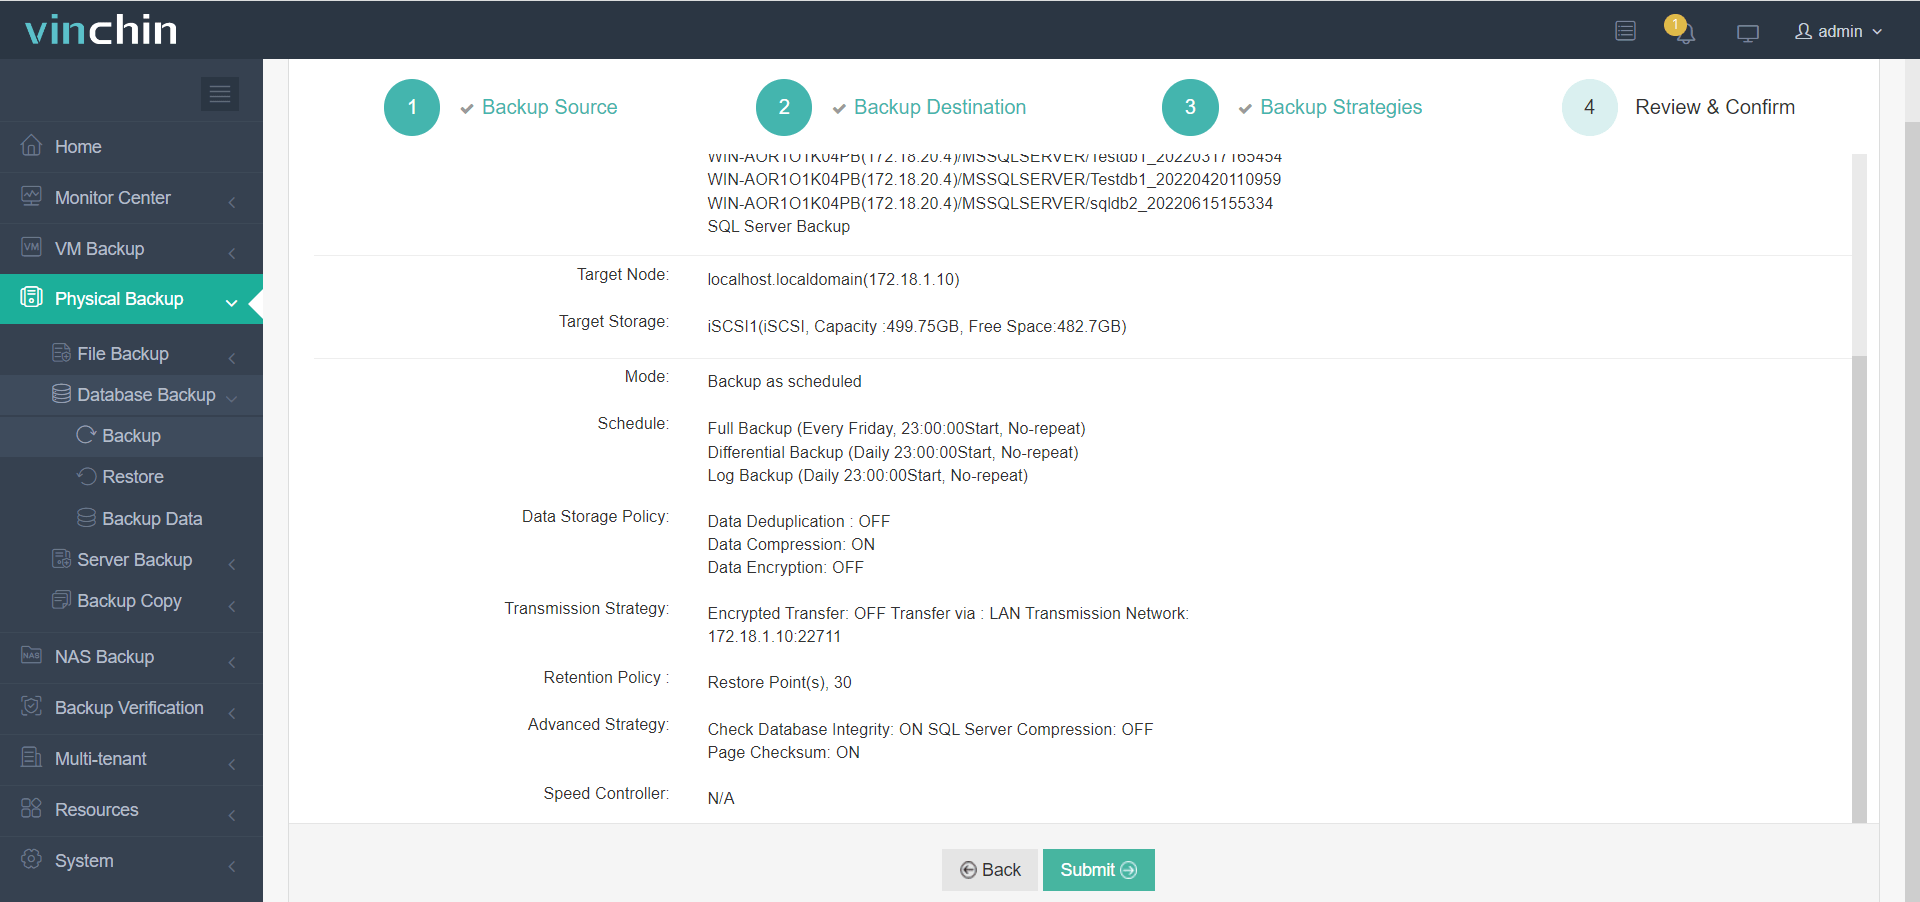
4.Finally submit the job

With global recognition among enterprises of all sizes—and top ratings from thousands of satisfied customers—you can experience Vinchin's full-featured platform free for 60 days by clicking below.
sqlbackupandftp FAQs
Q1: Can I back up Azure SQL or Amazon RDS databases with sqlbackupandftp?
Yes, SqlBackupAndFtp supports backing up both Azure SQL Database and Amazon RDS SQL Server instances. It connects to these cloud databases using standard SQL Server authentication and allows you to schedule automated backups, compress and encrypt them, and send them to destinations like local/network folders, FTP/SFTP, Dropbox, Google Drive, Amazon S3, etc.
However, note:
For Azure SQL Database, it backs up data via SQL scripts (BACPAC-like) or by exporting data as
.bakfiles (if supported).For Amazon RDS, you can use SqlBackupAndFtp to back up via SQL Server native backup if RDS allows access to the backup feature (typically through backup to S3 via RDS procedures), or more commonly, generate
.sqlscript backups.
Q2: How do I restore a database using sqlbackupandftp?
To restore a database using SqlBackupAndFtp, follow these steps:
Open SqlBackupAndFtp and go to the "History & Restore" section.
Find the backup job from which you want to restore and click the “Restore” link next to it.
Choose the backup file (.bak or .sql) you want to restore.
Enter the target SQL Server instance and authentication credentials.
Select the destination database name (you can overwrite an existing one or create a new database).
Click “Restore” and wait for the process to complete.
Tip: Ensure that the SQL Server you're restoring to has sufficient permissions and supports the file format you're restoring (e.g.,
.bakvs.sqlscripts).
Conclusion
Backing up SQL databases keeps business running even during unexpected crises—from accidental deletions through ransomware attacks alike SSMS offers basic native option while sqlbackupandftp adds automation cloud flexibility For comprehensive protection combine these tools alongside Vinchin’s centralized management advanced features modern IT environments
Share on:


