-
What Is Recover Database Until Sequence?
-
Why Use Recover Database Until Sequence?
-
Prerequisites and Pre-Recovery Checklist
-
Method 1: Manual Recovery Using Sequence Number
-
Method 2: Automated Recovery Using Oracle RMAN
-
Vinchin Backup & Recovery: Enterprise-Level Protection for Your Database Environment
-
Recover Database Until Sequence FAQs
-
Conclusion
Picture this: It’s 3:00 AM, and your production database is humming along when suddenly a script error wipes out key customer data. You have regular backups, but restoring everything would mean losing hours of legitimate transactions that happened after your last backup but before the mistake. What if you could roll back only up to just before that error? That’s where “recover database until sequence” comes in—a precise way to restore your Oracle database to exactly the right moment.
In this guide, you’ll learn what it means to recover a database until a specific redo log sequence number, why this method matters for minimizing data loss, how to perform it both manually and with Oracle RMAN (Recovery Manager), and what best practices can help ensure success.
What Is Recover Database Until Sequence?
Let’s start with the basics. In Oracle database, every change—no matter how small—is recorded in redo logs. These logs are assigned unique sequence numbers as they’re created. When you “recover database until sequence,” you restore your data up to—but not including—a particular redo log sequence number.
Why does this matter? Suppose an accidental table drop or bad update happens at 10:05 AM; by identifying which redo log contains that event (say, sequence 15), you can recover up through all changes except those captured in that log or later ones.
This approach is called incomplete recovery because you intentionally stop short of bringing the database fully current. It’s often used when you know exactly when things went wrong—like after human error or logical corruption—and want to avoid applying any unwanted changes made afterward.
Why Use Recover Database Until Sequence?
Why choose this method over others? Sometimes recovering by time or SCN (System Change Number) isn’t precise enough—especially if multiple changes happen within seconds or if clocks aren’t perfectly synchronized across systems.
Imagine someone drops an important table at 10:00 AM sharp during business hours. If you have archived redo logs available from regular backups, recovering until just before the offending log lets you keep all valid work while discarding only what was corrupted or lost due to error.
This technique also helps when synchronizing standby databases or resolving logical corruption issues where pinpoint accuracy is vital for business continuity.
Prerequisites and Pre-Recovery Checklist
Before diving into recovery steps, let’s cover some essentials every administrator should check:
First, verify that you have a recent backup taken before your target recovery point—the closer it is without overlapping unwanted changes, the better your results will be.
Next, make sure all required archived redo logs are accessible from backup time up through (but not including) your target sequence number. Missing even one log can halt recovery cold; use SQL like
SELECT SEQUENCE#, FIRST_TIME FROM V$ARCHIVED_LOG ORDER BY SEQUENCE#;
to confirm their presence and location on disk.
Identify exactly which redo log contains the event you want to avoid—often by matching timestamps or SCNs using queries against V$ARCHIVED_LOG. For example:
SELECT SEQUENCE#, FIRST_TIME
FROM V$ARCHIVED_LOG
WHERE FIRST_TIME >= SYSDATE-1
ORDER BY SEQUENCE#;
This shows logs generated within the last day so you can match them against known incident times.
Finally, remember that performing this type of recovery requires downtime—the database must be mounted but not open—so communicate clearly with stakeholders about expected service interruptions before proceeding.
Method 1: Manual Recovery Using Sequence Number
Manual recovery gives experienced administrators granular control over each step—a lifesaver when archive logs live in non-standard locations or when automation isn’t possible due to unusual circumstances.
Start by ensuring your Oracle instance is running in MOUNT mode:
1. Connect as sysdba using SQL*Plus
2. Issue SHUTDOWN IMMEDIATE if needed
3. Start up with STARTUP MOUNT
Now initiate manual recovery:
At the SQL*Plus prompt type
RECOVER DATABASE UNTIL CANCELThe system prompts for each archived redo log file needed:
    ORA-00279: change 123456 generated at 10/15/2023 08:30:45 needed for thread 1
    ORA-00289: suggestion : /u01/archive/1_100.arc
    ORA-00280: change 123456 for thread 1 is in sequence #100

    Specify log: {<RET>=suggested | filename | AUTO | CANCEL}
You may press Enter to accept Oracle’s suggested path if correct—or type out another full path if files are stored elsewhere (for example /mnt/backup/archive/1_101.arc). This flexibility helps when dealing with custom storage setups or disaster scenarios where files were moved offsite for safety.
Continue supplying paths (or pressing Enter) as prompted; Oracle applies each archive sequentially until reaching your desired stopping point—for instance just before sequence number 15 if that’s where trouble began.
When prompted for the next archive after applying all safe changes (Specify log:), simply type CANCEL. This halts further application of redo logs so no unwanted events are replayed into your restored environment.
Afterward:
Open your recovered database using
ALTER DATABASE OPEN RESETLOGS;
This crucial command resets internal counters so future archives don’t conflict with old ones—a mandatory step after incomplete recoveries!
Method 2: Automated Recovery Using Oracle RMAN
For most admins today, RMAN offers speedier—and safer—recovery thanks to built-in checks and automation features designed specifically for complex enterprise environments.
Begin by connecting RMAN both locally and remotely as needed:
1. Launch RMAN (rman TARGET /)
2. Shut down any running instance via SHUTDOWN IMMEDIATE
3. Mount using STARTUP MOUNT
Now define how far back you wish to go—in our example let’s say just before redo log sequence number 15 was created:
RUN {
   SET UNTIL SEQUENCE 15 THREAD 1;
   RESTORE DATABASE;
   RECOVER DATABASE;
}
Here,
SET UNTIL SEQUENCEtells RMAN precisely where to stop applying archived logsThe optional
THREADparameter distinguishes between instances in RAC clusters; single-instance databases almost always use thread value “1”RESTORE DATABASEpulls datafiles from backup mediaRECOVER DATABASEreplays only those archived logs leading up—but not beyond—the specified stopping point
Once complete,
open your restored environment using
ALTER DATABASE OPEN RESETLOGS;
Crucial Step: Opening with RESETLOGS creates a new incarnation of your database—it resets internal counters so old archives cannot be mistakenly applied later! Always take a fresh full backup immediately after opening with RESETLOGS since previous backups become obsolete at this point.
Vinchin Backup & Recovery: Enterprise-Level Protection for Your Database Environment
Given how critical precise point-in-time restoration is for Oracle environments—as well as MySQL, SQL Server, MariaDB, PostgreSQL/PostgresPro, and MongoDB deployments—it makes sense to invest in robust protection solutions like Vinchin Backup & Recovery. As a professional enterprise-level platform supporting nearly all mainstream databases including Oracle first and foremost here, Vinchin Backup & Recovery delivers advanced capabilities such as incremental backups options tailored per engine type, batch management of multiple databases simultaneously, flexible retention policies including GFS support, ransomware protection mechanisms built-in across workloads, and seamless cloud/tape archiving integration—all designed for operational resilience and regulatory compliance needs alike.
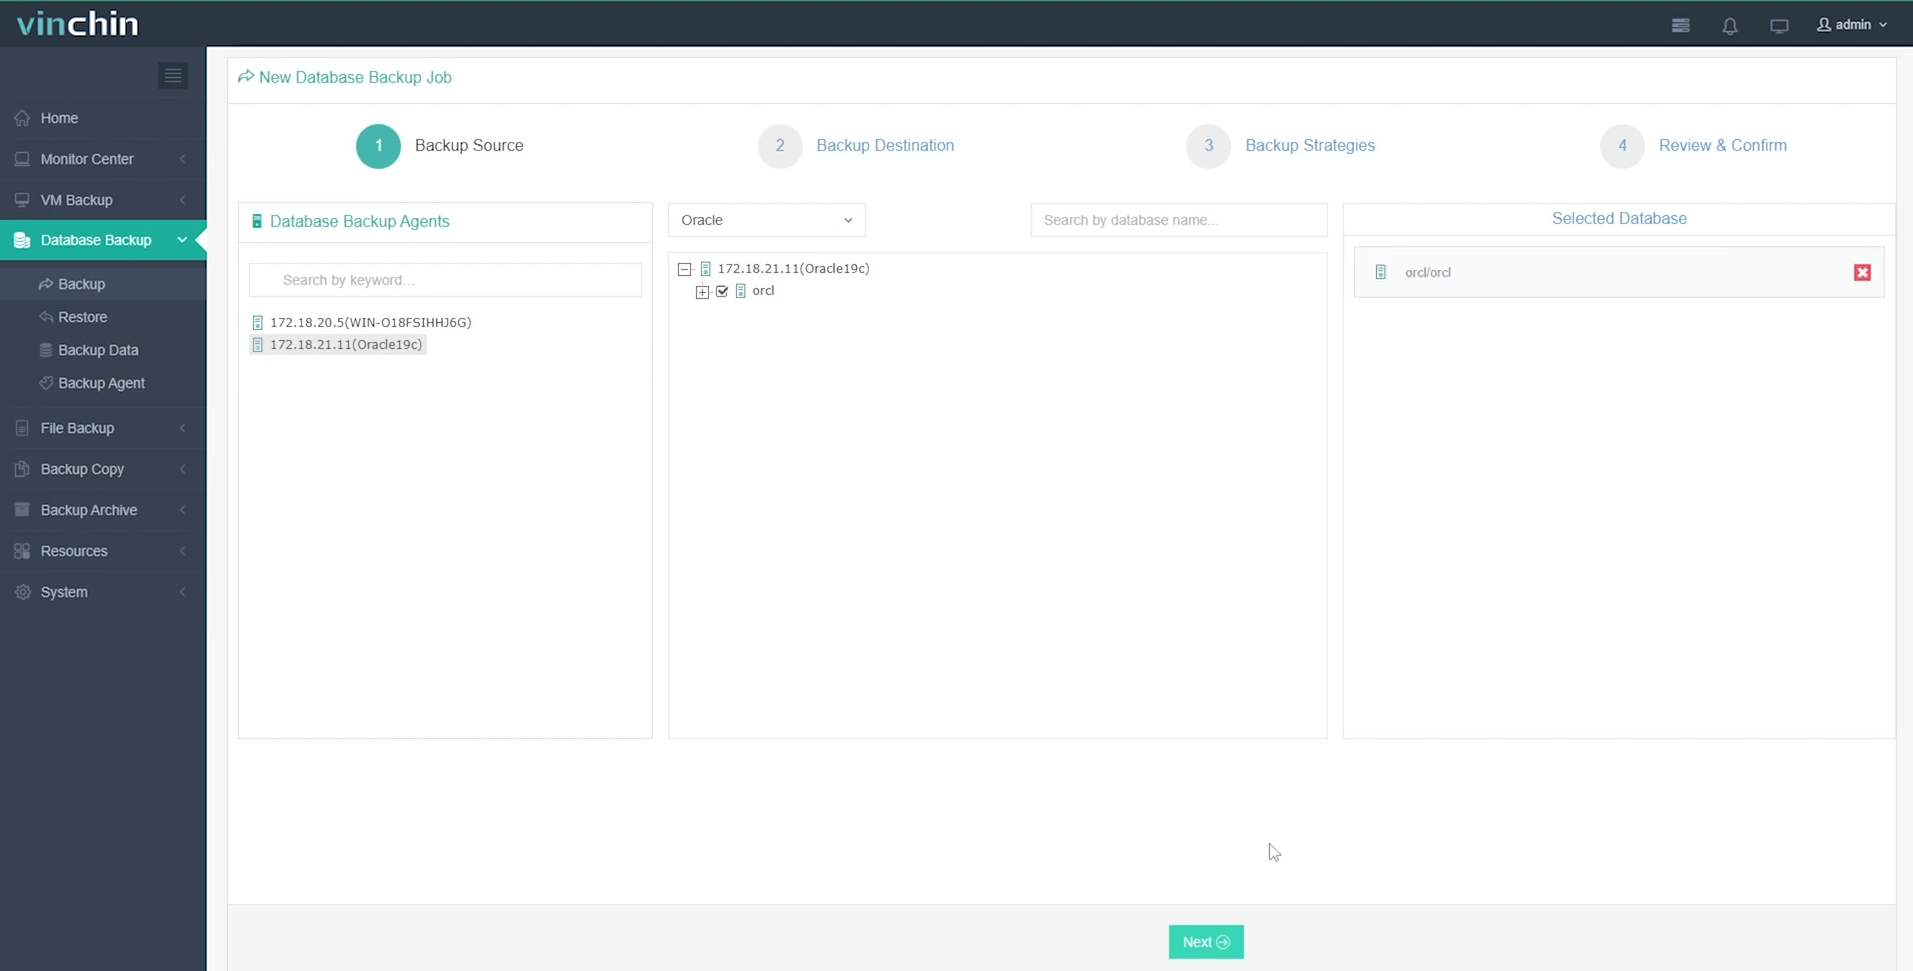
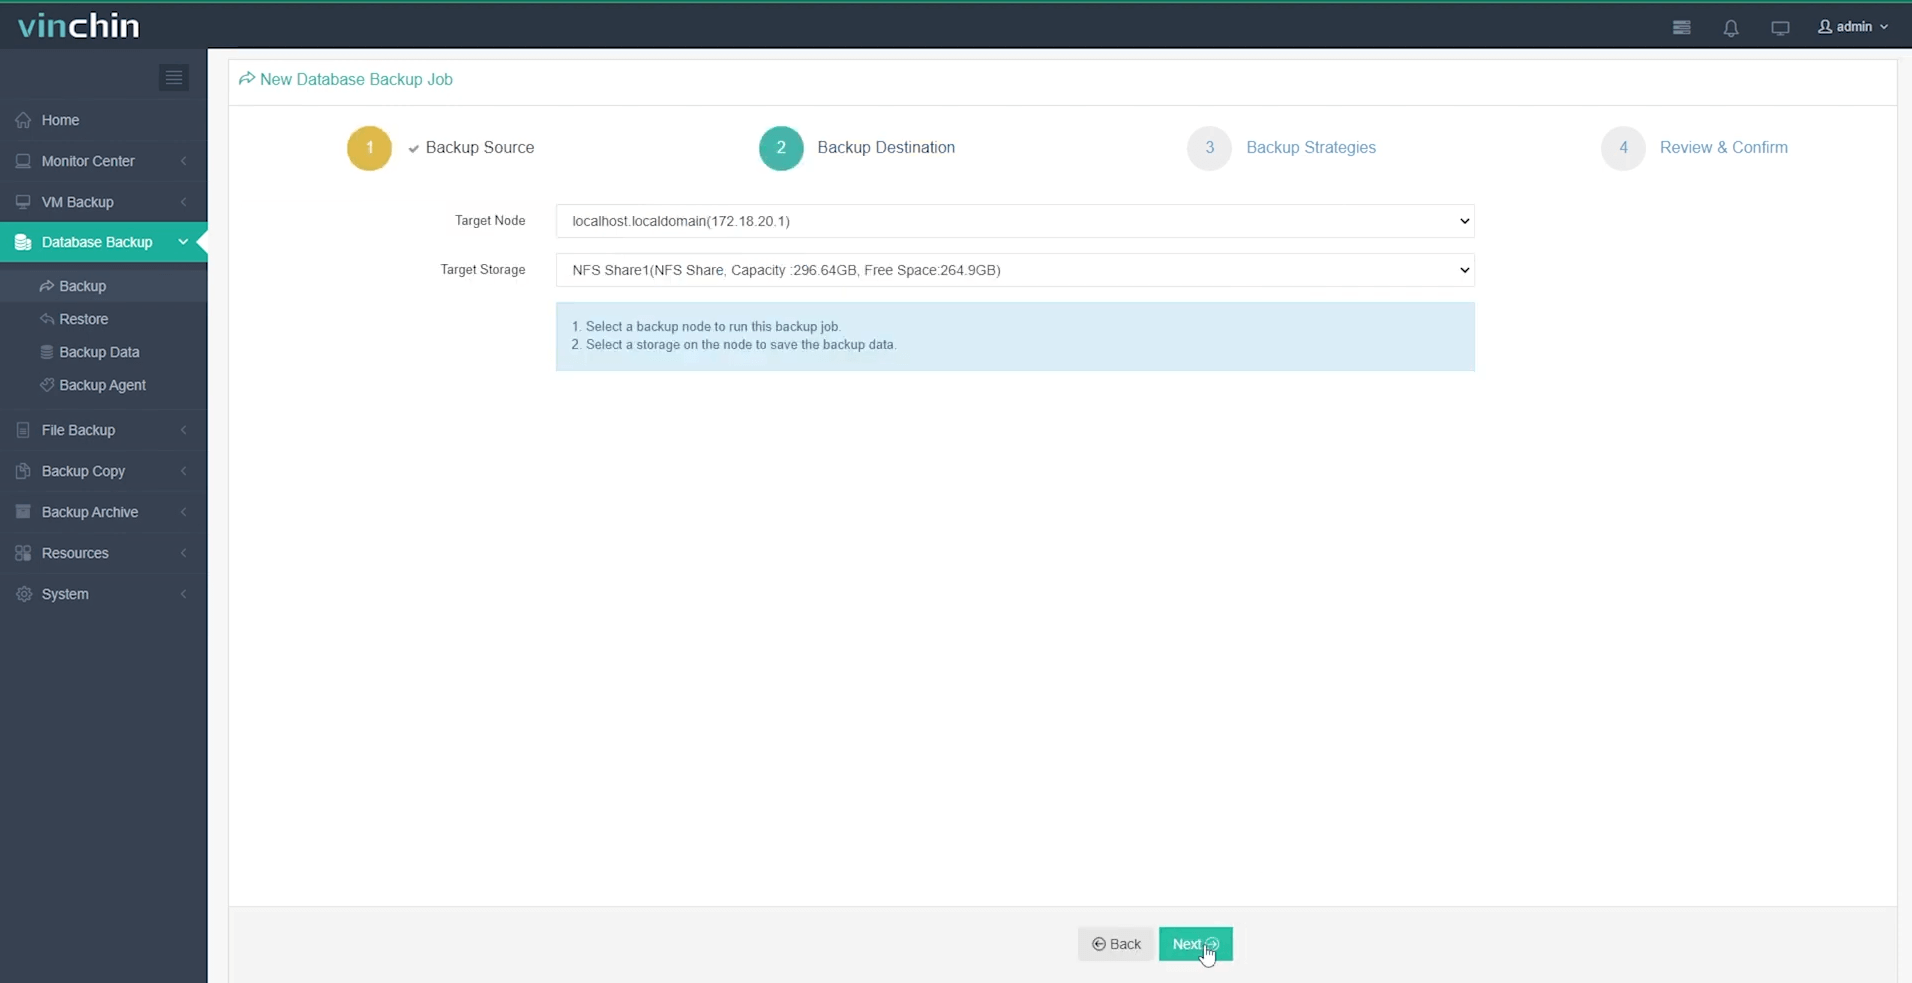
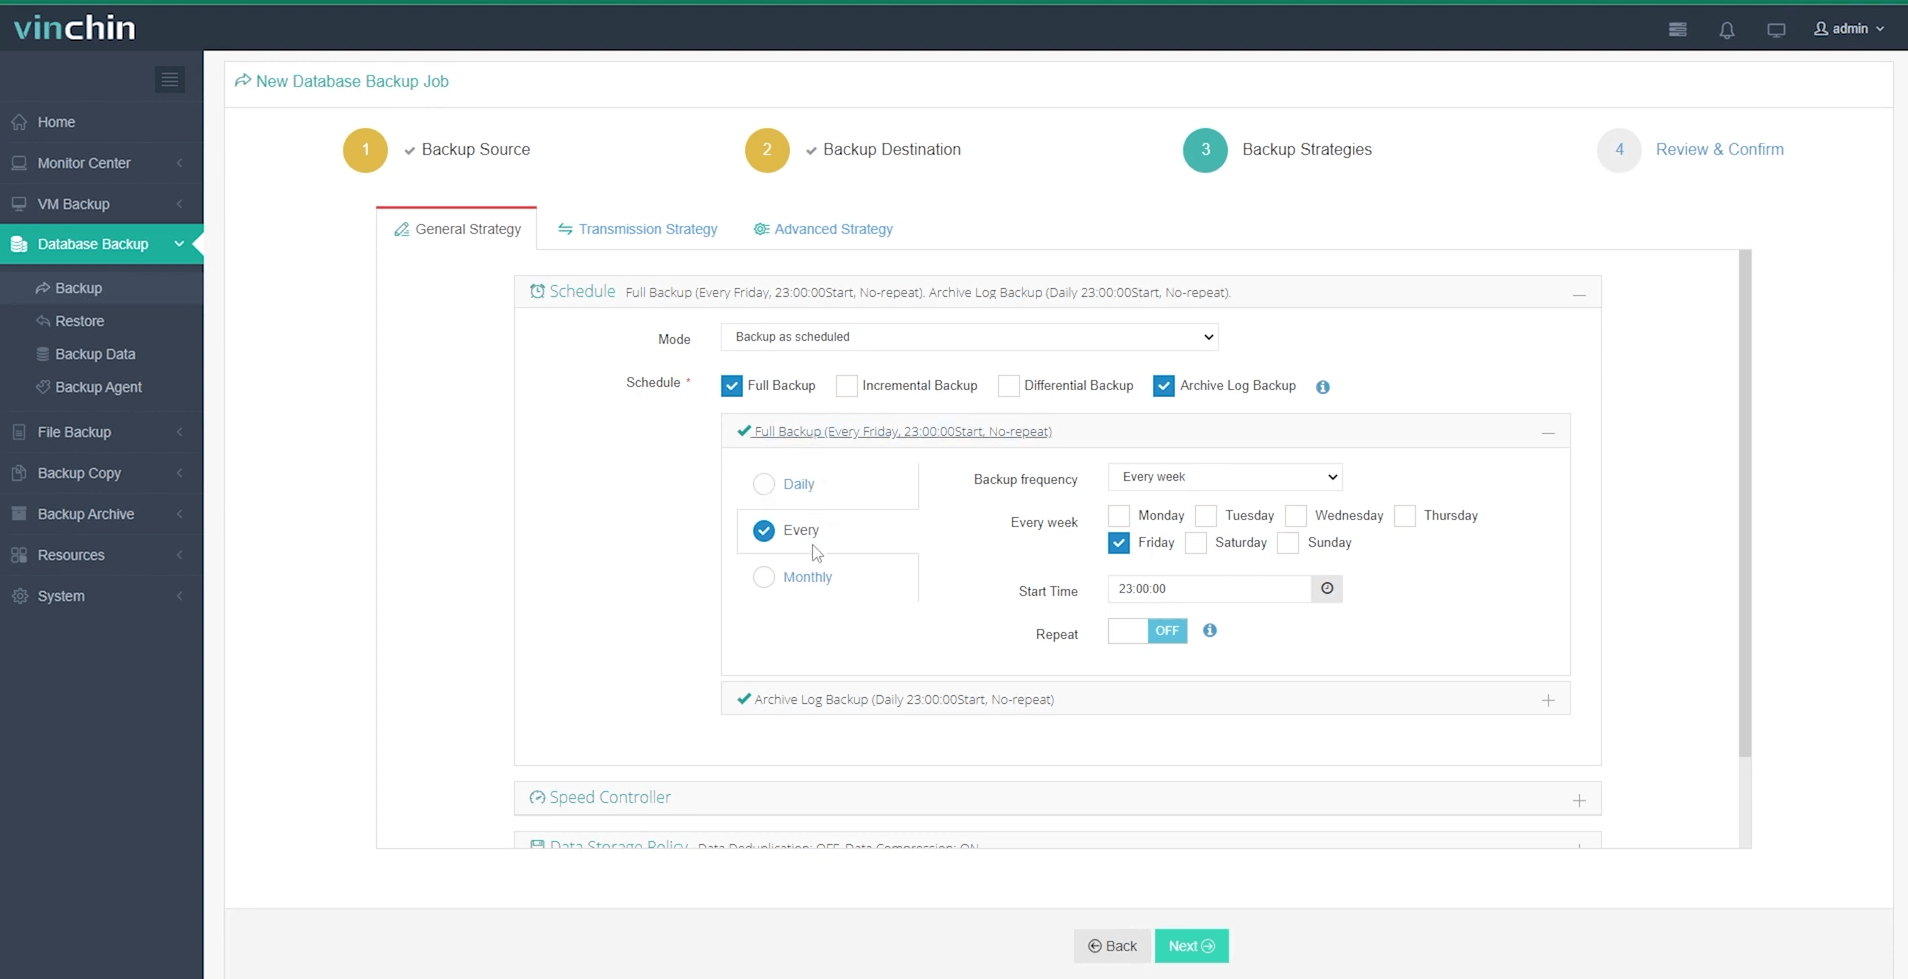
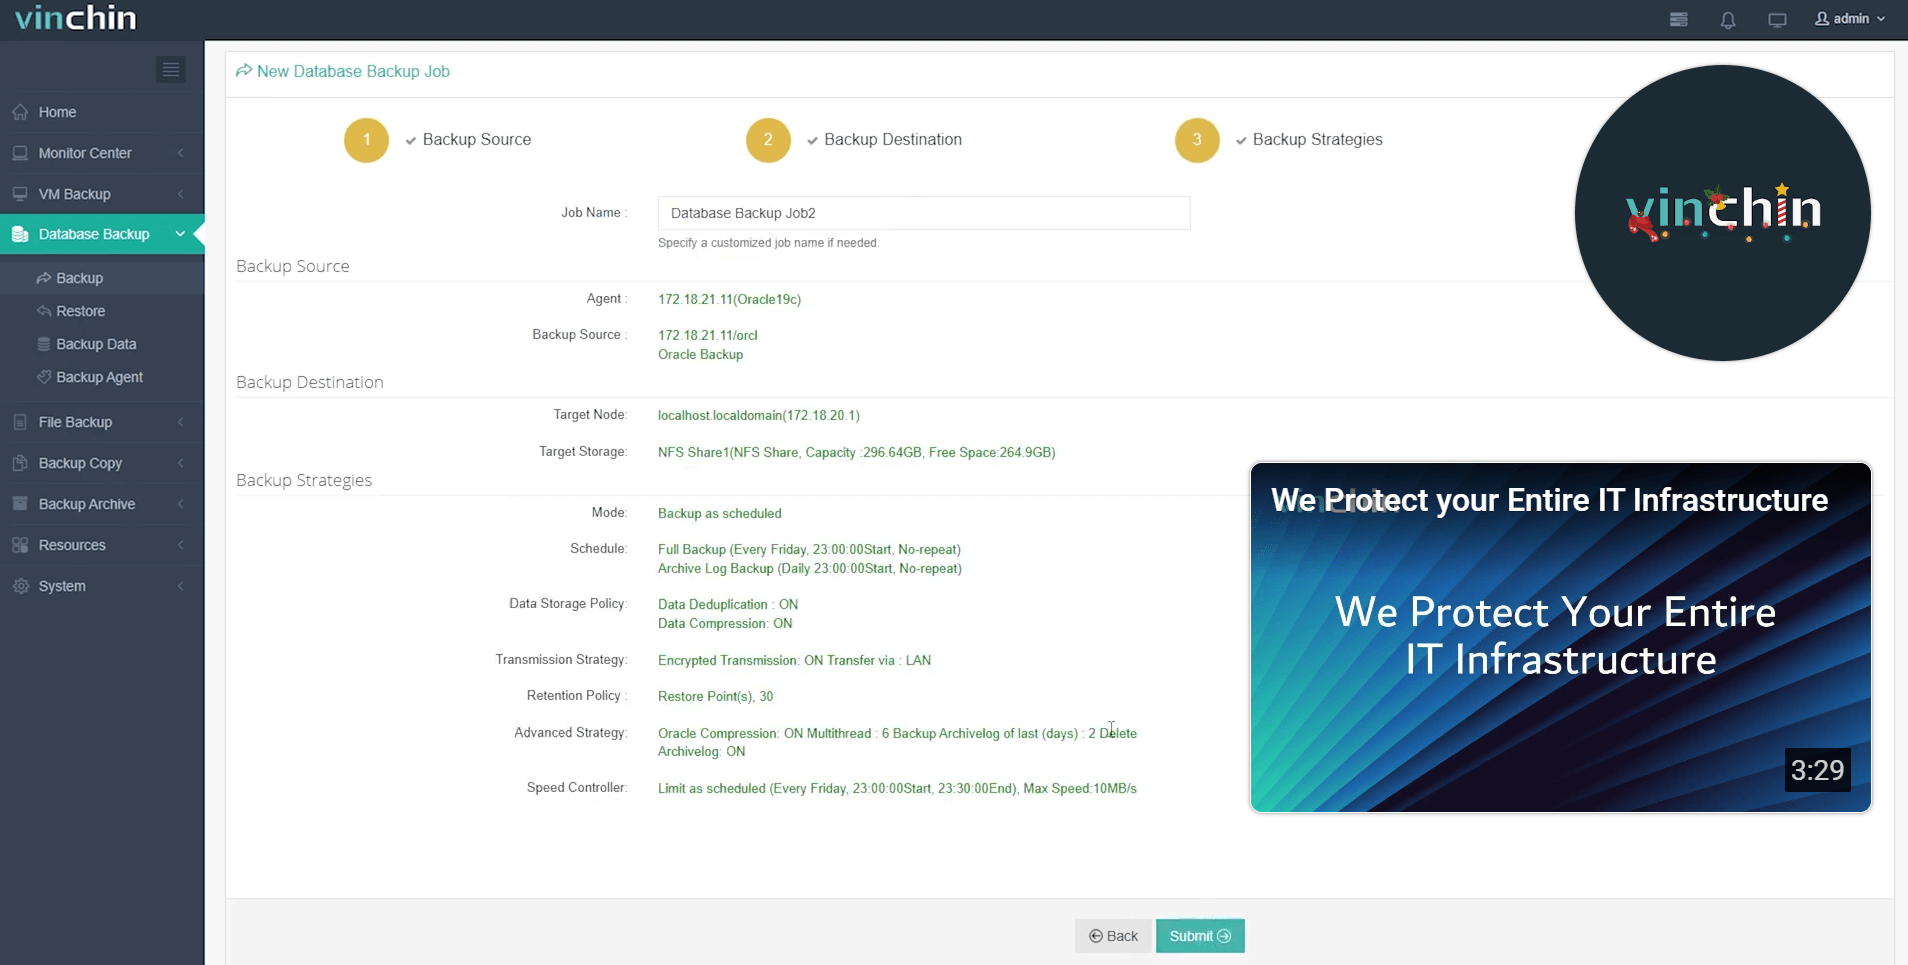
The intuitive web console streamlines operations into four simple steps tailored specifically for Oracle users:
Step 1: Select the Oracle database to back up

Step 2: Choose your preferred backup storage

Step 3: Define a tailored backup strategy

Step 4: Submit the job

With thousands of global customers relying on its top-rated technology daily—and a reputation backed by industry-leading reviews—you can try Vinchin Backup & Recovery risk-free today with a full-featured 60-day trial download below!
Recover Database Until Sequence FAQs
Q1: Can I perform "recover database until sequence" if some required archive logs are missing?
A1: No—you must have every necessary archive log present up through (but not including) your target sequence number for successful completion; missing files will halt progress immediately.
Q2: How do I determine which redo log sequence corresponds with my desired rollback point?
A2: Query V$ARCHIVED_LOG using SELECT statements filtered by timestamp or SCN values matching known incident times.
Q3: What happens if I try opening my recovered environment without issuing ALTER DATABASE OPEN RESETLOGS?
A3: The operation fails—Oracle enforces use of RESETLOGS following incomplete recoveries since internal counters must be reset first.
Q4: What should I do immediately after opening my recovered environment with RESETLOGS?
A4: Take a new full backup right away since previous backups become incompatible after creating a new incarnation.
Conclusion
Recovering an Oracle database until a specific sequence lets administrators undo mistakes while preserving valid work done beforehand—a vital skill under pressure! Whether working manually via SQL*Plus or automating tasks through RMAN scripts, always verify prerequisites carefully beforehand. Vinchin makes building robust backup/recovery plans easier so teams stay ready no matter what challenges arise next time around!
Share on:


