VMware vSphere is the popular virtualization solution, which helps companies and organizations easily deploy virtual environment. Although the server virtualization technology is already in its mature state, there is still a lot of maintenance work to do every day and sometimes issues would trouble the IT administrators.
What Does "Virtual Machine Disk Consolidation Is Needed" Mean?
In VMware environments, snapshots create delta disks that temporarily store changes made after the snapshot is taken. These delta files are commonly named like:
VMName-000001.vmdk
VMName-000002.vmdk
Normally, when snapshots are deleted, VMware merges these changes back into the base VMDK disk through a process called disk consolidation.
However, if the merge process fails or is interrupted, orphaned delta disks remain on the datastore. VMware then displays the warning:“Virtual machine disks consolidation is needed.”
Causes of the VMware Disk Consolidation Error
1. Failed snapshot deletion
This is the most common cause. The snapshot deletion task may successful in vSphere, but the delta disks are not fully committed.
2. Backup software leaves orphaned snapshots
If a backup task crashes or proxy disks remain attached, VMware may fail to remove temporary snapshots correctly.
3. Insufficient datastore space
Snapshot consolidation requires temporary working space.
4. Locked VMDK files
A VMDK can become locked by:
Common errors include:
Why Need to Consolidate the Virtual Machine Disk?
In the situation, you might not find the information of VM snapshot but could see the delta files in the properties of VM or see virtual machine disks consolidation is needed error but have no snapshots. The possible causes are as follows:
1. After you make VM backup, the snapshots are not properly deleted.
2. Virtual machine disk consolidation could not be completed because of not enough space on the datastore.
3. If you are using a third-party VM backup solution, snapshot files might be locked by it. The third-party software might also cause failed snapshot deleting or backup creation.
4. There might be issues with vCenter server and ESXi host connectivity.
5. There are too many VM snapshots and consolidation fails. 32 is the recommended maximum number.
6. The consolidation might be in process because of larger files, but the alert still shows up. If you have performed disk consolidation but find that VMware disk consolidation not working, it might be because the task hasn't been completed.
How to Fix VMware ESXi Disk Consolidation Issue?
In the last section, you have known the possible causes of the issue so you could troubleshoot it according to the real situation. Also, you could use the following solutions to fix the issue.
If you are worried that performing virtual machine disk consolidation might lead to data loss, backup VM before the operation.
Solution 1. Use VMware Consolidate Function
This is the safest and most direct fix.
1. Open vSphere Client, right-click the affected VM
2. Select Snapshots > Consolidate
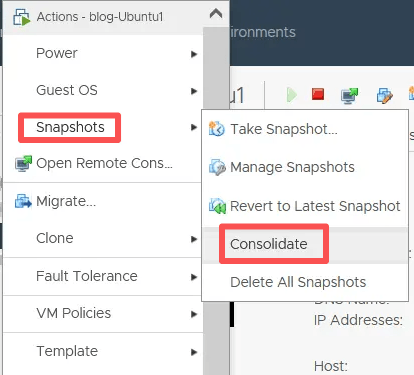
3. Confirm the task, click Yes
4. Monitor Recent Tasks untile completion
Solution 2. Delete snapshots in Snapshot Manager
This is the solution from a member of VMware community. If you cannot find the "invisible" snapshot in Snapshot Manager or cannot delete or consolidate snapshots (Consolidate option is greyed-out), then create a new snapshot to have a further operation.
1. Log into vSphere client, locate the problematic VM and right-click the VM
2. Select Snapshot >Take Snapshot and name the snapshot, click OK
3. Right-click the VM again, select Snapshot > Manage Snapshots > DELETE ALL
Solution 3. Consolidate snapshot with PowerCLI
This is also a solution from VMware community and some members think it's useful.
1. Download the .vmx and open it with a text editor find the line that has the virtual disk files configured scsi0:0.fileName = "virtual-machine-000001.vmdk" and remove "-000001" so you are left with scsi0:0.fileName = "virtual-machine.vmdk" save the file.
2. Rename the .vmx file on the datastore to .old and upload the edited .vmx file.
3. Either reload the VM by using PowerCLI or remove the VM from the Inventory and re-add it again.
4. Power on the VM.
5. If you get the "Virtual Disk Consolidation needed" message, go to the Snapshot menu and click "Consolidate" it should run correctly now and remove the message.
6. Manually remove the unused files from the datastore .old, -000001.vmdk and -000001-flat.vmdk.
Prevention of VMware Consolidation Problems
1. Avoid long-term snapshots
Snapshots should never be treated as backups.
2. Monitor datastore capacity
Always maintain sufficient free space before:
Running backups
Creating snapshots
Performing upgrades
3. Use reliable VMware backup software
Unstable backup jobs are one of the biggest causes of orphaned snapshots.
Vinchin Backup & Recovery Helps Reduce VMware Consolidation Risks
Now that you know how to resolve consolidation alerts, consider protecting your VMware environment with Vinchin Backup & Recovery. As a professional, enterprise-level VM backup solution, Vinchin supports VMware, Hyper-V, Proxmox, oVirt/OLVM/RHV, XCP-ng/XenServer, OpenStack, ZStack and more—covering 15+ platforms.
For VMware environments specifically, Vinchin helps reduce consolidation-related risks through:
Agentless VMware backup
Intelligent snapshot management
Automated backup verification
CBT-based incremental backup
Fast VM recovery
Centralized backup scheduling
Cross-platform VM protection
Unlike manual snapshot handling, Vinchin automates backup workflows and reduces the chance of leftover snapshot chains after backup operations.
The web console is intuitive. To back up a VMware VM in four simple steps:
1. Select the VMware VM to protect

2. Select the backup storage

3. Select the backup strategies

4. Submit the job

Vinchin is trusted by thousands worldwide and consistently rates highly among enterprise users. Experience every feature risk-free with a 60-day full-featured free trial—click below to download and deploy today.
Virtual machine disk consolidation is needed FAQs
Q1. What triggers "virtual machine disk consolidation is needed"?
It appears when VMware detects leftover redo logs or delta files after a snapshot doesn’t delete properly.
Q2. How do I clear a greyed-out CONSOLIDATE button?
Right-click VM > Take Snapshot > Manage Snapshots > DELETE ALL
Q3. Can I consolidate disks without shutting down my VM?
Yes, VMware's Consolidate operation runs online and preserves VM uptime. However, performance impact may occur during large consolidation operations.
Q4. How do I fix invisible snapshots via .vmx editing?
Download .vmx > Remove “-000001” in fileName > Upload edited .vmx > Reload VM > Power On
Sum Up
"Virtual machine disk consolidation is needed" alert often appears after incorrect snapshot deleting or other situations. The possible reasons have been listed in this passage so you could troubleshoot the issue by yourself. Also, you could use the 3 solutions in this passage to solve the problem.
To always avoid data loss, it is suggested to backup your virtual machines. Vinchin Backup & Recovery supports automated and agentless backup for VMware virtual machines. You could try 60-day full-featured free trial first to experience a brand-new effortless backup solution.