-
What Does Run ESXi From USB Mean
-
Why Run ESXi From USB
-
Method 1: Install ESXi On USB Drive
-
Method 2: Boot Existing ESXi From USB
-
How to Back Up ESXi Virtual Machines With Vinchin Backup & Recovery
-
Run ESXI From USB FAQs
-
Conclusion
Running ESXi from a USB drive offers flexibility and cost savings for IT environments of any size. Whether you manage a lab or production servers, this method can simplify deployment and recovery tasks. In this guide, you’ll learn what it means to run ESXi from USB, why it’s useful, how to set it up step by step—including troubleshooting—and how to protect your virtual machines along the way.
What Does Run ESXi From USB Mean
To run ESXi from USB means installing or booting VMware’s hypervisor directly from a USB flash drive or SD card instead of using an internal hard disk or SSD as your system disk. When you power on your server, it loads ESXi into memory from this removable device. This approach is officially supported by VMware (Broadcom KB 310085) and is popular in diskless server setups where minimizing hardware costs matters most.
For many administrators, running ESXi from USB also means easier upgrades—just swap out drives—or faster disaster recovery if something goes wrong with your primary storage device.
Why Run ESXi From USB
Why choose to run ESXi from a USB drive? There are several reasons that make this setup attractive:
It reduces hardware costs since there’s no need for dedicated boot disks.
Maintenance becomes simpler; if your boot device fails, swapping in a replacement takes just minutes.
Upgrades are safer—you can clone your working installation before making changes so rollbacks are quick if needed.
Deployment across multiple hosts gets easier because you can duplicate pre-configured images onto several drives at once.
However, keep these points in mind: Booting from USB may be slower than using SSDs or HDDs; log files aren’t stored persistently unless configured; and consumer-grade flash drives may wear out faster than enterprise storage devices.
Method 1: Install ESXi On USB Drive
Installing ESXi on a USB drive is straightforward but requires careful attention to compatibility and best practices at every step.
First things first: Always use high-quality flash drives—preferably industrial-grade models designed for frequent writes—to reduce failure risk over time. Make sure your server supports booting from external media by checking its BIOS or UEFI settings before starting.
1. Begin by inserting an empty USB flash drive (at least 8 GB recommended) into your server’s available port. Download the latest official VMware ESXi ISO image to another computer.
2. Next, create installation media using tools like Rufus (for Windows), UNetbootin (for Linux/Mac), or VMware-provided utilities to write the ISO file onto another blank USB stick—this one acts as your installer rather than as the final destination for ESXi itself.
3. Insert both sticks into your target server—one as installer media and one as the future system disk—and power up the machine. Enter BIOS/UEFI setup during startup (usually by pressing F2, DEL, or similar). Set “USB” as first in the boot order list so that installation begins automatically when you restart with both sticks attached.
4. When prompted by the installer screen, press Enter at welcome message then hit F11 to accept licensing terms. You’ll see a list of available disks; select your blank target flash drive here—not the installer stick!
5. Continue through prompts selecting keyboard layout then setting root password credentials before confirming install with another tap of F11 key again when asked “Are You Sure?”
6. Wait patiently while files copy over; upon completion remove both sticks leaving only newly created system disk plugged-in going forward! Reboot one last time adjusting firmware menu so permanent boot priority favors correct device now containing fresh OS image ready-to-go every time power cycles thereafter without further intervention required except normal day-to-day administration duties ahead.
Configuring Persistent Logs For USB-Booted ESXi
By default when running ESXi from removable storage such as flash drives core dumps plus log files live solely within volatile RAM space meaning they disappear after each reboot unless redirected elsewhere manually via configuration tweaks outlined below:
To ensure logs persist between restarts:
1. Open Host Client interface
2. Navigate through menus: Host > Manage > System > Advanced settings
3. Locate field labeled ScratchConfig.CurrentScratchLocation
4. Edit value entering full path pointing toward reliable datastore location e.g., /vmfs/volumes/datastore1/scratch
5. Save changes then reboot host if prompted
Alternatively configure remote syslog forwarding via CLI commands:
esxcli system syslog config set --loghost=<syslog_server_ip>
esxcli system syslog reload
Setting up persistent logging ensures critical diagnostic data survives unexpected shutdowns—a must-have best practice especially when relying on less durable consumer-grade hardware!
Method 2: Boot Existing ESXi From USB
Sometimes you need more than just fresh installs—you want rapid disaster recovery or mass deployment based on preconfigured templates cloned across multiple hosts quickly without repeating manual steps each time anew.
Here’s how experienced admins handle these situations:
Cloning And Restoring An Existing Installation
Start by shutting down source host safely ensuring no active VMs remain powered-on beforehand! Remove original boot stick connecting it instead directly onto separate Linux workstation equipped with sufficient free space available locally.
Now clone contents byte-for-byte preserving everything exactly intact including partition tables hidden metadata etcetera utilizing classic Unix toolset favorite dd syntax shown below:
dd if=/dev/sdX of=./esxi-flash.img bs=4M status=progress
Replace /dev/sdX accordingly matching detected identifier above else risk overwriting unrelated volumes accidentally—a common pitfall easily avoided simply double-checking beforehand always!
Once backup completes insert fresh blank stick equal-or-greater capacity writing saved image back out reversing directionality thusly:
dd if=./esxi-flash.img of=/dev/sdY bs=4M status=progress
sync
Again substitute /dev/sdY referencing appropriate destination slot now occupied newly inserted medium awaiting restoration process finish line soon reached momentarily thereafter.
Afterwards move cloned stick back into original server slot updating firmware menu priorities accordingly prior powering-up anew watching familiar splash screens reappear reassuringly signaling successful migration event concluded seamlessly.
Automating Cloning With Scripts For Advanced Users
If managing large fleets consider scripting repetitive tasks saving valuable time long-term! Here’s simple Bash example illustrating basic workflow logic suitable adaptation personal needs.
#!/bin/bash
echo "Cloning source..."
dd if=/dev/sdX of=/path/to/esxi-backup.img bs=4M status=progress
sync
echo "Restore complete!"
Just remember always validate device names carefully before launching automation jobs!
How to Back Up ESXi Virtual Machines With Vinchin Backup & Recovery
Protecting virtual machines hosted on VMware environments requires robust backup solutions tailored for enterprise needs. Vinchin Backup & Recovery is a professional solution designed specifically for virtual machine backup across more than 15 mainstream virtualization platforms—including VMware, Hyper-V, Proxmox, oVirt, OLVM, RHV, XCP-ng, XenServer, OpenStack, ZStack and others—with deep integration for VMware environments featured in this article's focus area.
Vinchin Backup & Recovery delivers advanced features such as quiesced snapshot support on VMware platforms for consistent backups; CBT-enabled fast incremental backups; LAN-free backup options that minimize network load; instant recovery capabilities for rapid VM restoration; and comprehensive data deduplication/compression technology—all contributing to efficient protection and minimal downtime while optimizing resource usage across diverse infrastructures.
The intuitive web console makes safeguarding VMs straightforward:
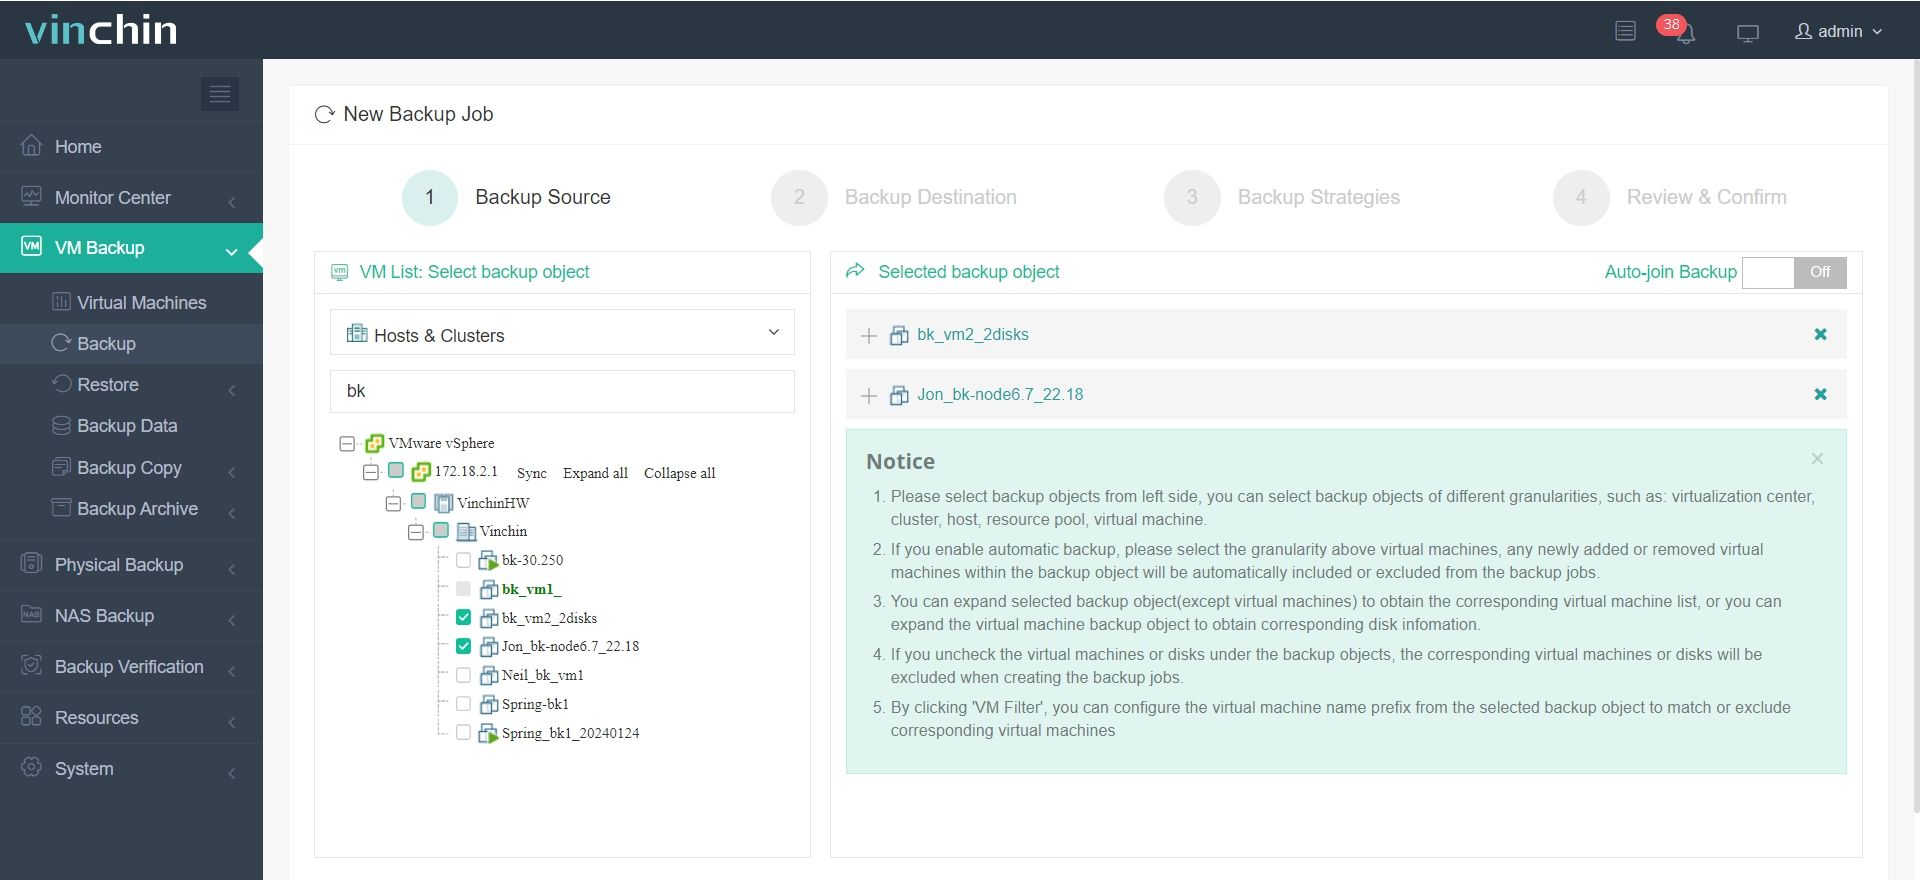
Step 1: Select the VMware VM to back up

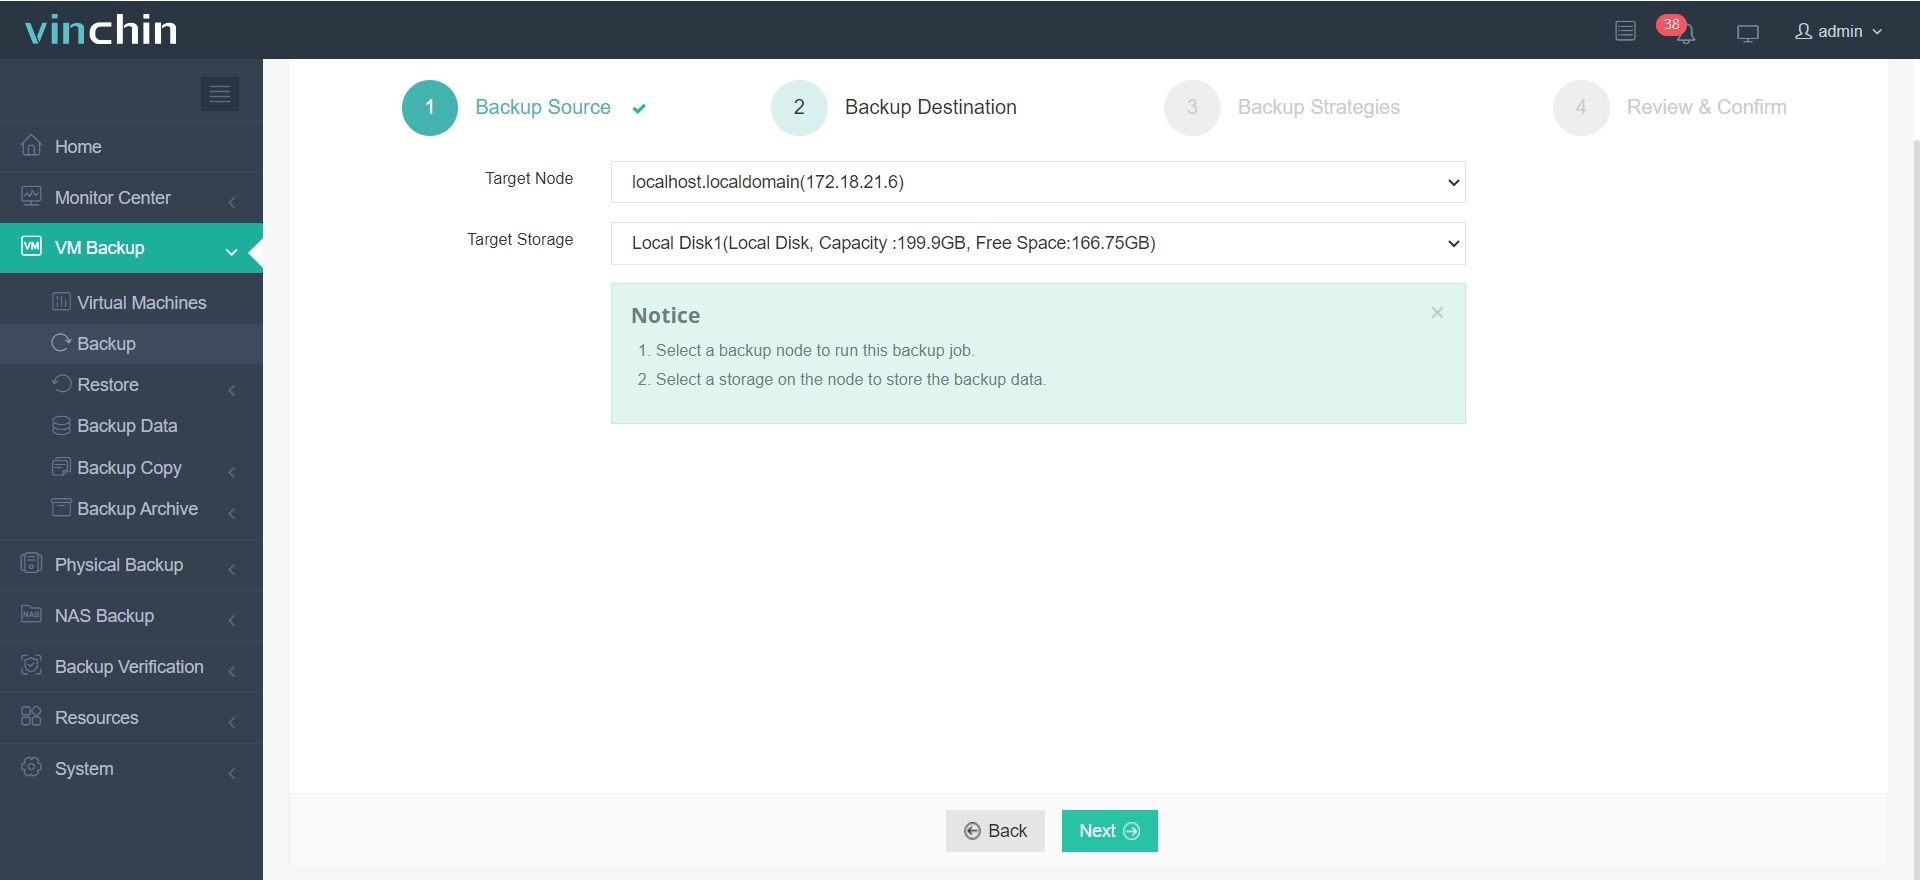
Step 2: Choose the backup storage

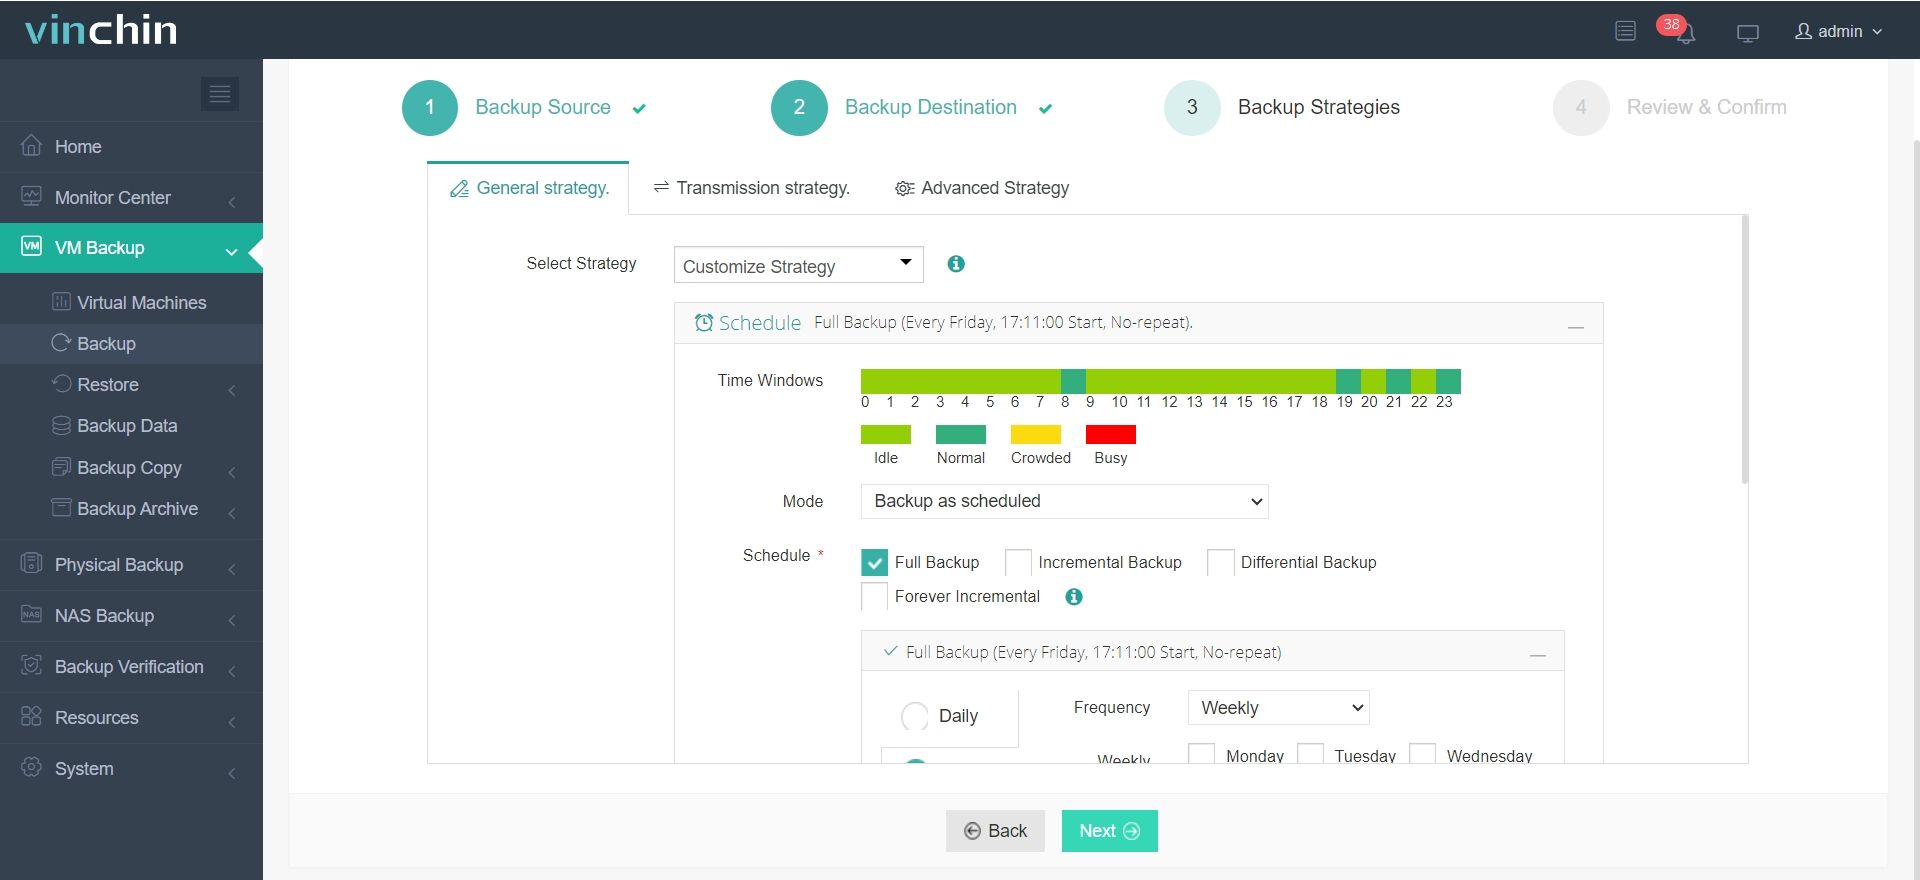
Step 3: Configure the backup strategy

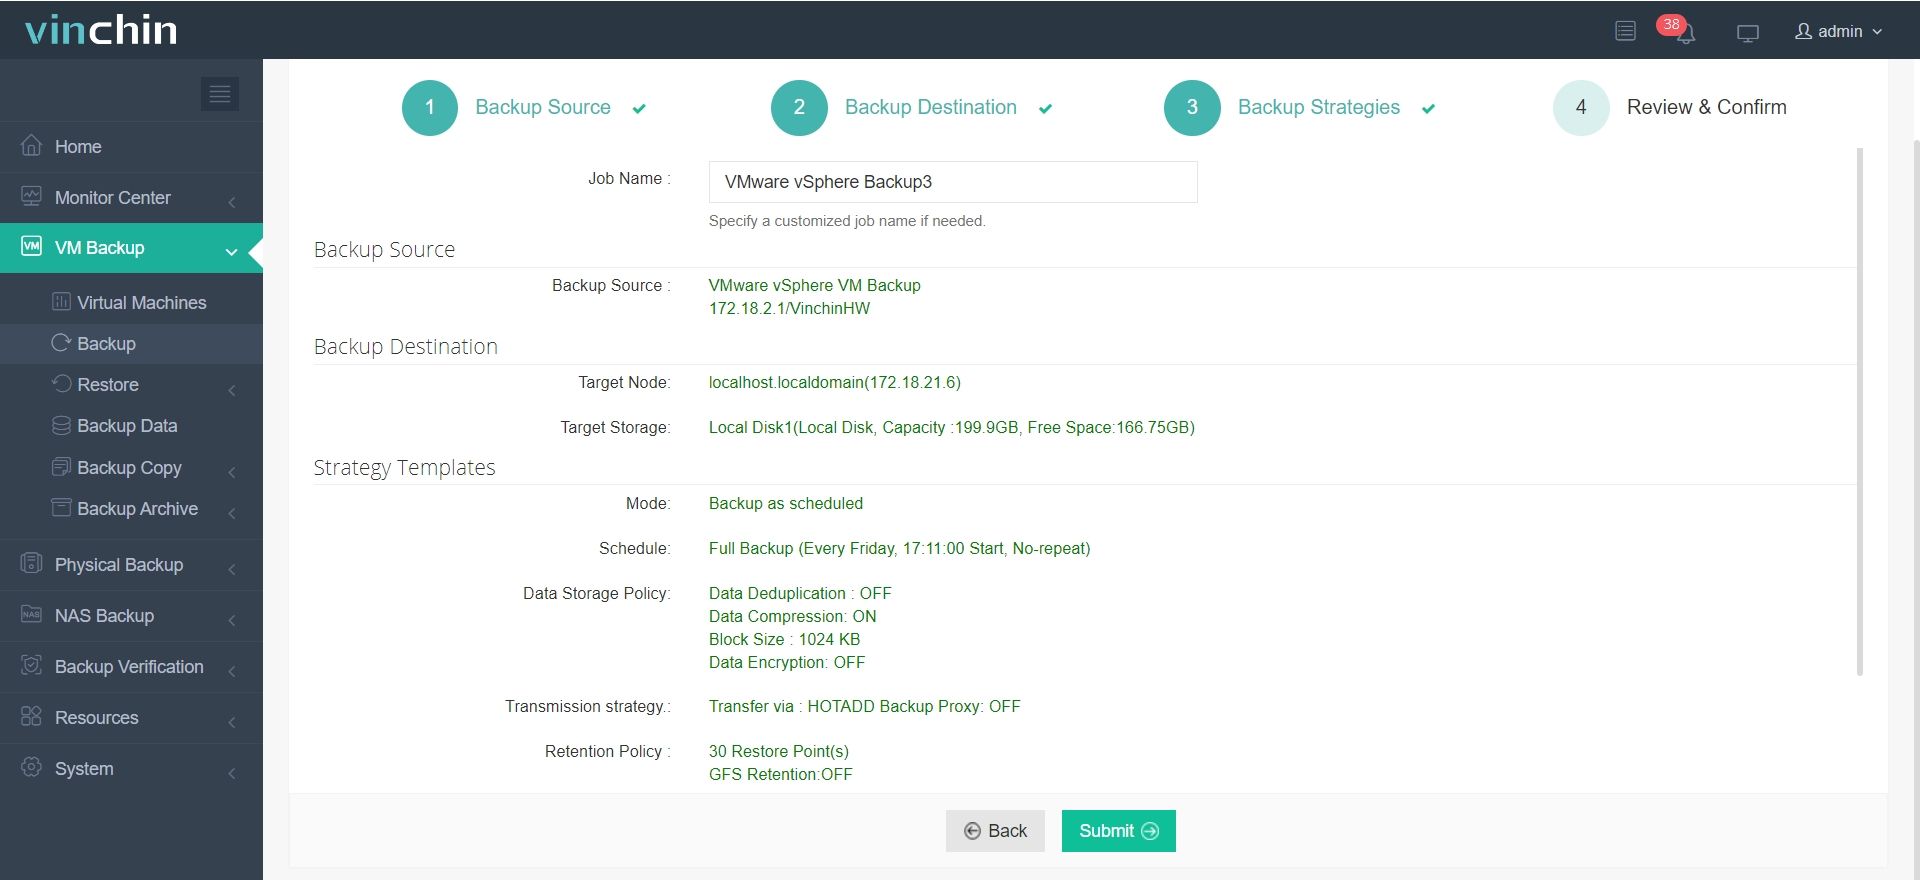
Step 4: Submit the job

Recognized globally with thousands of satisfied customers and top industry ratings—plus a 60-day full-featured free trial—Vinchin Backup & Recovery stands out as trusted enterprise data-protection software ready for immediate deployment.
Run ESXI From USB FAQs
Q1: How do I make sure my logs are saved permanently when running from a flash drive?
A1: In Host Client go to HOST > MANAGE > SYSTEM > ADVANCED SETTINGS edit SCRATCHCONFIG.CURRENTSCRATCHLOCATION enter path like /vmfs/volumes/datastore1/scratch save reboot done!
Q2: What should I do if my bootable stick fails unexpectedly?
A2: Clone backup image onto new identical-capacity stick insert set BIOS/UEFI order power-on resume normal operations instantly.
Conclusion
Running ESXi from USB is a low-cost, fast way to deploy—great for labs and mass installs. Use industrial-grade USBs, enable persistent logs or remote syslog, keep VM data on reliable shared storage, and maintain regular backups and restore tests.
Share on:


