-
I. Disable Hyper-V via Windows Features
-
II. Disable Hyper-V Using Command Line
-
III. Disable Hyper-V by Modifying System Configuration
-
Important Considerations When Disabling Hyper-V
-
Vinchin: Your Trusted Virtualization Backup Solution
-
Disabling Hyper-V FAQs
-
Conclusion
The main methods for disabling Hyper-V include: through Windows Features, using command-line tools, and modifying system configuration. Each method is suitable for different user needs. This article will provide a detailed explanation of these methods, along with professional insights to help you better understand and operate them.
I. Disable Hyper-V via Windows Features
1. Open Windows Features
First, you can disable Hyper-V through the “Windows Features” in Control Panel. This method is relatively simple and suitable for most users.
Open Control Panel and click on “Programs.”
Select “Turn Windows features on or off.”
In the pop-up window, locate and uncheck the “Hyper-V” option.
Click “OK” and follow the prompts to restart your computer.
2. Advantages and Disadvantages
Disabling Hyper-V via Windows Features is the most straightforward method, requiring no command-line operations, making it ideal for users unfamiliar with the command line. However, this method requires a system restart, which may affect your workflow.
II. Disable Hyper-V Using Command Line
1. Disable Hyper-V via PowerShell
PowerShell is a powerful command-line tool that you can use to disable Hyper-V.
Open PowerShell and run it as Administrator.
Enter the following command and press Enter:
Disable-WindowsOptionalFeature -Online -FeatureName Microsoft-Hyper-V-All
Wait for the command to complete and restart your computer as prompted.
2. Disable Hyper-V via CMD
You can also disable Hyper-V using CMD.
Open Command Prompt and run it as Administrator.
Enter the following command and press Enter:
dism.exe /Online /Disable-Feature:Microsoft-Hyper-V-All
Wait for the command to complete and restart your computer as prompted.
3. Advantages and Disadvantages
The advantage of using command-line tools to disable Hyper-V is higher flexibility and the ability to automate the process via scripts, making it suitable for IT professionals and developers. However, this method requires some command-line knowledge and might be a bit complex for average users.
III. Disable Hyper-V by Modifying System Configuration
1. Disable Hyper-V via BCDEdit
BCDEdit is a command-line tool used for managing boot configuration data. You can use it to disable Hyper-V.
Open Command Prompt and run it as Administrator.
Enter the following command and press Enter:
bcdedit /set hypervisorlaunchtype off
Restart your computer.
2. Re-enable Hyper-V
If you need to re-enable Hyper-V, use the following command:
bcdedit /set hypervisorlaunchtype auto
Restart your computer.
3. Advantages and Disadvantages
Disabling Hyper-V by modifying system configuration via BCDEdit is an advanced method, suitable for users who need deep control over system settings. This method does not uninstall Hyper-V but simply disables its launch, and re-enabling it is relatively easy. However, it requires a good understanding of system configuration and is not ideal for average users.
Important Considerations When Disabling Hyper-V
1. Compatibility Issues
Disabling Hyper-V may affect software and services that rely on virtualization technology. For example, if you are using Docker for Windows, disabling Hyper-V might cause Docker to malfunction.
2. Data Backup
Before making any system configuration changes, it is recommended to back up important data. Although disabling Hyper-V usually does not cause data loss, backing up your data is a good safety practice.
3. System Performance
Disabling Hyper-V may free up some system resources and improve computer performance. However, the performance gain is usually limited and depends on your system configuration and usage scenario. If you are disabling Hyper-V to improve performance, make sure to also optimize other factors such as hardware settings and system tuning.
Vinchin: Your Trusted Virtualization Backup Solution
If you frequently manage virtualized environments such as Hyper-V, VMware, XenServer, or Proxmox, having a reliable backup and recovery solution is essential. Vinchin Backup & Recovery offers comprehensive data protection for more than 10 virtual platforms, featuring advanced deduplication, compression, and flexible scheduling options. Whether you're performing regular backups or management, Vinchin ensures your data remains safe, recoverable, and optimized—no matter the environment.
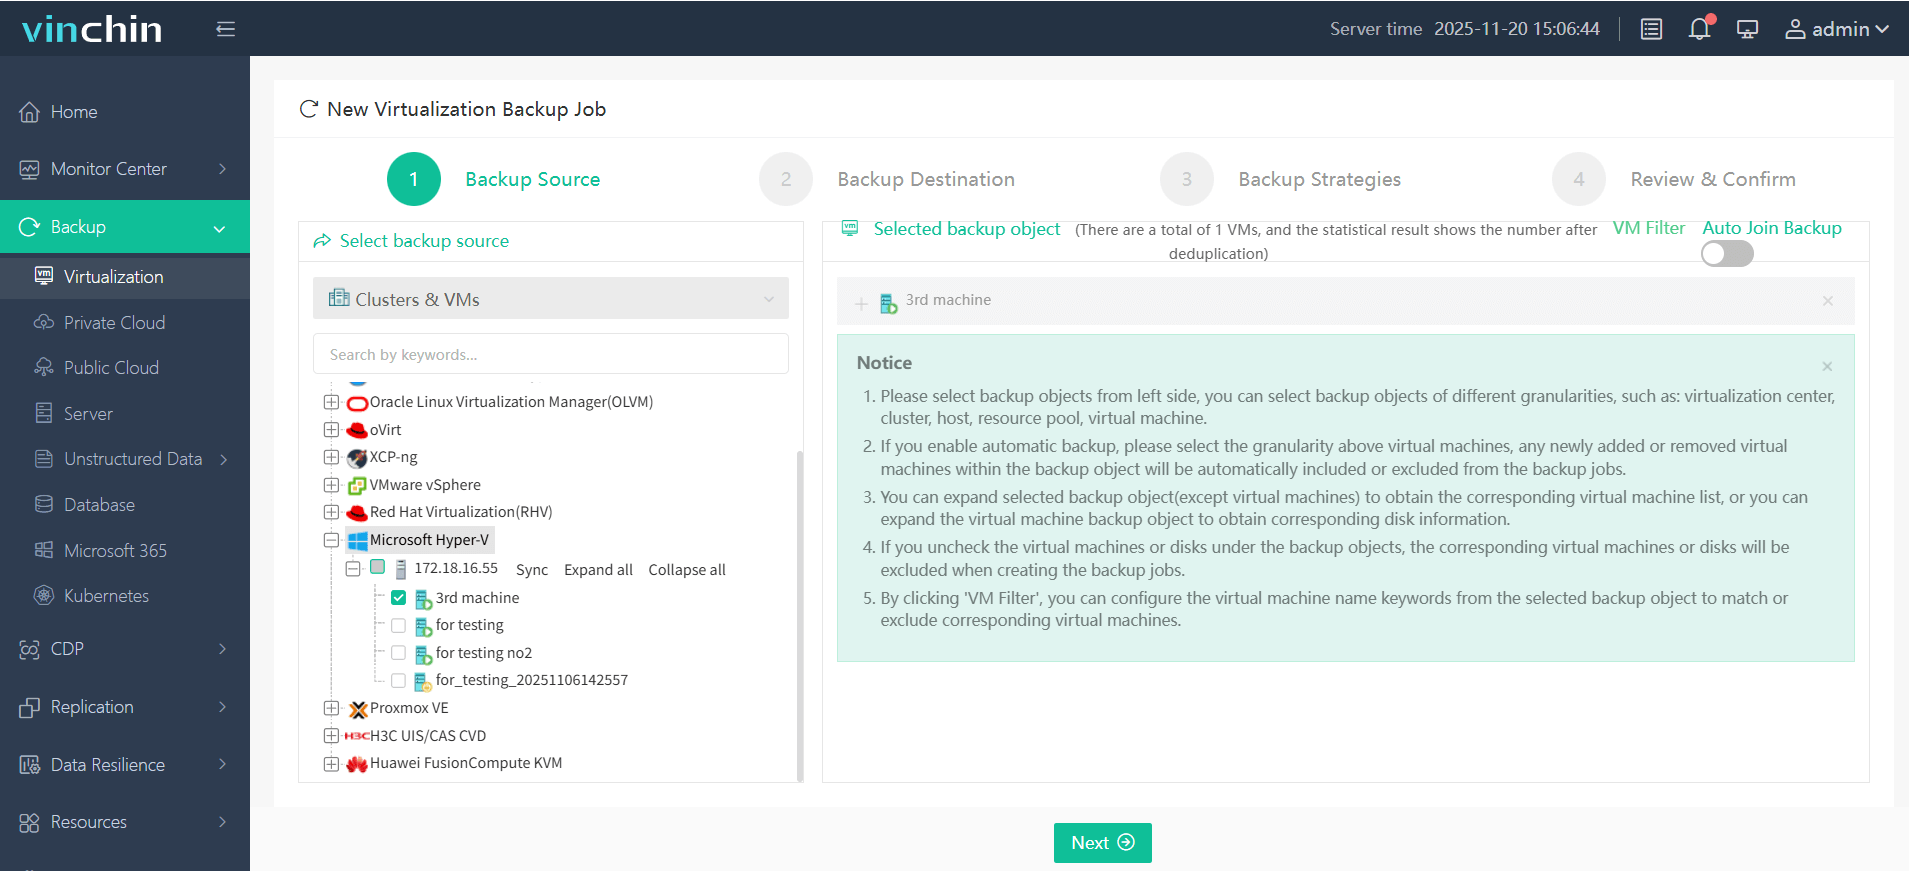
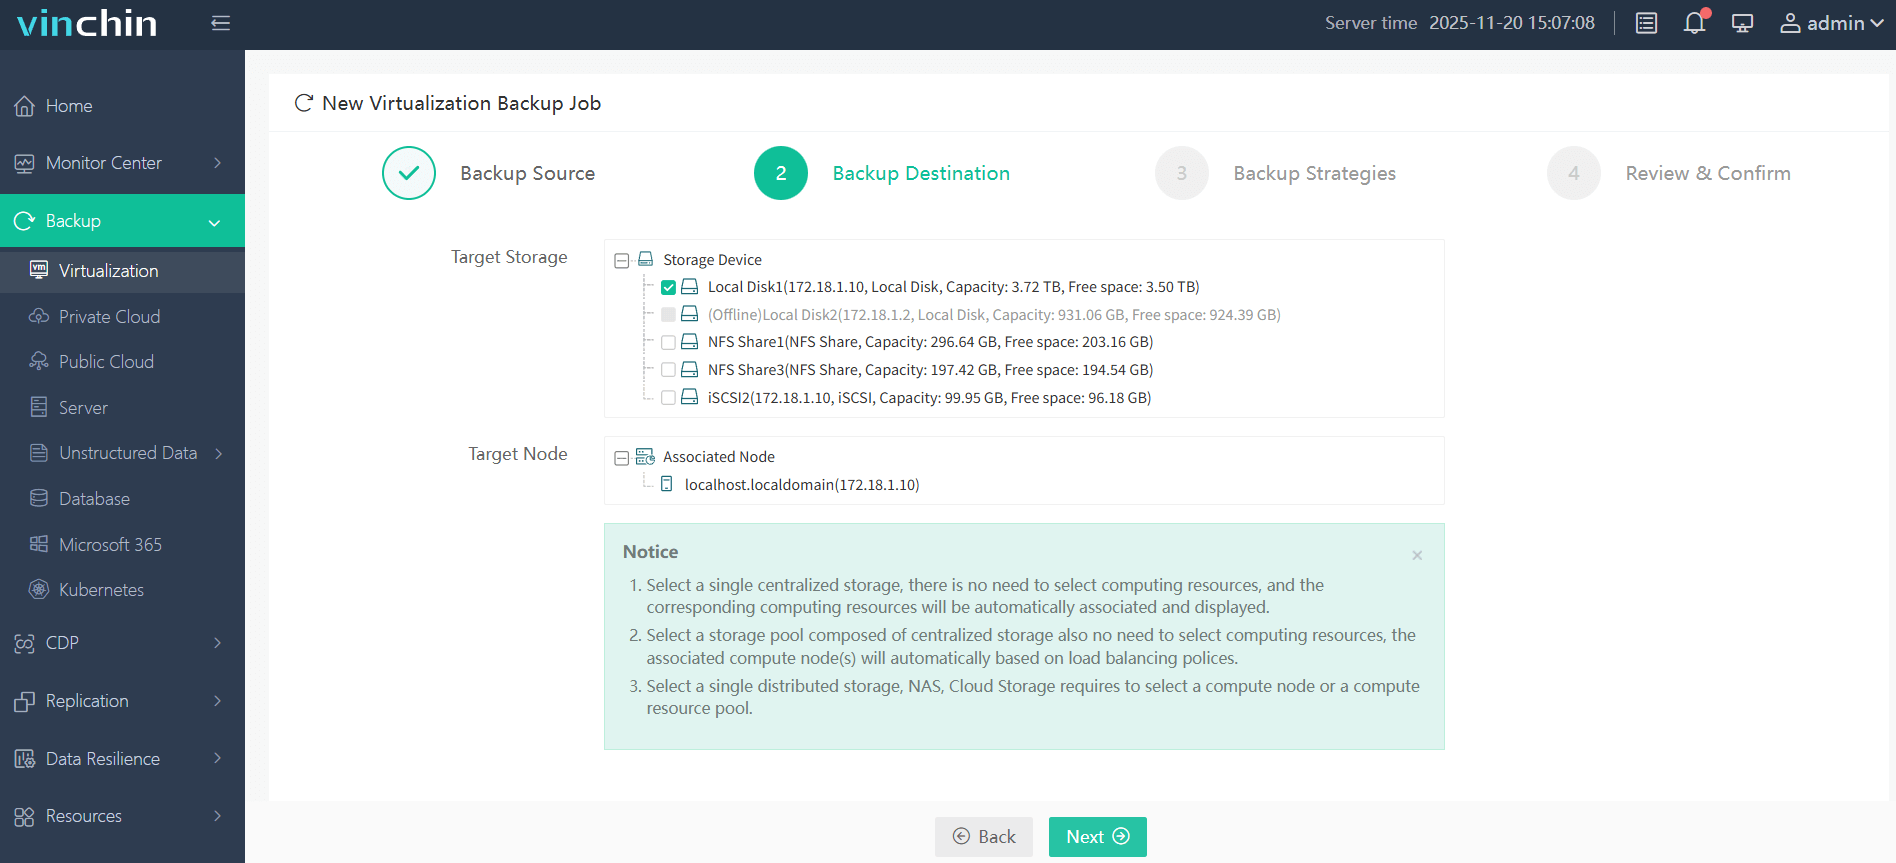
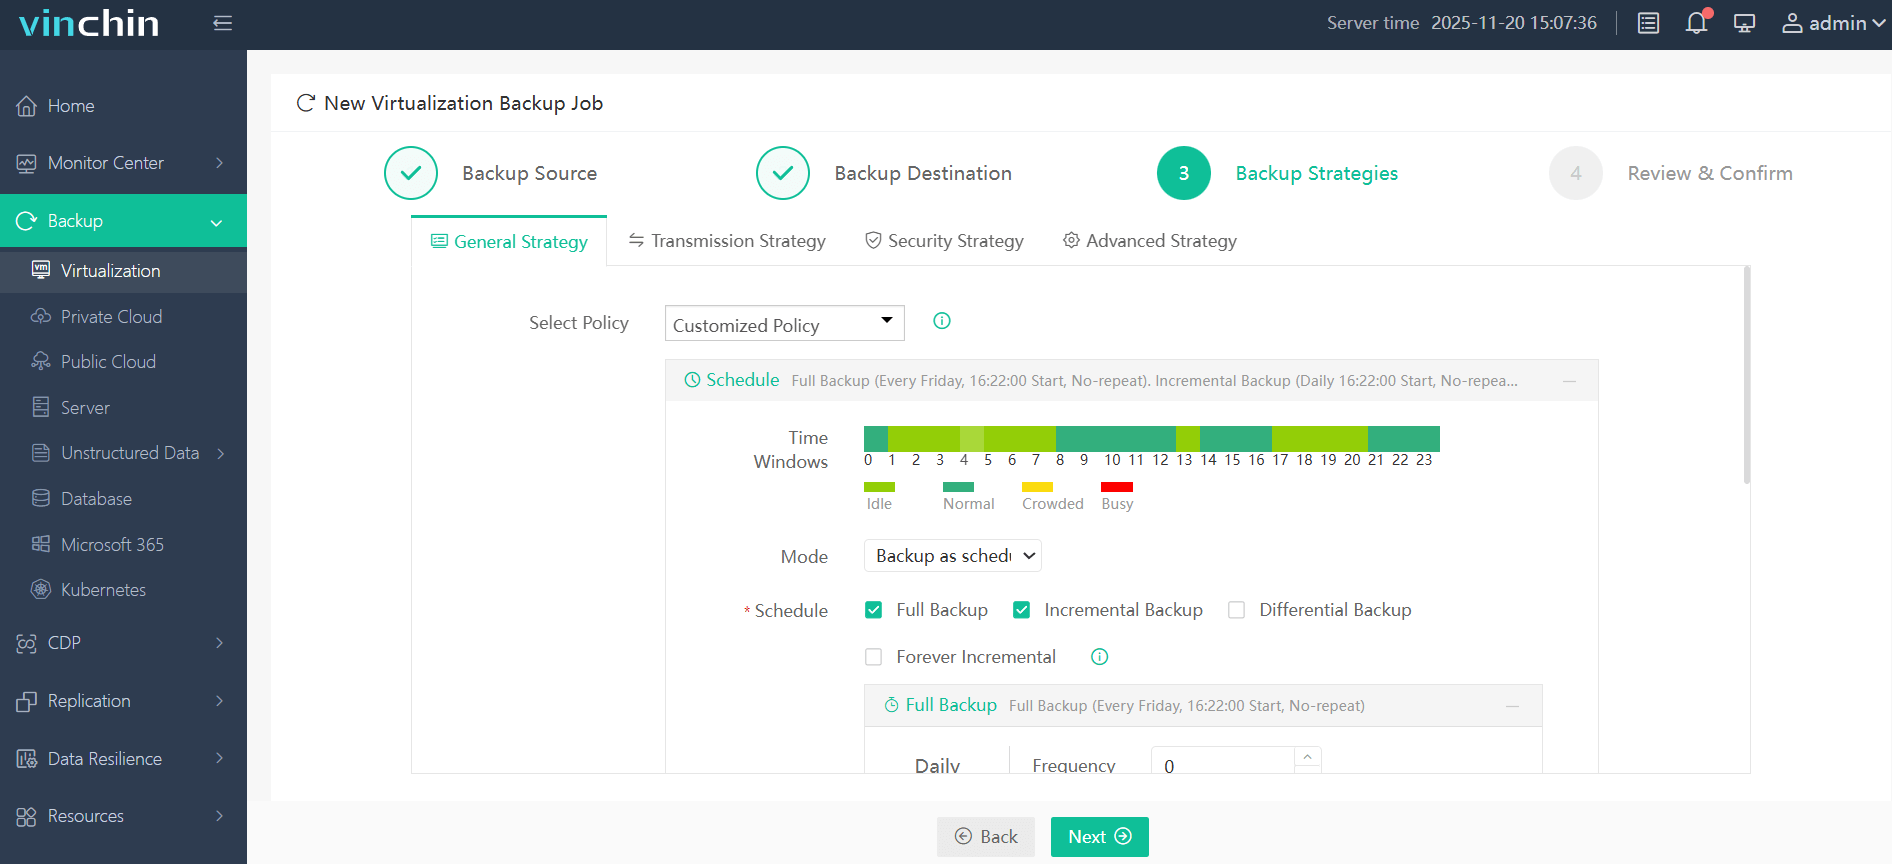
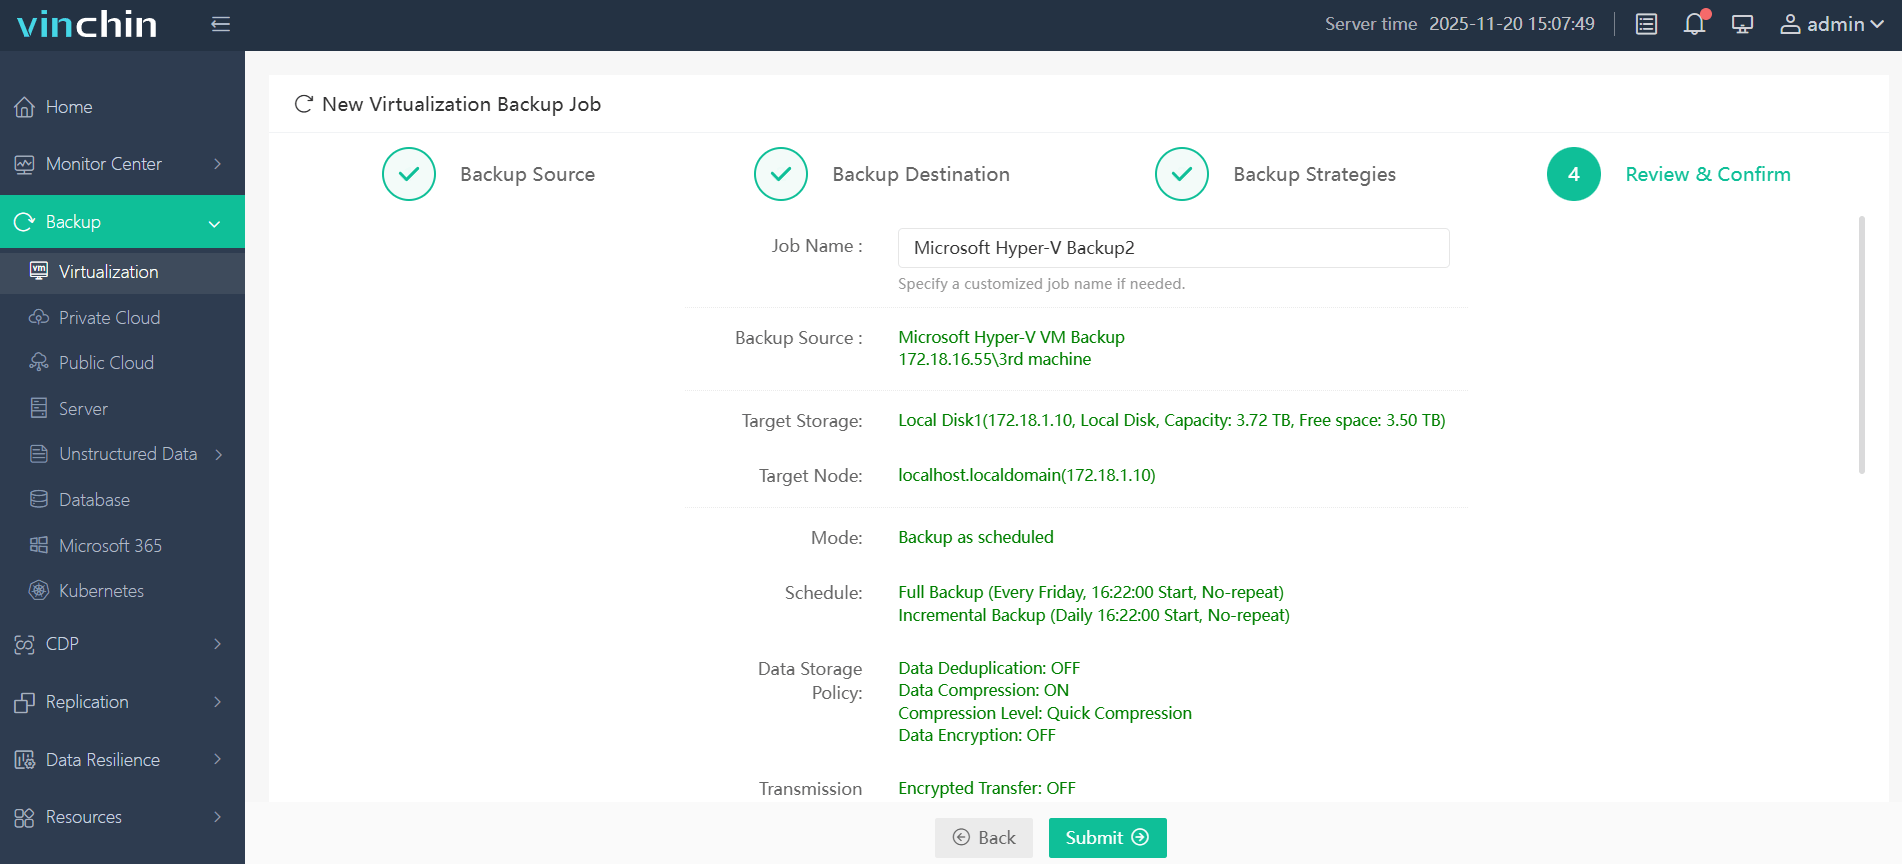
It only takes 4 steps to backup Hyper-V VMs with Vinchin Backup & Recovery:
1. Select the backup object.

2. Select backup destination.

3. Select backup strategies.

4. Review and submit the job.

In addition to robust backup capabilities, Vinchin also provides a powerful V2V migration feature, allowing seamless migration of virtual machines across different platformsz. This enables businesses to transition between virtualization environments with minimal downtime and no data loss.
Come on and experience the full capabilities of this robust system with a complimentary 60-day trial! Contact us with your requirements, and you will receive a tailored solution for your IT landscape.
Disabling Hyper-V FAQs
1. How do I verify if Hyper-V is disabled?
You can verify whether Hyper-V is disabled through the following methods:
Check it in the “Windows Features” of Control Panel.
Use the PowerShell command Get-WindowsOptionalFeature -Online -FeatureName Microsoft-Hyper-V-All to view the Hyper-V status.
Use the command prompt command bcdedit /enum to check Hyper-V boot configuration.
2. I just want to temporarily disable Hyper-V to shut down virtual machines, not permanently disable it. Is there a way to do that?
Yes, you can temporarily disable Hyper-V to shut down virtual machines without permanently disabling it. You can follow these steps:
In Windows, click the “Start” button and search for “Control Panel,” then open the Control Panel.
In the Control Panel, choose “Programs” or “Programs and Features.”
In the list of programs, click on the “Turn Windows features on or off” link.
In the Windows Features window, find and uncheck the “Hyper-V” checkbox.
Click the “OK” button and wait for the system to apply the changes.
Restart your computer to apply the changes.
Once the system restarts, Hyper-V will be temporarily disabled, and your virtual machines will stop running.
If you want to re-enable Hyper-V, repeat the above steps and check the “Hyper-V” checkbox again.
Conclusion
There are various methods to disable Hyper-V, including using Windows Features, command-line tools, and modifying system configuration. Each method has its pros and cons and suits different user needs. In practice, you can choose the method that best fits your technical level and specific requirements. Also, be sure to back up your data and understand software compatibility requirements before disabling Hyper-V.
Share on:


