-
What Is a VHDX File in Hyper-V?
-
Why Create Hyper-V VM from Existing VHDX?
-
Preparing Your VHDX File for VM Creation
-
Method 1: Create Hyper-V VM from Existing VHDX Using Hyper-V Manager
-
Method 2: Create Hyper-V VM from Existing VHDX with PowerShell
-
How to Backup Hyper‑V Virtual Machine with Vinchin Backup & Recovery?
-
Hyper V Create VM from Existing VHDX FAQs
-
Conclusion
Have you ever needed to recover a virtual machine from a VHDX file or migrate workloads between hosts? Hyper-V makes it possible to create a new VM using an existing VHDX file, saving time and effort. In this guide, you’ll learn what a VHDX file is, why you might want to use one, how to prepare your disk image properly, and how to create a VM from it using both Hyper-V Manager and PowerShell.
What Is a VHDX File in Hyper-V?
A VHDX file is a virtual hard disk format used by Hyper-V. It stores everything on a virtual machine’s hard drive—operating system files, applications, data files—inside one container. Compared to older formats like VHD, VHDX supports larger sizes (up to 64 TB), better performance under heavy loads, and improved reliability against corruption. For most modern environments running Windows Server 2012 or later with Hyper-V enabled, VHDX is now standard.
Why Create Hyper-V VM from Existing VHDX?
There are many reasons you might need to create a Hyper-V VM from an existing VHDX file. Maybe you’re restoring a backup after hardware failure or disaster recovery. Perhaps you want to migrate workloads between different hosts without reinstalling everything from scratch. Sometimes admins need test environments that mirror production systems exactly—using an existing disk image saves time by skipping OS installation and configuration steps.
Using an existing VHDX lets you get up and running quickly with all your data intact while avoiding repetitive manual setup tasks.
Preparing Your VHDX File for VM Creation
Before creating your new virtual machine in Hyper-V using an existing disk image (VHDX), take some important preparatory steps:
First, make sure your chosen .vhdx file is accessible by the target host server where you'll build the new VM—store it locally on that server if possible rather than on network shares unless those shares have proper permissions set up for read/write access by the host's SYSTEM account.
Next comes integrity checking: always verify that your .vhdx isn’t corrupted before attaching it as a boot disk or data volume. You can do this using built-in tools like Hyper-V Manager’s Inspect Disk feature or run Test-VHD -Path "D:\path\to\disk.vhdx" in PowerShell for quick validation results.
If your .vhdx contains an operating system that was previously installed elsewhere—and especially if you plan on deploying multiple copies of this image—it’s best practice to generalize Windows images with Sysprep first (run sysprep /generalize /shutdown inside Windows). This avoids duplicate SIDs which can cause networking problems later when joining domains or managing machines centrally via Group Policy.
Finally, ensure no other running virtual machines are currently attached to this .vhdx file! Only mount unused images during creation; otherwise data loss or corruption could occur if two systems write changes at once.
Taking these simple precautions helps prevent headaches down the road when bringing up new servers based on old images—a little prep work goes far!
Method 1: Create Hyper-V VM from Existing VHDX Using Hyper-V Manager
Hyper-V Manager offers an easy graphical way for admins of all skill levels to create new virtual machines based on pre-existing disk images (.vhdx). If you prefer point-and-click interfaces over command lines—or just want visual confirmation at each step—this method works well.
Start by launching Hyper-V Manager on your host server (you may need administrative rights). In the left pane select your server name; then in the right-hand Actions pane click New, followed by Virtual Machine. The wizard opens automatically—click Next through each screen:
On Specify Name and Location, enter something descriptive for easy identification later.
On Specify Generation, choose carefully:
Use Generation 1 if your .vhdx uses MBR partitioning/Bios firmware.
Choose Generation 2 only if your .vhdx has GPT partitions and was installed with UEFI firmware support.
> Note: Trying to boot an MBR/Bios-based image as Gen 2 will fail! Check partition style first via Disk Management.
On Assign Memory, allocate enough RAM based on workload needs.
On Configure Networking, pick which network switch connects this guest OS.
On Connect Virtual Hard Disk, select "Use an existing virtual hard disk," then click Browse... Navigate directly to your prepared .vhdx file.
Review settings under Summary; click Finish when ready.
Your newly created VM appears instantly in the list below your host node within Hyper-V Manager’s main window. Right-click its name then choose Connect… A console window opens so you can watch boot progress live after clicking Action > Start inside that window’s menu bar above.
If startup fails (“No boot device found” error), double-check that:
The correct generation matches both partition type and firmware mode
Your .vhdx contains valid OS install files
No other processes are locking/accessing this same disk image
With careful matching of generations/partition types plus clean source images most problems disappear!
Method 2: Create Hyper-V VM from Existing VHDX with PowerShell
PowerShell gives experienced admins powerful automation options when working with large numbers of servers—or simply speeding up repetitive tasks like building test labs quickly using scripted commands instead of wizards every time!
First open Windows PowerShell as Administrator (right-click its icon > Run as administrator) so all necessary permissions are available during creation steps below:
To see available network switches run:
Get-VMSwitch | Format-Table Name
This lists all configured switches usable by new guests for connectivity purposes later on.
Now build out your actual virtual machine shell referencing both switch name and path/location of desired .vhdx:
New-VM -Name "MyVM" -MemoryStartupBytes 2GB -BootDevice VHD -VHDPath "D:\VMs\MyDisk.vhdx" -Generation 2 -SwitchName "ExternalSwitch"
Replace "MyVM" with whatever label fits best; adjust RAM size (MemoryStartupBytes) per workload needs; update paths/names accordingly everywhere else too!
> Remember: Always match Generation number here (1 vs 2) against what kind of partition table/fimware mode exists inside original .vhdx—you cannot mix/match these without errors at boot time!
Once created start things up:
Start-VM -Name "MyVM"
To connect interactively via console session:
vmconnect localhost "MyVM"
Want another drive attached post-build? Add more storage easily:
Add-VMHardDiskDrive -VMName "MyVM" -Path "D:\VMs\DataDisk.vhdx"
This attaches extra volumes as secondary disks—not primary OS drives—to expand capacity further whenever needed down line!
PowerShell shines brightest when scripting mass deployments across dozens/hundreds of hosts simultaneously—but even solo builds benefit greatly thanks its repeatable syntax plus ability save/share scripts among teams long-term!
How to Backup Hyper‑V Virtual Machine with Vinchin Backup & Recovery?
After successfully creating and configuring your new virtual machine in Microsoft Hyper‑V, ensuring robust protection becomes essential for business continuity.
Vinchin Backup & Recovery is a professional enterprise-level solution supporting over fifteen mainstream virtualization platforms—including full compatibility with Microsoft Hyper‑V alongside VMware, Proxmox VE, oVirt/OLVM/RHV, XCP-ng/XenServer, OpenStack, ZStack and more—making it ideal for diverse IT environments requiring unified backup management across multiple hypervisors.
For organizations relying on Microsoft Hyper‑V infrastructure specifically, Vinchin Backup & Recovery delivers advanced features such as forever-incremental backup strategies for efficient storage usage; granular restore capabilities enabling rapid recovery at file or application level; scheduled backups aligned precisely with business SLAs; high-performance deduplication/compression routines reducing backup windows and storage costs; plus secure multi-thread transmission technology ensuring fast reliable protection even across large-scale deployments—all designed for operational efficiency and minimal disruption.
The intuitive web console makes safeguarding any Microsoft Hyper‑V VM straightforward:
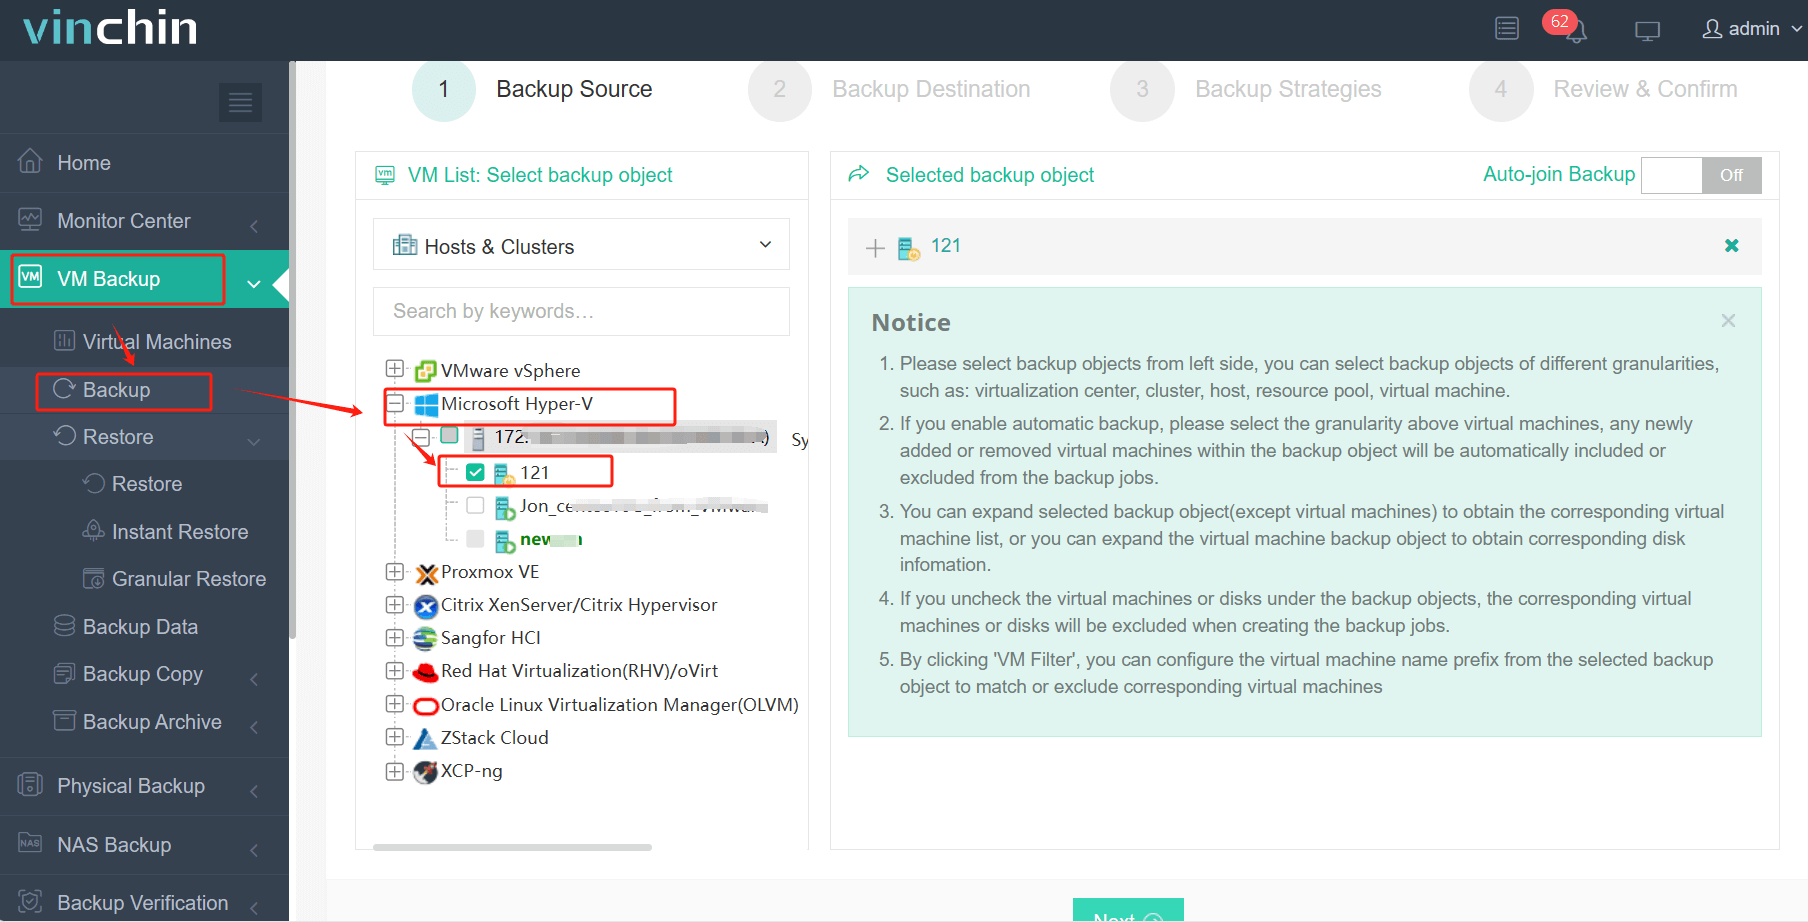
Step 1: Select the Microsoft Hyper‑V VM(s) needing backup

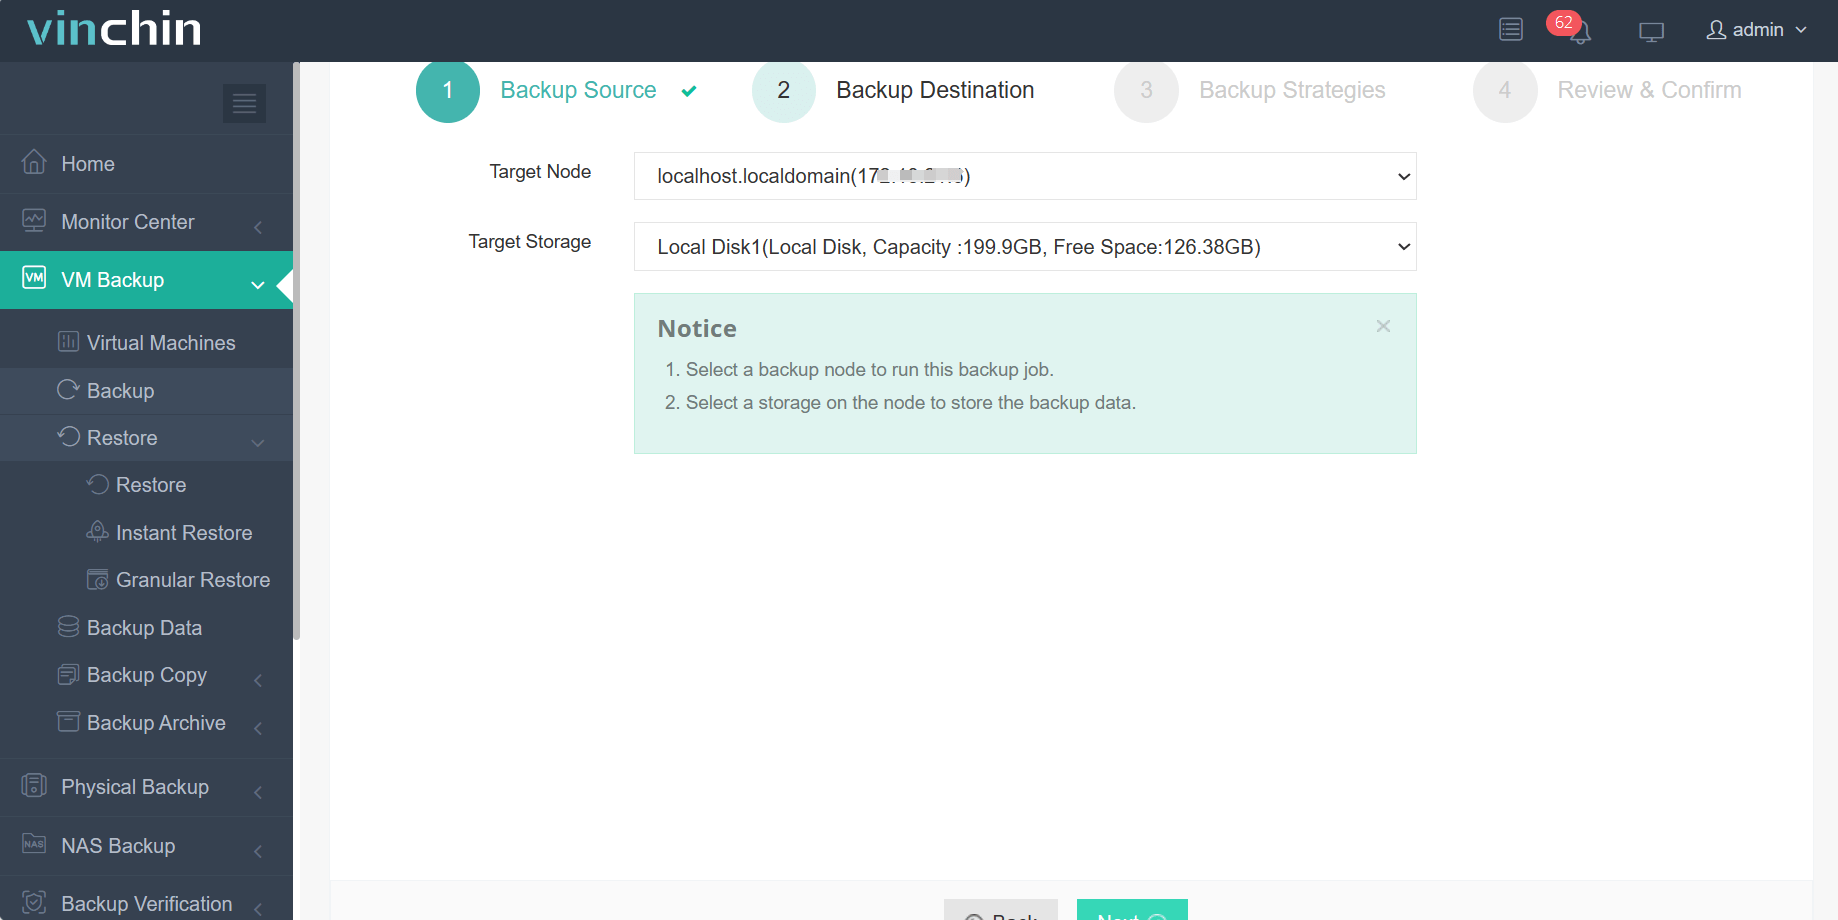
Step 2: Choose appropriate backup storage

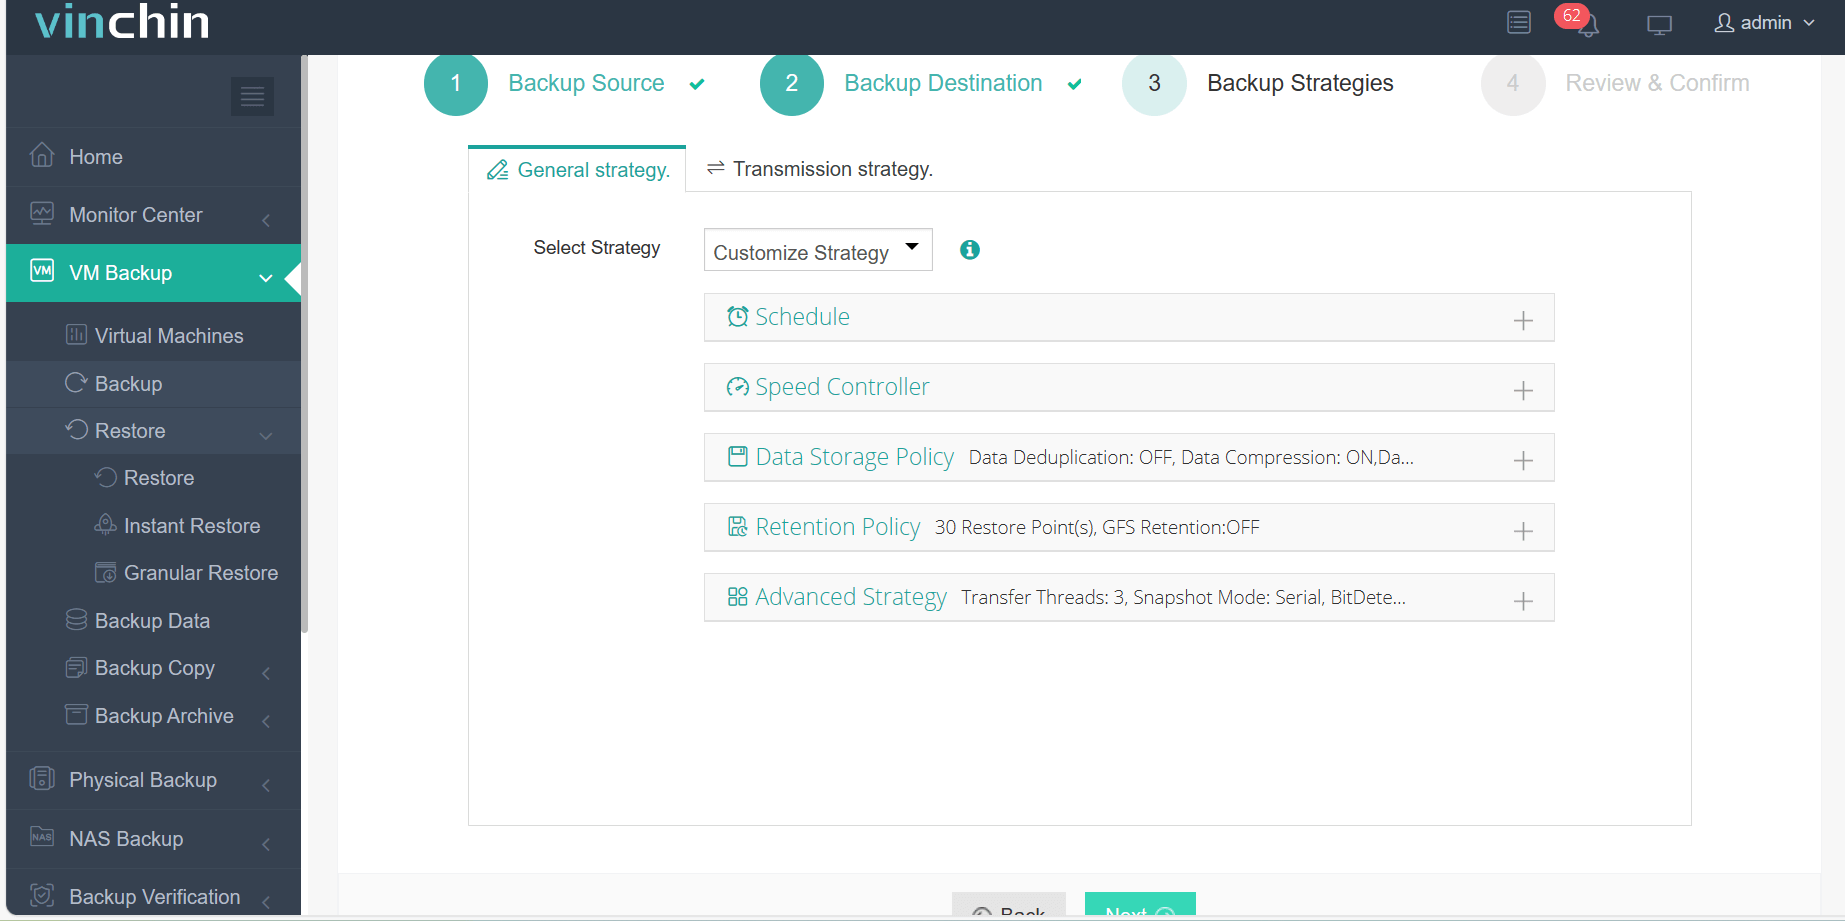
Step 3: Configure detailed backup strategy including schedule and retention policies

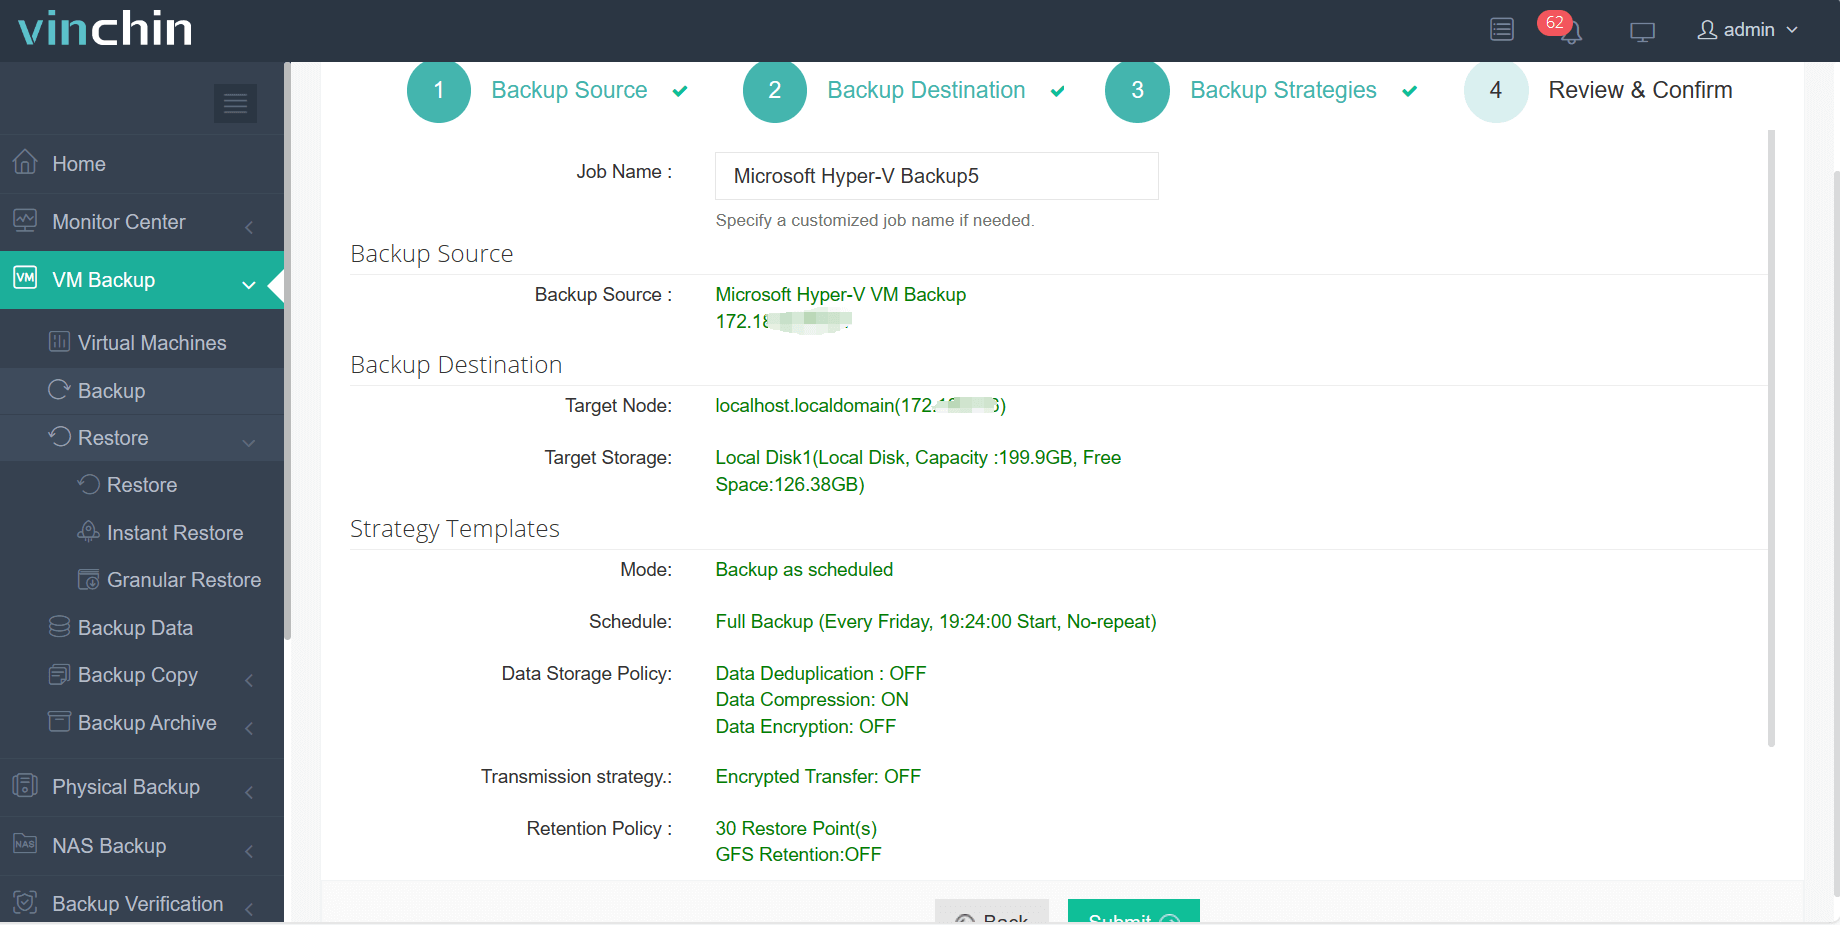
Step 4: Submit the job

Recognized globally among enterprise users—with top ratings and thousands of customers worldwide—Vinchin Backup & Recovery offers comprehensive data protection backed by industry trust. Experience every feature free for 60 days—click below to download now!
Hyper V Create VM from Existing VHDX FAQs
Q1: Can I create a Hyper‑V VM from a copied .vhdx taken off another physical host?
Yes—as long as no other active machines are writing changes into same image simultaneously and correct generation/partition style matches intended deployment scenario exactly every time too!
Q2: My imported .vhdx won’t boot after creating my new guest—is there anything else I should check?
Confirm original OS install used right firmware mode (BIOS vs UEFI); also verify no leftover device drivers/services tied back old hardware still present inside source image itself causing conflicts unexpectedly sometimes here too.
Q3: How do I attach additional data-only disks (.vhd/.vhdx) onto my freshly built guest instance?
Right-click target entry within main console tree view > Settings > SCSI Controller OR IDE Controller node depending config specifics required > Add Hard Drive button top-right corner dialog box appears next > Browse/select desired secondary volume location accordingly before applying final changes bottom page area shown there afterwards finally.
Conclusion
Creating a new virtual machine in Hyper‑V using an existing .vhdx streamlines recovery or migration workflows significantly—saving hours versus rebuilding everything manually each cycle anew! Whether leveraging GUI tools like Manager applet itself directly OR automating entire process end-to-end via robust scripting capabilities exposed natively through PowerShell cmdlets provided out-of-box nowadays…admins gain flexibility/control needed succeed regardless scale involved ultimately here overall! For reliable backup coverage across all such deployments moving forward consider evaluating Vinchin’s comprehensive solution suite today—it delivers peace mind alongside operational efficiency gains every step journey alike!
Share on:


