High availability is essential in today’s IT world. If a server fails unexpectedly, you want your virtual machines (VMs) to keep running without missing a beat. That’s why many organizations choose a Hyper-V cluster setup, as it offers reliable failover protection so workloads stay online even during hardware issues or planned maintenance windows.
What Is a Hyper V Cluster
A Hyper-V cluster is a group of servers called nodes that run Microsoft Hyper-V together as one unit. These nodes share storage resources so they can host VMs collectively. If one node goes down or needs maintenance, another node takes over hosting its VMs automatically using Microsoft Failover Clustering technology. This means your applications remain available with minimal disruption because all nodes have access to the same VM files through shared storage.
Why Choose Hyper V Cluster Setup
Why invest time in building a cluster? It comes down to uptime and flexibility. A Hyper-V cluster ensures high availability by moving VMs from failed or offline nodes to healthy ones with little interruption, often just seconds of downtime or less if configured well. Clustering also lets you perform updates or repairs on individual servers while others continue serving users’ needs uninterrupted.
As your business grows, clustering makes it easy to scale out by adding more nodes without reconfiguring everything from scratch. In short: clustering shields your business from both unexpected outages and routine maintenance headaches.
Prerequisites for Hyper V Cluster Setup
Before starting your hyper v cluster setup journey, make sure you have all requirements ready:
At least two physical servers with similar hardware specs.
Hardware virtualization support enabled in BIOS/UEFI.
Windows Server 2016 or later installed on each node (for full feature compatibility).
Both Hyper-V and Failover Clustering roles installed via Server Manager.
All nodes joined to the same Active Directory domain.
Static IP addresses assigned to each server.
Shared storage accessible by all nodes, and this could be iSCSI targets on dedicated storage appliances/SANs, Fibre Channel LUNs, or SMB 3.x file shares.
At least two network adapters per node: one for management traffic (like RDP) and another dedicated for cluster communication (heartbeat). For larger clusters or heavy workloads consider separate adapters for live migration traffic as well.
Disk partitions should use GPT when possible for better reliability with large disks; format shared volumes as NTFS or ReFS but do not assign drive letters, and the cluster manages these disks directly.
How to Set Up a Hyper V Cluster via Failover Manager
Setting up your hyper v cluster setup is straightforward if you follow these steps carefully:
1. Install Required Roles
Open Server Manager → Add Roles and Features → Install Hyper-V and Failover Clustering on all nodes → Restart if required.
2. Validate the Configuration
Open Failover Cluster Manager → Click Validate Configuration → Add all nodes → Select Run all tests → Review results and fix any errors before continuing.
3. Create the Cluster
In Failover Cluster Manager → Click Create Cluster → Add validated nodes → Enter a unique cluster name and static IP address → Confirm and complete the wizard.
4. Verify Node Status
Check that all nodes show “Up” under the Nodes view. Troubleshoot any issues using event logs or network/domain settings if needed.
5. Configure Quorum
Go to More Actions → Configure Cluster Quorum Settings → Choose an appropriate witness (e.g., Disk Witness or File Share Witness) to ensure proper cluster stability and avoid split-brain scenarios.
How to Configure Shared Storage for Hyper V Clustering
Shared storage is essential for Hyper-V clusters because it enables smooth VM failover between nodes.
If using iSCSI or Fibre Channel:
Open the iSCSI Initiator on each node and connect to the storage target provided by your SAN.
In Disk Management, bring the new disks online, initialize them as GPT, format them as NTFS or ReFS, and do not assign drive letters.
In Failover Cluster Manager, go to Storage > Disks, add the shared disks, then assign them to Cluster Shared Volumes (CSV) so they appear under C:\ClusterStorage\.
If using SMB 3.x shares:
Ensure the SMB share grants Full Control permissions to the computer accounts of all cluster nodes.
Configure the share as the VM storage location in Hyper-V so all nodes can access it consistently.
This setup ensures that any node can access the same VM storage during live migration or failover without manual file copying.
Ensuring High Availability After Setup
With core infrastructure ready it’s time to actually deploy highly available virtual machines:
1. Create a new clustered VM
In Failover Cluster Manager, go to Roles → right-click → Virtual Machines > New Virtual Machine. Choose the initial host and store the VM in C:\ClusterStorage\VolumeX so it can be accessed by all nodes.
2. Complete VM setup
Finish the wizard by configuring CPU, memory, and disk settings. Once created, the VM will appear under Roles with its status and owning node.
3. Perform live migration
To move a running VM, right-click it → Move > Live Migration → select the destination host. The migration completes with no downtime.
4. Test failover behavior
To validate resilience, gracefully shut down one cluster node. The cluster will automatically move running VMs to healthy nodes. Check Event Logs if any issues occur.
Network Configuration Best Practices for Hyper-V Clusters
Good network design is critical for cluster stability and helps prevent unexpected outages.Each server should have at least two NICs: one dedicated to management access (e.g., remote login) and another for cluster heartbeat communication.
In larger environments, additional NICs can be used for Live Migration or separate backup/storage traffic to avoid interference with production workloads. Use VLANs or subnets to isolate traffic whenever possible, and enable features like RSS and Jumbo Frames where supported to improve performance during high-volume data transfers.
Disable unnecessary network services on non-management interfaces to reduce noise and potential conflicts.
Finally, regularly test connectivity using tools like ping and tracert, and maintain clear network topology documentation to simplify troubleshooting when issues arise.
Post-Setup Health Checks and Monitoring
Building a hyper v cluster setup is only half the battle, keeping it healthy long-term matters just as much! Here’s what experienced admins do after initial deployment:
Check overall health regularly via Failover Cluster Manager dashboard views showing current state/status summaries instantly at-a-glance.
Review recent events/warnings/errors logged beneath Events tab frequently looking out especially around times when changes/upgrades occurred recently anywhere inside infrastructure stack supporting entire solution holistically!
Test planned/unplanned failovers periodically, not just once during initial rollout phase to confirm automated recovery actions still work reliably months later after patch cycles/hardware swaps/etc., have taken place quietly behind-the-scenes meanwhile.
Set up email/SNMP alerts proactively notifying team members immediately whenever critical thresholds get crossed unexpectedly overnight/weekends alike!
Consider leveraging PowerShell scripts/cmdlets such as Get-ClusterGroup/Get-ClusterNode/New-ClusterMove etc., automating routine checks/reporting tasks efficiently saving valuable time/resources otherwise spent clicking through GUIs manually day-after-day unnecessarily.
By following these habits you’ll spot small issues before they become major outages and keep stakeholders happy knowing their services remain protected around-the-clock year-round no matter what surprises tomorrow might bring next!
How Can Vinchin Back Up Virtual Machines in a Hyper V Cluster?
To ensure ongoing data protection after deploying your hyper v cluster setup, consider Vinchin Backup & Recovery, a professional, enterprise-level virtual machine backup solution supporting over 15 mainstream virtualization platforms including Microsoft Hyper‑V clusters, VMware, Proxmox, oVirt and others.
For protecting clustered virtual machines on Hyper‑V environments specifically, Vinchin Backup & Recovery delivers forever incremental backup strategies that optimize storage usage and speed up backup operations; advanced data deduplication and compression minimize space consumption; scheduled backups automate protection routines; granular restore enables precise recovery options down to file level; and robust data encryption safeguards sensitive information throughout the process, all contributing toward efficient management and rapid disaster recovery readiness across complex infrastructures.
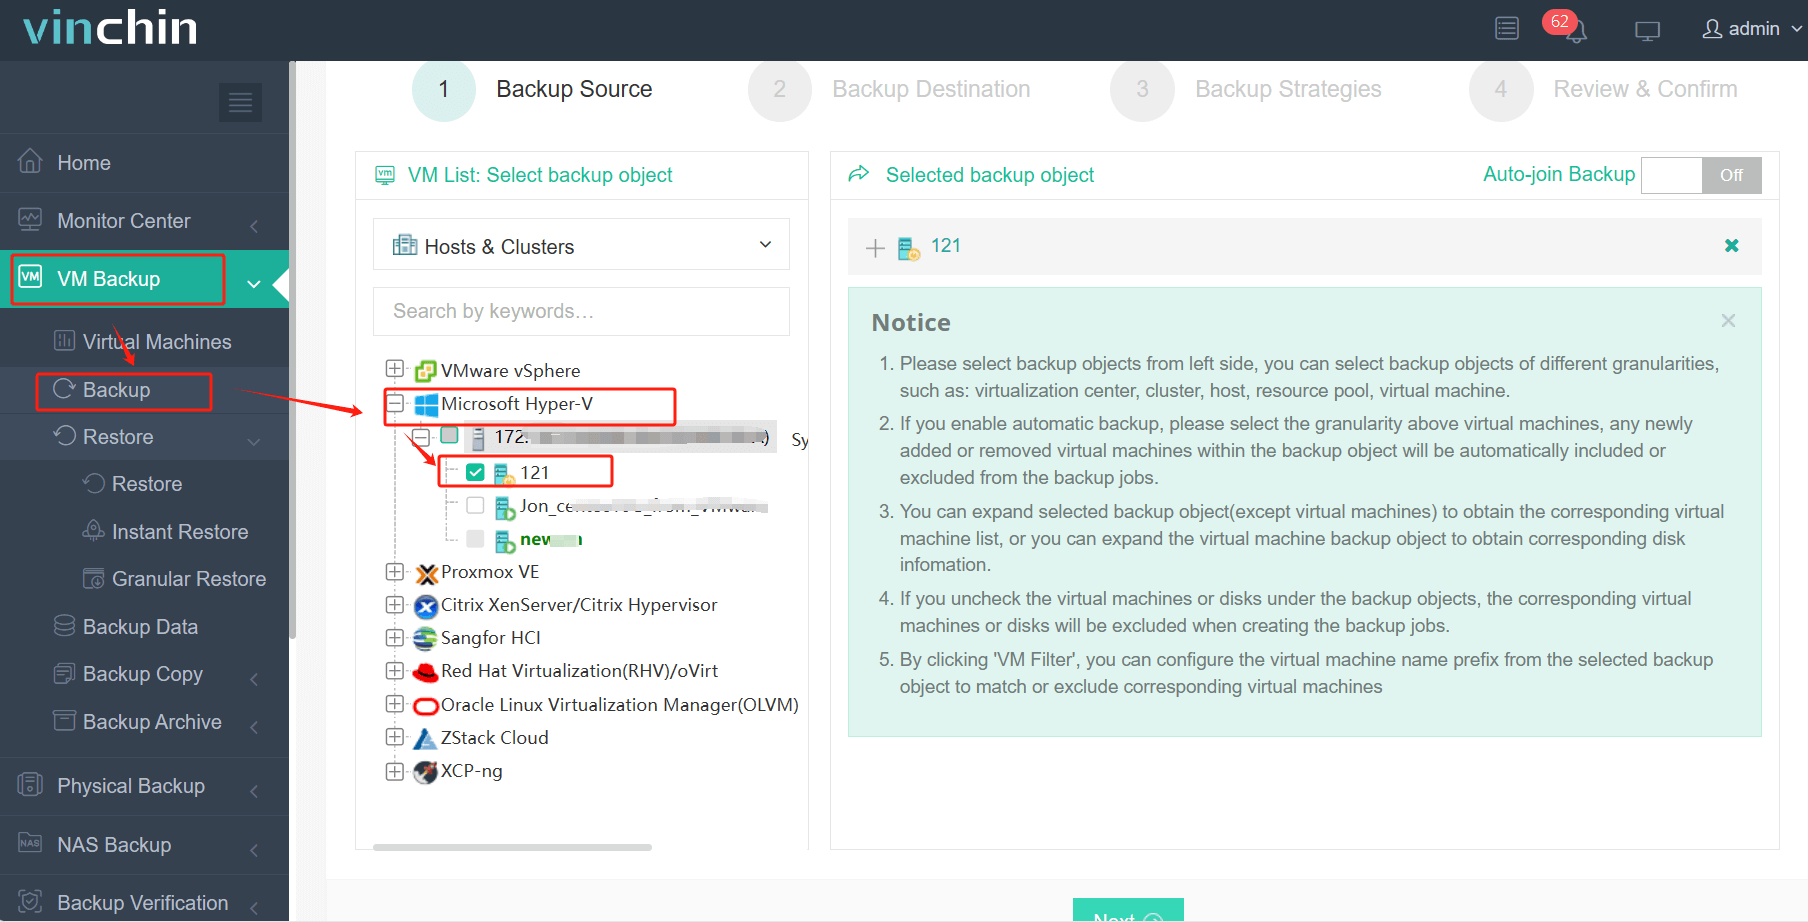
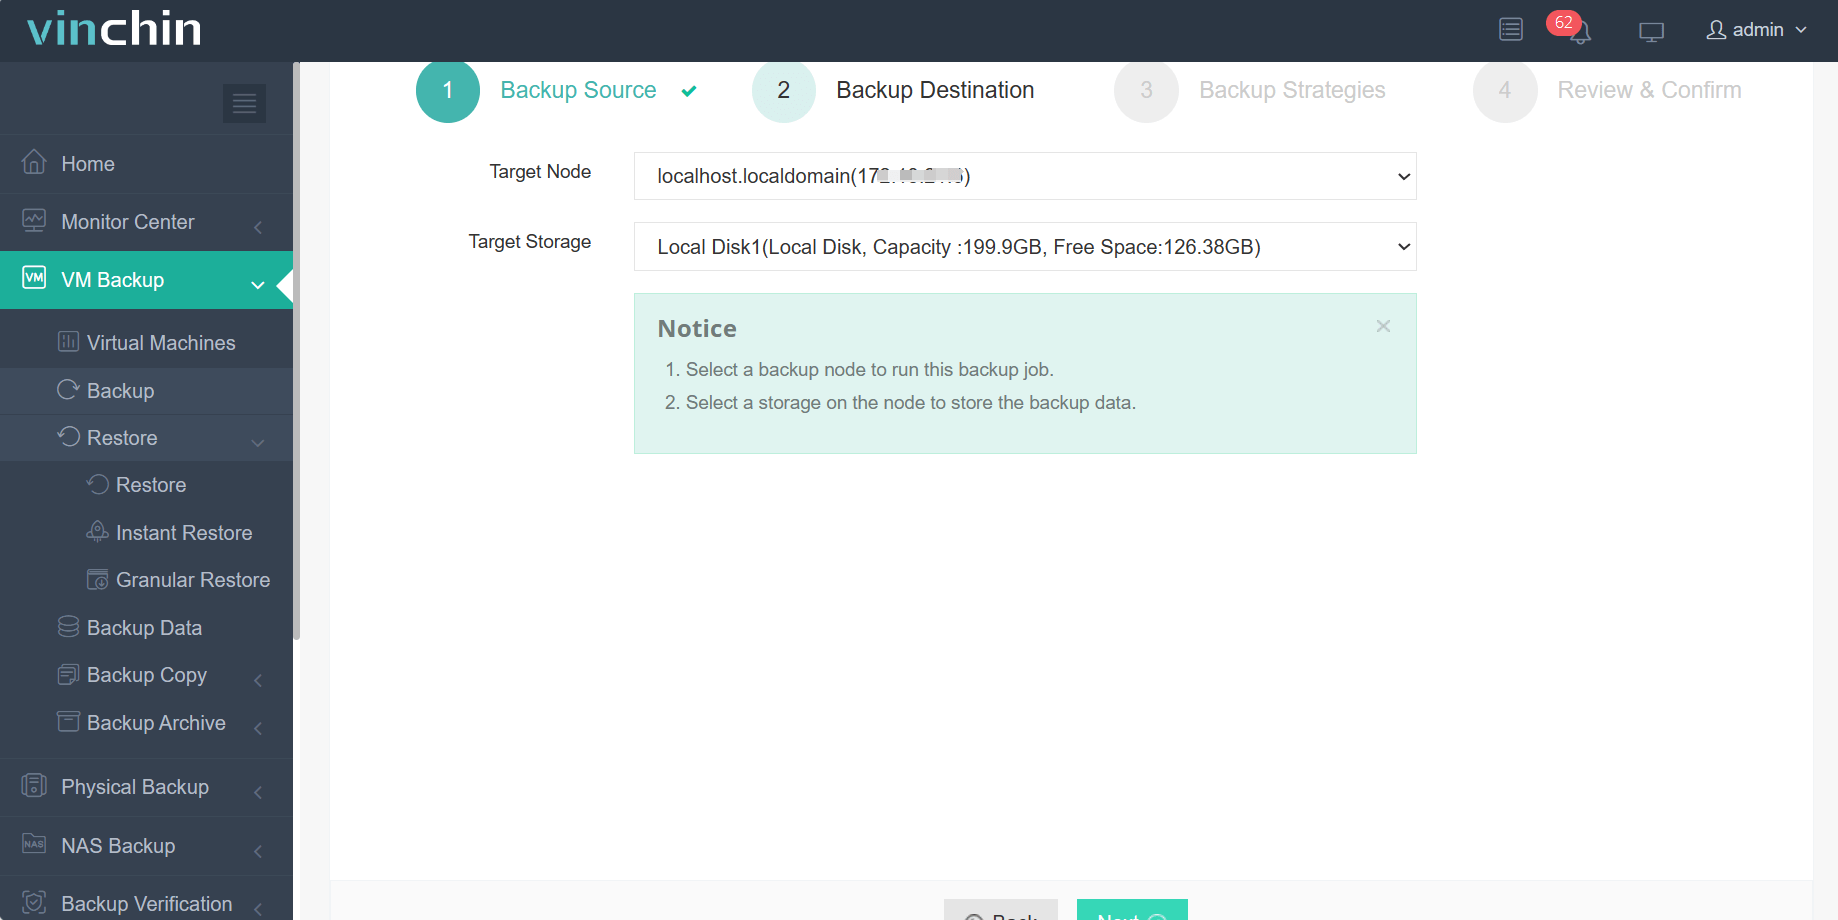
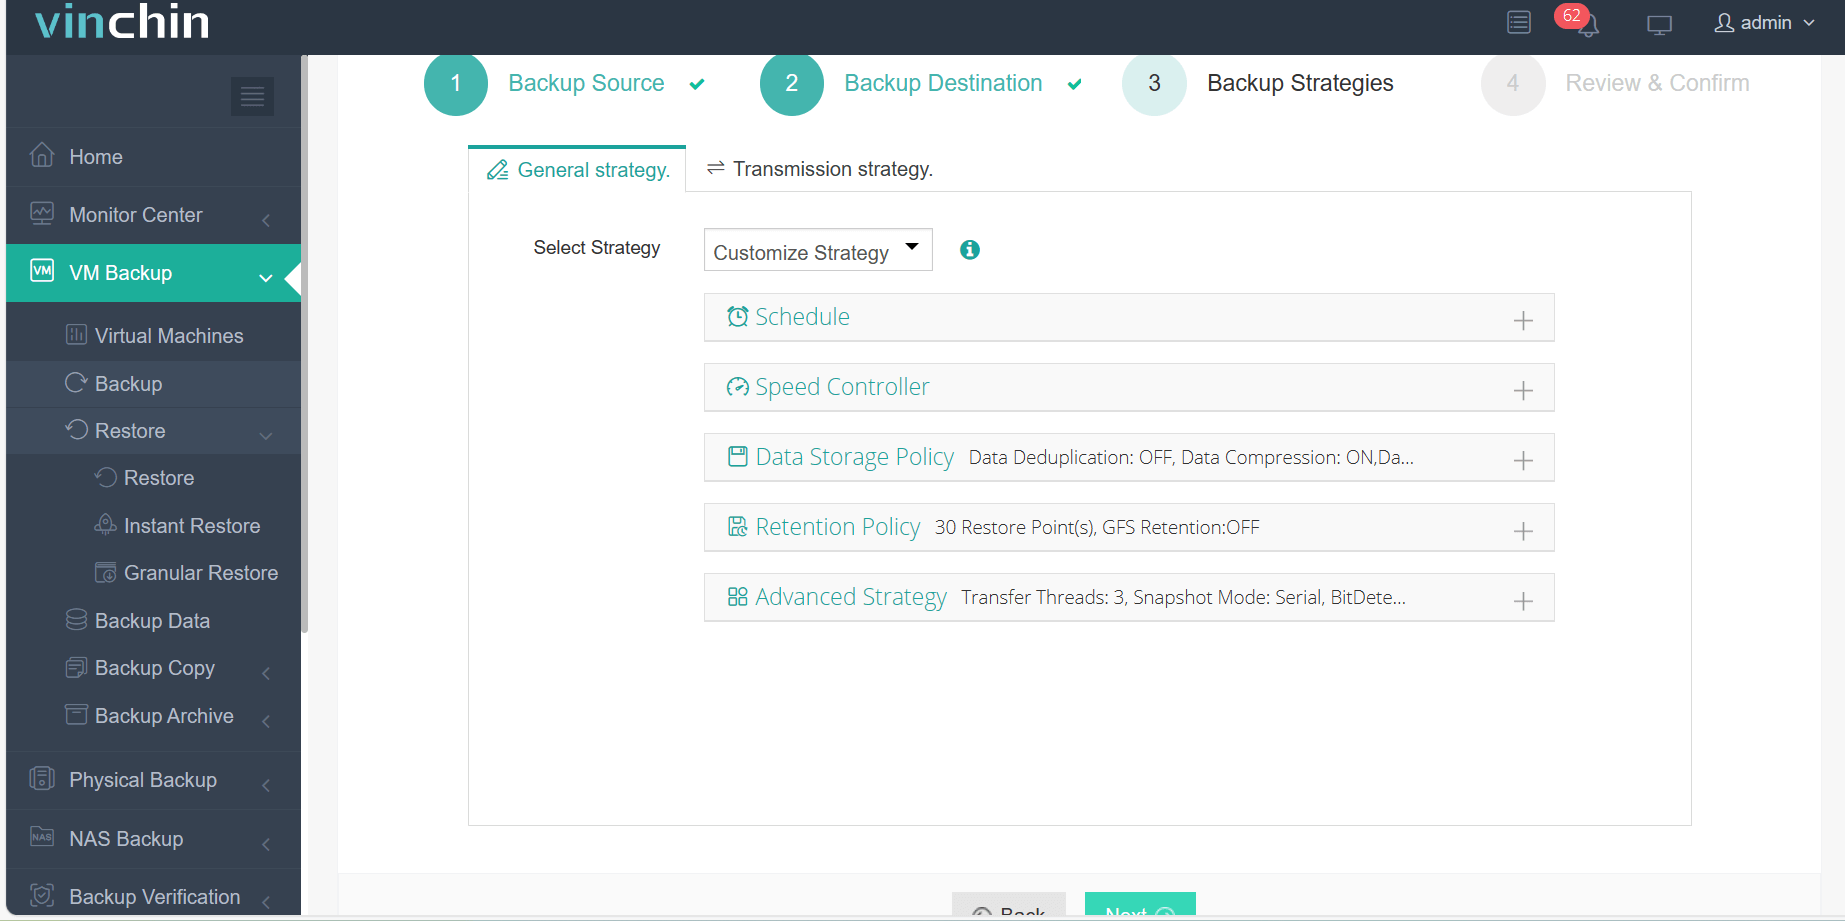
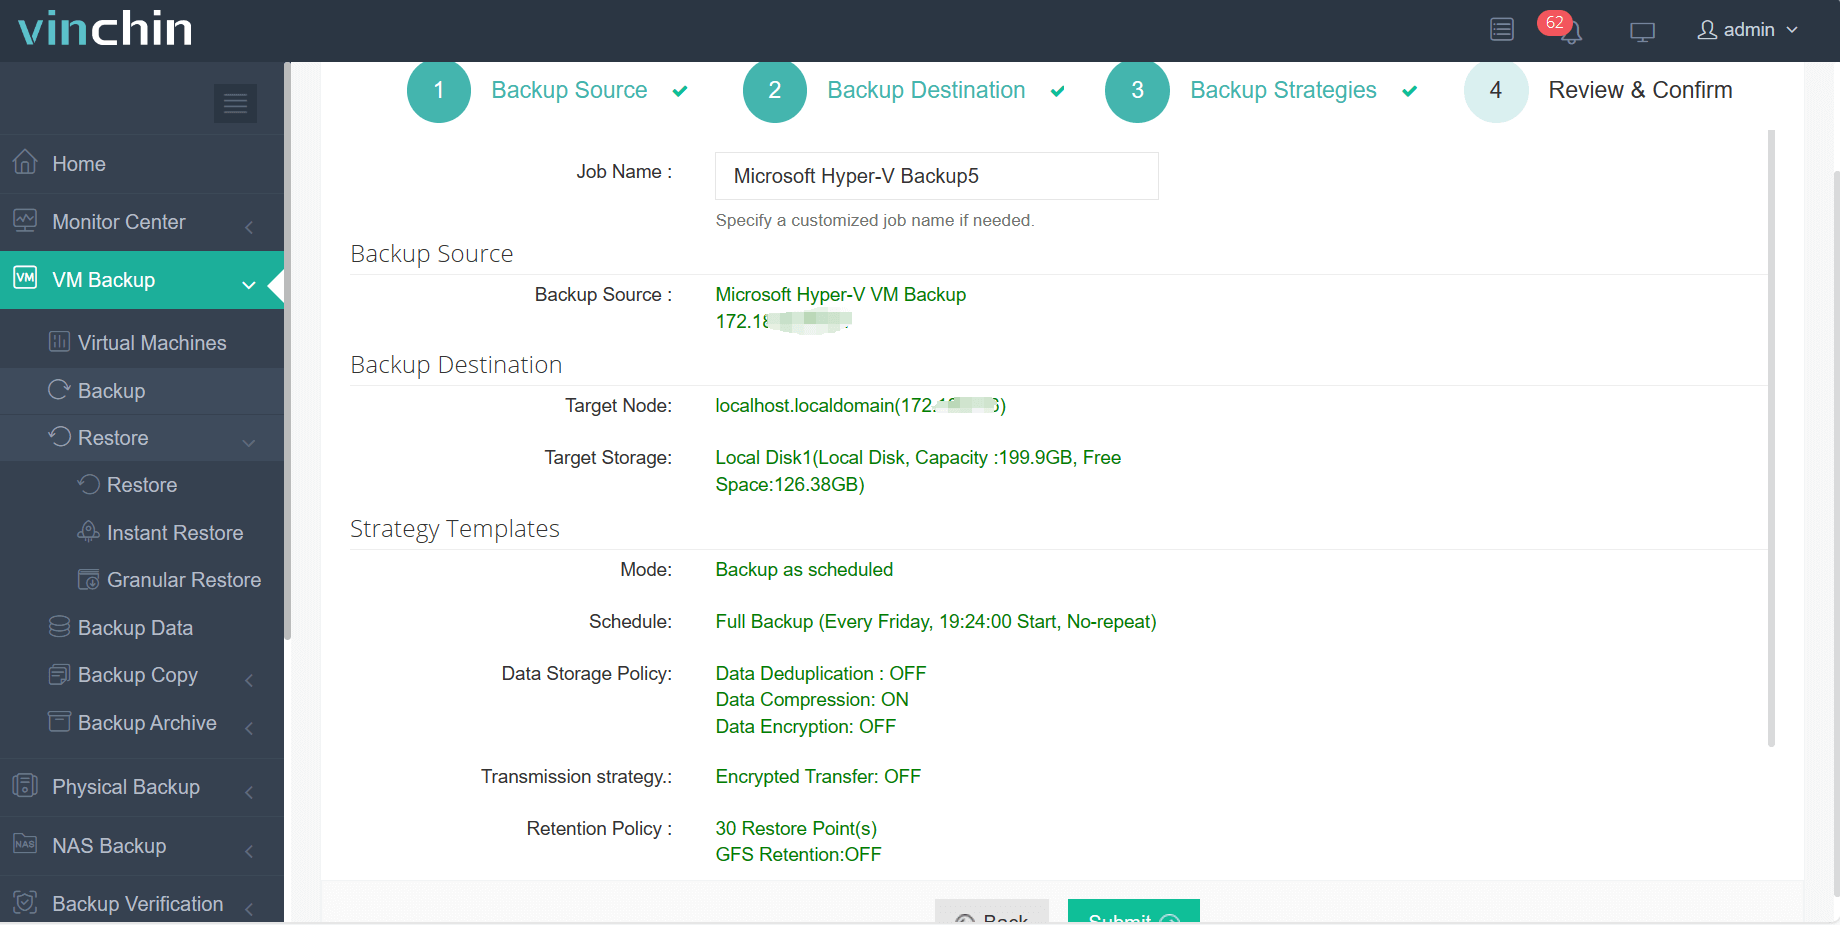
Vinchin's intuitive web console streamlines Hyper-V VM backup into four simple steps:
Step 1: Select the Hyper‑V VM you wish to back up
Step 2: Choose backup storage
Step 3: Configure backup strategy
Step 4: Submit the job
Recognized worldwide with top ratings and trusted by thousands of enterprises, Vinchin Backup & Recovery offers a 60‑day full-featured free trial; click below to experience powerful data protection firsthand.
FAQ About Setting Up Your First Hyper-V Cluster
Q1: Can I add more servers later if my workload grows?
Yes; open FAILOVER CLUSTER MANAGER > right-click CLUSTER NAME > select ADD NODE > follow prompts
Q2: Is there an easy way to check my whole cluster's health?
Yes; use FAILOVER CLUSTER MANAGER dashboard view or run GET-CLUSTERNODE / GET-CLUSTERGROUP commands in PowerShell
Q3: What happens if my shared disk goes offline briefly?
The affected virtual machines may pause until connectivity returns—but automatic failback resumes service once restored
Conclusion
A solid hyper v cluster setup delivers high availability that keeps businesses resilient against downtime risks large or small alike! With careful planning plus ongoing monitoring routines anyone can build robust solutions confidently and backing up those critical workloads becomes effortless thanks only ever needing trusted partners like Vinchin along every step forward together!