-
What Is Ballooning in Proxmox?
-
Why Use Ballooning in Proxmox?
-
Prerequisites for Ballooning in Proxmox
-
How to Enable Ballooning in Proxmox?
-
How to Backup Proxmox Virtual Machine with Vinchin?
-
Ballooning Proxmox FAQs
-
Conclusion
Efficient memory management is key for any virtualized environment—especially as workloads grow but budgets stay tight. With ballooning in Proxmox, you can boost VM density by up to 30% without adding physical RAM. But what is ballooning? How does it work? And how do you set it up safely? Let's walk through everything you need to know about ballooning proxmox step by step.
What Is Ballooning in Proxmox?
Ballooning in Proxmox is a dynamic memory management feature that lets your hypervisor adjust each virtual machine's RAM allocation on demand. Instead of locking every VM into a fixed amount of memory—which often leads to wasted resources—ballooning allows unused RAM from idle VMs to be reclaimed by the host or given to other VMs that need more at that moment.
This process relies on a special component called the balloon driver inside each guest OS. When extra memory is needed elsewhere, the driver “inflates,” signaling the guest OS to release some pages back to the host; when more RAM becomes available or needed by the VM itself, it “deflates,” letting the guest reclaim those pages. This approach helps maximize server utilization while keeping workloads responsive.
Why Use Ballooning in Proxmox?
Most VMs rarely use all their assigned memory at once—especially during off-peak hours or when running lightweight services. By enabling ballooning proxmox environments can dynamically shift unused RAM where it's needed most, reducing waste and increasing overall VM density per host.
In practice, tests have shown that using ballooning can reduce idle VM memory consumption by 40–60%, allowing administrators to run up to 30% more VMs on existing hardware. This makes overcommitting memory safer because if one VM suddenly needs more resources while others are idle or lightly loaded, Proxmox can shift available RAM accordingly instead of resorting immediately to slow disk swapping or risking out-of-memory errors.
Ballooning also gives control back to each guest OS: rather than having the hypervisor forcibly swap out random pages (which could hurt performance), the guest decides which pages are least important and safe to release.
Prerequisites for Ballooning in Proxmox
Before enabling ballooning proxmox features on your VMs, make sure your setup meets these requirements:
First, confirm that your guest operating system has an active balloon driver installed:
For most modern Linux distributions (like Ubuntu or CentOS), this driver comes pre-installed as
virtio-balloon. If missing, install it using your package manager.For Windows guests: Download the latest VirtIO drivers ISO from Fedora's official site. Attach this ISO as a CD-ROM drive in your VM settings via Proxmox GUI; then open Device Manager inside Windows, locate System Devices > right-click > Update Driver > Browse > select VirtIO CD-ROM > choose "VirtIO Balloon Driver" and complete installation.
After installing any missing drivers or making changes related to hardware configuration (including enabling/disabling balloon devices), always perform a full shutdown—not just reboot—of your VM before proceeding with further configuration.
Note: Hot-add of balloon devices isn’t supported; changes require downtime for proper initialization.
Ensuring these prerequisites avoids common pitfalls like failed dynamic allocation or error messages such as "device 'balloon' not found."
How to Enable Ballooning in Proxmox?
Once prerequisites are met—including proper drivers installed—you're ready to enable dynamic memory management for any eligible VM using either GUI or CLI methods below:
Method 1: Enabling Ballooning in Proxmox via GUI
The web interface makes configuring balloon settings straightforward:
Start by opening your Proxmox web console and selecting your target virtual machine from the left panel tree view.
Click on Hardware under that VM’s menu.
Double-click on Memory within the hardware list.
A dialog appears showing two fields: Minimum memory (MB) sets how little RAM this VM can shrink down toward during low activity; Maximum memory (MB) defines its upper limit during peak demand.
Enter values appropriate for your workload—for example: set minimum at 2048 MB (2 GB) if running light services but keep maximum at 4096 MB (4 GB) if occasional spikes occur.
Ensure you check the box labeled Ballooning Device so dynamic adjustment activates.
Click OK when finished.
If you're working with Windows guests here—and haven’t already done so—install VirtIO Balloon Driver as described above before starting up again.
After saving changes and powering up your VM again with these settings applied, monitor resource usage over time via both host dashboard graphs and guest OS tools like Task Manager or free -m on Linux systems.
Method 2: Enabling Ballooning in Proxmox via CLI
Prefer scripting or batch operations? You can configure everything directly from shell using qm commands:
First identify your target’s numeric ID (VMID). Then run:
qm set <VMID> -memory <max_memory_in_MB> -balloon <min_memory_in_MB>
For example:
qm set 100 -memory 4096 -balloon 2048
This command configures VM ID 100 so its usable RAM floats between a minimum of 2048 MB (guaranteed baseline) up through a maximum cap of 4096 MB depending on demand across all hosts’ workloads.
Remember: replace <VMID> with actual number shown beside each virtual machine name; values must be integers representing megabytes—not gigabytes!
To verify current settings after applying changes:
qm config <VMID> | grep balloon
If you see errors like "device 'balloon' not found," double-check whether you've installed required drivers inside guest OS per earlier instructions—and ensure you've performed a full shutdown/restart cycle since last hardware change.
How to Backup Proxmox Virtual Machine with Vinchin?
Protecting dynamically managed workloads is essential for business continuity. Vinchin Backup & Recovery is an enterprise-level solution supporting backup and recovery across over fifteen mainstream virtualization platforms—including seamless integration with Proxmox VE alongside VMware ESXi/vSphere, Hyper-V, oVirt, OLVM, RHV, XCP-ng, XenServer, OpenStack, ZStack and more.
With Vinchin Backup & Recovery for Proxmox environments you benefit from features such as forever-incremental backup strategies for storage efficiency; built-in data deduplication and compression; granular restore capabilities; scheduled backups with flexible retention policies; and cross-platform V2V migration—all designed for robust protection while minimizing operational overhead.
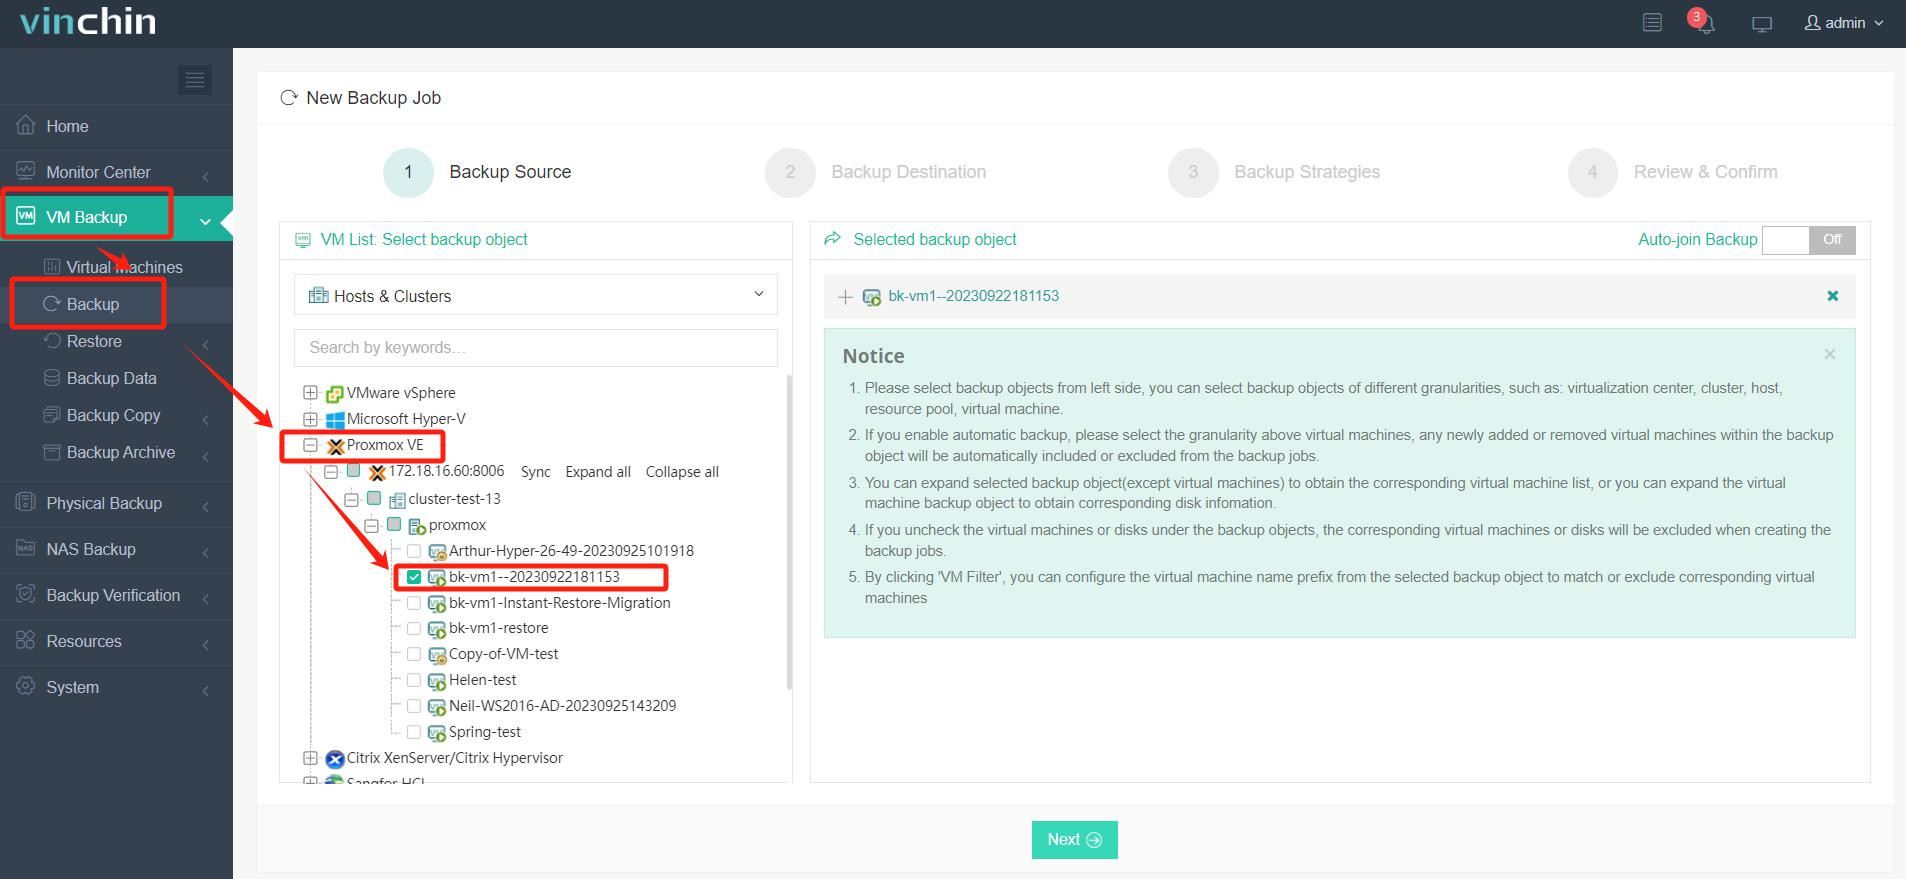
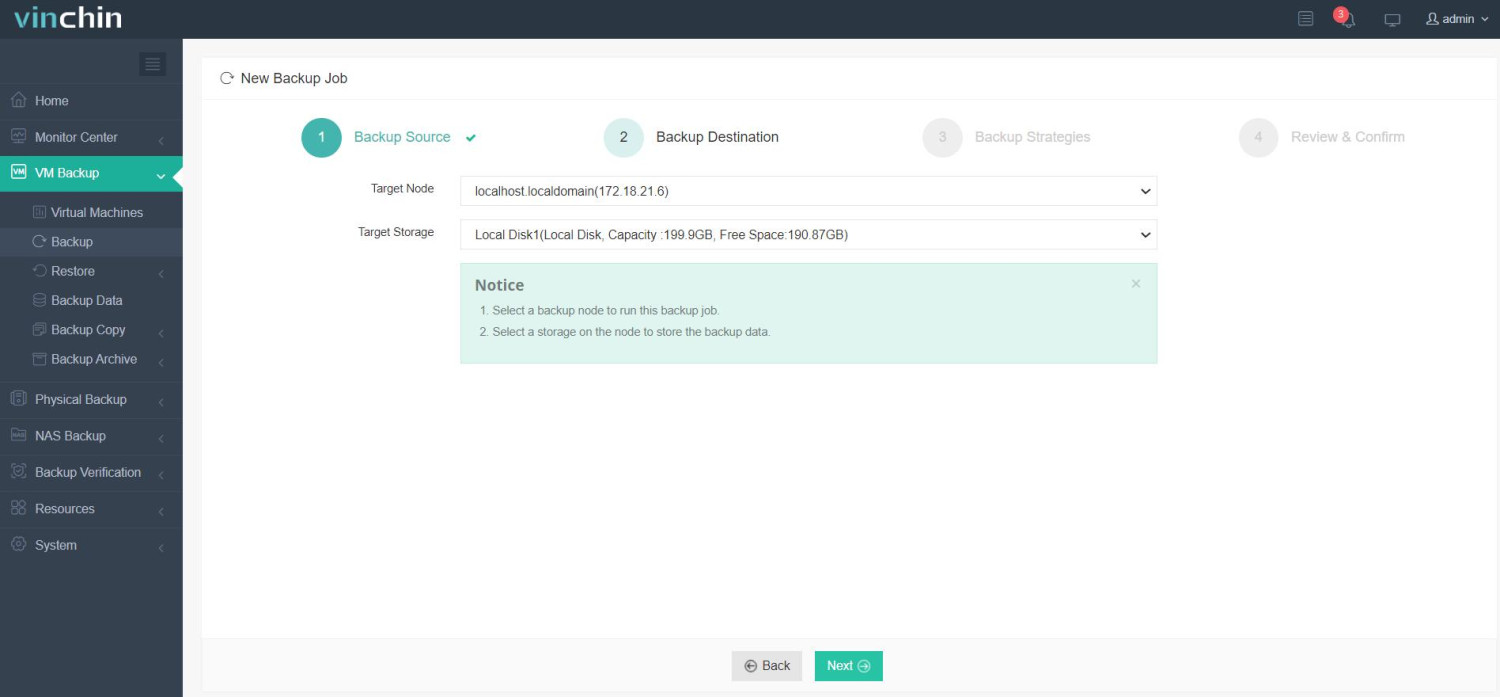
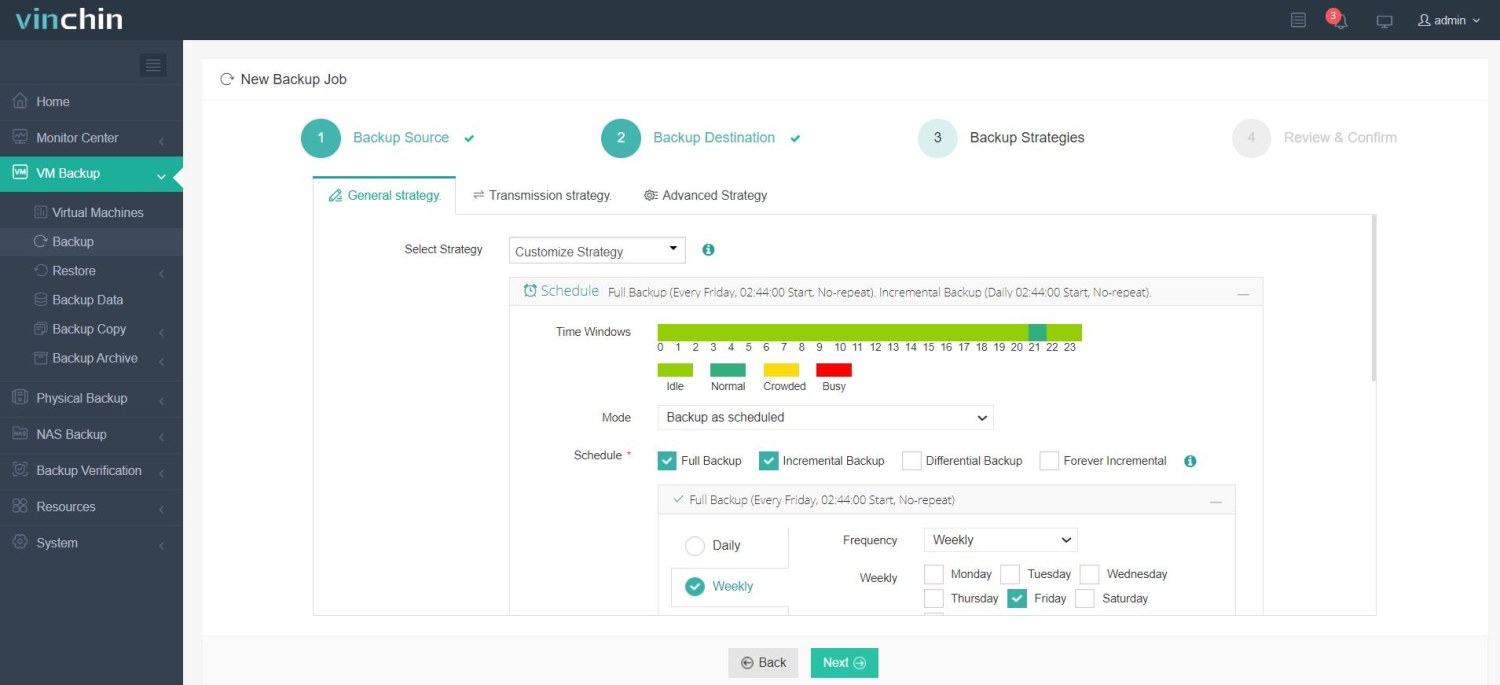
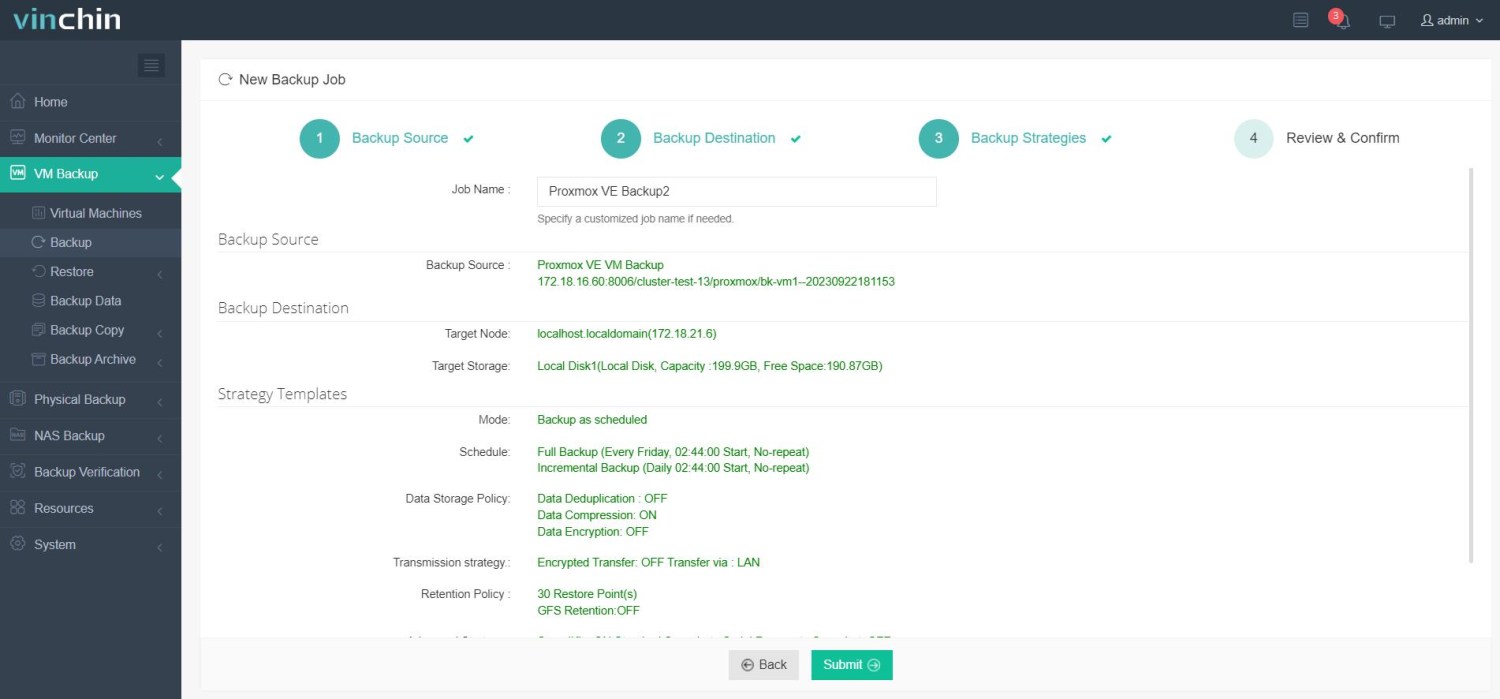
The intuitive Vinchin Backup & Recovery web console streamlines backup tasks into four steps:
✅ Step 1: Back Up the Proxmox VM

✅ Step 2: Restore to Target Platform (e.g., Azure or VMware)

✅ Step 3: Configure backup strategies;

✅ Step 4: Submit the job.

Recognized globally for reliability and top customer satisfaction ratings—with thousands of organizations protected—Vinchin Backup & Recovery offers a fully-featured free trial valid for 60 days. Click below to start safeguarding every critical workload now!
Ballooning Proxmox FAQs
Q1: Can I enable ballooning proxmox features if my VM uses PCI passthrough devices?
A1: No—PCI(e) passthrough requires fixed static mapping so dynamic resizing isn’t supported alongside those configurations.
Q2: How do I check if my Linux-based guest actually responds when host requests additional free RAM?
A2: Inside Linux guests run cat /proc/meminfo before/after load spikes—or monitor host-side graphs—to observe total used/free shifting dynamically within configured min/max bounds.
Q3: Does enabling balloon device ever slow down application performance?
A3: Under normal loads impact is negligible (<3% CPU overhead); however aggressive reclamation may cause brief latency spikes especially if minimum threshold set too low relative baseline app needs.
Conclusion
Ballooning proxmox lets admins stretch server resources further while keeping workloads stable—even under changing demands—with just minutes' setup effort required per machine! For end-to-end data safety across all platforms—including those optimized via dynamic allocation—Vinchin offers reliable backup solutions trusted worldwide today.
Share on:


