Introduction
Your old physical server still runs a critical application. The hardware is aging, support is ending, and nobody wants to reinstall Windows and rebuild everything from scratch.
The good news: you do not have to. You can convert a physical Windows server to a VM without reinstalling the OS. The operating system, applications, settings and data are captured and moved onto a hypervisor as they are.
The work is in the details. Drivers, boot settings, networking and licensing all change when hardware becomes virtual.
This guide covers:
What physical-to-virtual migration involves, and what usually goes wrong
A readiness checklist to run before you start
Three ways to convert a physical machine to a virtual machine, with commands where the tool supports them
How the methods compare, and how to make the process simpler
What Is Physical to Virtual Migration (P2V Conversion)?
Physical to virtual migration, also called P2V conversion, copies a physical server's disks and system state into a virtual machine. The VM boots the same Windows installation that ran on the hardware, so applications and settings carry over.
That is why P2V beats a reinstall in most cases:
You keep the OS, applications, users and configuration.
You avoid rebuilding and re-testing every application.
You can test the VM before retiring the physical server.
Virtual hardware is different from physical hardware, though. Four things usually need attention:
| Difficulty | What changes | What goes wrong if ignored |
|---|
| Drivers and boot | Physical storage and network drivers do not exist on virtual hardware | The VM stops at boot or shows a blue screen |
| Firmware and disk layout | BIOS or UEFI, partitions and disk type must match the VM type | The converted disk does not boot |
| Network | The virtual network adapter has a new name and MAC address | Static IP settings are lost |
| Licensing | Some Windows licenses are tied to hardware | The VM is not covered by your license |
Before You Convert: P2V Readiness Checklist
Run through this list before you touch the server. Most failed conversions trace back to something on it.
Protect the source
Check the system
Note whether the server uses BIOS or UEFI, and its disk layout.
Look for dynamic disks. virt-v2v, for example, does not support a Windows system disk on a dynamic disk.
Check for BitLocker. Disk2vhd does not support BitLocker volumes, so decrypt first.
Turn off Windows Fast Startup if you plan to use virt-v2v, because it cannot convert hibernated guests.
Check the environment
Record static IP addresses, DNS and routes.
List applications bound to hardware, such as license dongles or MAC-based licensing.
Plan a maintenance window for the final switchover.
Check licensing
Prepare the target
Confirm the hypervisor has enough CPU, memory and storage.
Choose the VM type (Generation 1 or 2 on Hyper-V) to match the source firmware.
Method 1: Convert a VM with Disk2vhd and PowerShell
Best for: a Hyper-V target and a hands-on admin who likes the command line.
Disk2vhd is a free Sysinternals tool. It creates a VHD for each physical disk, keeps the partition layout, and can run on a live system because it uses Windows volume snapshots to get a consistent copy.
Step 1: Capture the Physical Disks
Run this from an elevated prompt on the physical server. Write the VHD to a different disk than the one you are copying, because Microsoft notes performance is better that way.
disk2vhd * D:\vhd\server.vhd
The * includes all volumes. To capture only the system volume, replace it with a drive letter such as c:.
Step 2: Copy the VHD to the Hyper-V Host
Move the file to the host over the network or on external storage.
Step 3: Convert VHD to VHDX (Optional)
If you want the newer VHDX format, convert it with PowerShell. The disk must not be attached to a VM during conversion.
Convert-VHD -Path D:\vhd\server.vhd -DestinationPath D:\vhd\server.vhdx
Step 4: Create the VM
Match the VM generation to the source firmware: Generation 1 for BIOS servers, Generation 2 for UEFI servers.
New-VM -Name "P2V-Server01" -Generation 1 -MemoryStartupBytes 8GB `
  -VHDPath D:\vhd\server.vhdx -SwitchName "External"
Step 5: Boot and Fix Drivers
Start the VM and sign in. If Windows reports missing drivers, install the Hyper-V integration components, then reconfigure the network adapter and IP address.
Watch Out For
BitLocker. Disk2vhd does not support BitLocker volumes. Turn it off and wait for full decryption first.
Disk signature conflicts. Do not attach the VHD to the source server if you plan to boot from it. Windows assigns a new disk signature, and the boot configuration may then fail to find the boot disk.
Manual work. Disk2vhd creates the disks only. You build the VM, install drivers and set up networking yourself.
Method 2: Use VMware vCenter Converter as a VM Converter
Best for: teams moving a physical Windows server into a VMware environment who prefer a graphical wizard.
VMware vCenter Converter Standalone is the best-known free VM converter for P2V conversion. It converts a physical machine to a virtual machine while the server is powered on. Broadcom's download article says it is downloaded from the Broadcom support portal, which requires a login.
Step 1: Prepare the Server
Broadcom's P2V guide lists a few preparations:
Make sure the destination has free space at least equal to the server's used disk space.
Temporarily disable antivirus software.
Uninstall non-Microsoft drivers and disable third-party services, except Converter's own.
Step 2: Install and Start the Conversion
Install Converter Standalone on the server, then choose File > New > Convert Machine.
Step 3: Choose the Source and Destination
Source type: Powered-on machine, then This local machine.
Destination type: the VMware VM type that matches your product, for example VMware Workstation or other VMware virtual machine.
Destination location: a connected drive or network share with enough space.
Step 4: Adjust the Data to Copy (Optional)
Click Edit to choose which partitions to copy. Keep the system partition, and clear the recovery partition if you do not need it.
Step 5: Finish and Create the VM
Click Finish. When the conversion completes, attach the converted disk files to a VM on your VMware platform and boot it.
About the Command Line
Converter Standalone's command-line options cover installation, for example silent install with /qn. The conversion itself runs through the wizard.
Watch Out For
OEM Windows. Broadcom warns that OEM copies of Windows may fail to migrate because of Microsoft licensing.
Final changes. The server keeps running during the copy, so plan a short window at the end to capture the last changes before switching over.
Target focus. Converter is designed for VMware destinations. Moving to Hyper-V, Proxmox or another platform needs a different tool.
Method 3: Convert with virt-p2v and virt-v2v
Best for: KVM-based targets such as libvirt, oVirt or OpenStack, and admins comfortable with Linux.
This open-source pair splits the job in two. virt-p2v boots the physical machine from an ISO or USB image and sends its disks to a conversion server. virt-v2v on that server converts the guest so it boots on virtual hardware. virt-v2v lists Windows guests from Windows XP to Windows 11 and Windows Server 2025.
Step 1: Prepare the Conversion Server
Install virt-v2v on a Linux server. The SSH daemon must allow TCP forwarding, and scp must work.
# /etc/ssh/sshd_config
AllowTcpForwarding yes
For Windows guests, virt-v2v needs virtio drivers. It looks in the location set by the VIRTIO_WIN environment variable, then in /usr/share/virtio-win.
Step 2: Boot the Physical Server from the virt-p2v Image
Boot from the ISO or USB image. The disks must be quiescent, which is why the server cannot keep running during the copy. The connection always starts from the physical server, so it needs outbound access to the conversion server's SSH port.
You can fill in the connection details in the virt-p2v wizard, or pass them as kernel command-line options:
p2v.server=conv.example.com p2v.username=root p2v.o=local
Step 3: Convert and Output
virt-p2v uploads the disks and runs virt-v2v for you. If you already have a disk image, you can run the conversion directly:
virt-v2v -i disk disk.img -o local -os /var/tmp -of qcow2
The converted disks and a libvirt XML file are written to /var/tmp.
Step 4: Boot and Wait Out the First Start
Virt-v2v installs drivers in two stages, so the first boot takes longer. The documentation warns that Windows may reboot four or more times after conversion.
Watch Out For
Downtime. The physical server must be offline, booted from the virt-p2v image, for the whole copy.
Network speed. Conversion speed depends largely on the network between the two machines.
SSH timeouts. If the long-lived connection times out, virt-p2v fails.
Unsupported setups. A Windows system disk on a dynamic disk is not supported, and guests with Fast Startup enabled or hibernated cannot be converted.
P2V Methods Compared at a Glance
Here is how the three ways to convert a physical machine to a virtual machine line up:
| Disk2vhd + PowerShell | VMware vCenter Converter | virt-p2v + virt-v2v |
|---|
| Source online during copy | Yes, uses volume snapshots | Yes, powered-on conversion | No, boots from an image |
| Typical target | Hyper-V | VMware | KVM-based: libvirt, oVirt, OpenStack |
| Command line | Yes | Installation options only | Yes |
| Skill needed | Windows and PowerShell | Low, wizard-driven | Linux and SSH |
| Main limit | No BitLocker; VM built by hand | VMware destinations | Source offline; no dynamic system disks |
Pick by target platform first. Each tool fits one family of hypervisors well, and none of them covers all three.
Where These P2V Methods Fall Short
All three methods work, and for a single server they can be enough. Once you have several servers, mixed platforms or a tight window, the same gaps show up:
One tool per target. Disk2vhd suits Hyper-V, Converter suits VMware and virt-v2v suits KVM-based platforms. Moving different servers to different hypervisors means learning different tools.
Manual driver and VM work. With Disk2vhd you build the VM and fix drivers yourself. With virt-v2v the first boot involves several automatic reboots.
Downtime you have to plan. virt-p2v needs the server offline for the full copy, and live methods still need a final switchover.
No safety net by default. None of these tools gives you an ongoing backup of the source before or the VM after the move.
If you need to convert a physical Windows server to a VM across several platforms and keep it protected before and after, a backup-based approach can cover these gaps.
Convert a Physical Windows Server to a VM with Vinchin
Vinchin Backup & Recovery is a backup product that also works as a VM converter. It converts physical servers through a backup-driven process: you back up the physical server, then restore that backup onto a hypervisor as a virtual machine.
What Vinchin Brings to P2V
One tool for many targets. Vinchin says it restores physical backups to more than 15 mainstream virtualization platforms, including VMware, Hyper-V, Proxmox and XCP-ng.
Automatic driver handling. Vinchin says it removes the physical server's OEM drivers and injects suitable virtual machine drivers, with automated boot repair for hardware compatibility.
Short switchover. Vinchin describes the migration as nearly zero-downtime, with changes synced automatically and a short window to switch the business system.
Fast first boot. A VM can boot directly from the physical server backup repository, and its data can then be migrated to production storage.
Test before cutover. You can verify the converted VM in an isolated sandbox network before it goes live.
Backup before and after. The same product protects the physical server before the move and the new VM afterward, so there is a restore point at both ends.
Follow these steps to convert a physical machine to a virtual machine simply and quickly:
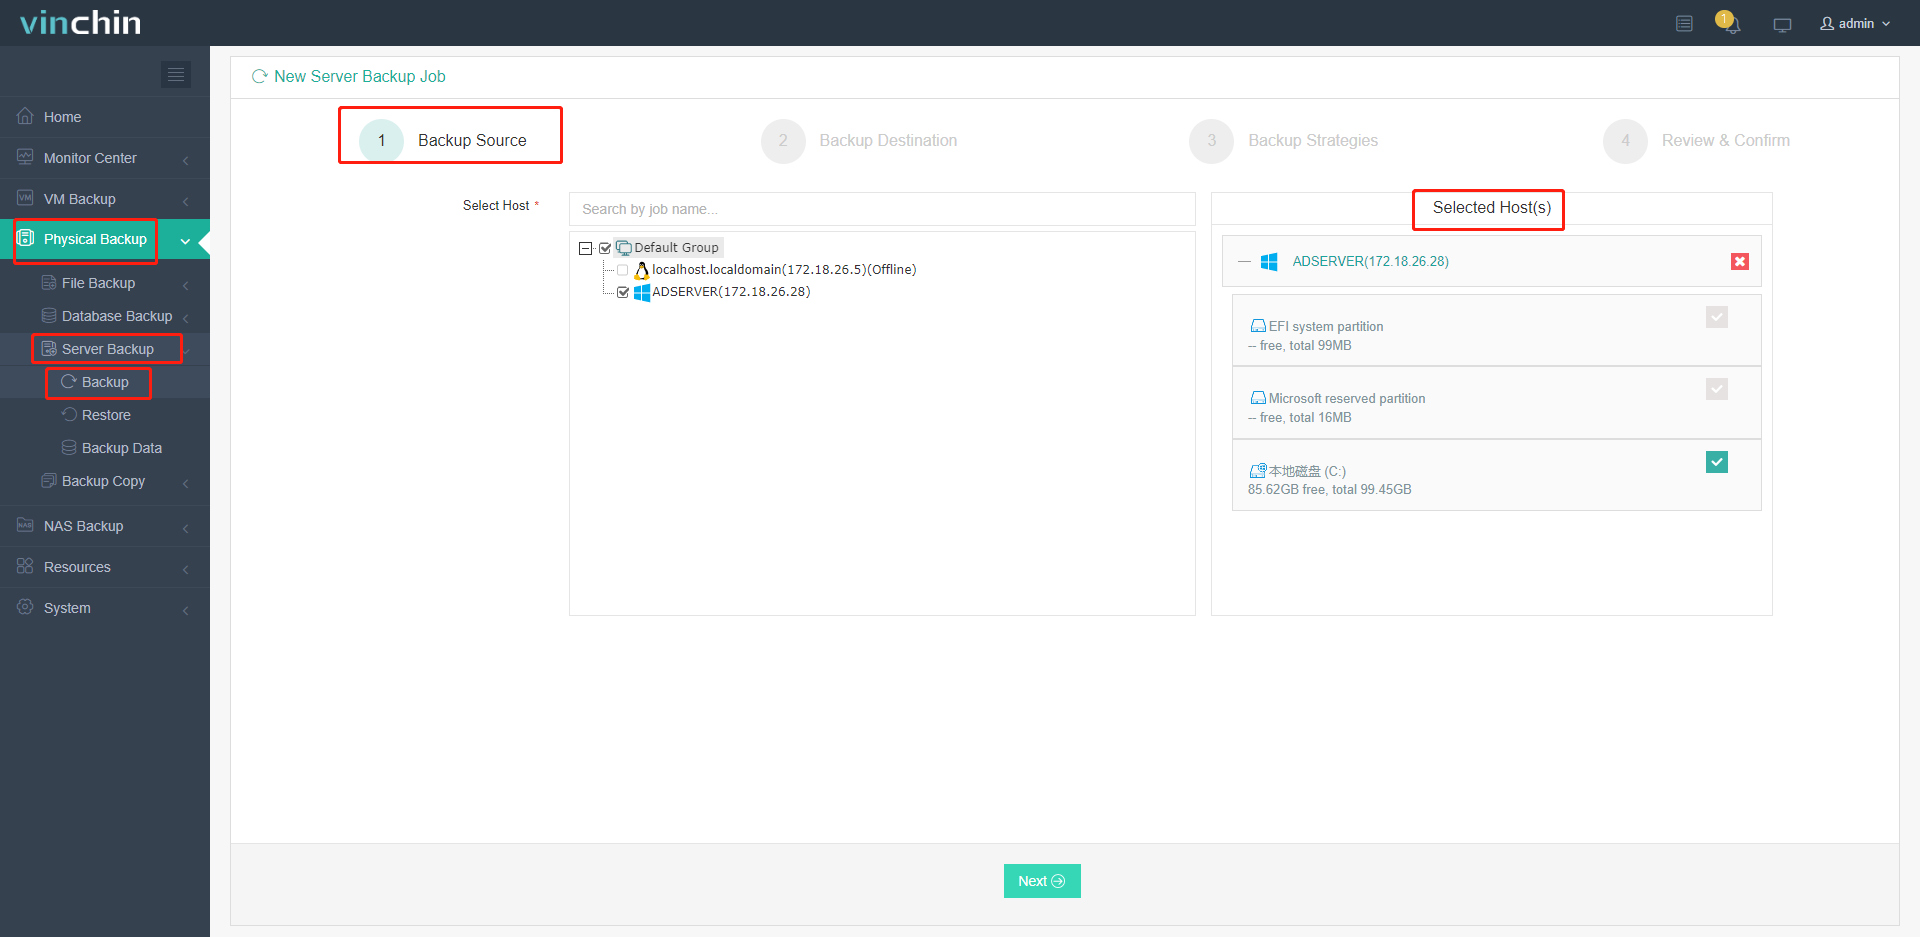
Step1: Back Up the Physical Server
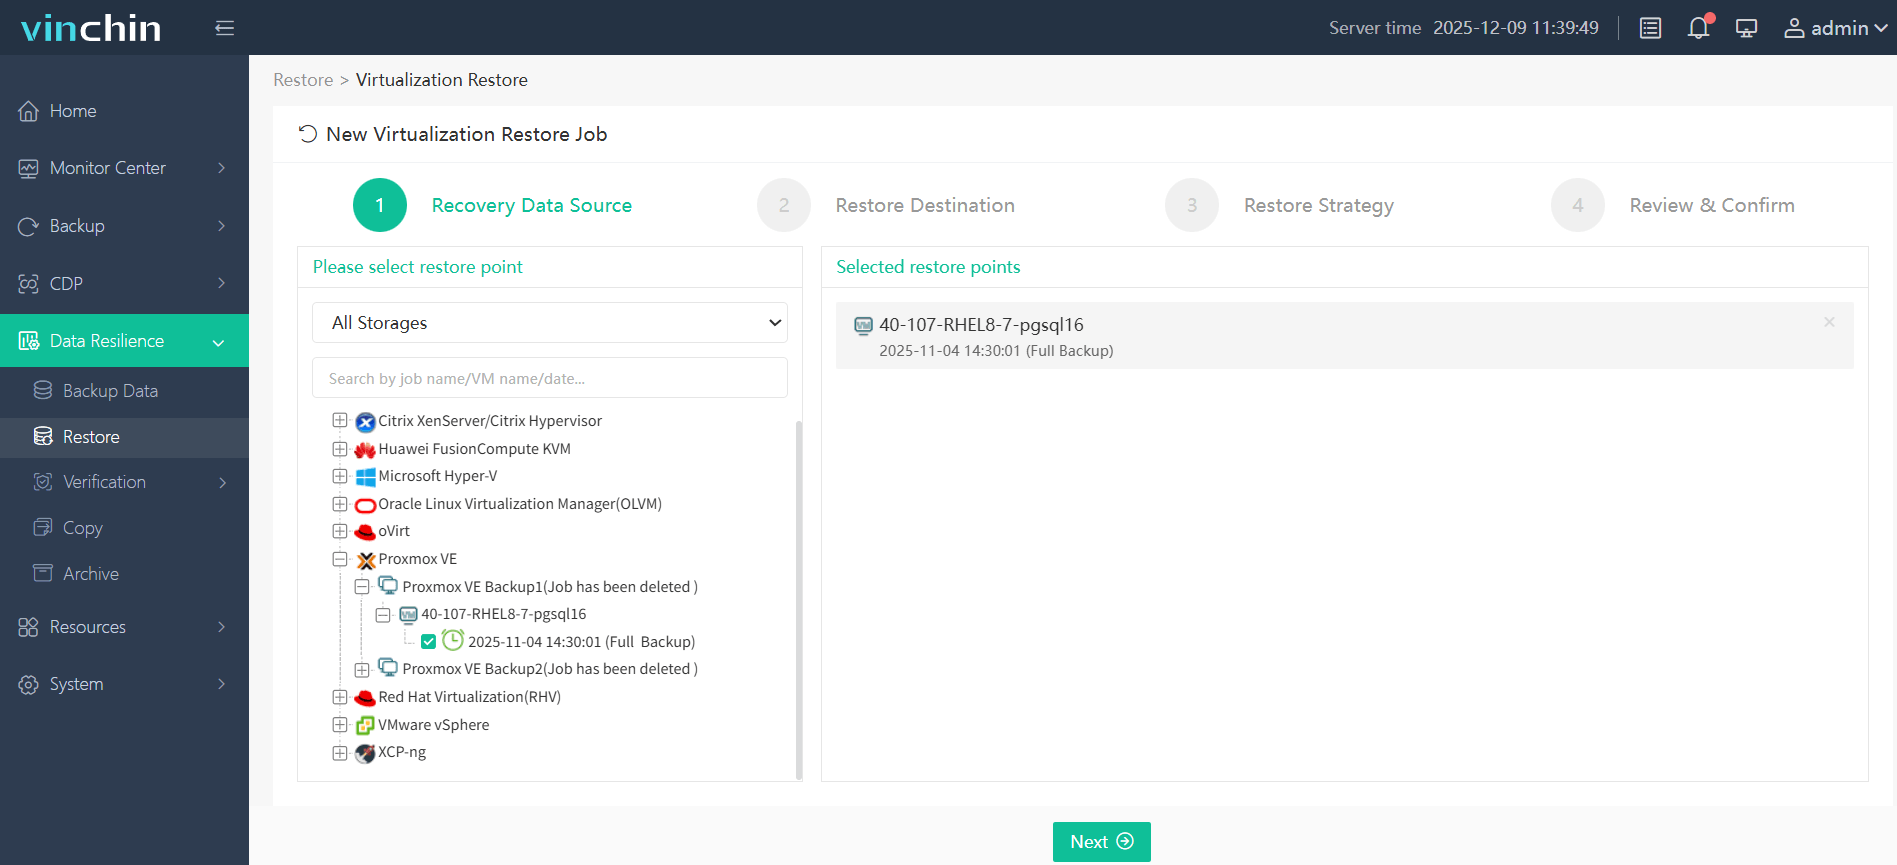
Step2: Once the backup job completes, click Data Resilience > Restore and select the backup data
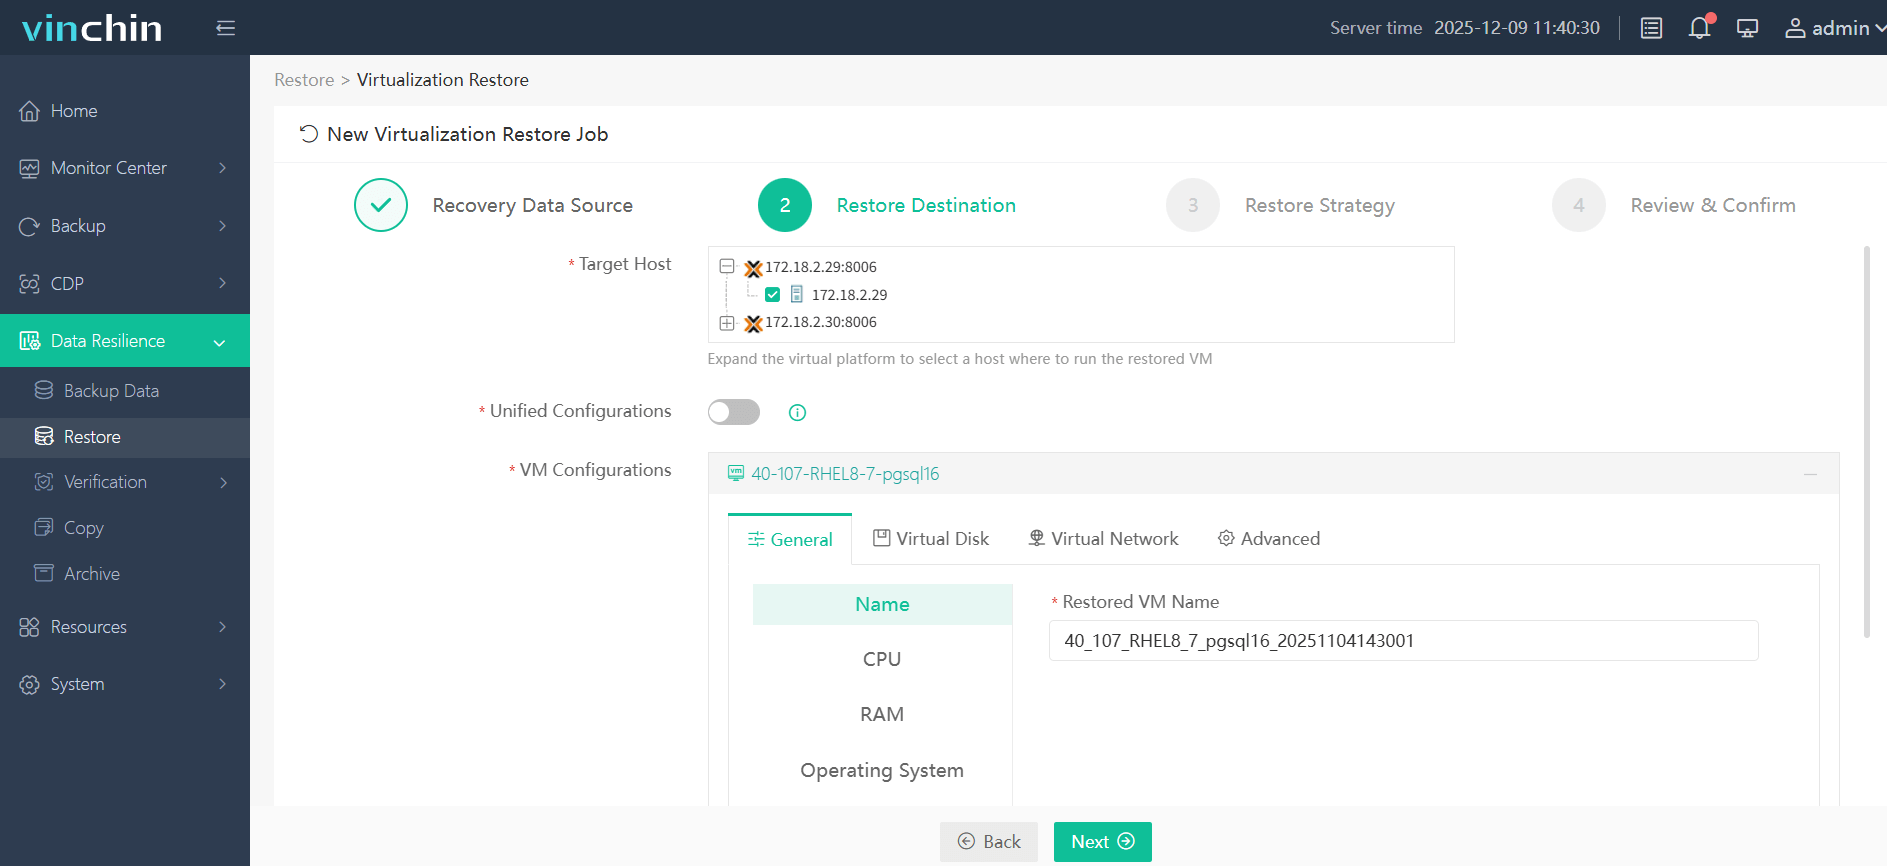
Step3: In Restore Destination, select the target host that you want to convert the physical machine to, like VMware, Hyper-V, XenServer, etc.
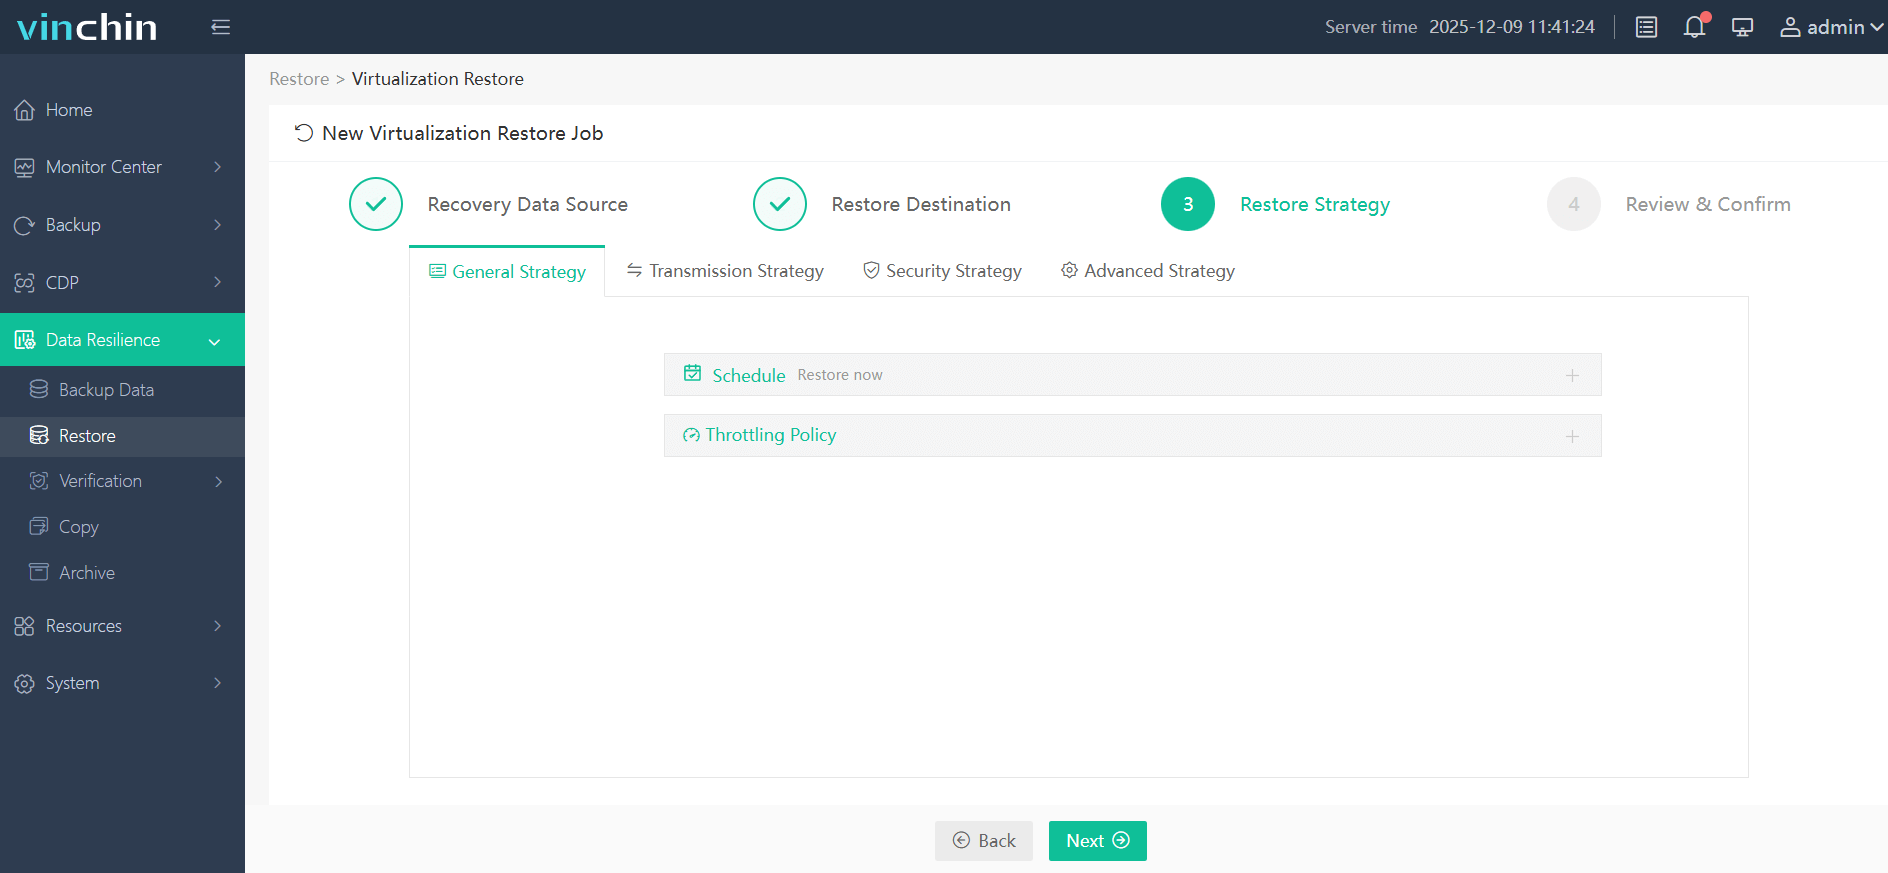
Step4: Set your restore strategy
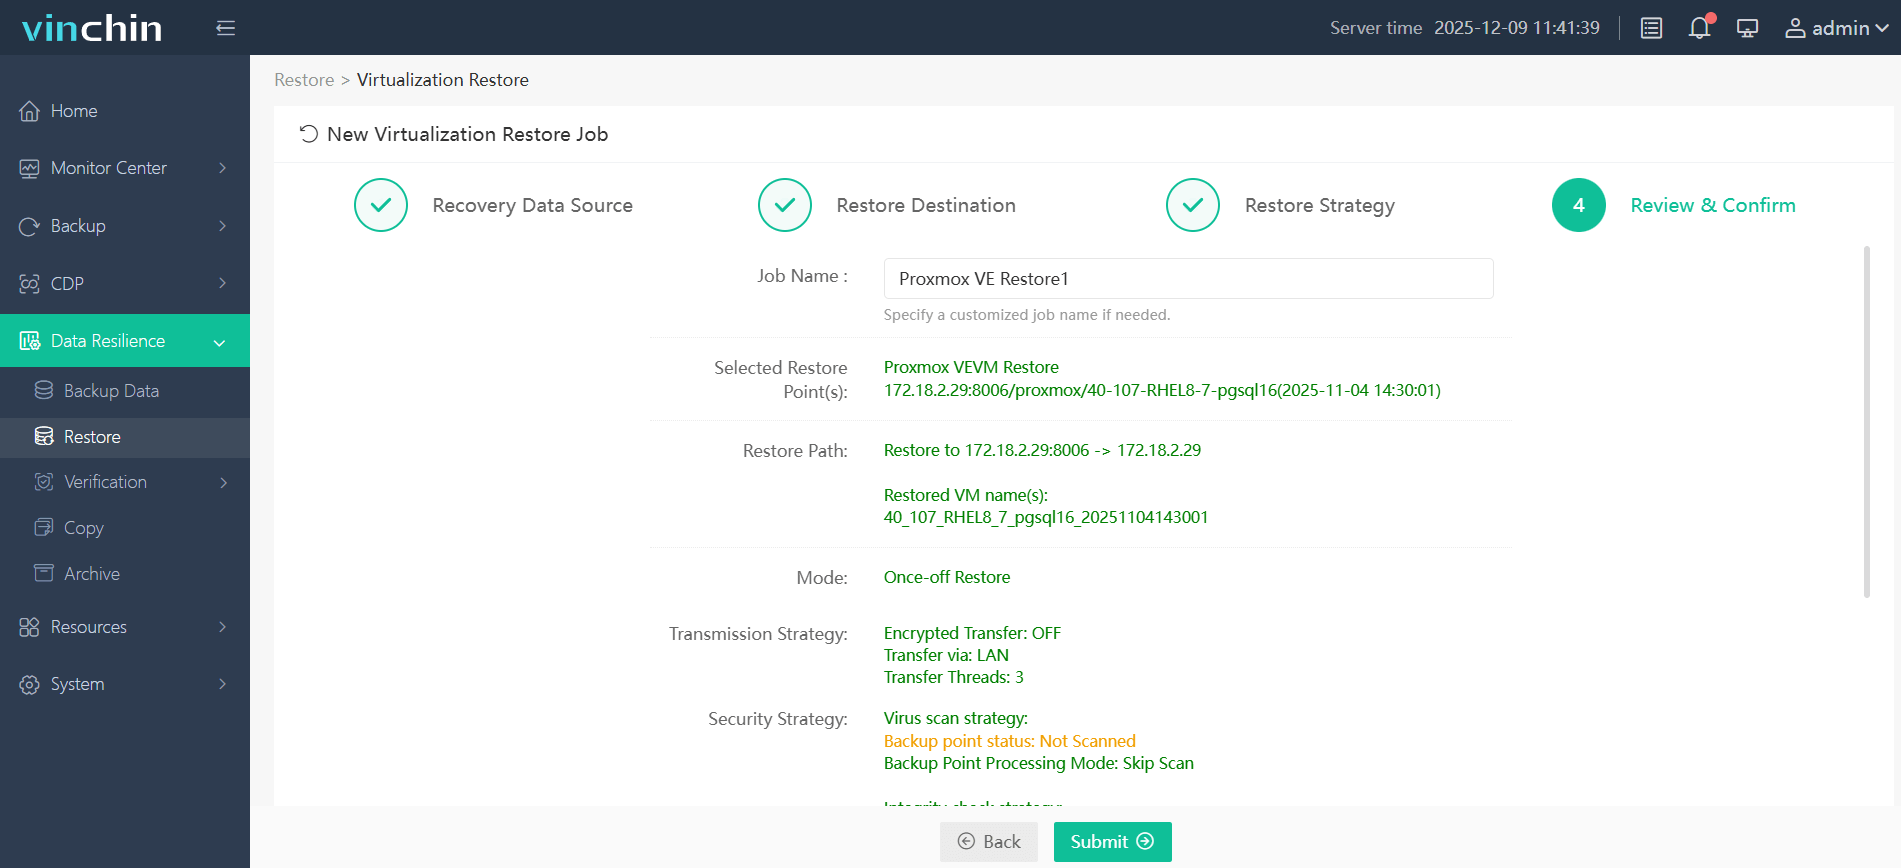
Step5: Confirm the settings and click the Submit button to start conversion.
Ready to move your physical servers to virtual machines without the manual work? Try Vinchin Backup & Recovery free for 60 days and make your next P2V conversion simple.
FAQ
Q1: Do I need to reinstall Windows to convert a physical server to a VM?
A1: No. P2V copies the existing operating system, applications and data. You may still need to adjust drivers, boot settings and network configuration, depending on the tool.
Q2: How much downtime does a P2V conversion need?
A2: Disk2vhd and VMware vCenter Converter can copy a running server, but you still need a short window for the final switchover. virt-p2v needs the physical server offline for the whole copy.
Q3: Can I convert a server with BitLocker enabled?
A3: Not with Disk2vhd, which does not support BitLocker volumes. Turn BitLocker off and wait for full decryption before capturing the disks.
Q4: Does my Windows license transfer to the VM?
A4: It depends on the license type. Microsoft's Disk2vhd page notes that OEM versions may not be transferable, so check your license terms with Microsoft or your reseller.
Conclusion
You can convert a physical Windows server to a VM without reinstalling the OS. Check readiness first, then pick the method that matches your target: Disk2vhd with PowerShell for Hyper-V, VMware vCenter Converter for VMware, or virt-p2v with virt-v2v for KVM-based platforms.
If you need one process for many platforms, with backup on both sides of the move, a backup-based P2V conversion is worth testing. Whichever route you choose, keep the physical server until the VM is verified.