-
Common Virtual Machine Data Loss Scenarios
-
Understanding Virtual Machine Storage Architecture
-
How to Recover Deleted Files from Virtual Machine?
-
Recovery Limitations and Failure Scenarios
-
Best Practices for Evidence Preservation
-
Preventive Measures Against Future Data Loss
-
Vinchin: Enterprise-Level Backup Solution for Reliable VM Protection
-
Recover Deleted Files From Virtual Machine FAQs
-
Conclusion
Virtual machines (VMs) are at the heart of today’s IT infrastructure. They let you run many operating systems on one server, test software safely, or isolate workloads for security. But what if you delete important files inside a VM by mistake? Is all hope lost? Not at all. This guide explains how to recover deleted files from virtual machines—starting with basic concepts and moving up to advanced recovery techniques.
Data loss can happen in any environment. Following best practices like the 3-2-1 backup rule—three copies of your data, on two types of media, with one offsite—is key for protection. Still, accidents happen. Let’s explore why files go missing in VMs—and how you can get them back.
Common Virtual Machine Data Loss Scenarios
Understanding how data gets lost in virtual machines helps you choose the right recovery approach. Each scenario has its own risks based on how VMs store data.
Accidental Deletion
Most file losses come down to human error—someone deletes a file or folder inside a VM by mistake. Sometimes it’s worse: an admin might remove an entire virtual disk image (such as VMDK for VMware or VHD/VHDX for Hyper-V) from the host system itself. Because these disk images contain everything inside your VM—including its OS and user files—deleting them can be catastrophic.
Formatting or Corruption
A VM disk may be formatted by accident during maintenance or troubleshooting. File system corruption can also strike due to software bugs, sudden power loss, or malware attacks within the guest OS. When this happens, both user files and system data may become inaccessible.
Snapshot or Backup Issues
Snapshots capture a VM’s state at one point in time but aren’t true backups—they depend on base disks remaining intact. Accidentally deleting recent snapshots or reverting to older ones can erase hours—or days—of work since those changes are discarded when rolling back.
Physical Storage Problems
If your physical server’s hard drive fails—the one storing your VM images—all hosted VMs are at risk of total loss unless backups exist elsewhere.
VM Configuration Errors
Misconfiguring storage paths or changing settings in your hypervisor can make virtual disks unreachable—even though they still exist somewhere on disk.
No matter which scenario strikes first, acting quickly gives you the best chance at recovering deleted files from virtual machines before they’re overwritten.
Understanding Virtual Machine Storage Architecture
Before diving into recovery steps, it helps to know how VMs store their data behind the scenes.
Each virtual machine uses one or more virtual disk files, which act like physical hard drives but exist as large files on your host server’s storage system:
VMDK: Used by VMware products
VHD/VHDX: Used by Microsoft Hyper-V
VDI: Used by Oracle VirtualBox
QCOW/QCOW2: Used by QEMU/KVM
These formats support features like thin provisioning (using only as much space as needed), snapshots (delta/differencing disks), encryption, and compression depending on platform capabilities.
When you delete a file inside a running VM:
1. The guest OS marks that space as free—but doesn’t erase it immediately.
2. If new data is written later (by apps/users), it may overwrite those blocks.
3. If you delete an entire virtual disk image from the host side—that removes access to everything stored within that file unless backups exist.
Knowing these basics helps explain why some recovery methods work better than others—and why speed matters after deletion occurs!
How to Recover Deleted Files from Virtual Machine?
Let’s walk through proven ways to recover deleted files from virtual machines—from simple restores using backups/snapshots up through advanced techniques used by professionals.
Method 1: Restore from Backups or Snapshots
Restoring from backup is always fastest—and safest—if available! Most organizations schedule regular full/incremental backups of their critical VMs using enterprise tools or built-in hypervisor features like snapshots/checkpoints.
Backups create independent copies stored separately; snapshots only record changes since creation (“delta” files). Snapshots rely on base disks staying healthy; if either is lost/corrupted so are dependent changes!
Here’s what you should do:
1. Open your hypervisor management console (vSphere Client, Hyper-V Manager, etc.).
2. Look for available Snapshots under each VM entry; revert if there’s one taken before deletion occurred—but remember this rolls back all changes made since then!
3. For full-featured backup solutions: locate most recent backup job covering affected VM(s); restore either whole machine (“bare metal”) or just specific folders/files if granular restore is supported.
4. Always verify restored data before putting systems back into production!
Testing both backups and snapshot chains regularly ensures they’ll work when disaster strikes—not just when scheduled jobs complete without errors!
Method 2: Recover Files Using Web Console File-Level Restore
Some virtualization platforms allow direct file-level restores via web consoles—but only if integrated backup plugins/extensions are installed. This lets admins recover individual files/folders without rolling back entire VMs—a huge time saver!
Steps generally look like this:
1. Log into your platform's web console (vSphere Client, etc.).
2. Navigate to My Data > VMs > My Virtual Machines
3. Find target VM; click Restore under Actions column—or select desired volume/folder structure directly via Select Files
4. Choose items needing restoration; click Restore
5. Set destination path/options; confirm overwrite settings if needed
6. Click Restore Now
Note: Steps vary depending on vendor/plugin used! Always check official documentation for exact workflow matching your environment.
This method avoids downtime but requires prior setup/configuration of compatible backup agents/plugins within both hypervisor & guest OS layers!
Method 3: Use Data Recovery Software on Virtual Disk Images
If no usable backup exists—or snapshots were never taken—you still have options! Specialized recovery tools scan raw virtual disk images (.vmdk/.vhd/.vhdx/.vdi) looking for deleted file signatures left behind after logical removal inside guest OSes.
Here’s how:
1. Power off affected VM immediately—to prevent overwriting freed-up blocks!
2. On host server/storage array: copy original virtual disk image(s) somewhere safe (myvm.vmdk, myvm.vhdx, etc.). Never work directly against originals!
3. Open copied image(s) using trusted data recovery tool supporting relevant format(s).
4. Run deep scan across selected partitions/filesystems; preview found items where possible.
5. Save recovered content outside original image—to another volume/network share entirely!
Pro tip: Tools use “file carving” algorithms searching unallocated space/slack areas for known header/footer patterns tied to common document/media types—even after directory entries vanish! Success depends heavily upon whether new writes have already reused freed sectors since deletion event occurred…
CLI Example (Linux):
dd if=/path/to/myvm.vmdk of=/safe/location/image_backup.img bs=4M status=progress
Never save recovered output onto same drive/image being scanned—it could overwrite other lost items waiting discovery!
Method 4: Mount and Scan Virtual Disks in Host Operating System
Many platforms let admins mount offline .vhd/.vhdx images natively within Windows Disk Management:
1.Open Windows Disk Management utility
2.Click Action > Attach VHD
3.Browse/select .vhd / .vhdx file needing analysis
4.New drive letter appears representing mounted volume(s)
5.Run standard undelete/file-recovery utilities targeting attached drive letter—not underlying host filesystem!
For VMware .vmdk/.vdi formats mounting isn’t always native—third-party tools may be required such as qemu-nbd under Linux (modprobe nbd max_part=8 && qemu-nbd -c /dev/nbd0 mydisk.vmdk). Once mapped devices appear locally they’re accessible via normal recovery workflows too!
Keep in mind:
• Host must support guest filesystem type (NTFS/ext4/etc.)
• Never write anything back into mounted volumes during investigation phase!
• Some complex multi-disk configurations require reconstructing descriptor chains before mounting works correctly
Mounting allows powerful cross-platform analysis—but always preserve originals until satisfied all useful content has been extracted safely elsewhere…
Method 5: Install Data Recovery Software Inside Guest OS
If affected VM remains bootable—and minimal activity has occurred since deletion—you might try installing undelete/recovery utilities directly inside its operating system:
• Download/install chosen tool within guest session
• Scan local partition(s)/volumes where loss happened
• Preview/save results onto external USB/network share—not same logical drive being searched
Warning! Every install/write operation risks overwriting previously deleted material marked “free” by filesystem metadata… For best results shut down unnecessary services/apps first—or consider attaching secondary rescue media instead so nothing touches primary partition until scan completes successfully!
In high-stakes cases consider creating full-disk clones/images prior even attempting internal scans— soundness matters especially under regulatory scrutiny…
Method 6: Contact Professional Data Recovery Services
Sometimes DIY efforts fall short—especially after hardware failures affecting underlying SAN/NAS arrays hosting multiple critical VMs simultaneously… Or when encrypted volumes lack valid keys/passwords required unlocking contents post-crash/corruption events…
Professional labs offer cleanroom facilities plus specialized hardware/software stacks capable extracting bits even off physically damaged platters/chips not readable otherwise… They’ll typically provide diagnostic reports upfront outlining likely success rates/costs involved before proceeding further…
Red flag alert! Avoid vendors demanding payment prior detailed assessment—or promising guaranteed outcomes regardless initial findings… Reputable firms operate transparently throughout process keeping clients informed every step along way…
Recovery Limitations and Failure Scenarios
Not every situation ends happily ever after—even with expert help! Certain factors make recovering deleted files from virtual machines much harder—or outright impossible:
• SSD-based storage often implements TRIM commands automatically erasing freed blocks soon after deletion events occur.
• Encrypted volumes lacking valid credentials cannot be brute-forced open without keys/passphrases present at time crash/loss happened.
• Thin-provisioned disks sometimes reclaim unused sectors aggressively making old content unrecoverable faster than thick-provisioned alternatives.
• Clustered/distributed storage setups split single logical disks across multiple nodes/devices complicating manual reconstruction efforts considerably.
• RAID controller failures may scramble parity/data layouts beyond reach absent proper configuration records/backups kept elsewhere securely.
Always assess likelihood success honestly upfront based upon above constraints—sometimes prevention truly beats cure when stakes run high enough...
Best Practices for Evidence Preservation
When investigating serious incidents involving sensitive/confidential information—it pays following established digital evidence handling protocols throughout process:
1.Create bit-for-bit clone/image of affected volume/disk using trusted imaging tools (dd, dcfldd, etc.) preserving original untouched wherever possible.
2.Generate cryptographic hash values (SHA256/SHA512 recommended) documenting integrity chain start-to-finish per NIST guidelines.
3.Log every action taken including timestamps/usernames/tools invoked ensuring audit trail completeness should legal review become necessary later down road…
4.Store working copies/clones separate physically/logically minimizing risk accidental modification/destruction during ongoing analysis stages.
Following these steps protects both organization & investigators alike against claims tampering/mishandling evidence downstream...
Preventive Measures Against Future Data Loss
Prevention remains best defense against future headaches caused by accidental deletions/corruptions/outages impacting mission-critical workloads running atop modern virtualization stacks everywhere today...
Consider adopting following habits/practices organization-wide:
• Schedule automated daily incremental/full backups covering all production/test/dev environments alike—with periodic validation/restoration drills confirming usability long-term!
• Enable role-based access controls limiting who can modify/delete key resources across both host & guest layers reducing exposure surface area overall...
• Monitor health/status indicators reported real-time via dashboards/logging frameworks catching early warning signs impending trouble ahead...
• Document change management procedures thoroughly ensuring everyone understands impact potential missteps could trigger unexpectedly someday soon...
By building robust culture around resilience/redundancy now—you’ll sleep easier knowing next crisis won’t catch team flat-footed again anytime soon...
Vinchin: Enterprise-Level Backup Solution for Reliable VM Protection
To minimize future risks and ensure fast recovery from any incident, investing in a comprehensive backup solution is crucial—and this is where Vinchin stands out among enterprise options.
Vinchin Backup & Recovery delivers professional-grade protection tailored specifically for diverse virtualization environments—including VMware, Hyper-V, Proxmox VE, oVirt, OLVM, RHV, XCP-ng, XenServer, OpenStack, ZStack and more (supporting over 15 mainstream platforms). If you're running VMware or Hyper-V—the most widely used enterprise solutions—or any other listed platform, Vinchin offers seamless compatibility designed around real-world IT needs.
With Vinchin's robust feature set—including forever-incremental backup that saves storage space while accelerating daily jobs; advanced deduplication and compression technologies that minimize network usage and reduce costs; flexible cross-platform V2V migration capabilities; granular restore options; plus scheduled policies and GFS retention strategies—you gain peace of mind knowing business-critical workloads remain protected no matter what happens next. These highlights represent just part of Vinchin's extensive toolkit designed for reliability and efficiency across heterogeneous infrastructures.
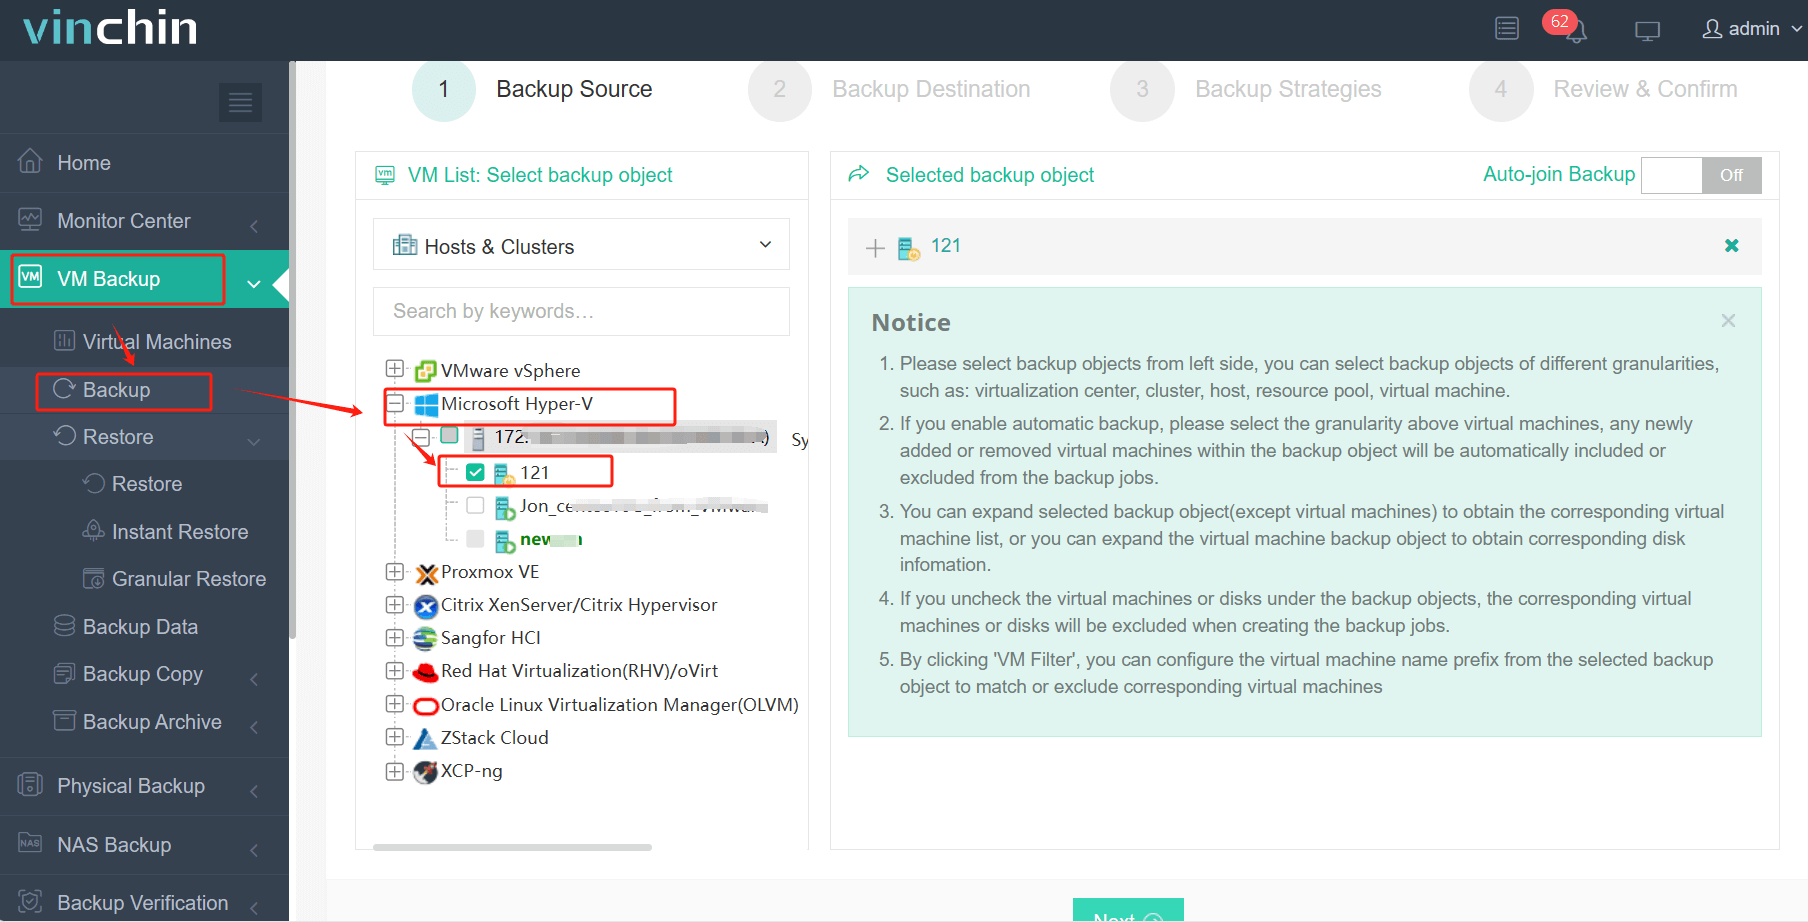
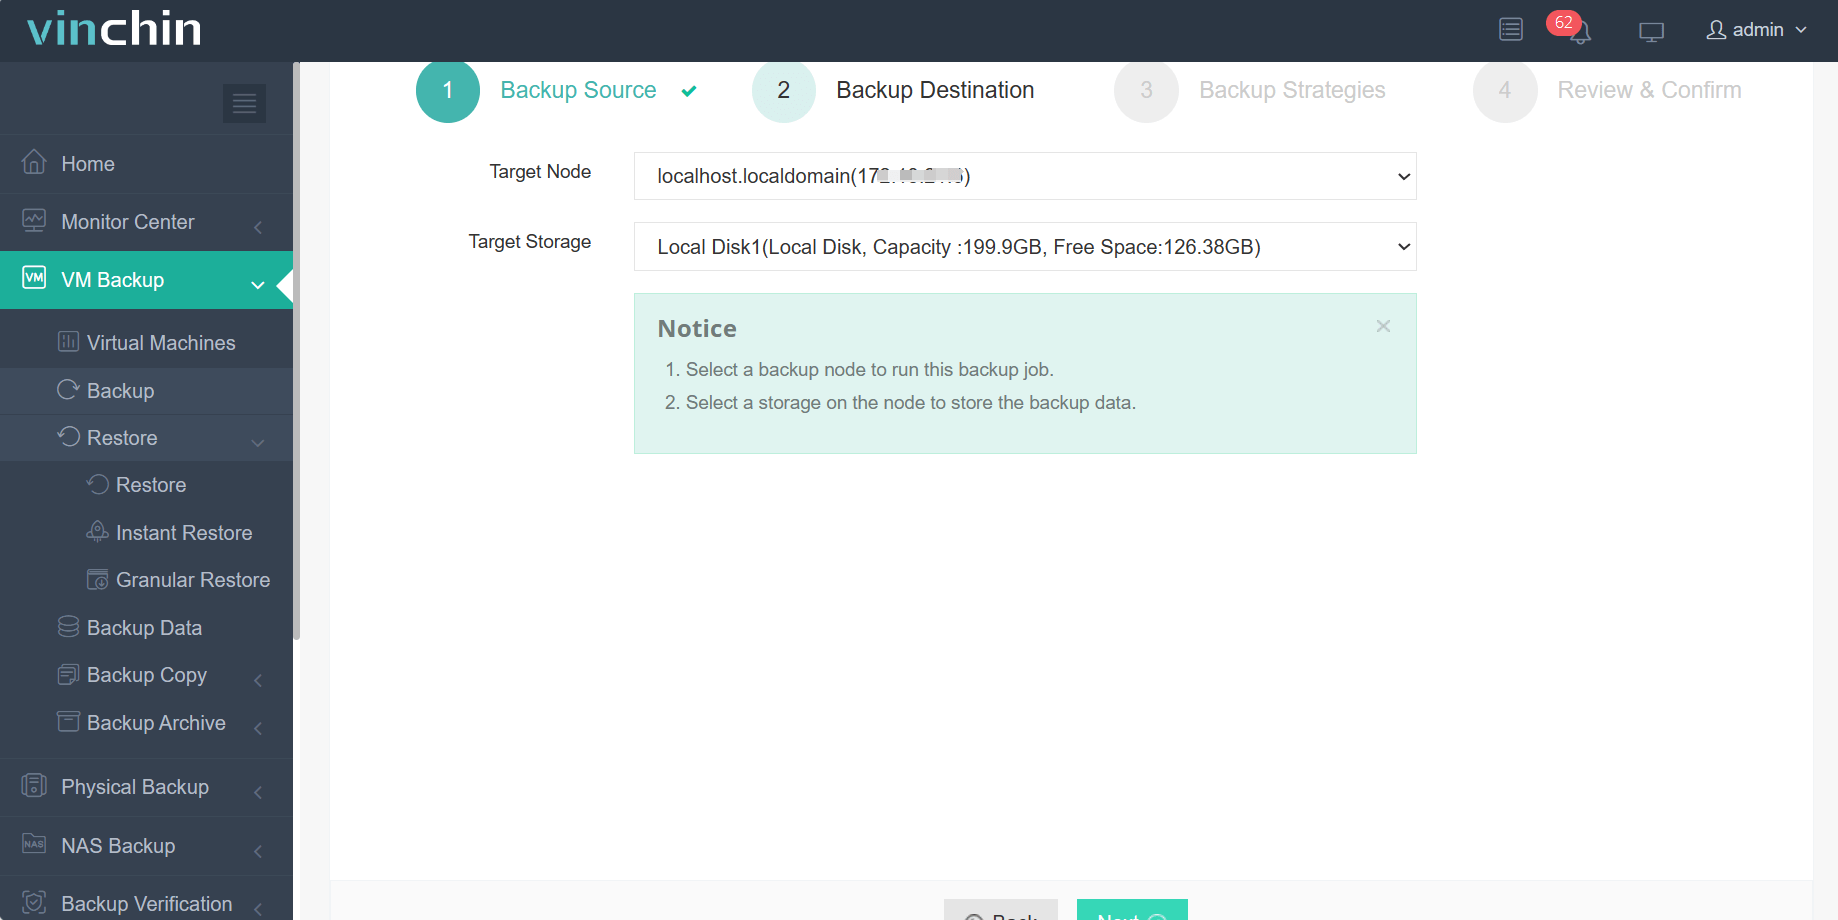
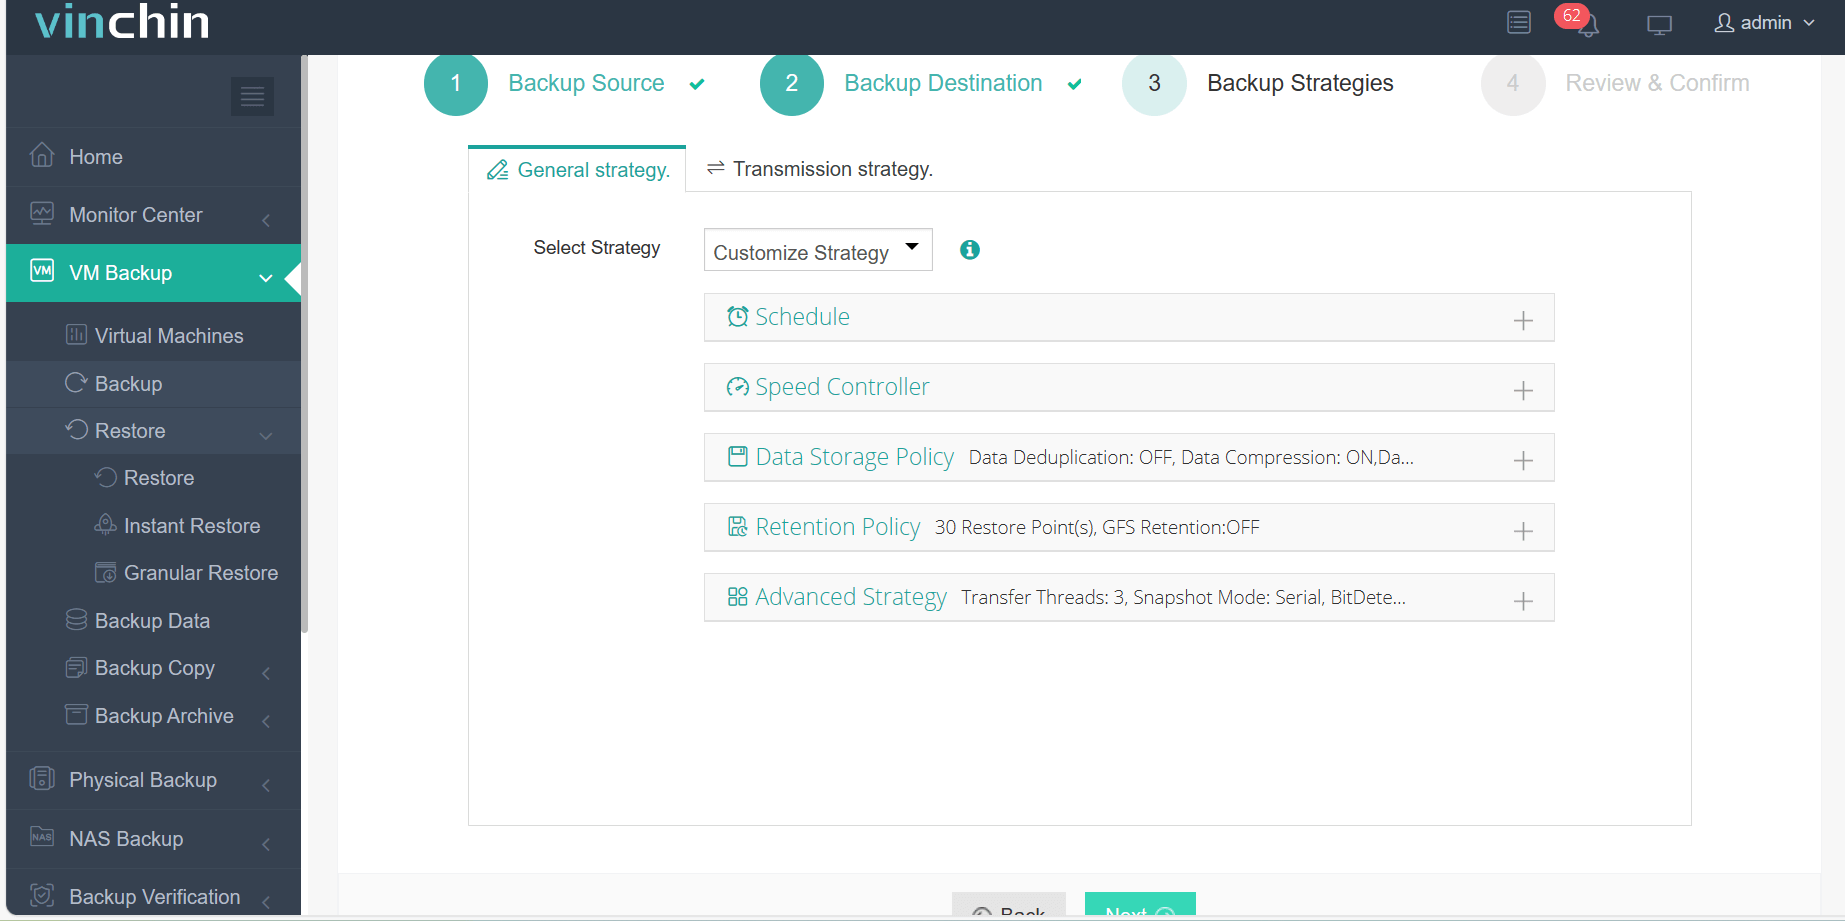
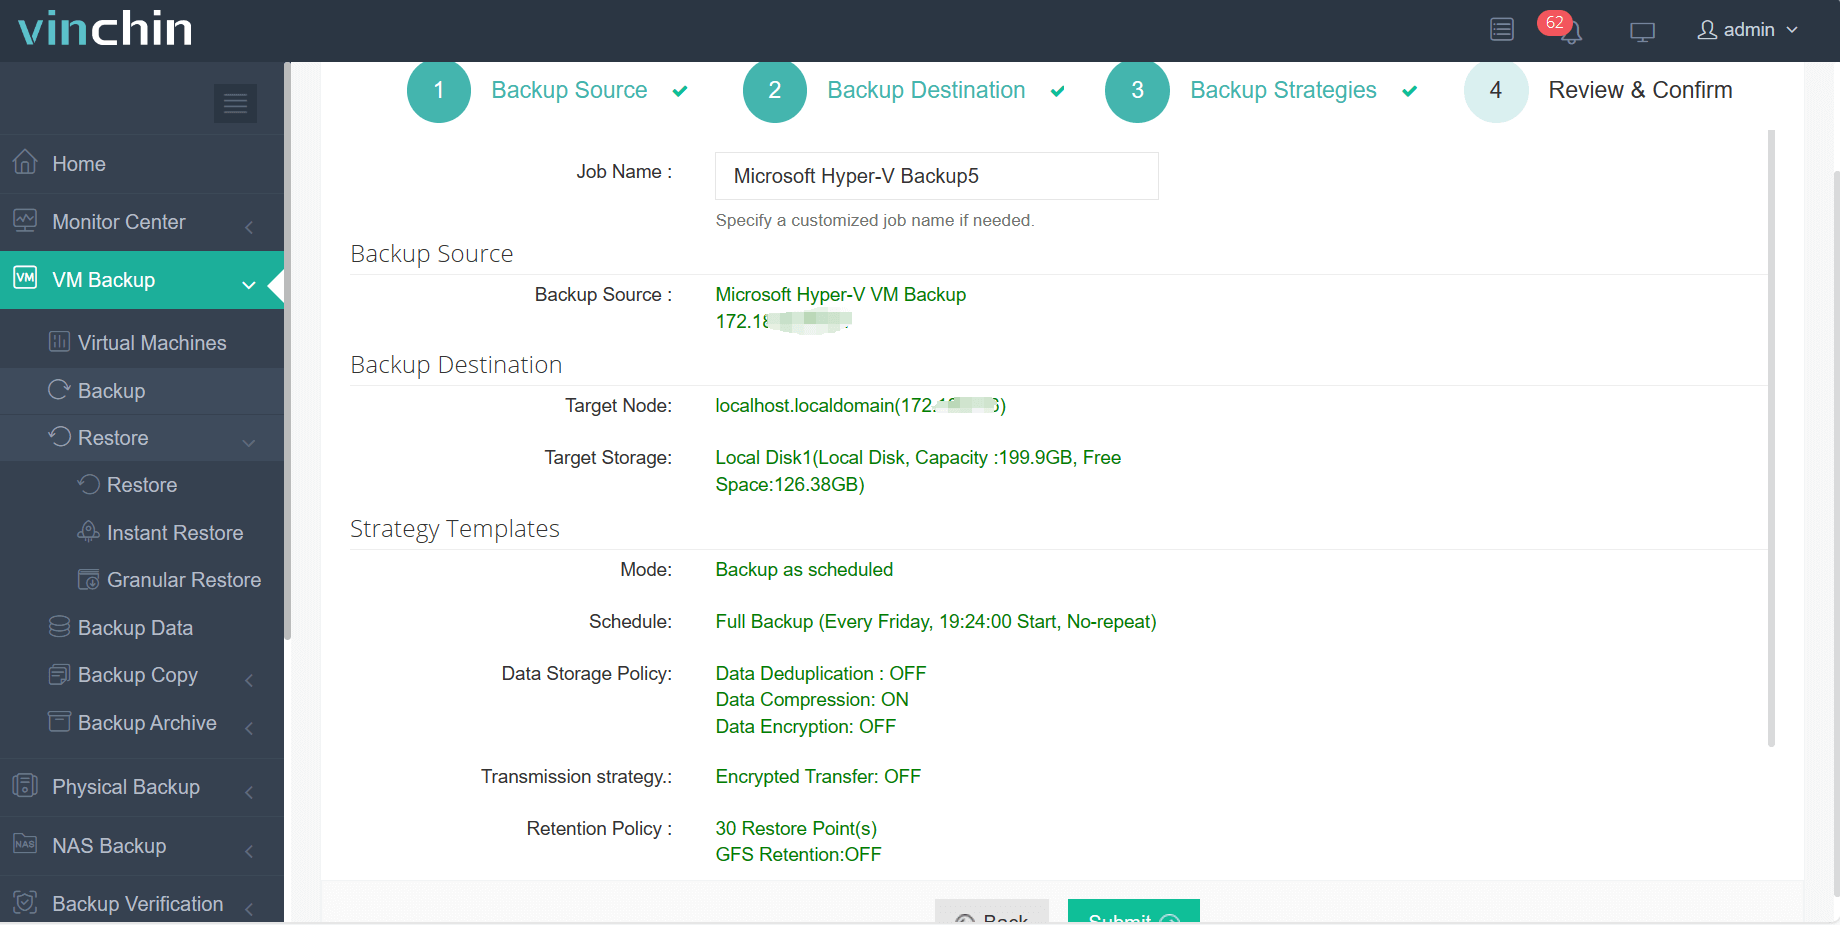
The intuitive web console makes safeguarding any supported VM straightforward—even for less experienced users:
1. Select which VM you'd like to protect.

2. Choose where you'd like those backups stored.

3. Define strategy details.

4. Submit the job.

Recognized globally with strong customer satisfaction ratings,Vinchin offers a fully functional free trial lasting up to 60 days. Download now with just one click,and experience effortless deployment alongside industry-leading protection standards.
Recover Deleted Files From Virtual Machine FAQs
Q1: Can I recover deleted files if my company uses clustered shared storage?
Yes; however,you must identify which node holds relevant segments,and coordinate access carefully per cluster documentation guidelines .
Q2: What should I do if my organization uses encrypted virtual disks?
You need valid decryption keys/passwords present at time incident occurred ;without them,data cannot be recovered even professionally .
Q3: Are there risks restoring individual files versus whole-machine rollbacks?
Yes;if dependencies(libraries/configurations)changed since last snapshot,some applications/services may not function properly until fully restored together .
Conclusion
Losing important files inside a virtual machine feels stressful,but quick action makes successful recovery possible.Backups,snapshots,and careful planning remain vital.For ongoing peace-of-mind,Vinchin delivers reliable protection across major virtualization platforms.Try it free today—and keep business-critical workloads safe year-round.
Share on:


