-
What is Proxmox?
-
The Advantages of Using Proxmox
-
Built-in Proxmox Tools
-
Different Proxmox Management Tools
-
Troubleshooting Toolkit
-
Vinchin: Enterprise-Level Backup Solution for Your Proxmox Environment
-
FAQs About Using Proxmox Tools
-
Conclusion
Proxmox VE is a favorite among IT administrators for its flexibility, open-source nature, and robust virtualization features. But did you know that a wide range of Proxmox tools can make your daily management tasks even easier? Whether you’re just starting with Proxmox or running a complex cluster, the right tools can save you time, reduce errors, and unlock new capabilities. In this article, we’ll explore what Proxmox is, why it stands out, and which tools—both built-in and community-driven—can help you get the most from your virtual infrastructure.
What is Proxmox?
Proxmox Virtual Environment is an open-source server virtualization platform that combines two powerful technologies: KVM for full virtualization and LXC for lightweight containers. With Proxmox, you can run both Windows and Linux virtual machines (VMs) and containers on a single platform. The integrated web-based user interface lets you manage VMs, containers, storage, networking, and even high-availability clusters—all from your browser. Proxmox is designed for both small labs and large enterprise data centers alike.
The Advantages of Using Proxmox
Why do so many administrators choose Proxmox? First off—it’s open source; you have full access to the codebase plus strong community support. Installation is simple: download the ISO file from the official site, boot from USB media on your hardware server or workstation node using Boot Menu, then follow the installation wizard step-by-step.
Once installed you get a complete virtualization stack without extra licensing fees or hidden costs. The web interface makes it easy to create VMs or containers without needing command-line skills right away. Advanced features like live migration between nodes in a cluster keep workloads moving smoothly during maintenance windows or hardware upgrades.
You also get software-defined storage options including ZFS (with snapshots) or Ceph distributed storage pools—ideal if you want scalable performance across multiple servers. Integrated backup utilities help protect your data out-of-the-box.
Built-in Proxmox Tools
Every fresh install of Proxmox comes packed with essential utilities that handle most daily tasks directly from either the web dashboard or terminal shell. Let’s look at these core tools:
The Proxmox Web UI serves as your main dashboard for managing VMs/containers/storage/networks/clusters all in one place via any modern browser window.
For those who prefer command-line control—or need automation—the following CLI utilities are indispensable:
1. qm manages QEMU/KVM virtual machines; try qm list to see all VMs or qm status <VMID> to check one VM’s state.
2. pct handles LXC containers; use pct list to show all active/inactive containers.
3. vzdump creates backups of VMs/containers; run vzdump <VMID> --mode snapshot --storage BackupStorage when backing up running guests safely using snapshots rather than freezing filesystems mid-operation.
4. qmrestore restores VM backups—including compressed .zst files—with commands like qmrestore /path/to/vmbackup.vma.zst <VMID>. If needed decompress first using zstd -d.
5. pvecm manages cluster nodes; check status via pvecm status, add nodes using pvecm add IP_OF_CLUSTER_NODE, remove failed ones with pvecm delnode <nodename>, or force quorum after network splits by typing pvecm expected 1.
6. pveperf benchmarks host performance quickly; just type pveperf.
Each command has detailed manual pages (man qm) so don’t hesitate to consult them when scripting routine jobs.
Different Proxmox Management Tools
While built-ins cover basics well enough for small teams or test labs—they may not scale easily nor provide advanced automation/reporting required by larger organizations.
Let’s explore additional toolsets available:
Helper Scripts & Community Automation
The Proxmox VE Helper-Scripts project offers dozens of ready-made scripts maintained by users worldwide—from initial setup tweaks through automated updates/configuration fixes up to mass deployment helpers for both VMs/LXCs.
Installation follows standard GitHub cloning procedures described in their README file; once downloaded simply execute relevant scripts directly from your host shell prompt whenever repetitive admin work arises (e.g., batch updating container templates).
Remote Access & Display Tools
Accessing guest consoles remotely happens daily—whether troubleshooting OS boots or installing updates interactively inside VMs/LXCs:
1. noVNC Console works natively within browsers via WebSockets—just click Console tab under any VM/container entry in Web UI.
2. For higher performance—including clipboard sharing/USB redirection—choose SPICE under Console menu instead; download generated .vv config file then launch it locally using any SPICE client application. Note that SPICE performs best over fast LAN links—not recommended across slow WANs unless tunneled through VPN solutions like WireGuard first!
3. Secure remote access should always be routed through encrypted tunnels (VPN/reverse proxy) rather than exposing management ports directly online.
Storage Optimization Techniques
Storage speed/reliability often determines how well virtualized workloads perform under load—but tuning isn’t always obvious upfront!
For ZFS-backed pools set ashift=12 during pool creation if deploying onto NVMe SSD arrays (improves block alignment/performance); monitor ARC cache usage closely since default sizing may consume too much RAM on smaller hosts—increase/decrease dynamically via:
echo VALUE_IN_BYTES > /sys/module/zfs/parameters/zfs_arc_max
(Replace VALUE_IN_BYTES accordingly.)
Ceph users benefit from tuning CRUSH maps carefully so hot data lands preferentially onto faster OSD disks versus archival cold tiers; monitor latency stats regularly using built-in ceph-osd-perf/zpool iostat commands plus alerting integrations described below!
Always avoid storing critical backups/snapshots solely on single-redundancy volumes—replicate copies offsite/cloud/tape wherever feasible per industry best practices.
Troubleshooting Toolkit
Even seasoned admins encounter hiccups now and again—from stuck migrations through broken UIs down to misbehaving services post-upgrade cycles! Here are some proven remedies:
If Web UI refuses connection restart proxy layer cleanly:
systemctl restart pveproxy.service
Investigate deeper failures across stack layers using journal logs filtered specifically around PVE components:
journalctl -u pve*
Validate individual VM configurations prior restoring old snapshots/backups after crash events:
qm config <VMID>
When faced with “TASK ERROR: cluster not ready” messages double-check underlying SDN/firewall rules haven’t blocked inter-node communication channels inadvertently!
Test vzdump restores periodically—not just backups—to ensure DR plans actually work under pressure rather than discovering missing dependencies/filesystems months later!
Vinchin: Enterprise-Level Backup Solution for Your Proxmox Environment
As you enhance your Proxmux environment's reliability and scalability, robust backup becomes essential—and that's where Vinchin shines as an enterprise-grade solution purpose-built for virtual machine protection across more than 15 mainstream platforms including native support for Proxmox, VMware vSphere, Hyper-V, oVirt/RHV/OLVM, XCP-ng/XenServer, OpenStack, ZStack and more.
Vinchin delivers comprehensive features such as forever-incremental backup (saving space/time), advanced deduplication/compression technology (reducing storage/network loads), seamless cross-platform V2V migration (for hybrid cloud transitions), granular restore capabilities (recover files/folders instantly), scheduled backup automation and multi-thread transmission—all accessible through an intuitive web console.
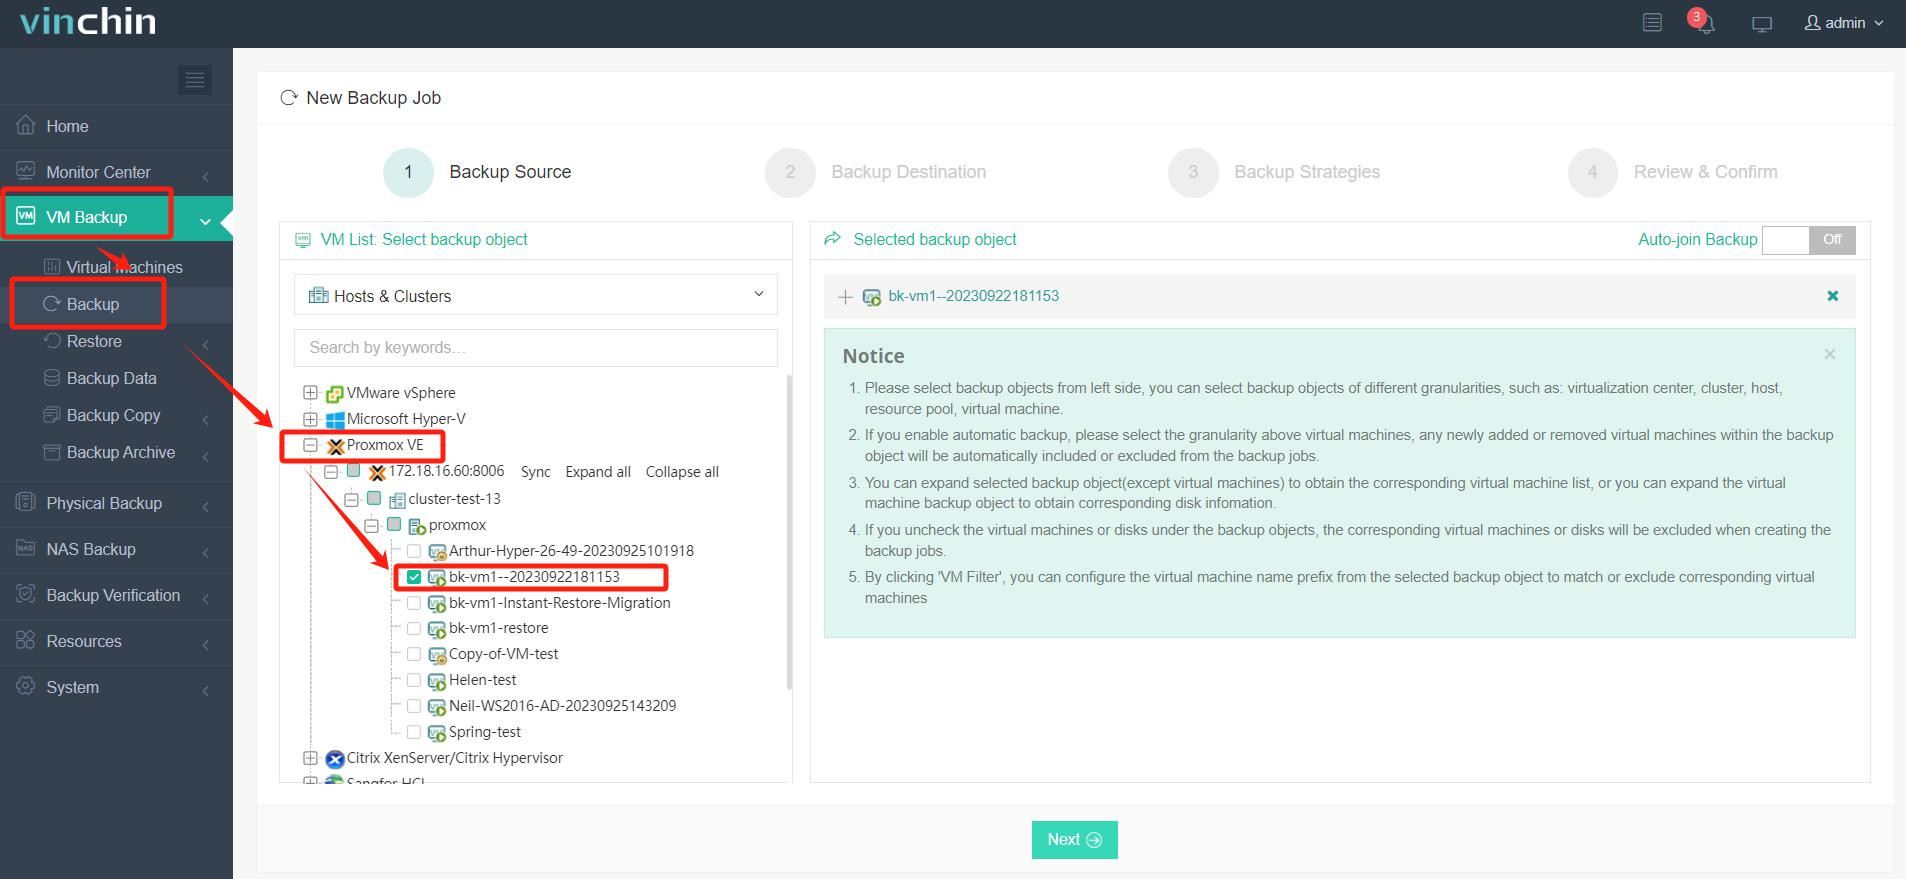
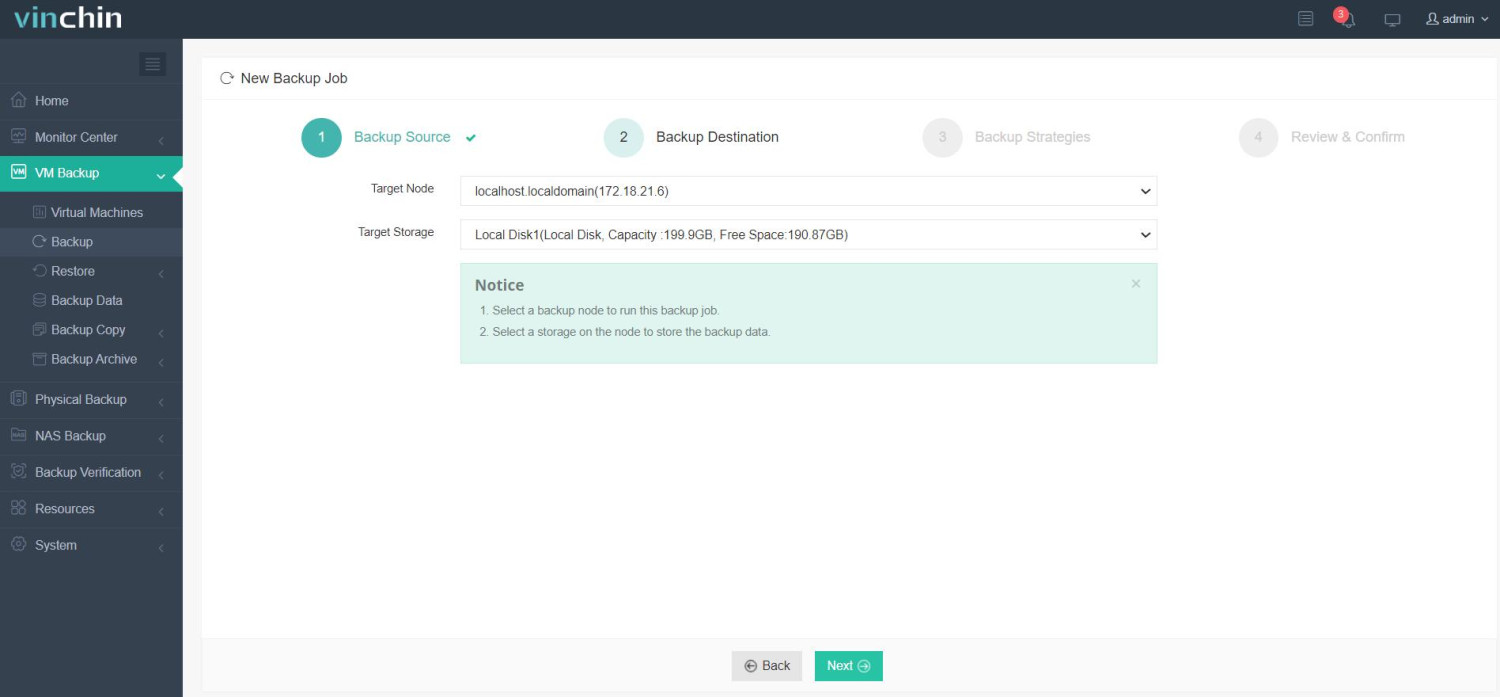
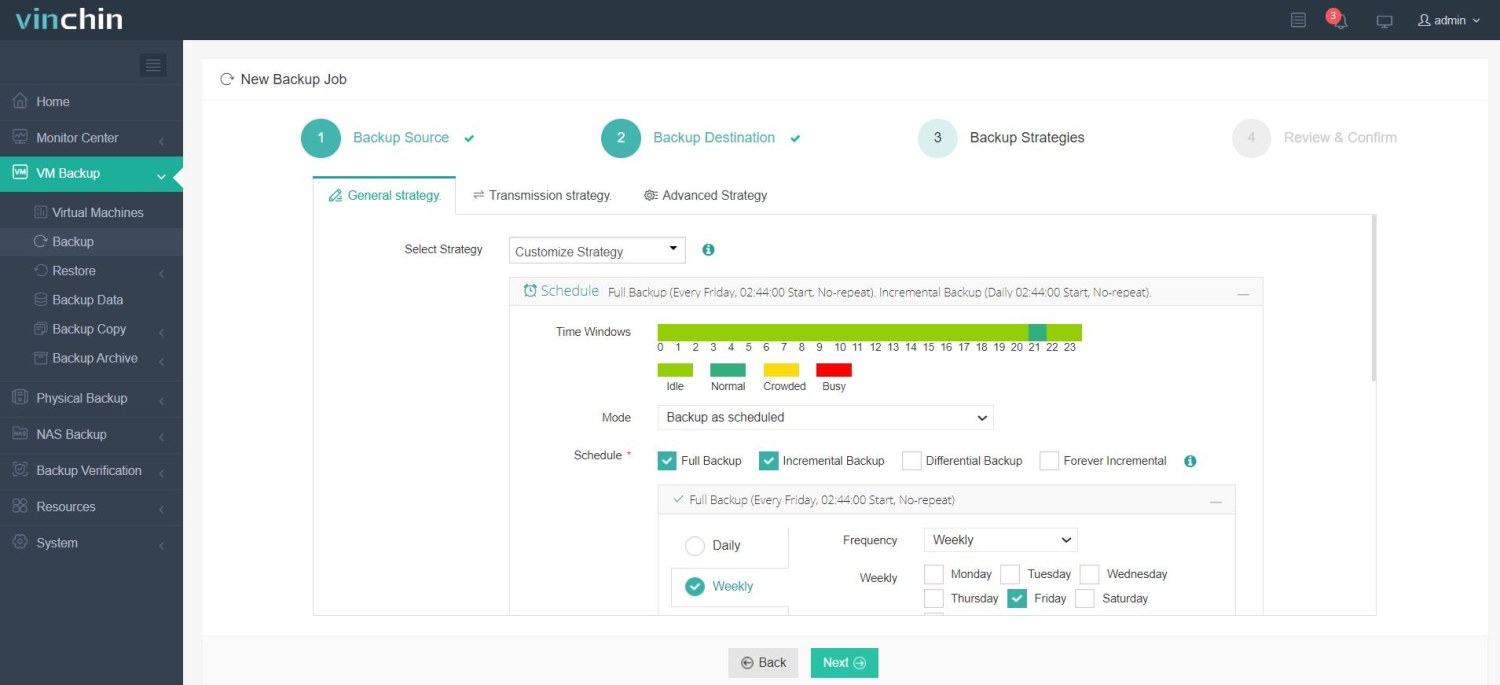
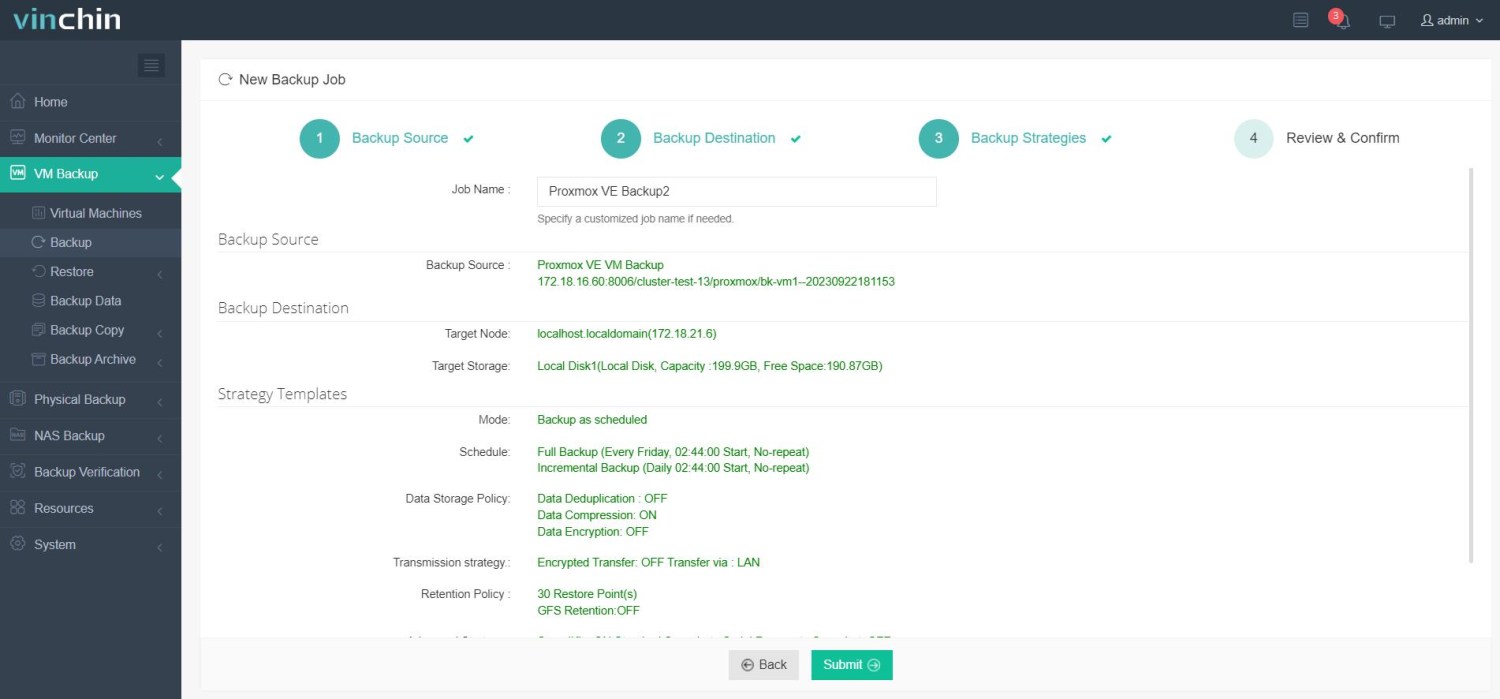
Backing up a PVE guest takes just four steps in Vinchin's user-friendly interface:
1. Select your target Proxmox VM(s),

2. Choose backup storage destination,

3. Configure backup strategy tailored to your needs,

4. Submit the job.

Recognized globally with high customer satisfaction ratings and trusted by thousands worldwide, Vinchin offers a risk-free 60-day full-featured free trial so you can experience effortless deployment firsthand.
FAQs About Using Proxmox Tools
Q1: How do I recover quickly after losing quorum in my cluster?
A1: Run pvecm expected N where N equals number of reachable healthy nodes until repairs complete—but fix root cause promptly afterward!
Q2: What steps optimize ZFS ARC cache size safely?
A2: Calculate half system RAM value then echo BYTES_VALUE into /sys/module/zfs/parameters/zfs_arc_max adjusting upward/downward based workload patterns observed overtime!
Q3: How can I automate regular testing/restoration of vzdump backups?
A3: Schedule cron jobs calling vzdump/qmrestore commands nightly onto isolated test hosts verifying integrity proactively before actual emergencies strike unexpectedly!
Conclusion
With its flexible architecture plus rich ecosystem of built-in/community-driven tools alike—ProxMVE empowers IT teams everywhere regardless experience level/budget constraints faced day-to-day! For cross-platform enterprise-grade protection look no further than Vinchin—it delivers peace-of-mind reliably every time! Always validate scripts/configurations thoroughly before deploying widely though…your future self will thank you!
Share on:


