-
What is Hyper-V Server 2019?
-
Why Install Hyper V Server 2019?
-
Hardware Requirements Before You Install
-
Method 1: Install Hyper V Server 2019 with ISO Image
-
Method 2: Install Hyper V Server 2019 via Windows Server Roles
-
Backing up Your Critical Workloads With Vinchin Backup & Recovery
-
Install hyper v server 2019 FAQs
-
Conclusion
Virtualization lets you run many operating systems on one physical machine—a must for today’s IT teams. If you want a reliable way to virtualize workloads on Windows platforms, Microsoft Hyper-V Server 2019 stands out as a top choice. In this guide, you’ll learn how to install Hyper-V Server 2019 using two proven methods, configure it for production use, secure your setup, and protect your virtual machines with robust backup strategies.
What is Hyper-V Server 2019?
Hyper-V Server 2019 is Microsoft’s free Type-1 hypervisor built for running virtual machines directly on bare-metal hardware. Unlike installing Windows Server with the Hyper-V role enabled—which gives you a full operating system—Hyper-V Server runs lean with no graphical desktop interface (GUI). You manage it through command-line tools or remotely from another computer using graphical tools like Hyper-V Manager or Windows Admin Center.
The key difference? With standalone Hyper-V Server 2019:
You don’t need a paid Windows Server license just to host VMs.
There’s no GUI; all local management happens via PowerShell or command prompt.
It’s designed for minimal overhead—ideal when every resource counts.
With Windows Server + Hyper-V Role:
You get more built-in features like Active Directory support.
A GUI is available if you choose Desktop Experience during setup.
Licensing costs are higher but offer broader functionality for enterprise needs.
Why Install Hyper V Server 2019?
Why do so many IT pros choose to install hyper v server 2019? For starters, it’s lightweight—using fewer resources than a full-blown Windows OS—so more of your hardware power goes straight into running virtual machines instead of background services or GUIs you rarely use on servers. It’s also secure by design; fewer components mean less attack surface area.
Hyper-V Server fits well in data centers where efficiency matters most but also shines in labs or branch offices where budgets are tight yet reliability can’t be compromised. And since it’s free to download from Microsoft, there are no licensing hurdles just to get started with virtualization at scale.
Hardware Requirements Before You Install
Before you begin any installation process, make sure your hardware meets these minimum requirements:
A compatible x64 processor with Second Level Address Translation (SLAT) support
Hardware-assisted virtualization enabled in BIOS/UEFI (Intel VT-x or AMD-V)
Data Execution Prevention enabled (DEP/NX bit)
At least 4 GB RAM (8 GB+ recommended for production)
Sufficient storage space depending on VM workload plans
Network adapter compatible with your environment
To check if your system supports these features:
1. Open Command Prompt as Administrator
2. Run systeminfo.exe
3. Review the output under “Hyper-V Requirements”
If any requirement shows “No,” update BIOS settings before proceeding further.
Method 1: Install Hyper V Server 2019 with ISO Image
This method walks through installing standalone Hyper-V Server using an ISO image—a great fit when setting up dedicated virtualization hosts without extra software overhead.
First things first: confirm that all firmware updates are applied and RAID controllers are configured if needed for storage redundancy.
Step 1: Download the ISO
Visit the Microsoft Evaluation Center to download the official ISO file for Hyper-V Server 2019 directly from Microsoft’s site—always avoid third-party sources for security reasons!
Step 2: Create Bootable USB Media
Use trusted tools such as Rufus or Microsoft’s own Media Creation Tool:
1. Launch Rufus
2. Select your USB drive
3. Choose the downloaded ISO file
4. Click Start and wait until completion
If boot fails later due to UEFI/BIOS mismatch errors, reformat USB media accordingly or adjust boot mode settings in firmware menus—a common stumbling block!
Step 3: Boot From USB & Begin Installation
Insert prepared USB stick into target server then reboot; enter boot menu if needed by pressing F12/Esc/Del during POST sequence.
1. Select language preferences
2. Click Install Now
3. Accept license terms
4. Choose Custom: Install Windows only
5. Pick destination disk; delete old partitions if necessary before clicking Next
If disks aren’t visible here due to missing drivers (common on RAID/SAS setups), click Load driver, insert manufacturer-provided drivers via separate USB stick/CD-ROM as prompted.
Step 4: Complete Initial Setup
After copying files and rebooting:
1. Set Administrator password when prompted
2. Log in; you’ll see only Command Prompt plus an automatic launch of the blue-text-based tool called sconfig
Within sconfig utility:
Change computer name (Option 2) so hosts are easily identified later
Configure network settings (Option 8) including static IPs/DNS servers critical for stable remote access
Enable Remote Desktop (Option 7) if desired—but always restrict access via firewall rules!
Join domain/workgroup (Option 1) based on organizational policy
Download/install latest updates (Option 6) before exposing host to production traffic
Don’t forget: press numbers corresponding to each option then follow prompts—it’s straightforward even without prior experience!
Step 5: Enable Remote Management
For day-to-day tasks most admins prefer managing remotely rather than working at console level all day long! To enable remote PowerShell sessions securely:
1. Run Enable-PSRemoting at command prompt
2. Execute Enable-WsManCredSSP -Role server
3. On admin workstation add host IP/name under trusted hosts list (Set-item wsman:\localhost\Client\TrustedHosts "hyperv-host")
Always run PowerShell commands as Administrator—and check execution policies (Get-ExecutionPolicy) if scripts fail unexpectedly!
Step 6: Connect Using Hyper-V Manager
On any modern Windows Pro/Enterprise PC:
1.Open Control Panel > Programs > Turn Windows features on or off
2.Enable both Hyper-V Management Tools
3.Launch Hyper-V Manager, select Connect to server, enter hostname/IP address of new host
Now VM creation/control can happen right from your desk—even across large networks!
Method 2: Install Hyper V Server 2019 via Windows Server Roles
Already have Windows Server installed? Adding the Hyper‑V role transforms any supported edition into a powerful virtualization platform—with optional GUI management tools included if desired!
Step 1: Prepare Your Environment
Install either Standard or Datacenter edition of Windows Server 2019 onto target hardware following normal procedures; choose between Core (no GUI) or Desktop Experience based on comfort level/preference—the underlying capabilities remain identical once roles are added.
Step 2: Update Operating System First
Run all pending updates through Settings app—or via sconfig utility if using Core version—to patch known bugs/security holes before enabling new roles/features that depend upon them being current!
Step 3: Add Role Using PowerShell Commands
Prefer automation? Use this single line after opening PowerShell window as Administrator:
Install-WindowsFeature -Name Hyper‑V –IncludeManagementTools –Restart
System installs required components automatically then reboots itself—all done hands-free! Afterward confirm success by running:
Get-WindowsFeature –Name Hyper‑V
Look for “Installed” status beside feature name before proceeding further…
Step 4: Create Your First Virtual Machine
From within newly available tools:
– Open Administrative Tools > Hyper‑V Manager
– Right-click local server name > select New, then choose Virtual Machine
– Follow wizard prompts specifying memory allocation/disk size/network assignment etc.—all customizable per workload needs
On Core installations manage remotely using same steps above from another PC running matching management utilities over secure connection!
Backing up Your Critical Workloads With Vinchin Backup & Recovery
To ensure business continuity and safeguard against data loss after deploying your virtualized environment, consider implementing enterprise-grade backup solutions tailored for platforms like Microsoft Hyper‑V first and foremost among others such as VMware, Proxmox, oVirt, OLVM, RHV, XCP-ng, XenServer, OpenStack, ZStack and more (15+ environments). Vinchin Backup & Recovery is a professional solution designed specifically for enterprise-level VM protection across these mainstream virtualization platforms—including comprehensive support for both standalone and role-based deployments of Microsoft Hyper‑V environments.
Among its extensive feature set relevant to mission-critical operations are incremental backup strategies, forever-incremental backup modes that minimize storage usage while maximizing recovery points, granular restore capabilities allowing precise item-level recovery within guest systems, advanced deduplication and compression technologies optimizing bandwidth/storage consumption across backups large and small alike, plus robust GFS retention policy controls ensuring compliance-ready archival cycles—all engineered to deliver fast restores and efficient ongoing protection without disrupting production workloads.
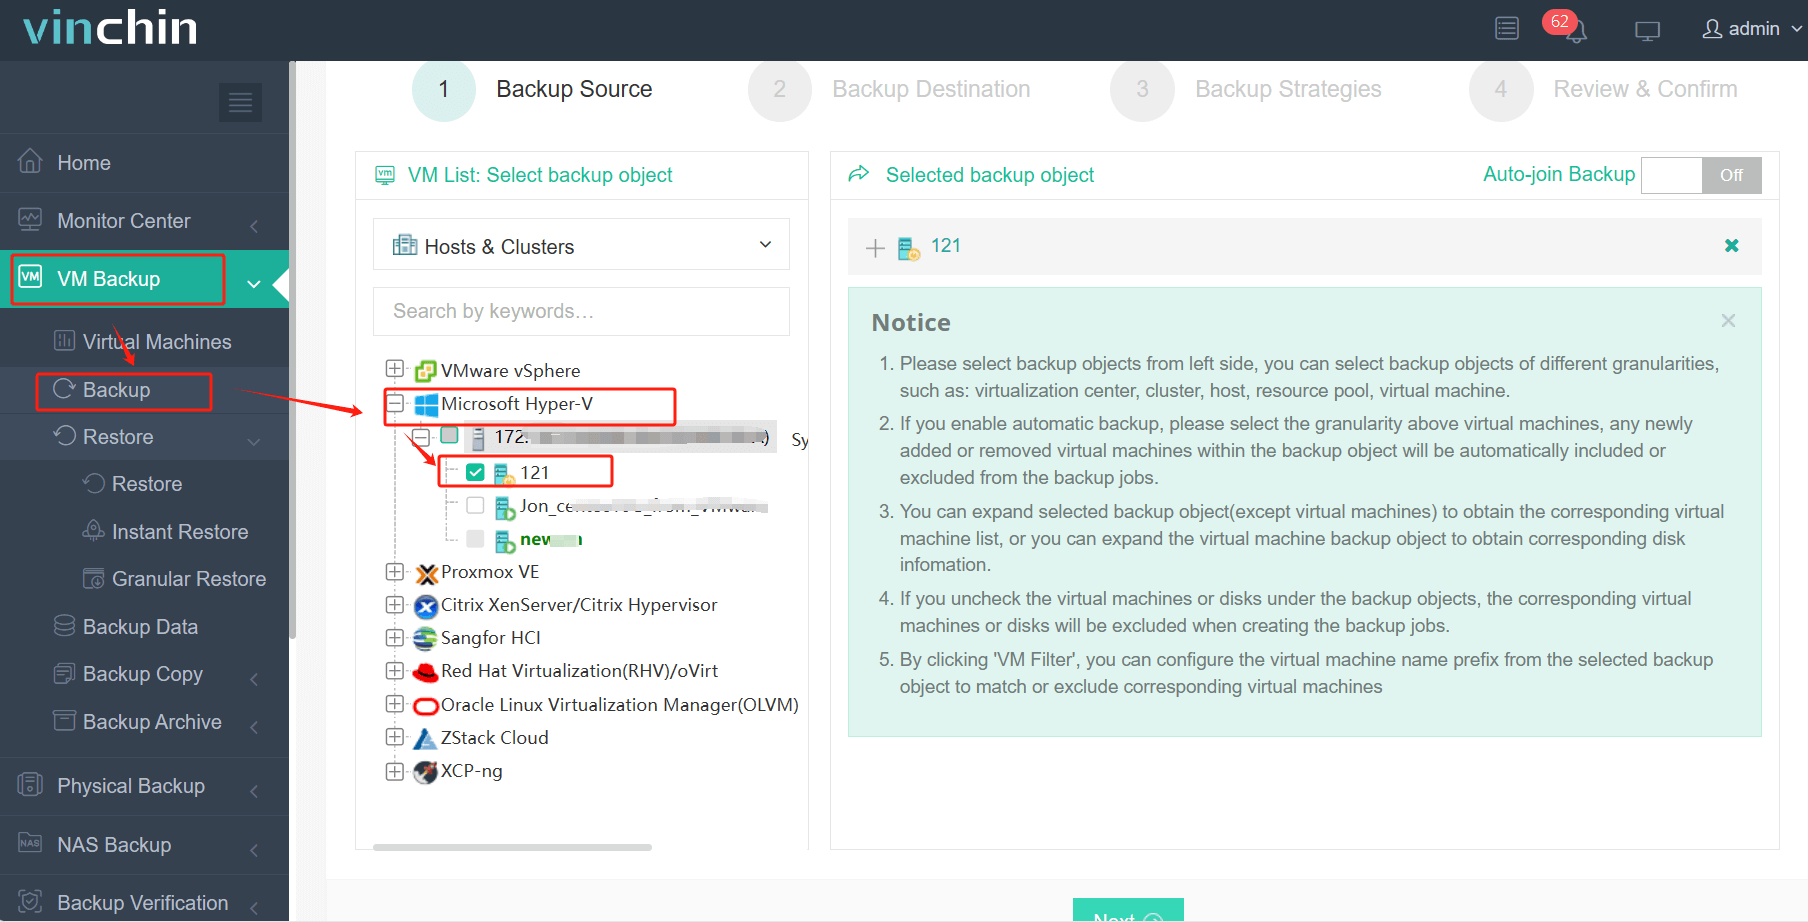
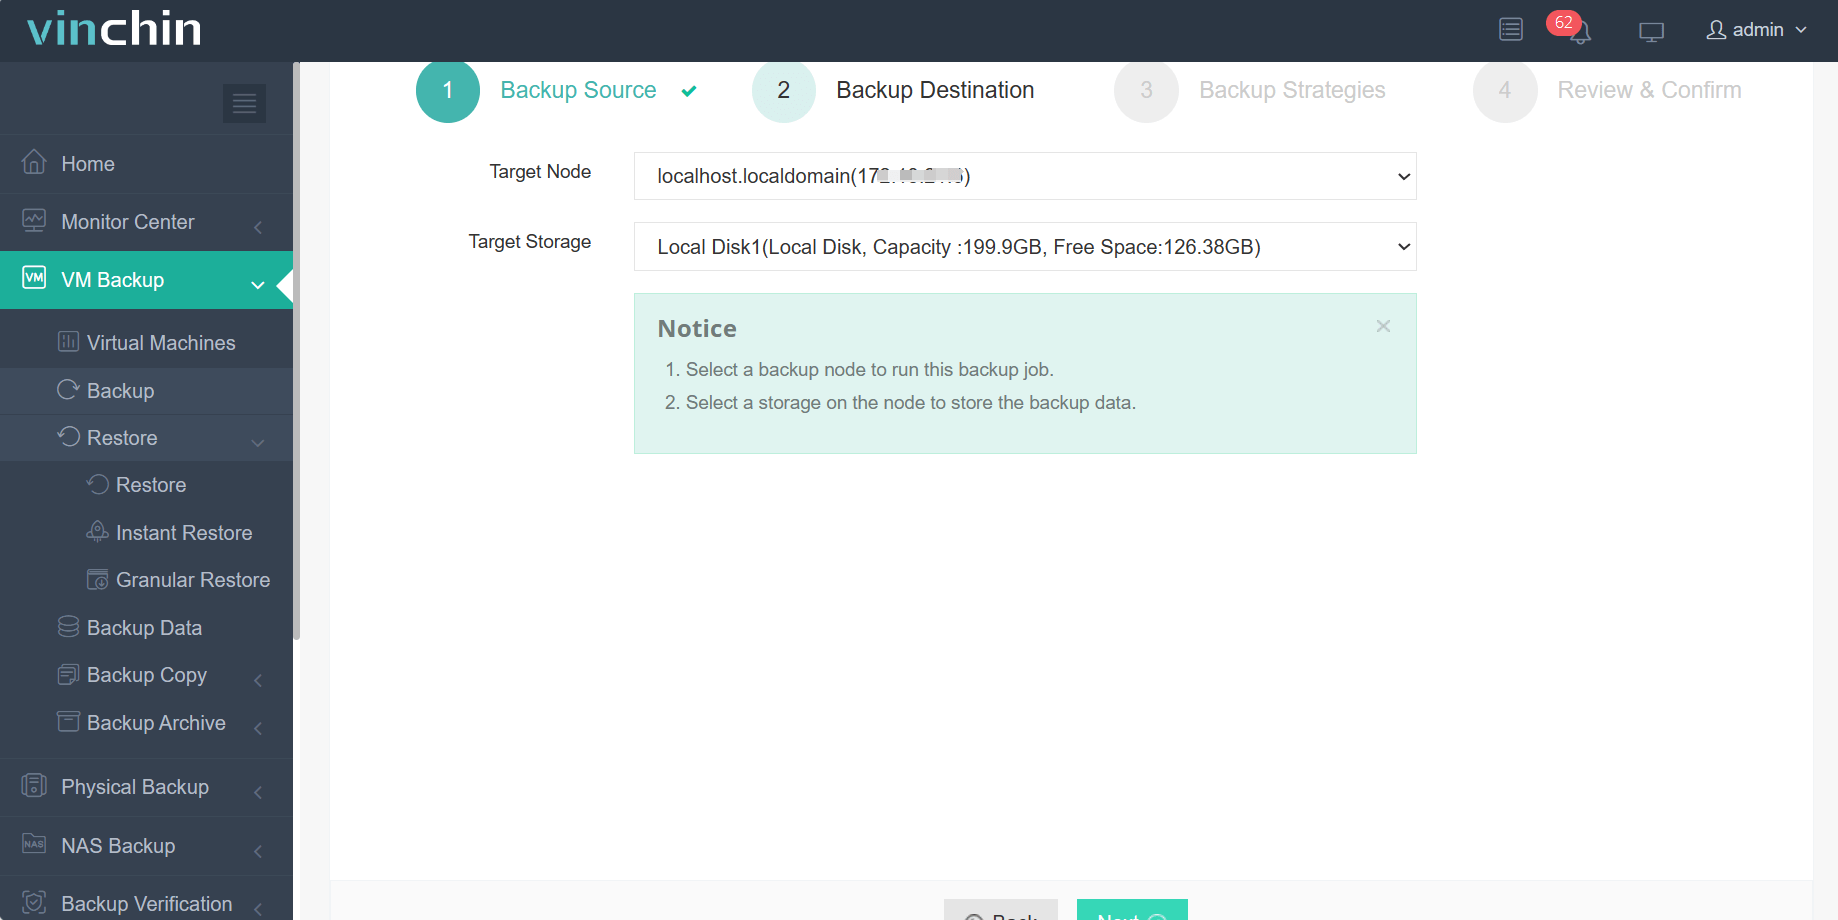
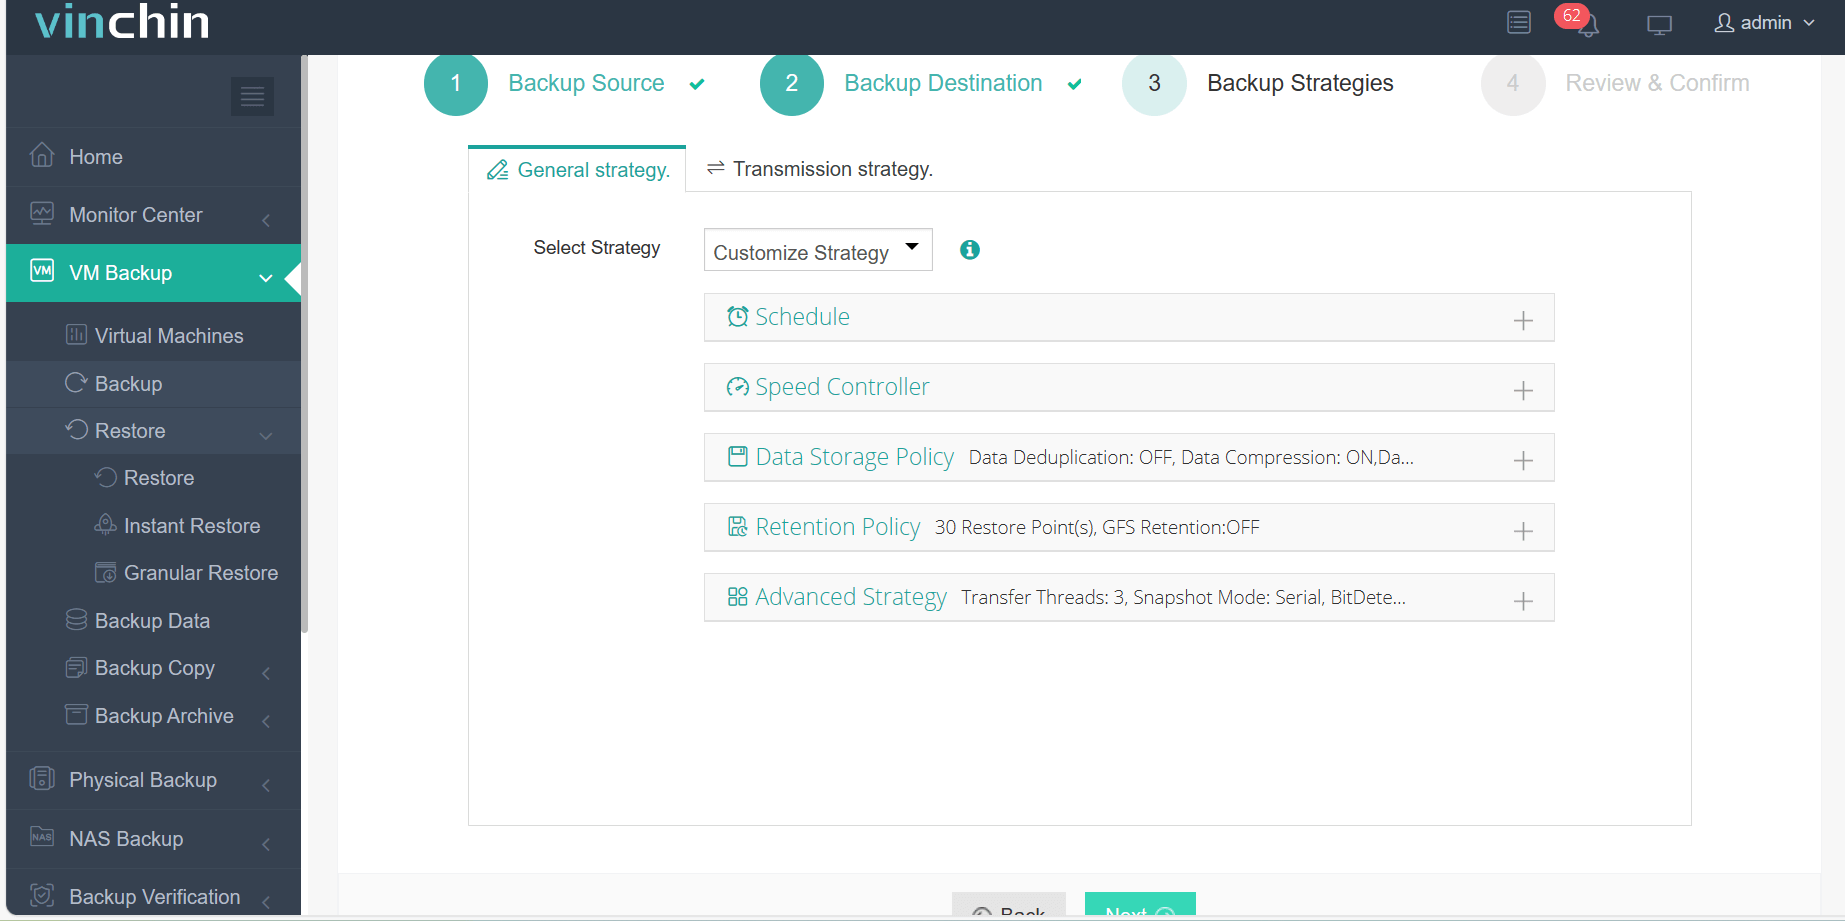
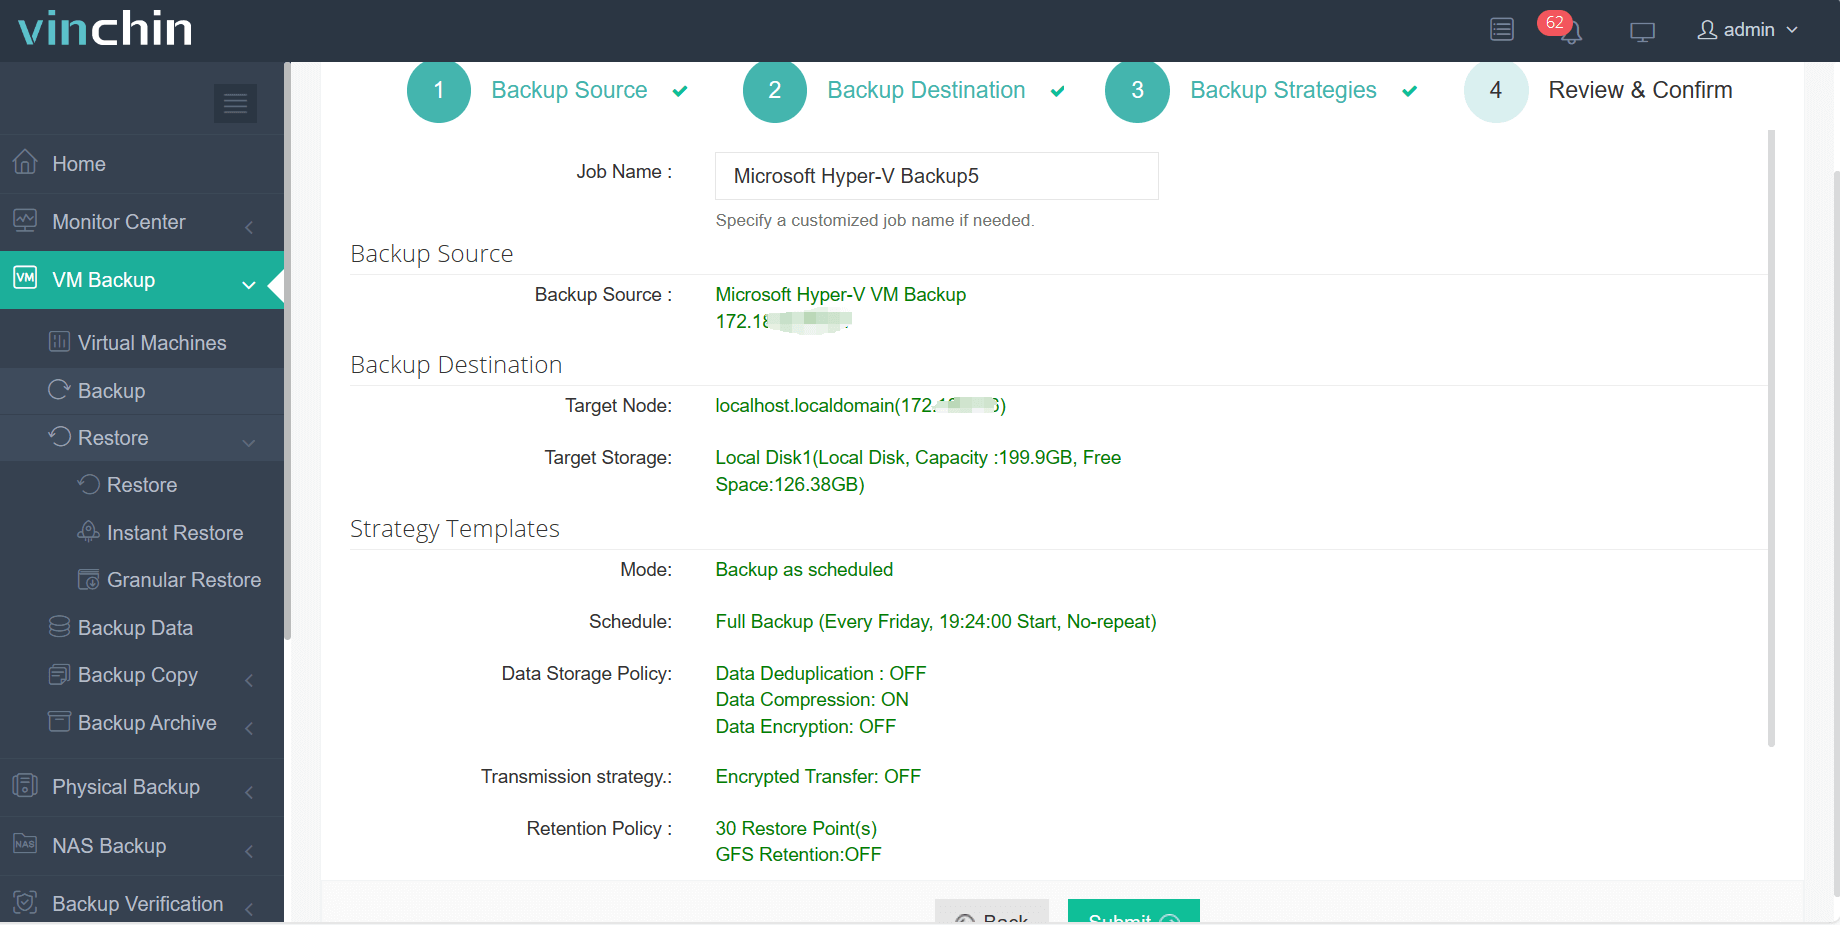
Backing up a virtual machine with Vinchin Backup & Recovery is straightforward thanks to its intuitive web console interface:
Step 1: Select the Hyper-V VM to back up.

Step 2: Choose the backup storage.

Step 3: Configure the backup strategy.

Step 4: Submit the job.

Recognized globally by thousands of organizations—with top ratings in industry reviews—Vinchin Backup & Recovery offers a fully functional free trial valid for sixty days so you can evaluate its complete feature set risk-free; click below to start protecting your infrastructure today.
Install hyper v server 2019 FAQs
Q1: Can I install hyper v server 2019 alongside other operating systems in dual boot?
A1: Yes—you can dual boot but ensure each OS resides on its own partition and only one uses virtualization extensions at any given time.
Q2: What should I do if my network adapters aren’t recognized after installing hyper v server?
A2: Download latest drivers from manufacturer website onto USB drive then load them manually during setup using Load Driver option onscreen.
Q3: How do I automate regular snapshots/backups of my VMs?
A3: Schedule tasks using PowerShell scripts combined with Task Scheduler—or leverage integrated backup solutions like Vinchin Backup & Recovery for streamlined protection workflows.
Conclusion
Installing hyper v server 2019 gives IT teams cost-effective flexibility whether deploying stand-alone hosts or adding roles atop existing infrastructure—and securing plus backing up those environments has never been easier thanks to modern solutions like Vinchin offering seamless integration out-of-the-box.
Share on:


