-
What Are Kubernetes Volumes?
-
Why Backup Is Essential for Kubernetes Volumes?
-
Method 1: Manual Volume Backup in Kubernetes
-
Method 2: How to Back Up Kubernetes Volumes Using Velero
-
Enterprise-Level Kubernetes Protection with Vinchin Backup & Recovery
-
Kubernetes Volume Backup FAQs
-
Conclusion
Data loss can cripple your business—even if your infrastructure is built on Kubernetes. Persistent data lives in volumes attached to pods; if those volumes are lost or corrupted, applications may fail to recover fully. That’s why every operations administrator needs a robust kubernetes volume backup plan that covers both routine failures and rare disasters like storage outages or ransomware attacks.
What Are Kubernetes Volumes?
Kubernetes volumes provide persistent storage for containers running inside pods. Unlike ephemeral container storage—which disappears when a pod restarts—volumes keep data safe across pod lifecycles. Most production clusters use PersistentVolume (PV) objects managed by PersistentVolumeClaim (PVC) resources so you can decouple storage management from application deployment.
Volumes come in many types: local disks, network-attached storage (NAS), cloud block stores, and more—all abstracted through PVs and PVCs for portability within your cluster environment.
Why Backup Is Essential for Kubernetes Volumes?
Backups are not just about ticking boxes—they’re about survival when things go wrong unexpectedly. If someone deletes a PVC by mistake or a node fails catastrophically, you could lose critical databases or user files forever without backups in place.
Infrastructure-as-Code tools can rebuild clusters quickly but cannot restore unique business data stored in volumes unless you have backups ready to go. Regular kubernetes volume backup routines also help with migration between clusters or clouds—and let you test disaster recovery plans safely before an emergency strikes.
Method 1: Manual Volume Backup in Kubernetes
Manual backups give you full control over what gets saved—but they require careful planning around compatibility and consistency checks at each step.
Understanding CSI Driver Requirements
Before using snapshots for kubernetes volume backup, check that your cluster’s Container Storage Interface (CSI) driver supports the CREATE_DELETE_SNAPSHOT capability—a must-have feature for native snapshotting workflows. To verify this support:
kubectl get csidrivers -o jsnpath='{range .items[*]}{.metadata.name}: {.spec.snapshotter}\n{end}'If your driver does not list snapshot support (snapshotter field present), consider upgrading it or using file-level copy methods instead.
Snapshot-Based Backup
Snapshots create point-in-time images of your PVCs without stopping workloads—a fast way to protect large datasets if supported by your storage backend.
First define a VolumeSnapshotClass resource:
apiVersion: snapshot.storage.k8s.io/v1
kind: VolumeSnapshotClass
metadata:
  name: my-snapshotclass
driver: csi-driver-name
deletionPolicy: Delete
Apply it:
kubectl apply -f volumesnapshotclass.yaml
Next create a VolumeSnapshot linked to your target PVC:
apiVersion: snapshot.storage.k8s.io/v1
kind: VolumeSnapshot
metadata:
  name: my-snapshot
spec:
  volumeSnapshotClassName: my-snapshotclass
  source:
    persistentVolumeClaimName: my-pvc
Apply this manifest:
kubectl apply -f volumesnapshot.yaml
To confirm success:
kubectl get volumesnapshot my-snapshot -o jsonpath='{.status.readyToUse}'A value of true means the snapshot is complete and usable.
Validating Snapshot Integrity
It’s wise to validate that snapshots actually contain usable data—not just metadata pointers! Create a temporary PVC from the snapshot:
apiVersion: v1
kind: PersistentVolumeClaim
metadata:
  name: pvc-restore-test
spec:
  dataSource:
    name: my-snapshot
    kind: VolumeSnapshot
    apiGroup: snapshot.storage.k8s.io
  storageClassName: csi-driver-name
  accessModes:
    - ReadWriteOnce
  resources:
    requests:
      storage: 1Gi
Apply it:
kubectl apply -f pvc-restore-test.yaml
Mount this new PVC into a test pod; then run checksum tools like md5sum on key files to compare against originals before disaster strikes!
File Copy Backup
If snapshots aren’t available—or you want extra flexibility—you can back up files directly from mounted PVCs using standard Linux tools via temporary pods.
However, note that kubectl cp works best only for small datasets due to network timeouts; large-scale backups should use streaming tools like tar.
Here’s how:
1. Deploy a helper pod mounting the target PVC—for example,
apiVersion: v1
kind: Pod
metadata:
  name: backup-helper-pod
spec:
  containers:
    - name: busybox
      image: busybox
      command:
        - sleep
        - "3600"
      volumeMounts:
        - mountPath: /data-backup
          name: target-pvc-volume
      securityContext:
        runAsUser: 0 # root access may be required for all files
  volumes:
    - name: target-pvc-volume
      persistentVolumeClaim:
        claimName: my-pvc
2. Start the pod with kubectl apply -f helperpod.yaml.
3. Use tar over exec for large directories:
kubectl exec backup-helper-pod -- tar czf - /data-backup | cat > /local/backup/my-backup.tar.gz
4. To restore later,
cat /local/backup/my-backup.tar.gz | kubectl exec -i backup-helper-pod -- tar xzf - -C /data-backup
This approach gives fine-grained control but lacks automation features like scheduling or retention policies found in dedicated tools.
Method 2: How to Back Up Kubernetes Volumes Using Velero
Automated solutions streamline kubernetes volume backup tasks—reducing manual error risk while adding policy controls at scale.
Velero is an open-source tool designed specifically for backing up both cluster resources and persistent volumes together.
Preparing Your Environment
Before installing Velero,
Create an S3-compatible bucket (or equivalent object store)
Set up IAM credentials granting read/write access.
Ensure DNS resolution works inside all cluster nodes.
PersistentVolumes must use either supported CSI drivers with snapshotting enabled—or compatible legacy providers.
Installing Velero
Download the CLI from velero.io then install into your cluster with credentials configured:
velero install \
--provider aws \
--bucket <your-bucket> \
--secret-file <path-to-credentials> \
--plugins velero/velero-plugin-for-aws:v1.x.x
Replace provider/plugin values based on your platform.
Creating Backups Automatically
To back up everything in one namespace—including its persistent volumes—run:
velero backup create daily-backup --include-namespaces my-namespace
Check status:
velero backup get
A status of Completed signals success.
Scheduling Recurring Backups
Automate regular protection by creating schedules:
velero schedule create nightly --schedule "0 2 * * *" --include-namespaces my-namespace
This runs every day at 2 AM server time.
Restoring Data When Needed
Restore everything from any named backup:
velero restore create --from-backup daily-backup
You can specify different namespaces if migrating workloads between environments—as long as underlying PV types match.
Enterprise-Level Kubernetes Protection with Vinchin Backup & Recovery
For organizations seeking advanced protection beyond manual scripts and open-source utilities, Vinchin Backup & Recovery delivers professional, enterprise-grade kubernetes volume backup capabilities tailored for demanding environments. This solution stands out with features such as full/incremental backups, fine-grained recovery options (by cluster, namespace, application, PVC), policy-based scheduling alongside one-off jobs, encrypted transmission and WORM protection, plus seamless cross-cluster/cross-version restores—even across heterogeneous infrastructures and cloud platforms. Together these capabilities ensure reliable data safety, flexible recovery scenarios, regulatory compliance, and efficient performance at scale.
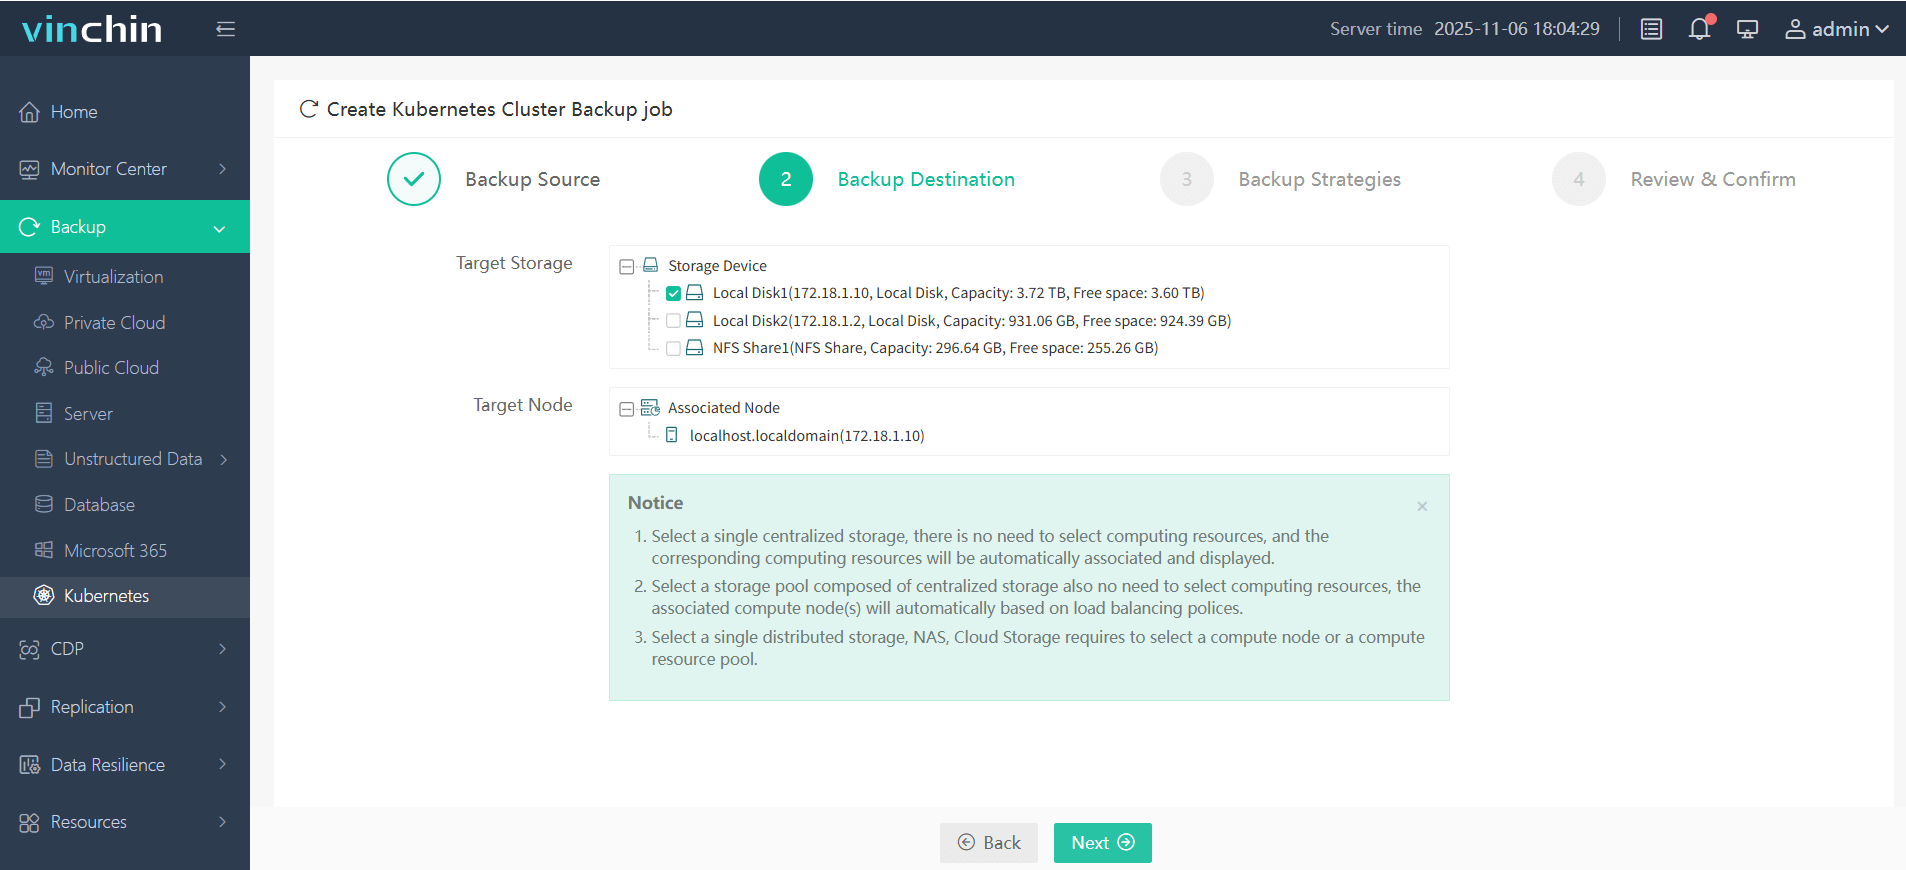
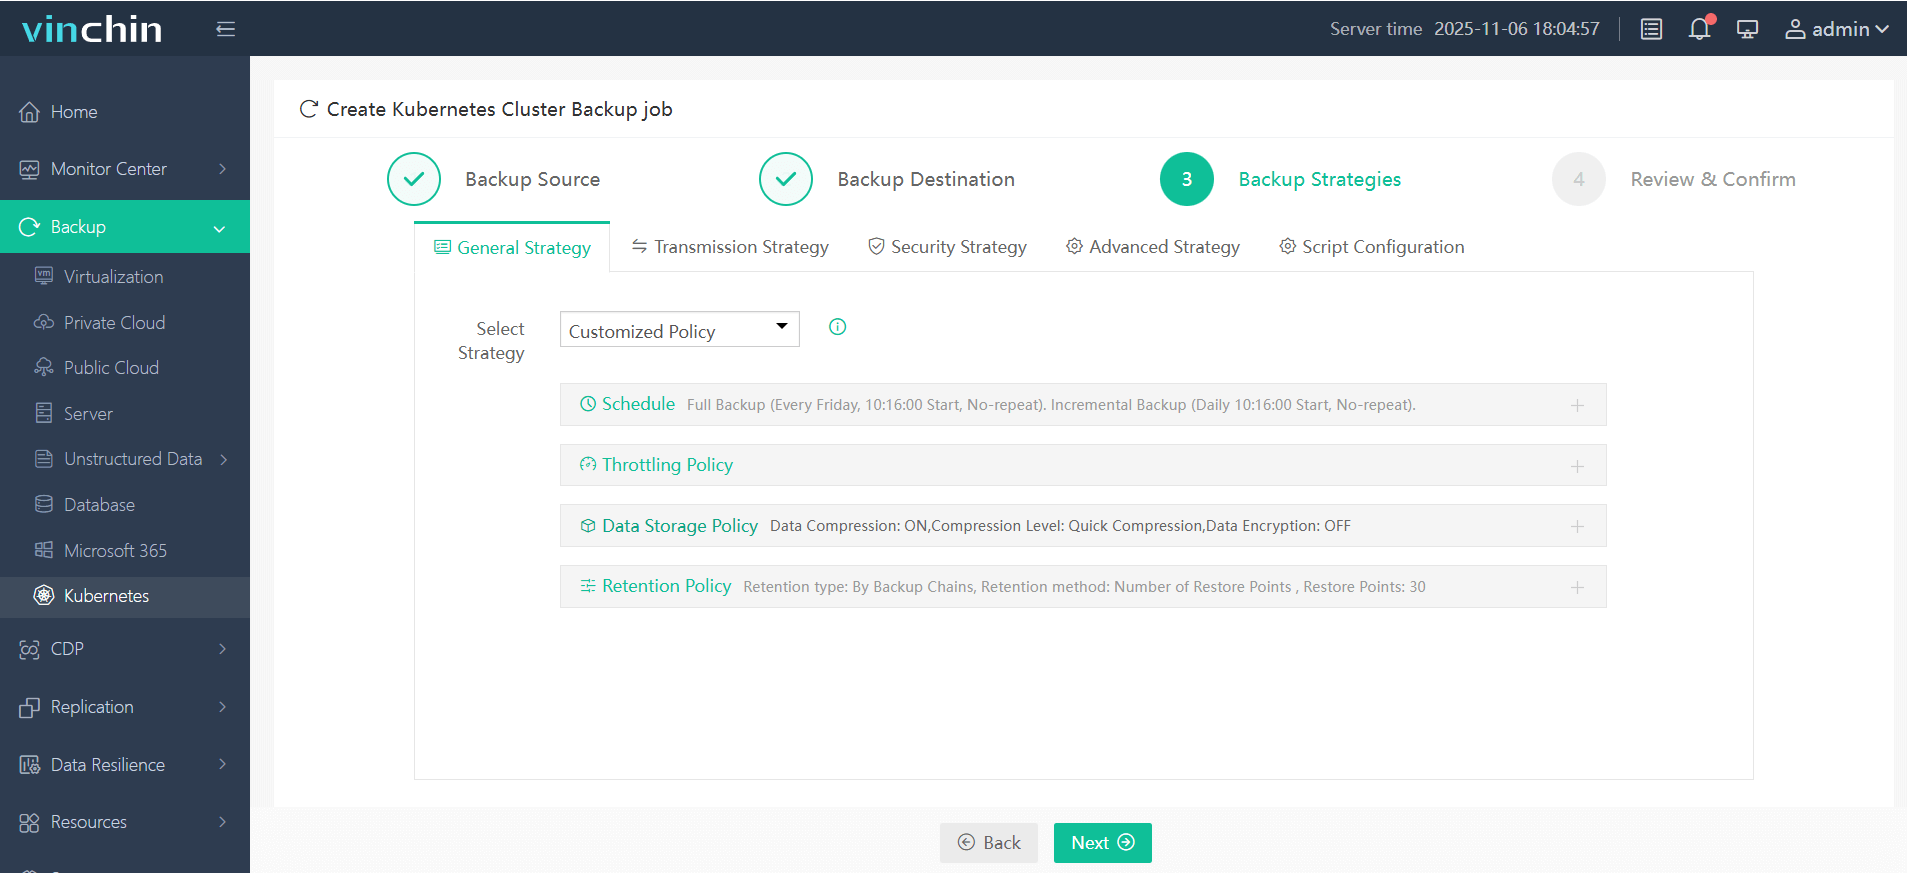
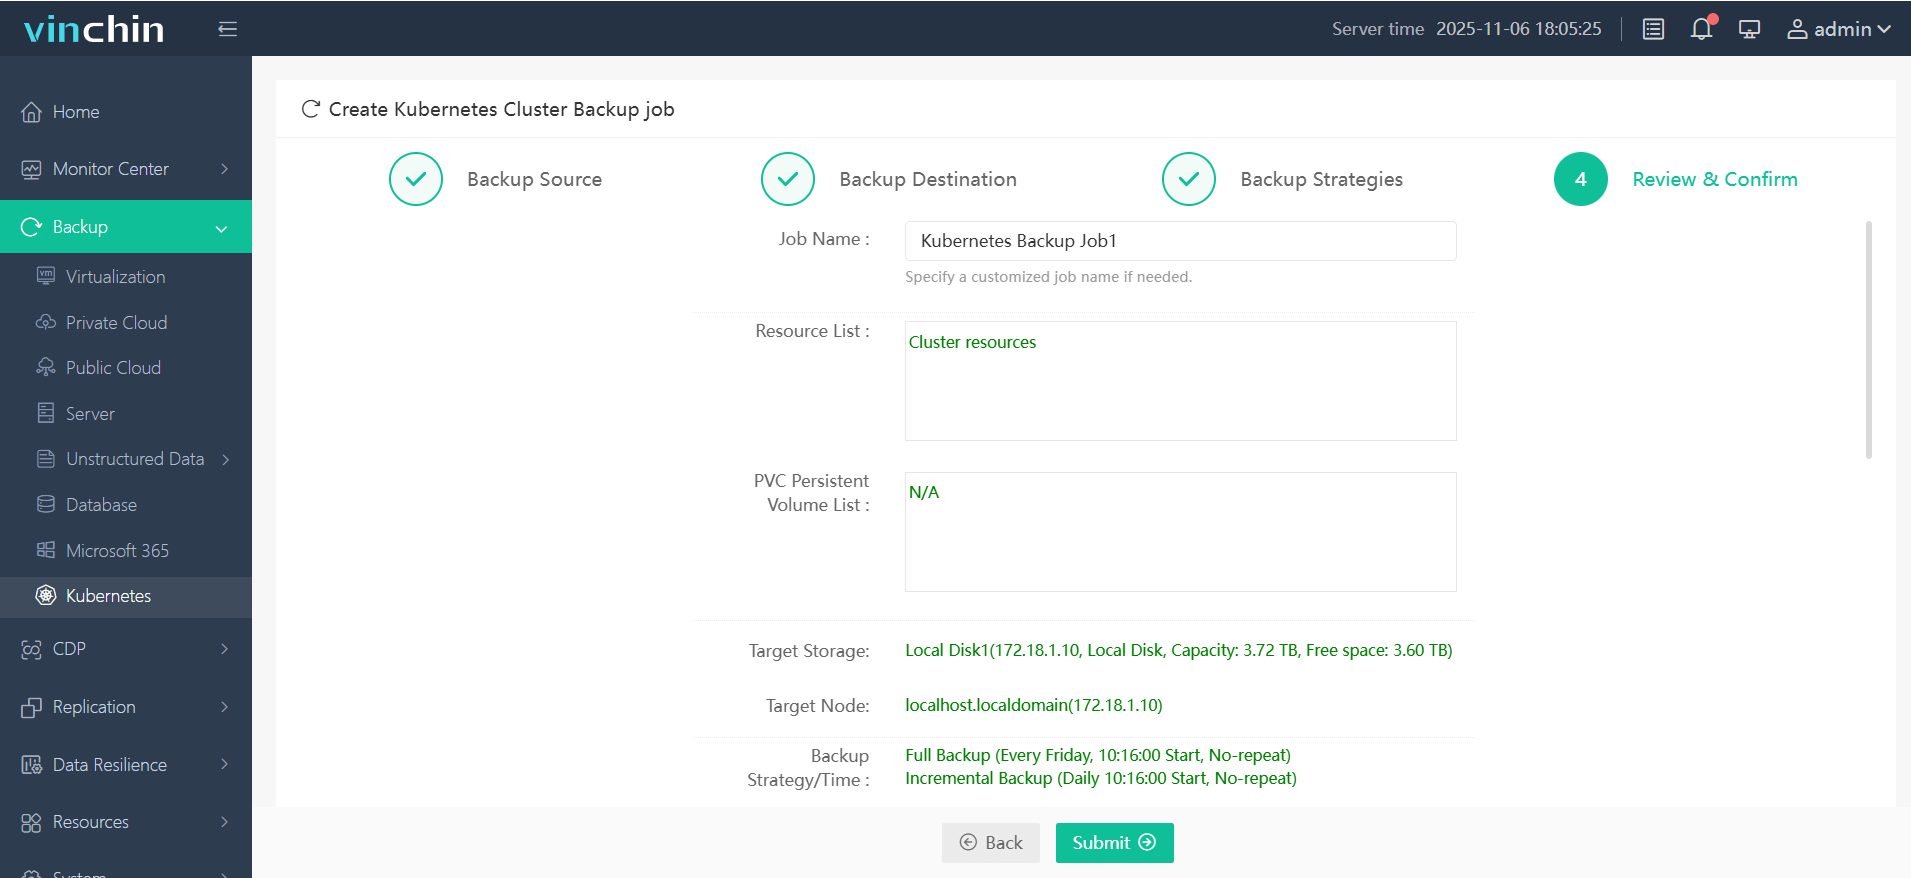
The intuitive web console makes safeguarding Kubernetes workloads straightforward—just follow four steps tailored specifically for kubernetes volume backup needs:
1. Select the backup source

2. Choose the backup storage

3. Define the backup strategy

4. Submit the job

Join thousands of global enterprises who trust Vinchin Backup & Recovery—top-rated worldwide—for secure data protection! Experience every feature free for 60 days; click below to start your trial today.
Kubernetes Volume Backup FAQs
Q1. Can I estimate how much space my kubernetes volume backups will need?
Yes; check current used capacity of each PVC via kubectl describe pvc, then add overhead based on retention policy length plus growth trends over time.
Q2. What should I do if restoring fails due to permission denied errors?
Ensure restored pods’ service accounts have correct RBAC rules; verify file system permissions inside restored PV match expected user/group IDs set by workloads.
Q3. How do I migrate backed-up data between different cloud providers?
Export snapshots/files locally first; upload them into new provider’s object store; recreate corresponding PV/PVC definitions pointing at imported data location before restoring workloads.
Conclusion
Kubernetes volume backup protects vital business data against loss—from accidental deletion to major outages—by enabling fast recovery across clusters or clouds.Regular testing ensures reliability. Vinchin delivers powerful automated protection so you can focus on running applications confidently every day.
Share on:


