-
What is RMAN Backup in Oracle?
-
Prerequisites for Restoring Oracle Database
-
Method 1: Restore Using RMAN Duplicate Command
-
Method 2: Restore Using RMAN Restore and Recover Commands
-
Vinchin Backup & Recovery: Enterprise Solution for Reliable Oracle Migration
-
Restore Oracle Database from RMAN Backup FAQs
-
Conclusion
Restoring an Oracle database from an RMAN backup to another server is a vital skill for IT operations teams. Whether you face disaster recovery needs, want to test changes safely, or plan a migration project, knowing how to move your database reliably matters. This guide explains key concepts and walks you through proven methods—starting simple before moving into advanced territory.
What is RMAN Backup in Oracle?
Oracle’s Recovery Manager (RMAN) is the standard tool for backing up and restoring databases. It automates many tasks that used to require manual scripts or third-party tools. With RMAN you can back up entire databases or just selected tablespaces or datafiles as needed.
RMAN handles not only your datafiles but also archive logs (which record all changes), control files (which track database structure), and server parameter files (SPFILE/PFILE). These pieces together allow you to recover your database fully—even if something goes wrong at the hardware level.
Prerequisites for Restoring Oracle Database
Before starting any restore operation on another server, preparation is essential. Skipping steps here can lead to failed restores or inconsistent databases later.
First, confirm you have a valid RMAN backup set that includes all required components: datafiles, control file backups (or at least one recent copy), archived redo logs covering your desired recovery point, plus either an SPFILE or PFILE.
Next, check software compatibility between source and target servers:
Both must run the same Oracle version; verify with
SELECT * FROM v$version;.Operating system versions should match unless you're using cross-platform transportable tablespaces—a complex topic outside this guide's scope.
Directory structures matter too; plan where datafiles will reside on the new server (for example
/u01/app/oracle/oradata/NEWDB/).
Transfer all necessary backup files—including archive logs—to accessible storage on the target machine. Create directories ahead of time so there are no surprises during restore.
Finally:
Ensure you have sufficient disk space.
Set correct permissions so Oracle processes can read/write as needed.
Confirm network connectivity if using remote duplication features.
Prepare environment variables like
ORACLE_HOMEandORACLE_SID.
A quick pre-flight checklist:
| Item | Command / Check |
|---|---|
| Oracle version matches | SELECT * FROM v$version; |
| Enough disk space | df -h |
| Directories created | ls -ld /u01/app/oracle/oradata/NEWDB/ |
| Backups transferred | ls /backup/rman/* |
| Permissions set | ls -l /backup/rman/* |
Method 1: Restore Using RMAN Duplicate Command
The DUPLICATE command in RMAN lets you clone or restore an entire database onto another server with minimal manual effort. It’s popular because it automates much of what used to be tedious work—making it great even if you’re new to Oracle administration.
You’ll need both source (original) and target (new) servers online with network access between them. On the target side:
1. Install matching Oracle software.
2. Create required directories for datafiles/control files/logs.
3. Set environment variables (ORACLE_HOME, ORACLE_SID) appropriately.
4. Start the instance in NOMOUNT mode using either a PFILE or SPFILE:
   export ORACLE_SID=newdb
   sqlplus / as sysdba
   STARTUP NOMOUNT PFILE='/path/to/initnewdb.ora'
Now connect via RMAN from your admin workstation or directly on the target server:
rman TARGET sys@source_db AUXILIARY sys@newdb
Replace connection strings as needed for your setup.
At the RMAN prompt enter:
DUPLICATE TARGET DATABASE TO newdb
FROM ACTIVE DATABASE
SPFILE
  PARAMETER_VALUE_CONVERT 'old','new'
  SET DB_FILE_NAME_CONVERT='/u01/app/oracle/oradata/OLDB/', '/u01/app/oracle/oradata/NEWDB/'
  SET LOG_FILE_NAME_CONVERT='/u01/app/oracle/oradata/OLDB/', '/u01/app/oracle/oradata/NEWDB/'
  SET CONTROL_FILES='/u01/app/oracle/oradata/NEWDB/control01.ctl'
NOFILENAMECHECK;
Adjust paths/names based on your environment.
During duplication:
Datafiles are copied over automatically.
Control files are created fresh at specified locations.
Archive logs are applied so your restored database matches its last consistent state.
Watch progress messages closely—they’ll alert you if anything fails due to missing files or permission issues.
This method saves time but requires both servers online during cloning—a limitation if disaster has taken out your primary site.
Method 2: Restore Using RMAN Restore and Recover Commands
If direct network access isn’t possible—or if you prefer full control—you can perform a manual restore using RESTORE/RECOVER commands within RMAN itself.
Start by ensuring all relevant backup sets (datafiles/control file/archive logs) are present locally on your target server’s storage:
1. Install matching Oracle software; create directories as before.
2. Copy over both PFILE/SPFILE and password file (orapw<SID>) from source system.
3. Set environment variables (ORACLE_HOME, ORACLE_SID) accordingly.
4. Launch SQL*Plus:
   export ORACLE_SID=targetdb
   sqlplus / as sysdba
   STARTUP NOMOUNT PFILE='/path/to/init_targetdb.ora'
5. Open RMAN locally:
rman TARGET /
6. Restore control file first—this tells Oracle where everything else lives:
RESTORE CONTROLFILE FROM '/backup/rman/cf_backup.bkp';
7. Mount database so other components become accessible:
ALTER DATABASE MOUNT;
8. If backup sets were moved into different folders than originally backed up from,
tell RMAN about their location:
CATALOG START WITH '/backup/rman/';
9. Validate backups before proceeding—it’s better than discovering corruption mid-way!
RESTORE DATABASE VALIDATE;
10.If directory paths differ between old/new systems,
use SET NEWNAME FOR DATAFILE statements inside a RUN block before restoring actual datafiles—for example,
    RUN {
      SET NEWNAME FOR DATAFILE 1 TO '/u01/app/oracle/oradata/NEWDB/system01.dbf';
      SET NEWNAME FOR DATAFILE 2 TO '/u01/app/oracle/oradata/NEWDB/sysaux01.dbf';
      RESTORE DATABASE;
      SWITCH DATAFILE ALL;
    }
11.Recover changes by applying archived redo logs included in backup set(s):
RECOVER DATABASE;
12.Finally open restored DB—with RESETLOGS option—to reset log sequence numbers after recovery completes successfully:
ALTER DATABASE OPEN RESETLOGS;
Renaming the Database Post-Restore
Sometimes you want your restored copy running under a different name than production—for testing purposes perhaps? Use Oracle’s NID utility:
1.SHUTDOWN IMMEDIATE
2.STARTUP MOUNT
3.EXIT SQL*Plus
4.Run NID utility:
nid TARGET=/ DBNAME=newname SETNAME=Y
5.Restart instance normally after completion
Manual restores offer flexibility when dealing with isolated environments—but demand careful attention at each step!
Vinchin Backup & Recovery: Enterprise Solution for Reliable Oracle Migration
For organizations seeking greater efficiency and automation beyond native tools, enterprise-grade solutions provide significant advantages when migrating databases such as Oracle across servers or environments today—including cloud deployments and hybrid infrastructures alike.
Vinchin Backup & Recovery stands out as a professional solution supporting most mainstream databases including Oracle, MySQL, SQL Server, MariaDB, PostgreSQL, PostgresPro, and MongoDB—with robust features tailored specifically for enterprise workloads like yours involving critical platforms such as Oracle first and foremost in this context.
Among its extensive capabilities are incremental backup options for reduced storage usage and faster operations; batch database backup management; flexible retention policies including GFS retention policy; ransomware protection safeguards; plus seamless cloud backup integration—all designed to ensure secure migrations while minimizing downtime risks across diverse deployment scenarios.
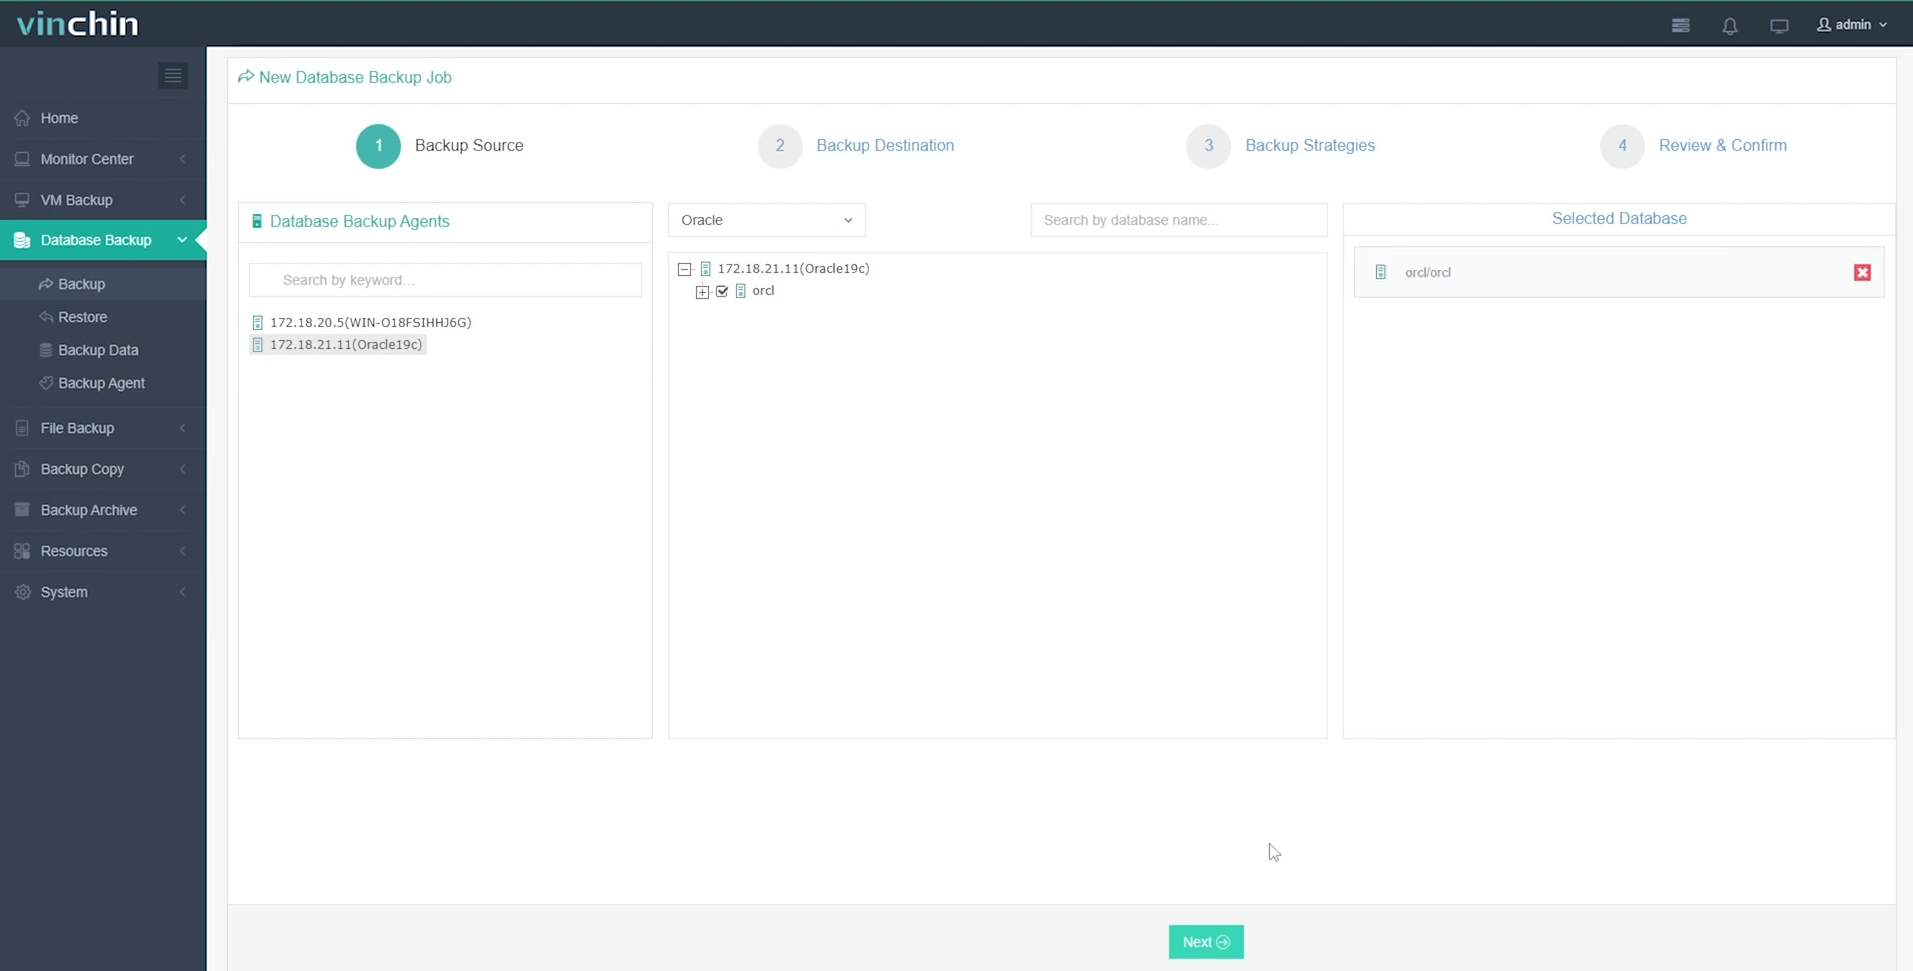
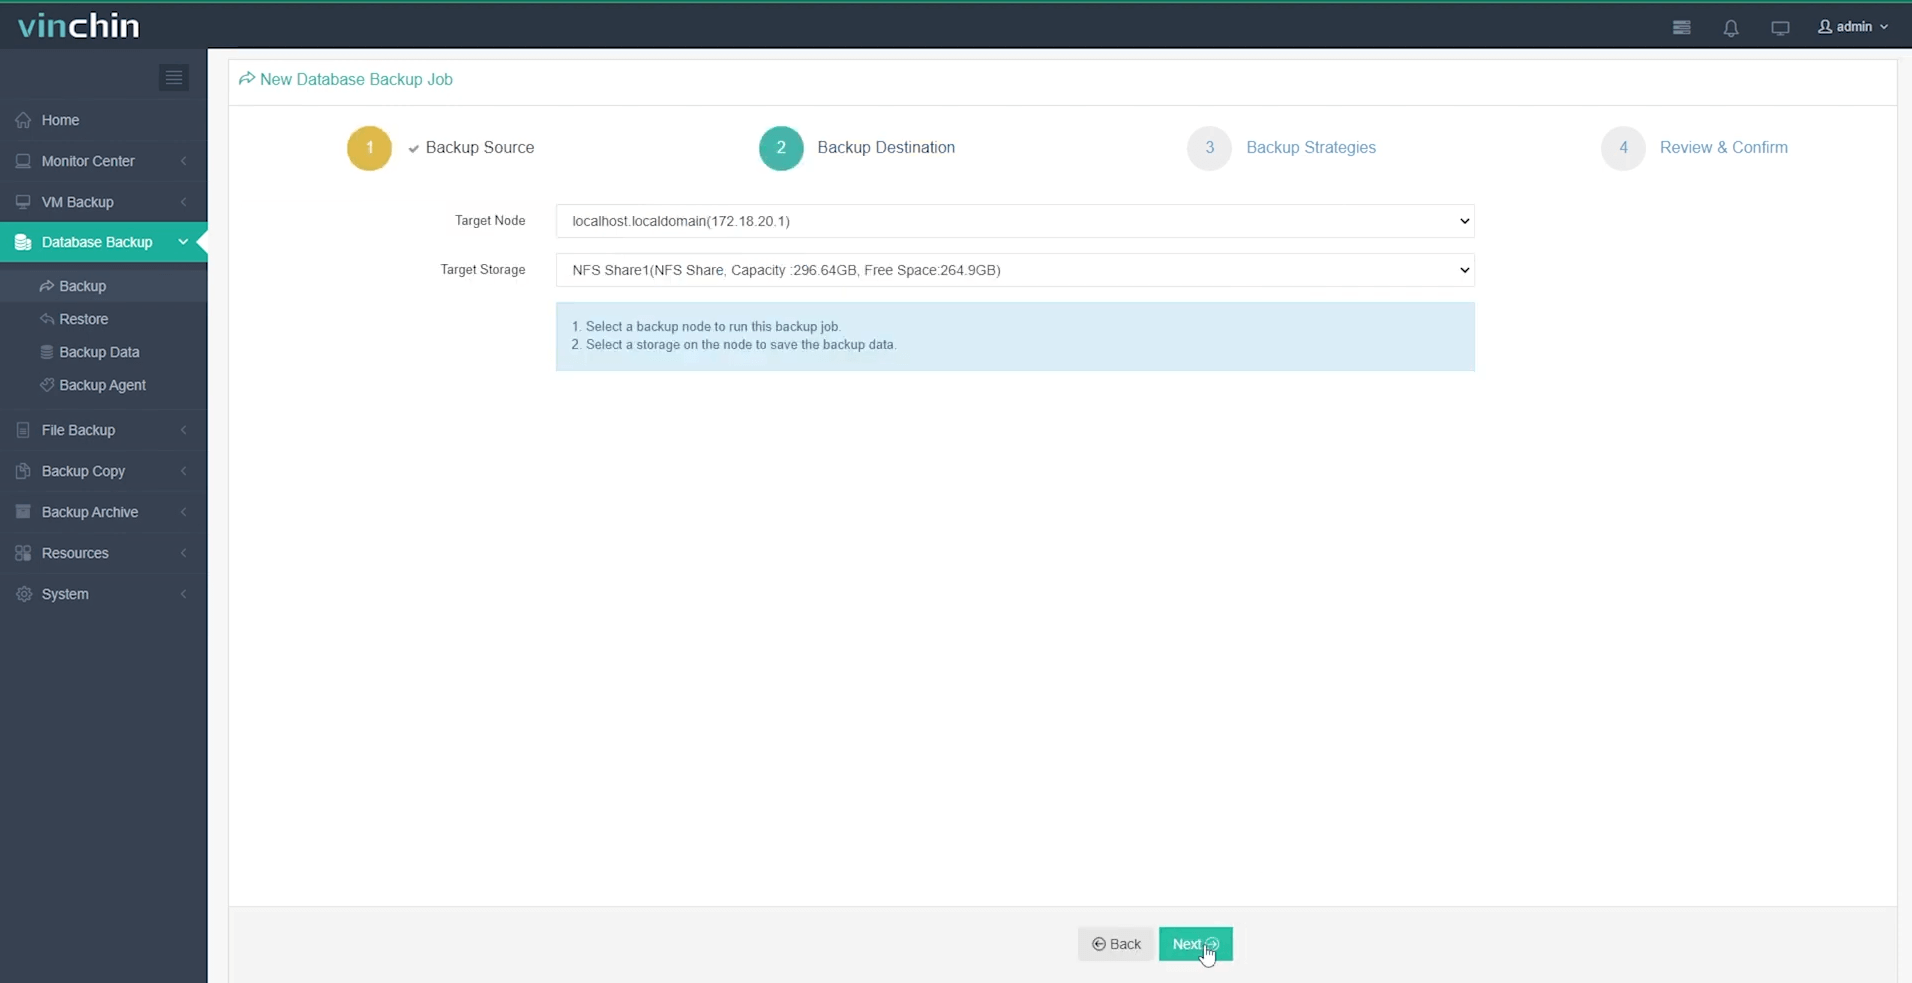
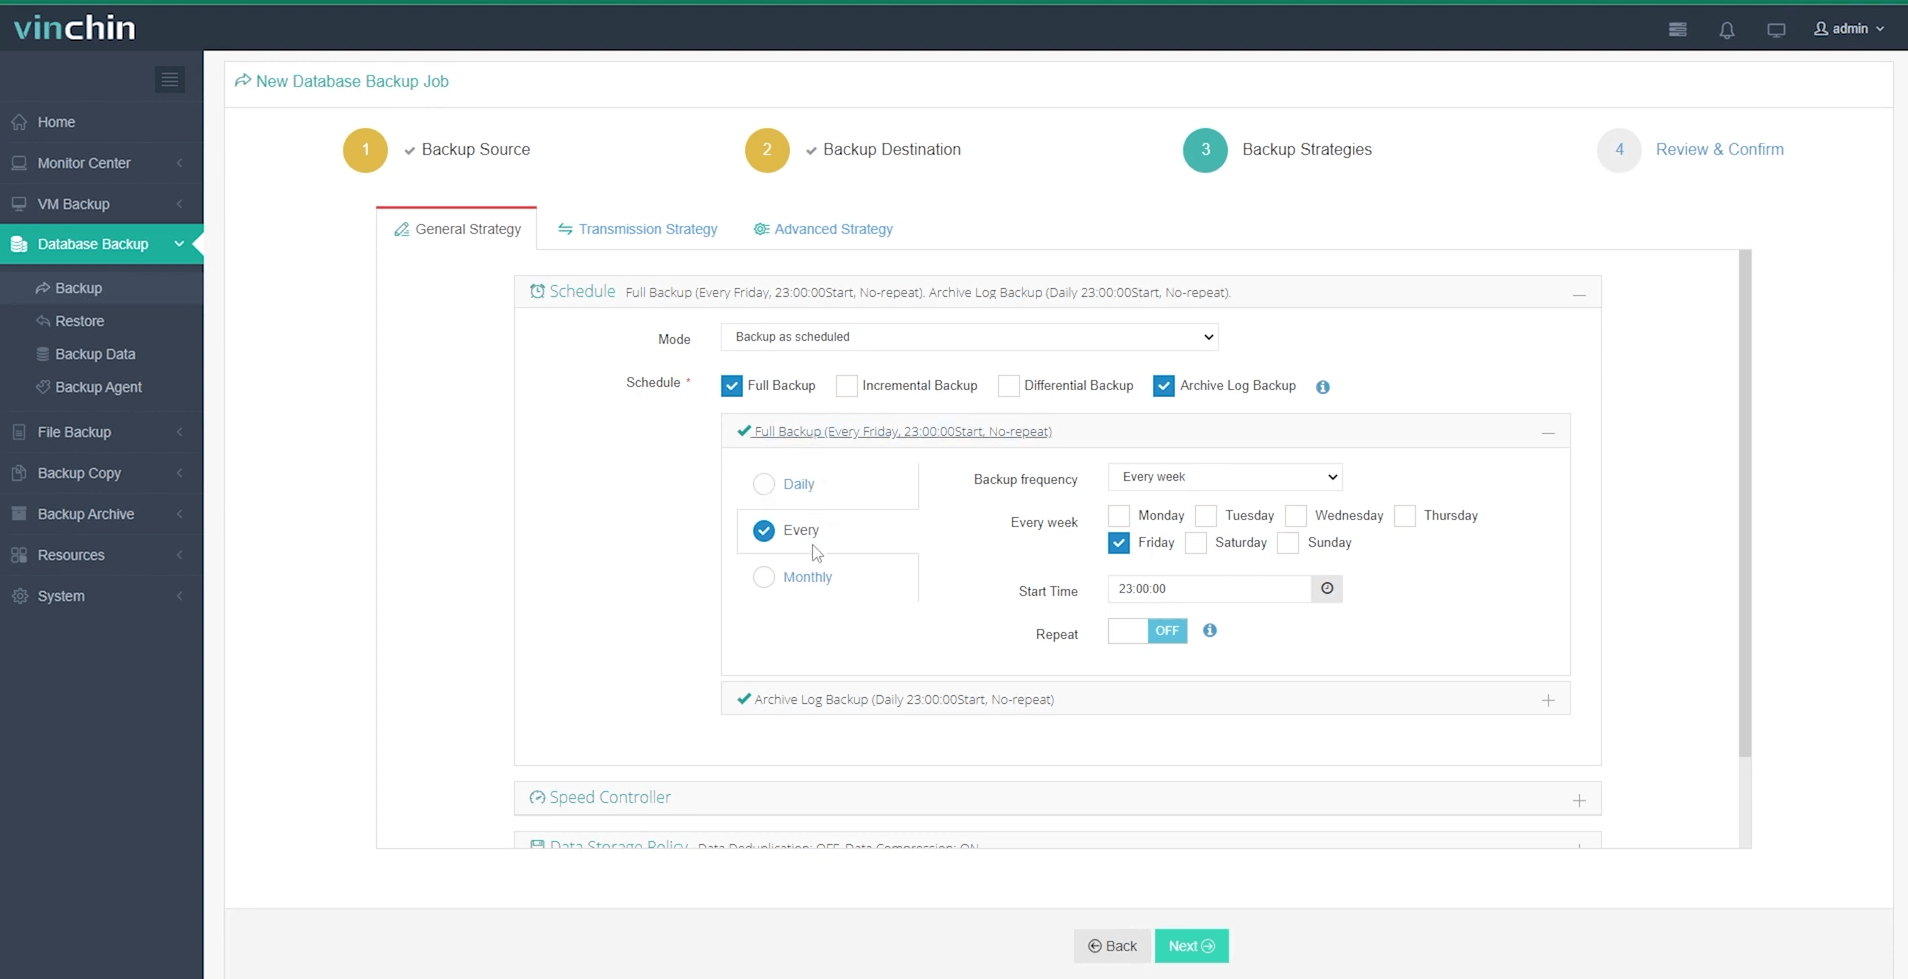
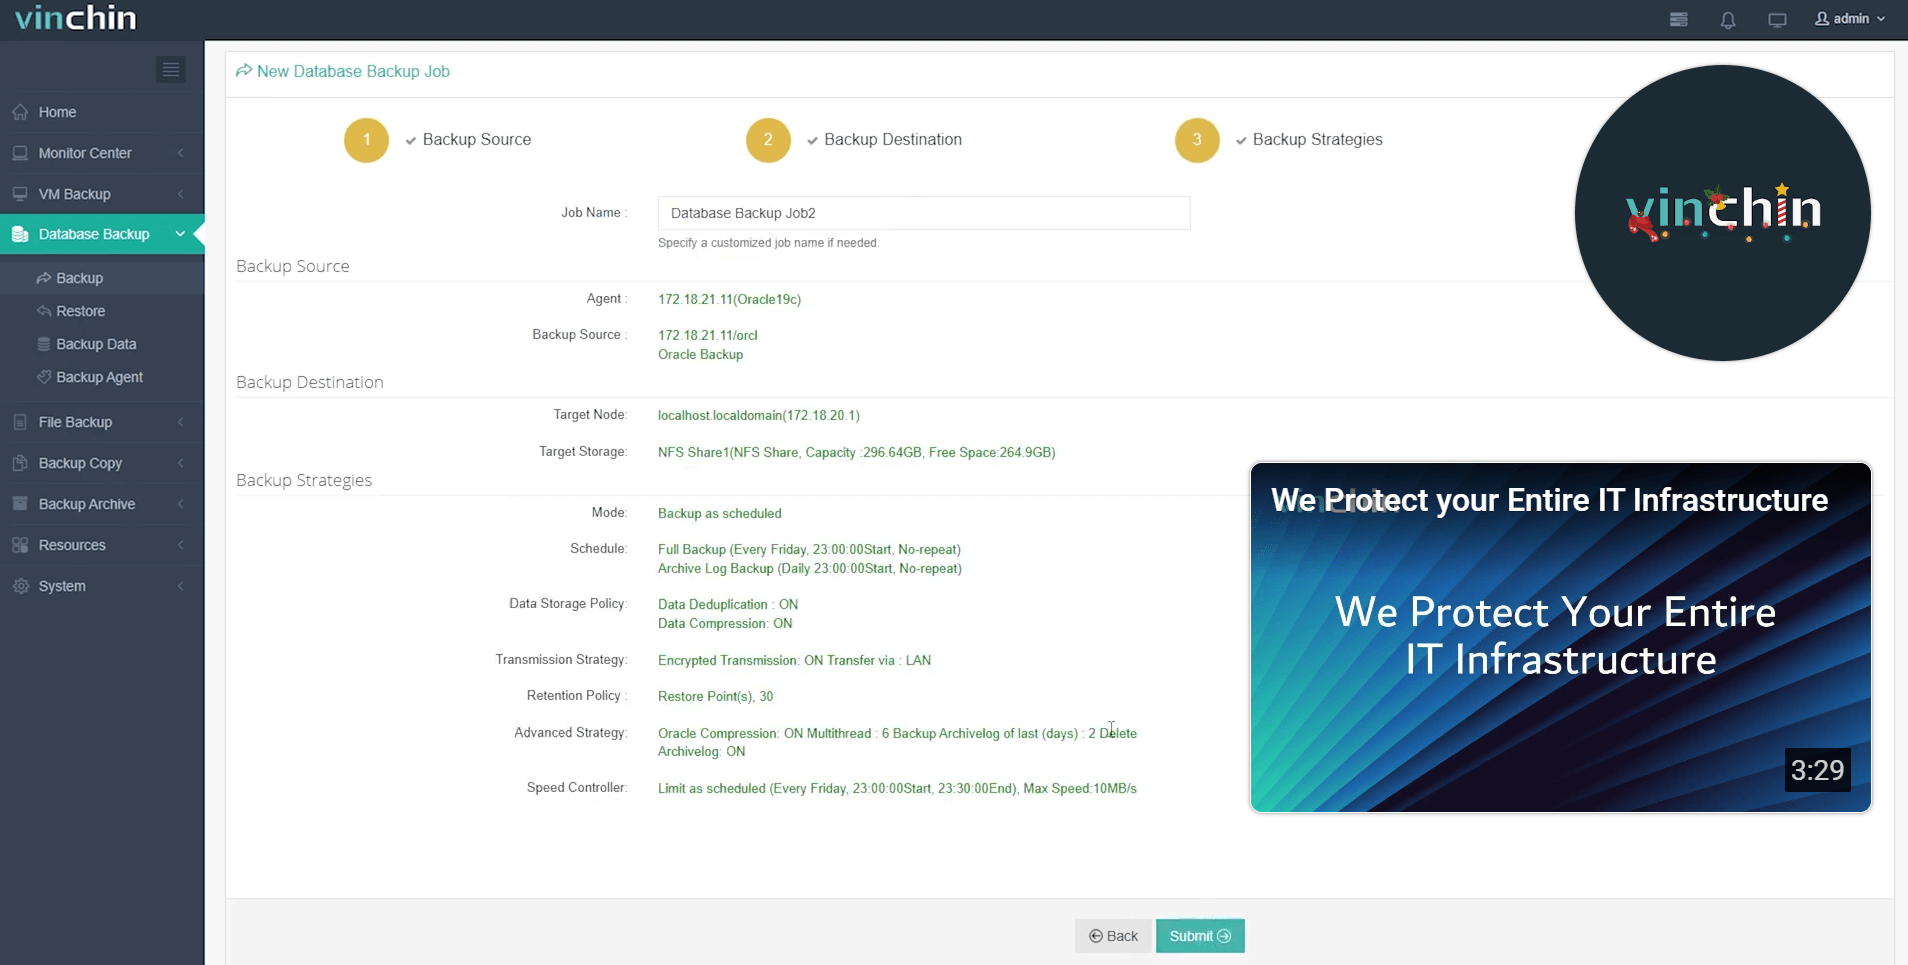
The intuitive web console makes every operation straightforward—in most cases requiring just four steps:
Step 1: Select the Oracle database to back up;

Step 2: Choose backup storage;

Step 3: Define strategy settings such as schedule/compression/policy;

Step 4: Submit job for execution.

Trusted globally by thousands of enterprises with top industry ratings—Vinchin Backup & Recovery offers a fully featured free trial lasting 60 days so you can experience its power firsthand before making any commitment—click below now to get started!
Restore Oracle Database from RMAN Backup FAQs
Q1: Can I use my existing backups if my directory layout changed?
A1: Yes—use SET NEWNAME FOR DATAFILE in RMAN scripts so each file maps correctly onto its new path structure before restoring/recovering them individually.
Q2: Is cross-platform restoration supported?
A2: No—you cannot directly restore Linux-based backups onto Windows hosts (or vice versa); both source & destination must share OS architecture/version.
Q3: How do I handle Transparent Data Encryption during restores?
A3: Always copy wallet/key store files along with encrypted backups then open wallet using ADMINISTER KEY MANAGEMENT commands before mounting/restoring TDE-enabled databases.
Conclusion
Restoring an Oracle database from an RMAN backup onto another server takes planning but pays off when disaster strikes—or when testing big changes safely away from production.Vinchin makes migrations even easier thanks totheir automatedtoolsand intuitiveinterface.Try it next timeyou needa reliableOraclerestore!
Share on:


