-
What is SQL Server Database Partitioning?
-
Why Use Partitioning in SQL Server?
-
Method 1: Partition Tables by Range
-
Method 2: Partition Tables by List
-
Method 3: Partition Tables by Hash
-
Introducing Vinchin Backup & Recovery for Enterprise-Level SQL Server Protection
-
SQL Server Database Partitioning FAQs
-
Conclusion
Managing large tables in SQL Server is never easy. As your data grows, queries slow down, maintenance becomes harder, and backups take longer to finish. SQL Server database partitioning offers a proven way to solve these problems. By splitting big tables into smaller pieces called partitions, you can boost performance and make administration simpler.
But how does partitioning work? What options do you have? Let’s break it down together—step by step.
What is SQL Server Database Partitioning?
SQL Server database partitioning means dividing a large table or index into smaller parts called partitions. Each partition holds a subset of rows based on values in one column—the partition key—but users still see one logical table or index.
Partitioning in SQL Server is always horizontal; that means each partition contains certain rows rather than columns.
To set up partitioning, you need three main components:
The partition function, which defines how data splits based on the chosen column’s values.
The partition scheme, which maps each partition to a physical filegroup for storage.
The actual partitioned table or index, which uses the scheme and function.
Partitioning is invisible to most queries but can have a huge impact on both performance and maintenance tasks.
Why Use Partitioning in SQL Server?
Partitioning brings several benefits when managing large databases.
First, it improves query performance—especially when queries filter using the partition key. In those cases, SQL Server skips entire partitions through “partition elimination.”
Second, it makes data management easier. You can load new data or archive old records by switching whole partitions instead of handling millions of rows one at a time.
Third, maintenance tasks like rebuilding indexes or updating statistics can be done per-partition rather than across an entire table—saving time and resources during busy periods.
Finally, partitioning supports scalability as your business grows; just add new partitions without redesigning your schema or moving existing data around.
Partitioning works best for very large tables—think millions of rows—that group naturally by date, region, or another logical key.
Method 1: Partition Tables by Range
Range partitioning is the most common method in SQL Server—it divides data into partitions based on value ranges within one column such as dates or numeric IDs.
This approach works well for time-based records like logs or transactions where archiving old data is routine practice.
Let’s walk through setting up range-based table partitioning step by step:
First create filegroups—one per planned range—to store each future partition separately:
ALTER DATABASE SalesDB ADD FILEGROUP FG2022;
ALTER DATABASE SalesDB ADD FILEGROUP FG2023;
Next add files to each filegroup:
ALTER DATABASE SalesDB ADD FILE (
    NAME = N'SalesData2022',
    FILENAME = N'C:\Data\SalesData2022.ndf'
) TO FILEGROUP FG2022;
Repeat this process for every year (or other range) you want covered by its own filegroup/file pair.
Now define your boundary logic using a partition function:
CREATE PARTITION FUNCTION PF_OrderDate (datetime)
AS RANGE RIGHT FOR VALUES ('2022-01-01', '2023-01-01', '2024-01-01');
This creates four partitions: before 2022; all of 2022; all of 2023; everything after January 1st 2024 onward.
Map these boundaries onto physical storage using a matching scheme:
CREATE PARTITION SCHEME PS_OrderDate
AS PARTITION PF_OrderDate
TO (FG2022, FG2023, FG2024, [PRIMARY]);
Finally create your main table using this scheme:
CREATE TABLE Orders (
    OrderID INT PRIMARY KEY,
    OrderDate DATETIME NOT NULL,
    CustomerID INT,
    TotalAmount DECIMAL(10,2)
) ON PS_OrderDate(OrderDate);
From now on whenever you insert orders with different dates—they’ll land automatically in their correct year’s filegroup!
When running queries filtered by date—for example WHERE OrderDate >= '2023-01-01'—SQL Server will skip irrelevant years entirely thanks to “partition elimination.”
Method 2: Partition Tables by List
SQL Server doesn’t natively support list-style partitions where each group contains specific discrete values like regions or categories—but there are workarounds worth knowing about!
One common trick uses separate tables plus check constraints:
CREATE TABLE Orders_North (
    OrderID INT PRIMARY KEY,
    Region VARCHAR(10) CHECK (Region = 'North'),
    OrderDate DATETIME,
    TotalAmount DECIMAL(10,2)
);

CREATE TABLE Orders_South (
    OrderID INT PRIMARY KEY,
    Region VARCHAR(10) CHECK (Region = 'South'),
    OrderDate DATETIME,
    TotalAmount DECIMAL(10,2)
);
Then unify them under one view:
CREATE VIEW Orders AS
SELECT * FROM Orders_North
UNION ALL
SELECT * FROM Orders_South;
This “partitioned view” lets users query all orders at once while physically storing them apart behind the scenes—a handy workaround but not true automatic table-level management like native range schemes provide Microsoft.
Alternatively use computed columns as pseudo-partition keys—but design carefully since these approaches lack some automation found in built-in methods!
If high transaction rates matter most—or if DML operations must span multiple groups—you may find these workarounds less flexible than true range-based solutions.
Method 3: Partition Tables by Hash
Hash-based distribution spreads rows evenly across multiple groups regardless of their actual values—a good fit when no natural ranges exist but balanced workloads matter most.
Native hash-based disk-table support isn’t available yet except for memory-optimized tables introduced in SQL Server 2016 Microsoft Docs. However you can simulate hash-like behavior using computed columns:
First add a hash key column calculated from another field such as CustomerID:
ALTER TABLE Orders
ADD HashKey AS (ABS(CHECKSUM(CustomerID)) % 4) PERSISTED;
Define boundaries just like before:
CREATE PARTITION FUNCTION PF_HashKey (int)
AS RANGE RIGHT FOR VALUES (0, 1, 2, 3);

CREATE PARTITION SCHEME PS_HashKey
AS PARTITION PF_HashKey
TO (FG0, FG1, FG2, FG3);
Build an aligned clustered index so inserts distribute evenly:
CREATE CLUSTERED INDEX IX_Orders_HashKey
ON Orders(HashKey)
ON PS_HashKey(HashKey);
Always test hash distribution with sample workloads first! Skewed hashes lead to hot spots that defeat even spreading goals.
Hash-style setups help balance heavy write loads but lack natural grouping advantages found in date/range approaches.
Introducing Vinchin Backup & Recovery for Enterprise-Level SQL Server Protection
While effective database management strategies such as partitioning optimize performance and scalability in SQL Server environments, robust backup remains essential for safeguarding critical business information. Vinchin Backup & Recovery stands out as an enterprise-grade solution supporting today’s mainstream databases—including Oracle®, MySQL®, MariaDB®, PostgreSQL®, PostgresPro®, MongoDB®, and especially Microsoft® SQL Server®.
Vinchin Backup & Recovery delivers advanced features tailored for demanding enterprise needs: incremental backup ensures efficient protection of growing datasets; batch database backup streamlines operations across multiple instances; multi-level compression optimizes storage usage; comprehensive data retention policies simplify compliance management; and ransomware protection secures backups against modern threats. Together these capabilities enable organizations to maintain reliable recoverability while minimizing resource consumption and operational overheads.
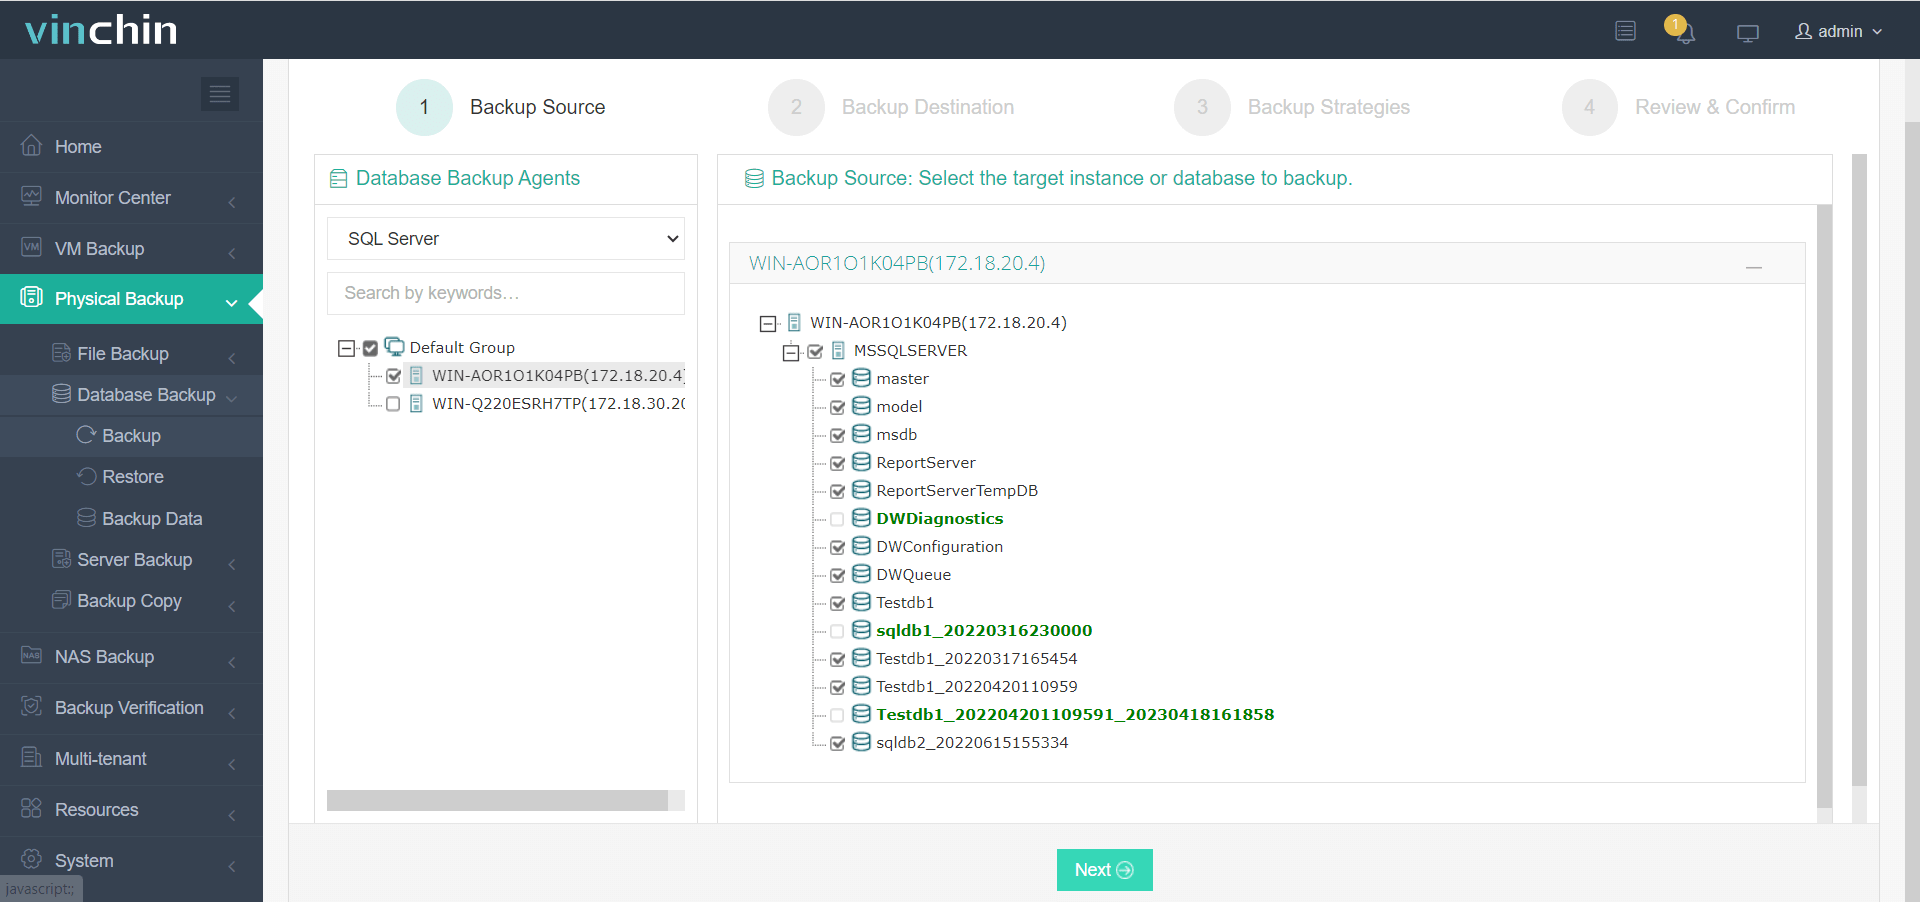
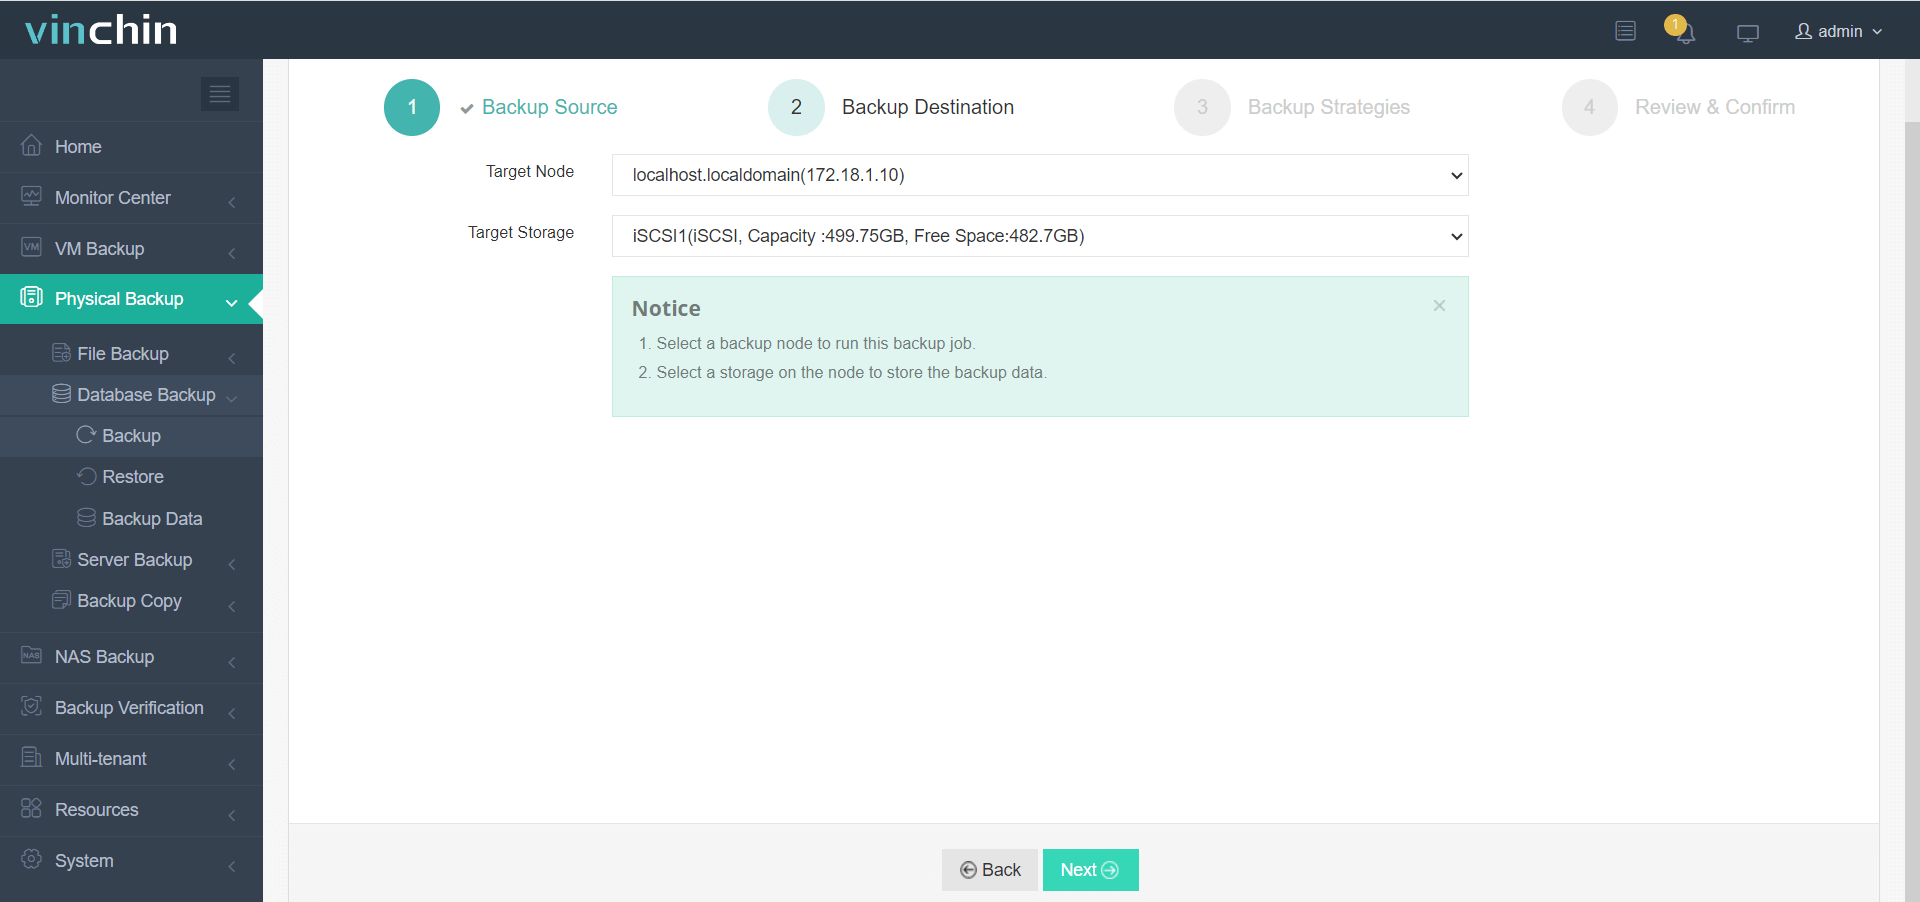
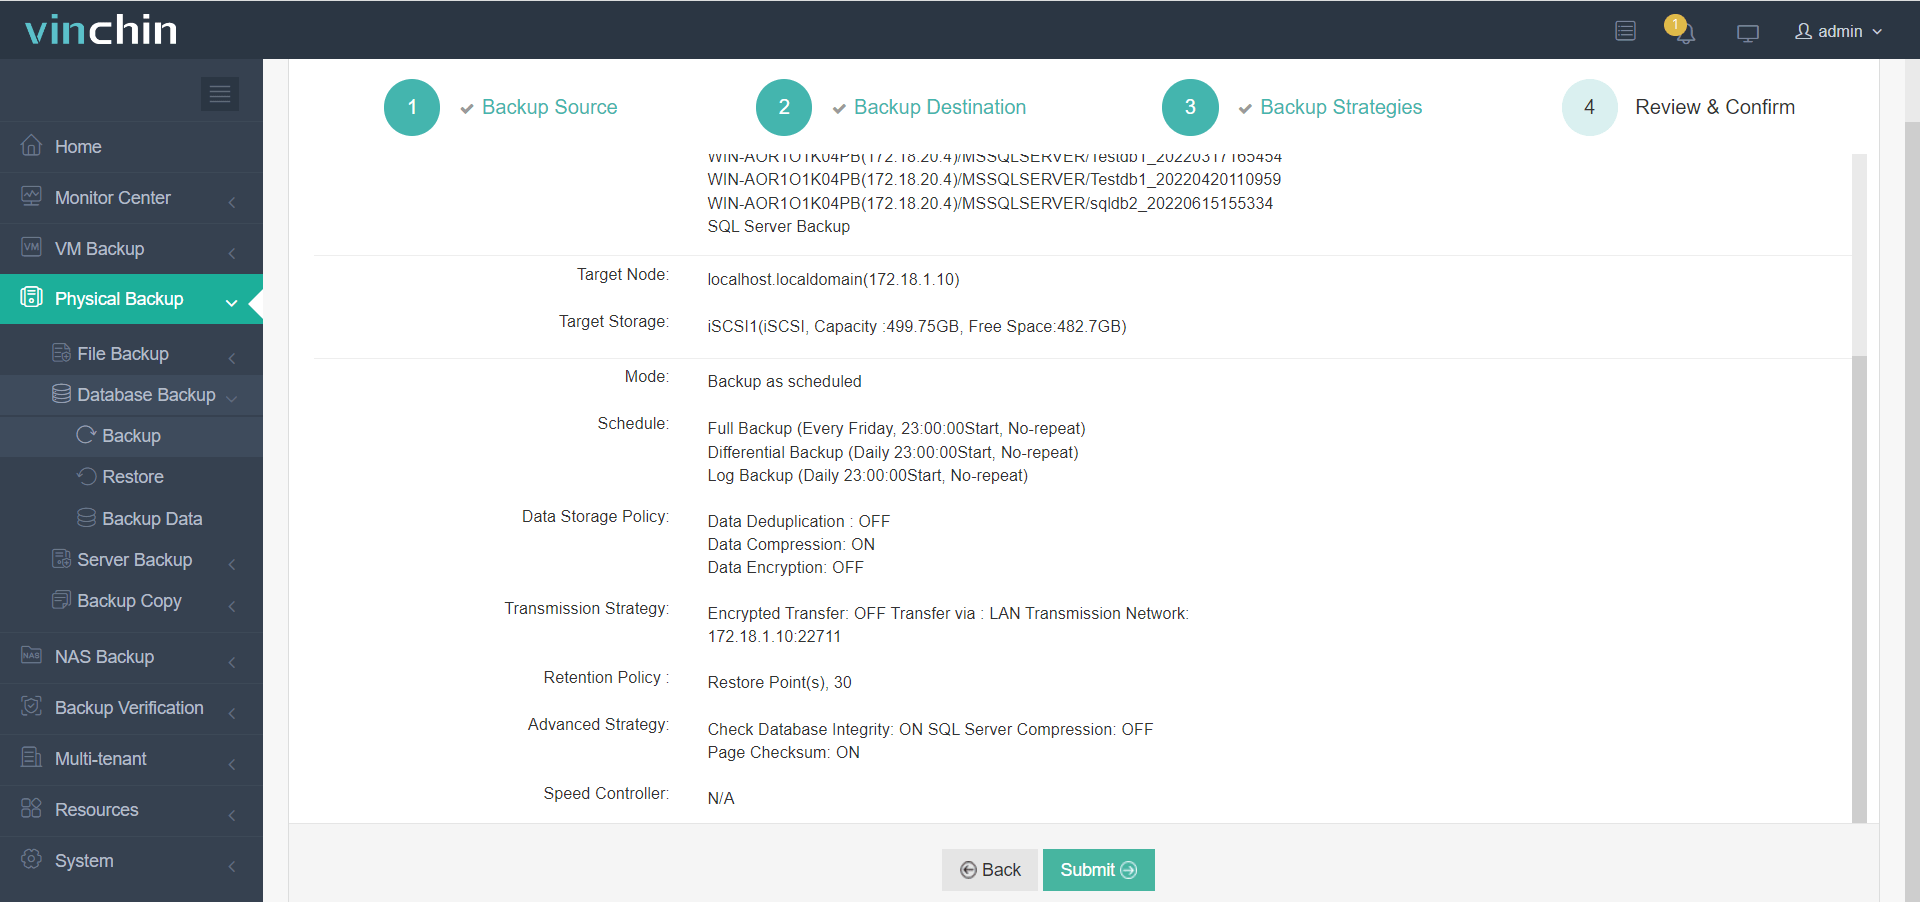
The intuitive web console makes protecting your SQL Server environment straightforward:
1. Select source SQL Server database(s),

2. Choose target storage location(s),

3. Configure backup strategies,

4. Submit the job.

Trusted worldwide with top ratings from thousands of customers across diverse industries—Vinchin Backup & Recovery offers a fully featured free trial valid for 60 days. Click below to experience leading enterprise-grade protection firsthand!
SQL Server Database Partitioning FAQs
Q1: Can I repartition my sales history table online without downtime?
A1: Yes—with Enterprise Edition—you can split or merge partitions online using ALTER PARTITION FUNCTION commands during off-hours for minimal disruption.
Q2: How do I monitor if my monthly reports benefit from “partition elimination”?
A2: Check execution plans after running filtered queries; look for operators labeled “Partition Elimination” indicating only relevant groups were scanned.
Q3: What happens if I drop an old filegroup used by past years’ archived sales?
A3: Dropping a filegroup removes both its structure and any contained historical records permanently—always back up before deleting!
Conclusion
SQL Server database partitioning gives administrators powerful tools for managing growth improving speed and simplifying upkeep—even as datasets reach massive scale. Choose between range list-style workarounds or hash methods based on workload needs—and remember Vinchin protects every byte no matter how complex your setup gets!
Share on:


