-
What Is a SQL Server Database Dump?
-
Why Perform a SQL Server Database Dump?
-
Method 1. Exporting with SQL Server Management Studio
-
Method 2. Using T-SQL Commands for Dumps
-
How to Restore from a SQL Server Database Dump?
-
Effortless Protection with Vinchin Backup & Recovery
-
SQL Server Database Dump FAQs
-
Conclusion
Backing up your SQL Server database is essential for any operations administrator. One reliable way to do this is by creating a SQL Server database dump. This process protects your data, supports migrations, and helps you recover from disasters. But what exactly is a database dump? How do you create one—and restore it when needed? Let’s walk through everything step by step.
What Is a SQL Server Database Dump?
A SQL Server database dump is a file that contains a copy of your database’s structure and data at a specific point in time. You can use this file to recreate the entire database elsewhere if needed. In practice, “dump” may refer either to a full backup file or to an export script containing all the necessary statements to rebuild tables, views, stored procedures, and insert data.
Why Perform a SQL Server Database Dump?
There are several reasons why regular dumps matter so much:
First, dumps provide reliable protection against hardware failure or accidental deletion—you always have something recent to restore from if disaster strikes.
Second, dumps make migrating databases between servers or environments much easier; you simply move the dump file instead of rebuilding everything from scratch.
Third, keeping periodic dumps supports auditing and compliance by giving you snapshots of your data at key points in time.
Finally, having recent dumps lets you test upgrades or changes safely before rolling them out live—no more risky experiments on production systems!
Method 1. Exporting with SQL Server Management Studio
Using SQL Server Management Studio (SSMS) offers the most user-friendly way to create a database dump—perfect for beginners or anyone who prefers working with graphical tools rather than command lines.
Start by opening SQL Server Management Studio and connecting to your server instance. In Object Explorer, locate your target database. Right-click its name; hover over Tasks; then select Generate Scripts from the menu that appears—this launches the scripting wizard.
Click Next until you reach Choose Objects. Here you decide whether to script out just certain tables—or everything at once (recommended for full dumps). Click Next again until you see Set Scripting Options; here’s where things get interesting! Click the Advanced button near the bottom right corner of this window.
In the list that appears under “General,” find Types of data to script, then choose Schema and Data from its dropdown menu—this ensures both structure AND contents are included in your output file (not just empty tables).
Now pick where you want SSMS to save this script: click into the field labeled File name, browse for your preferred folder location (make sure there’s enough free disk space), then confirm with OK.
Click through any remaining prompts (Next, then finally Finish) until SSMS generates your complete .sql script—a text-based snapshot of everything inside that database at this moment in time!
This approach works well for small-to-medium databases because scripts remain readable—and easy to edit if needed before importing elsewhere later on.
Method 2. Using T-SQL Commands for Dumps
If you want more control—or need automation—you’ll likely prefer T-SQL commands over graphical wizards. Advanced users often rely on direct commands when dealing with large production environments where speed matters most.
The main tool here is BACKUP DATABASE, which creates binary .bak files suitable for fast restores later:
1. Open SQL Server Management Studio; connect as usual.
2. Open a new query window.
3. Enter something like:
   BACKUP DATABASE YourDatabase
   TO DISK = 'D:\backups\YourDatabase.bak'
   WITH FORMAT,
        MEDIANAME = 'SQLServerBackups',
        NAME = 'Full Backup of YourDatabase',
        CHECKSUM;
Replace YourDatabase with yours—and adjust paths as needed (D:\backups\...). The WITH FORMAT option tells SQL Server it’s okay overwriting existing media sets—but use caution! If unsure whether old backups should be preserved alongside new ones instead of overwritten outright, consider omitting WITH FORMAT or using options like INIT/NOINIT.
Adding CHECKSUM helps verify integrity during both backup creation AND restoration—a smart safeguard against silent corruption.
You can also perform differential backups by adding WITH DIFFERENTIAL, capturing only changes since last full backup:
BACKUP DATABASE YourDatabase
TO DISK = 'D:\backups\YourDatabase_diff.bak'
WITH DIFFERENTIAL;
Automating Backups with SQL Server Agent and PowerShell
Manual work gets tedious fast! For recurring jobs—or hands-off overnight runs—you can schedule T-SQL commands using built-in automation tools:
With SSMS open: Expand server node > expand "SQL Server Agent" > right-click "Jobs" > select "New Job..."
Name your job ("Nightly Full Backup"), add steps specifying T-SQL scripts above.
Set schedules under "Schedules" tab (e.g., daily at midnight).
Save job; monitor results via "Job Activity Monitor".
Prefer scripting outside SSMS? Use PowerShell's Backup-SqlDatabase cmdlet:
Backup-SqlDatabase -ServerInstance "MyServer" -Database "YourDatabase" -BackupFile "D:\backups\YourDatabase.bak"
This approach fits well into broader Windows task automation strategies—and integrates easily with monitoring solutions too!
Automation reduces human error risk while ensuring regular protection—even when nobody remembers manually clicking buttons late at night!
How to Restore from a SQL Server Database Dump?
Restoring depends on how you created your original dump:
If it’s an export script (.sql), open it inside SSMS connected either locally OR remotely—as long as permissions allow—and execute all statements sequentially (F5 runs entire batch). This recreates tables/views/procedures plus inserts all saved records back into place just like before!
For binary .bak files produced via BACKUP DATABASE:
1. In SSMS Object Explorer: right-click top-level node labeled "Databases", choose "Restore Database".
2. Under "Source", select "Device:", click ellipsis button beside input box.
3. Add path pointing directly toward desired .bak.
4. Under "Destination", enter name for restored DB instance (can match original OR differ).
5. Check "Files" tab—in case default locations don’t fit current disk layout—and adjust paths accordingly.
6. Click "OK"; wait while engine processes restore operation behind scenes!
Alternatively—from query window:
RESTORE VERIFYONLY
FROM DISK = 'D:\backups\YourDatabase.bak';

RESTORE DATABASE NewDatabase
FROM DISK = 'D:\backups\YourDatabase.bak'
WITH MOVE 'YourDatabase_Data' TO 'D:\data\NewDatabase.mdf',
     MOVE 'YourDatabase_Log' TO 'D:\data\NewDatabase_log.ldf',
     REPLACE;
Always run RESTORE VERIFYONLY first—it checks integrity without actually restoring anything yet! Use logical names matching those found via:
RESTORE FILELISTONLY FROM DISK = 'D:\backups\YourDatabase.bak';
Add REPLACE ONLY IF overwriting existing DBs intentionally—otherwise omit it!
Restoring Across Servers or Handling Orphaned Users
Moving databases between servers sometimes leads to mismatched user accounts (“orphaned users”). After restoring onto new hardware:
Run
EXEC sp_change_users_login 'Auto_Fix', '<username>';
Replace <username> accordingly.
Also check compatibility level after migration:
ALTER DATABASE NewDatabase SET COMPATIBILITY_LEVEL = 150;
Adjust version number based on target environment.
Effortless Protection with Vinchin Backup & Recovery
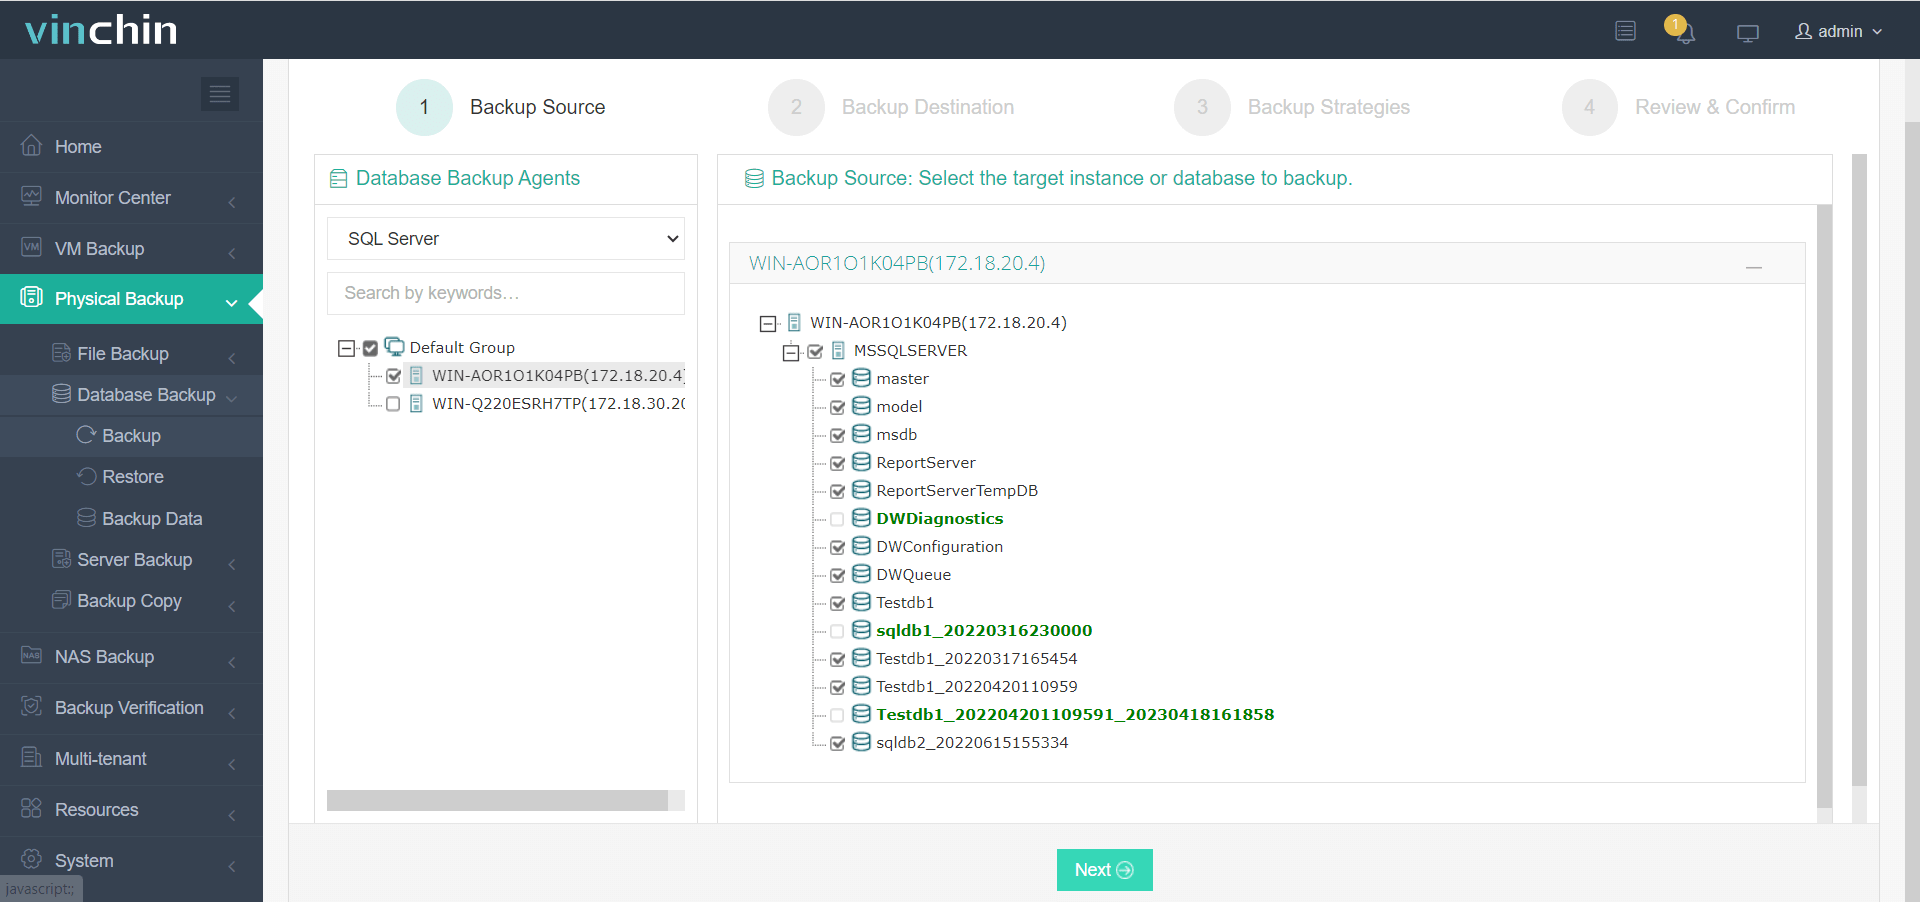
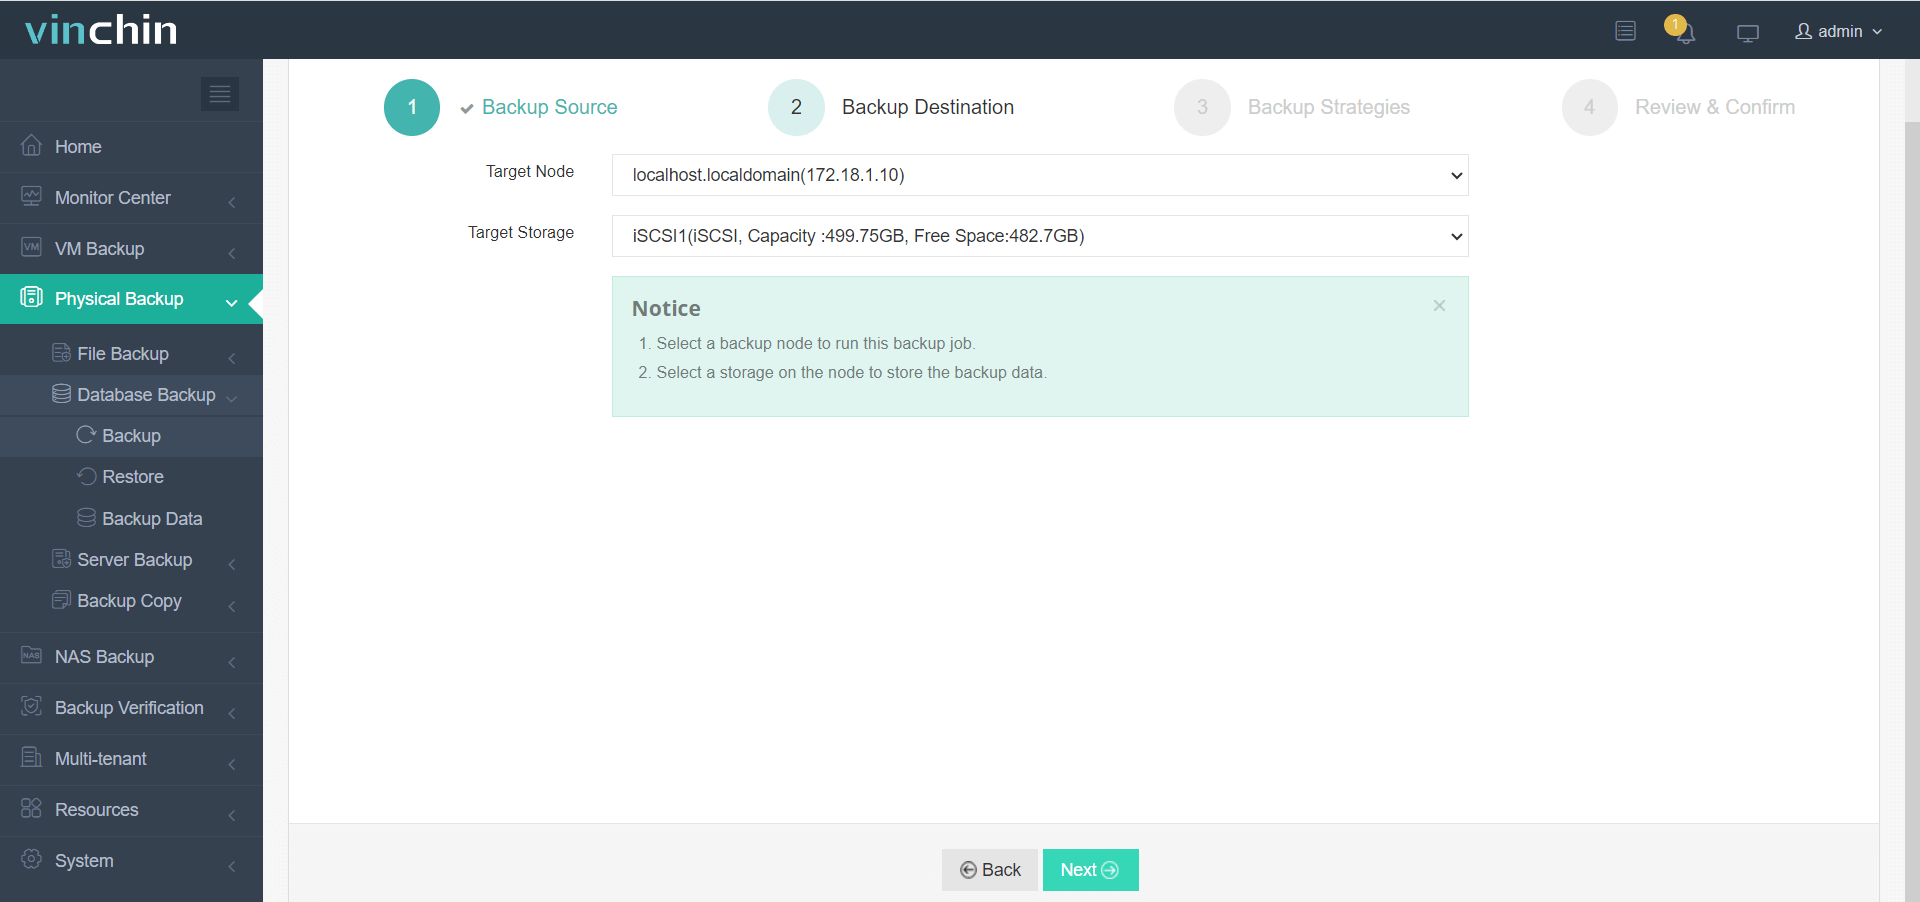
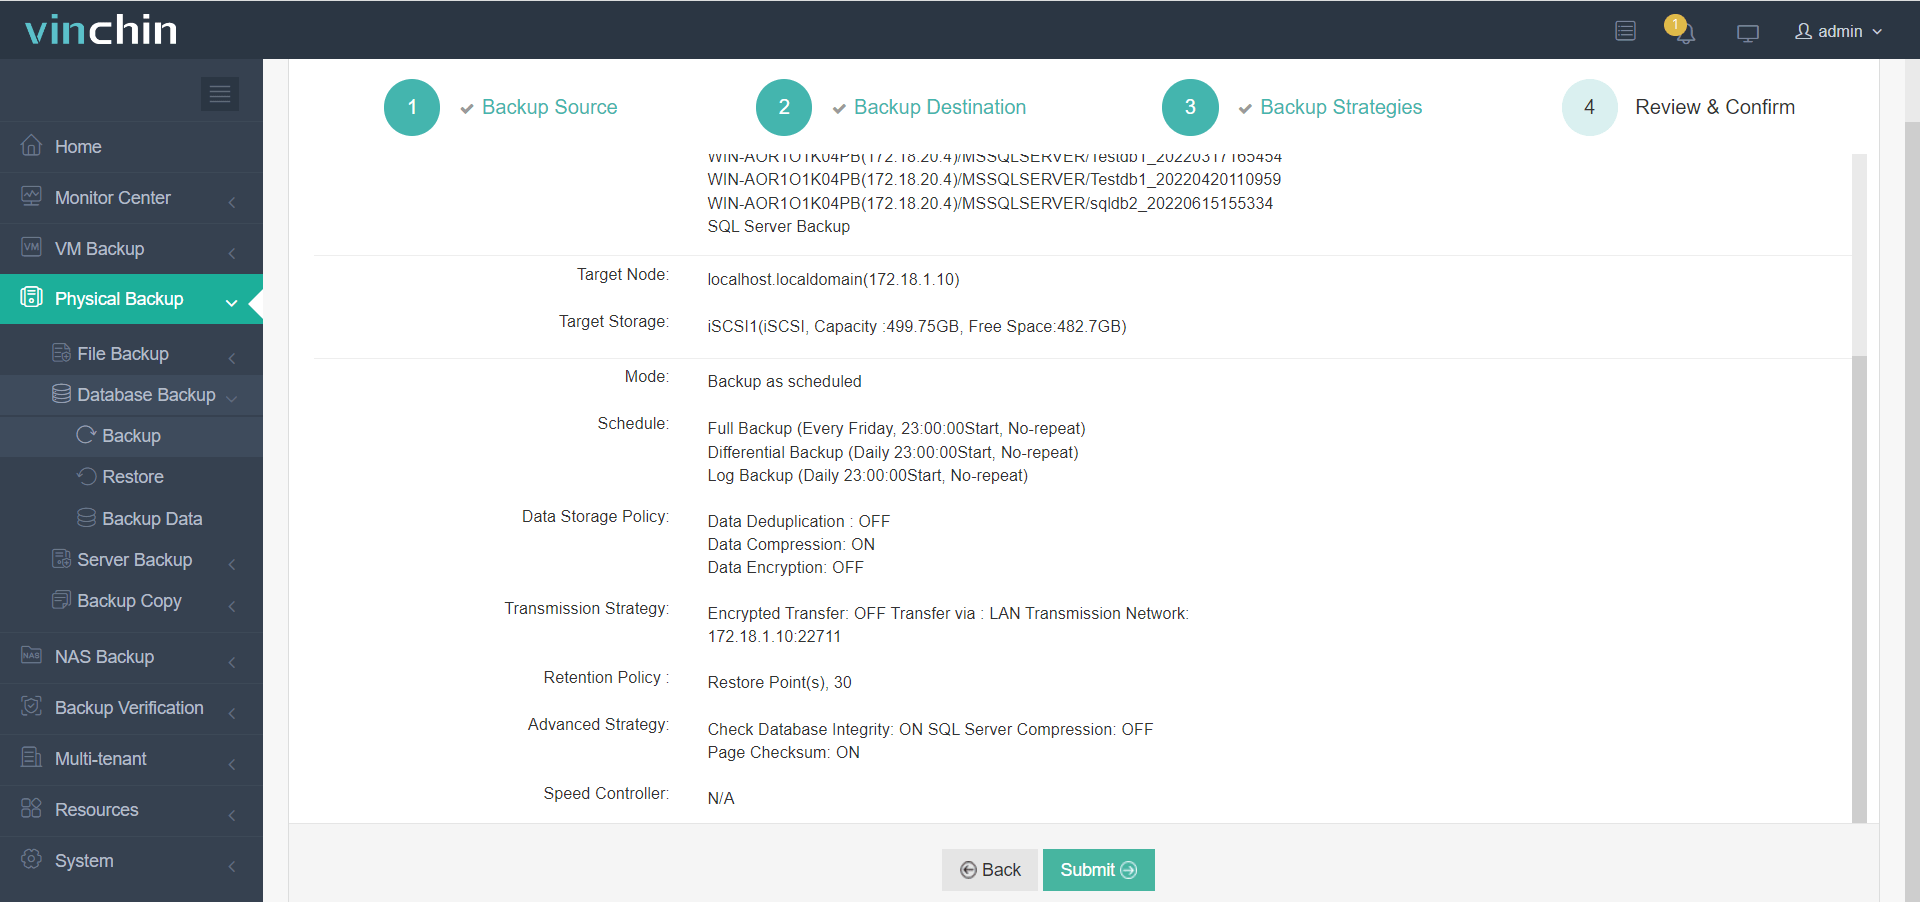
Beyond manual methods, organizations seeking robust enterprise-grade protection should consider Vinchin Backup & Recovery—a professional solution supporting today’s mainstream databases including SQL Server, Oracle, MySQL, MariaDB, PostgreSQL, PostgresPro, and MongoDB. For SQL Server environments specifically, Vinchin Backup & Recovery delivers advanced features such as source-side Compression, batch database backup capabilities, flexible retention policies including GFS retention policy support, ransomware protection measures, and seamless cloud/tape archiving integration—all designed for operational efficiency and comprehensive security across diverse workloads.
The intuitive web console makes safeguarding your environment straightforward:
Step 1—Select the Microsoft SQL Server instance you wish to back up;

Step 2—Choose the desired storage target;

Step 3—Define scheduling and retention strategies according to business requirements;

Step 4—Submit the job.

Join thousands worldwide who trust Vinchin Backup & Recovery for enterprise data protection—enjoy top-rated reliability backed by global recognition and strong customer satisfaction scores! Start now with their fully featured 60-day free trial by clicking below.
SQL Server Database Dump FAQs
Q1: Can I automate daily full backups without third-party software?
A1: Yes—use built-in tools like SQL Server Agent jobs or Windows Task Scheduler calling PowerShell scripts such as Backup-SqlDatabase cmdlet.
Q2: What should I do if my .bak file fails verification during RESTORE VERIFYONLY?
A2: Try restoring from another recent backup immediately; investigate disk health issues causing corruption before taking further action.
Q3: How do I migrate only selected tables—not whole DB—to another server?
A3: Use Generate Scripts wizard in SSMS selecting specific objects plus Schema & Data option; run resulting .sql script on destination system.
Conclusion
A regular SQL Server database dump keeps critical business data safe against loss or downtime risks—from accidental deletions through major disasters alike! Whether using graphical wizards or automated scripts makes sense depends entirely upon workload size plus team expertise—but best practices always pay off long-term security-wise! For effortless protection at scale consider Vinchin's automated solutions tailored specifically toward enterprise-grade reliability needs.
Share on:


