-
What Is an LXC Container?
-
What Is Proxmox Virtual Environment?
-
Why Use LXC Containers in Proxmox?
-
Method 1. Creating an LXC Container in Proxmox
-
Method 2. Managing LXC Containers on Proxmox
-
Backup Proxmox VMs with Vinchin Backup & Recovery
-
LXC Container Proxmox FAQs
-
Conclusion
Virtualization is essential in today’s IT landscape. If you want lightweight Linux environments without full virtual machine overhead, an LXC container proxmox setup offers a resource-efficient solution. But what are LXC containers? How do you use them with Proxmox? Let’s walk through everything you need to know—from beginner steps to advanced best practices.
What Is an LXC Container?
An LXC container is a system-level Linux container that runs a complete Linux distribution using the host’s kernel. Unlike virtual machines that emulate hardware and run their own kernels, LXC containers share the host’s kernel while isolating processes with namespaces and cgroups (Proxmox Wiki). This means near-native performance with minimal overhead—but only Linux operating systems are supported inside these containers.
What Is Proxmox Virtual Environment?
Proxmox Virtual Environment (Proxmox VE) is an open-source virtualization platform designed for managing both VMs and containers from a single web-based interface or command line. It uses KVM for virtual machines and integrates LXC as its container technology. With features like clustering, high availability, flexible storage options, built-in firewalling, and easy backups—all managed centrally—Proxmox VE makes deploying Linux workloads simple at any scale.
Why Use LXC Containers in Proxmox?
LXC containers in Proxmox offer several advantages over traditional VMs:
They’re lightweight—using fewer resources since there’s no hardware emulation.
Startup times are fast; you can launch many containers quickly on one host.
Ideal for microservices architectures or running multiple isolated applications side by side.
Tight integration means containers benefit from shared storage pools, networking bridges like vmbr0, firewalls, snapshots—and even live migration within clusters.
However, remember that all containers share the same host kernel. This means they’re best suited for trusted workloads because a vulnerability could potentially affect all running containers if exploited at the kernel level.
Method 1. Creating an LXC Container in Proxmox
Setting up your first lxc container proxmox environment is straightforward using either the web GUI or command line tools.
Before starting any deployment work on your production system: always make sure your node has internet access or pre-uploaded templates available locally!
Step 1: Download a Container Template
Templates provide ready-to-use root filesystems for popular distributions like Debian or Ubuntu. In the web interface:
Select your node
Click local (your node name) > CT Templates
Hit Templates to browse available images
Choose your preferred distro; click Download
The template appears once downloaded successfully.
Alternatively via CLI:
pveam download local debian-12-standard_12.0-1_amd64.tar.gz
Always verify template integrity using SHA256 checksums when possible—especially if uploading manually!
Step 2: Create the Container
Click Create CT at top right of the web UI to launch the wizard:
Under General, enter a unique CT ID (for example: 101), set a hostname like "webserver," then choose a strong root password.
On Template, pick your downloaded image file.
For Disks, set disk size (in GB) appropriate for your workload; most distros need at least 8GB minimum.
Assign CPU cores under CPU based on expected load.
Set RAM amount under Memory, plus optional swap space if desired.
Configure networking under Network; default bridge (vmbr0) uses DHCP unless you specify static IPs here—a good idea for production!
Leave DNS blank unless custom settings are required; otherwise defaults apply.
Review everything on Confirm page; check "Start after created" if you want immediate boot-up; then click Finish.
Step 3: Access Your New Container
Once created:
Select it from left panel > click Console
Log in as root using your chosen password—you now have shell access inside your running lxc container proxmox instance!
Prefer command-line creation?
pct create CTID local:vztmpl/debian-12-standard_12.0-1_amd64.tar.gz --rootfs local-lvm:8 --cores 2 --memory 2048 --net0 name=eth0,bridge=vmbr0
Replace CTID with your chosen numeric ID; adjust parameters as needed per workload requirements.
Method 2. Managing LXC Containers on Proxmox
Once deployed, managing lxc container proxmox instances involves routine tasks like starting/stopping services or adjusting resources—all easily handled via GUI or CLI tools.
Step 1: Starting and Stopping Containers
To control power state:
In GUI—select desired container > click either Start, Shutdown, or Stop
On CLI:
pct start CTID
pct stop CTID
Replace CTID with actual numeric ID assigned during creation.
Step 2: Adjusting Resource Allocation
Resource needs change over time! You can modify CPU cores/RAM/disk allocations anytime—even while running (some changes require reboot).
In GUI—select container > go to Resources
For memory adjustment via CLI:
pct set CTID -memory 2048
This sets RAM limit to 2048 MB (2GB). For dynamic memory ballooning add --balloon <value> as needed.
Step 3: Configuring Network Settings
Networking defines how your lxc container proxmox instance communicates externally or internally within clusters.
GUI method—go to selected container > open Network tab > edit interface details such as bridge assignment (vmbr0) or static IP addresses (recommended for servers).
CLI alternative:
pct set CTID -net0 name=eth0,bridge=vmbr0,ip=192.168.10.50/24,gw=192.168.10.1
Assign static IPs whenever possible to avoid DHCP conflicts in production environments.
Step 4: Managing Mount Points and Storage
You may want extra storage volumes attached—or bind-mount directories from host into specific paths inside containers—for data sharing between host/container apps.
GUI path—select Resources tab > Add > Mount Point; specify source/destination paths accordingly.
CLI example:
pct set CTID -mp0 /mnt/shareddata/mpdatafolder.mp,/sharedfolderinsidecontainer/
Note: Bind mounts allow direct access between host/container filesystems but may expose sensitive data if misused! See Best Practices below.
Step 5: Taking Snapshots and Backups
Snapshots capture current state instantly so you can roll back after risky upgrades/config changes; backups protect against disaster recovery scenarios by saving full copies externally!
GUI tabs labeled Snapshot/Backup handle these tasks interactively;
Or use CLI commands:
vzdump CTID --mode snapshot --storage backup-storage-name
Snapshot mode minimizes downtime by freezing filesystem briefly during backup process.
Step 6: Migrating Containers
If running clustered nodes—you can move live lxc container proxmox instances between hosts seamlessly!
GUI method—right-click target container > select Migrate… follow prompts;
CLI equivalent:
pct migrate CTID target-node-name
Container must be stopped before migration begins.
Backup Proxmox VMs with Vinchin Backup & Recovery
To further enhance data protection for lxc container proxmox environments, consider leveraging Vinchin Backup & Recovery—a professional enterprise-level VM backup solution supporting Proxmox VE alongside more than fifteen mainstream virtualization platforms including VMware, Hyper-V, oVirt, OLVM, RHV, XCP-ng, XenServer, OpenStack, ZStack and others. For Proxmox users specifically, Vinchin delivers robust features such as forever incremental backup for efficient storage usage; advanced deduplication/compression technologies that minimize backup size and network load; scheduled backups with granular restore capabilities ensuring flexible recovery options; V2V migration enabling seamless cross-platform moves; plus comprehensive data encryption safeguarding critical information throughout each operation—all designed to streamline management while maximizing reliability.
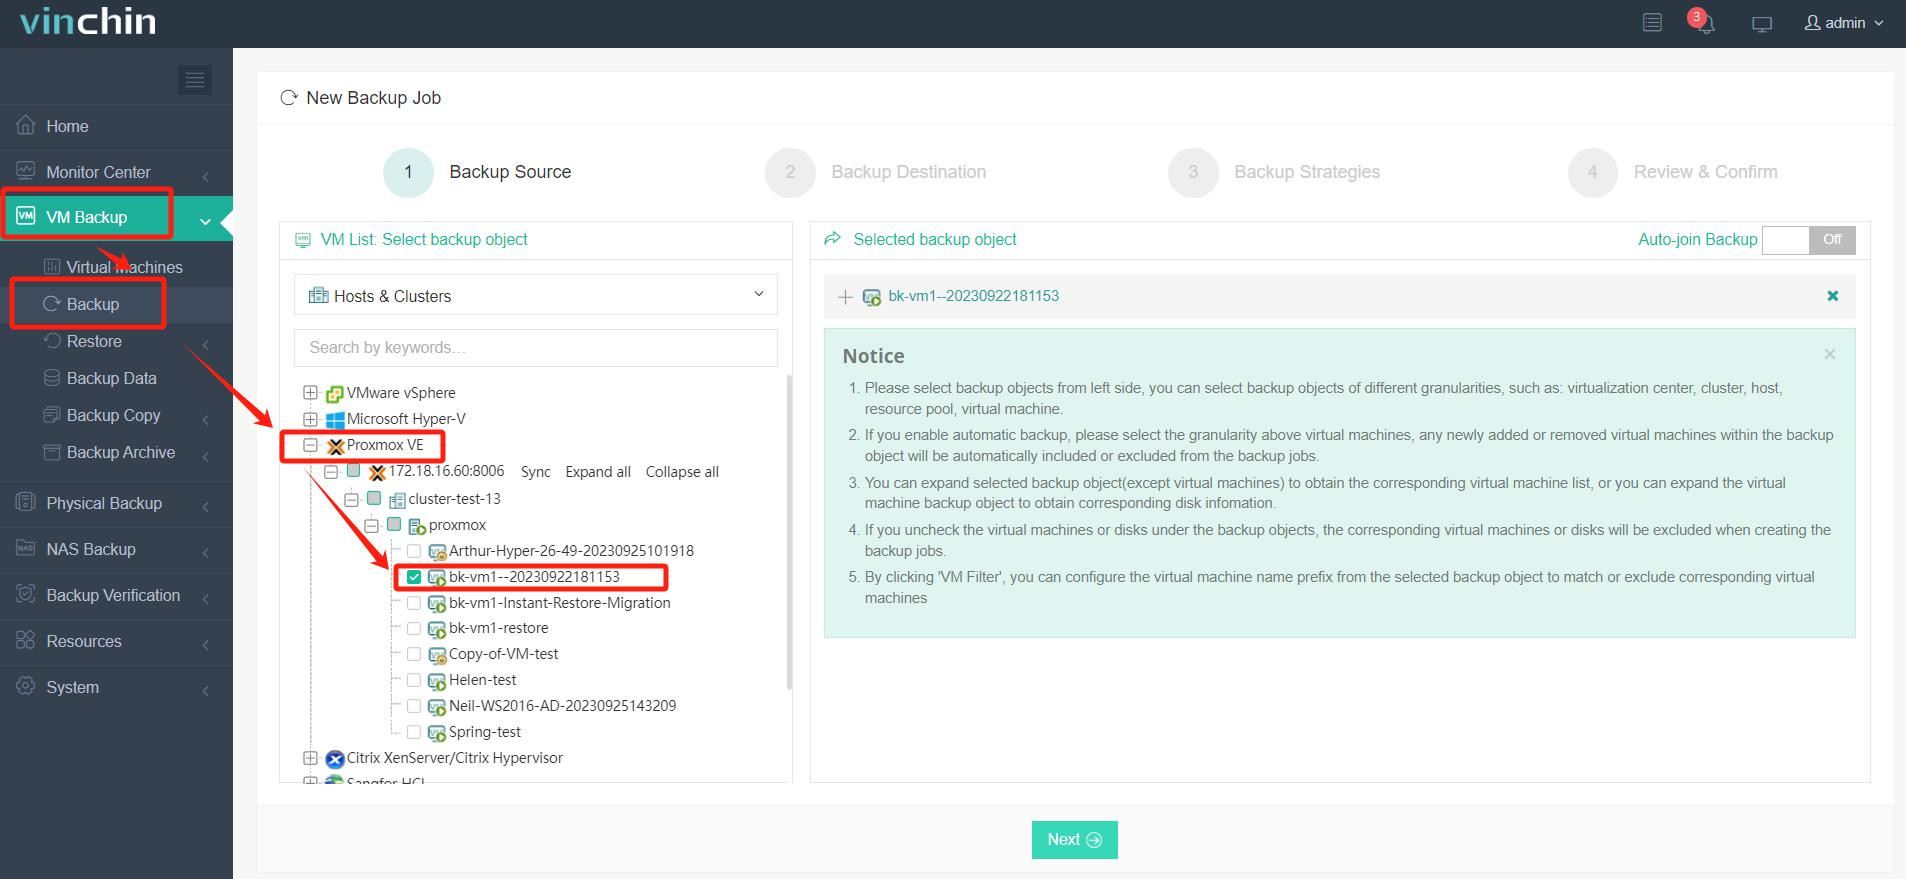
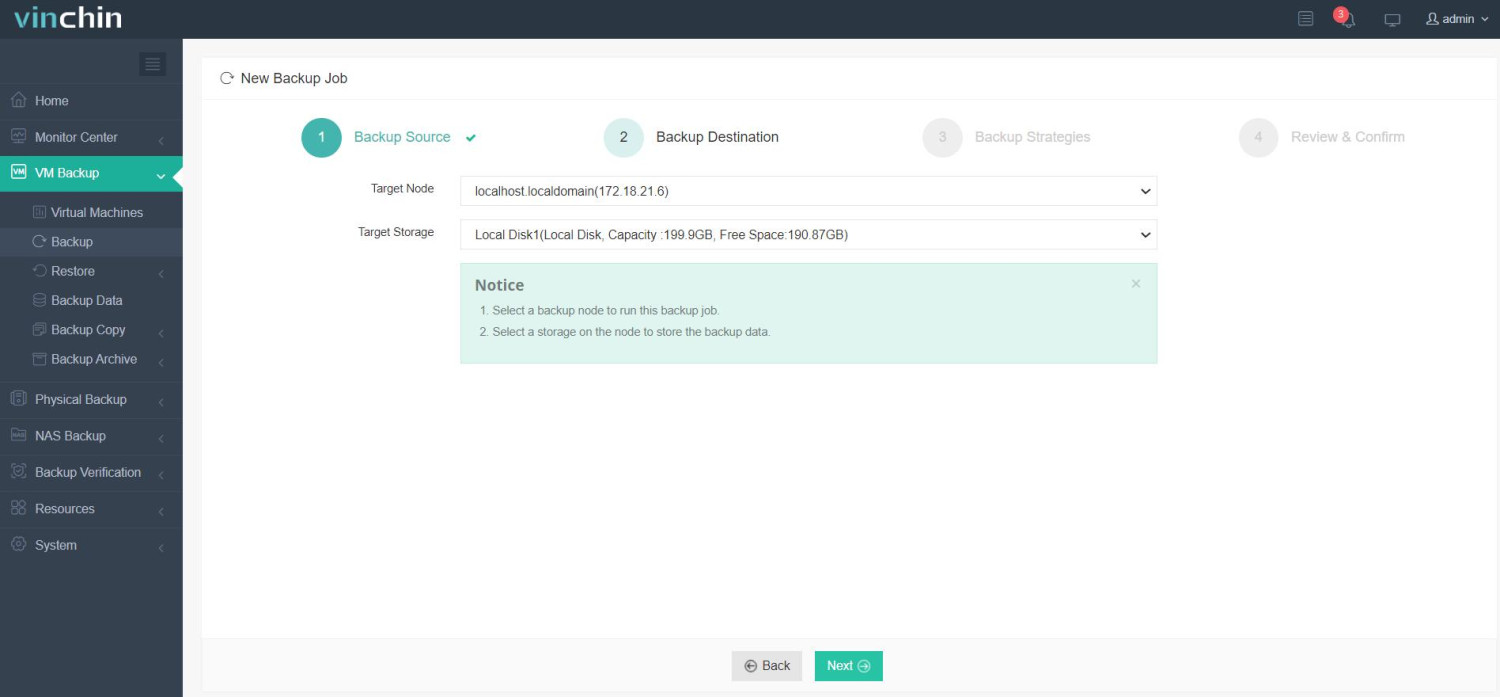
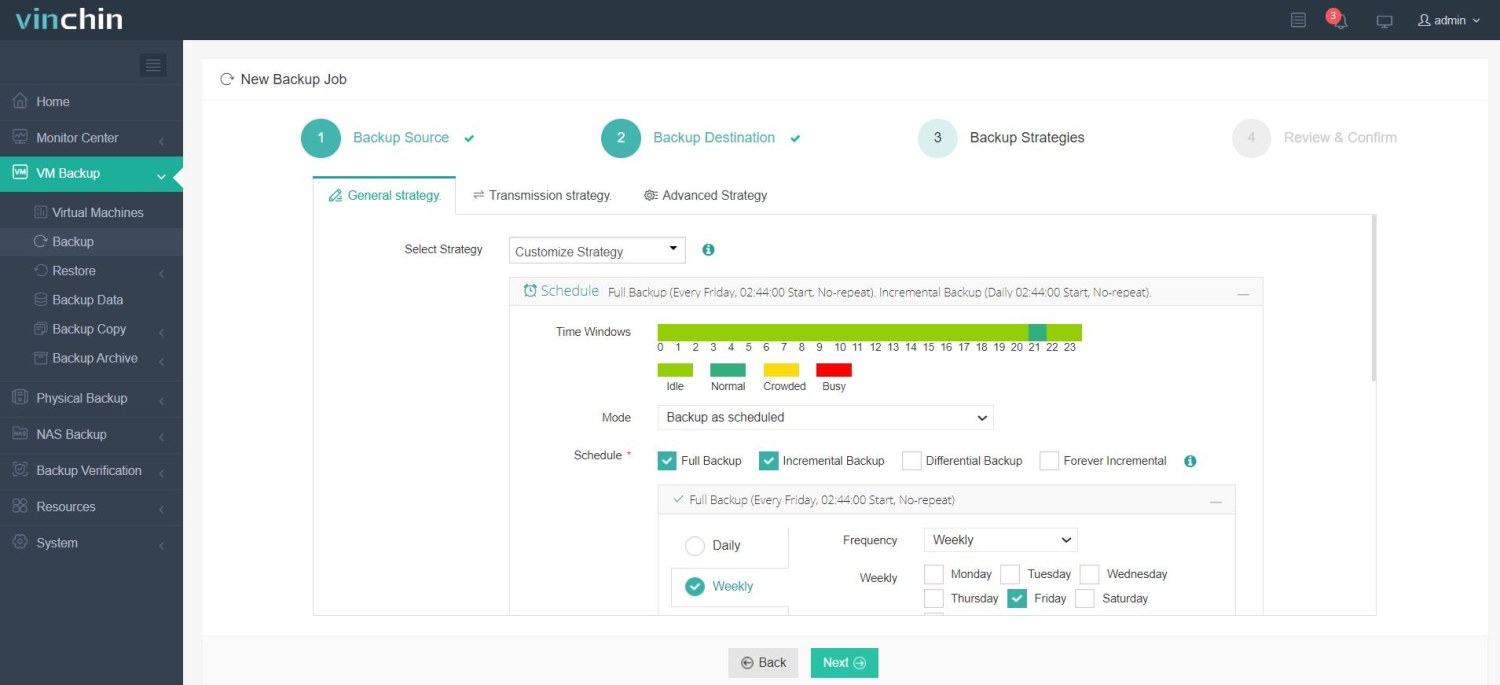
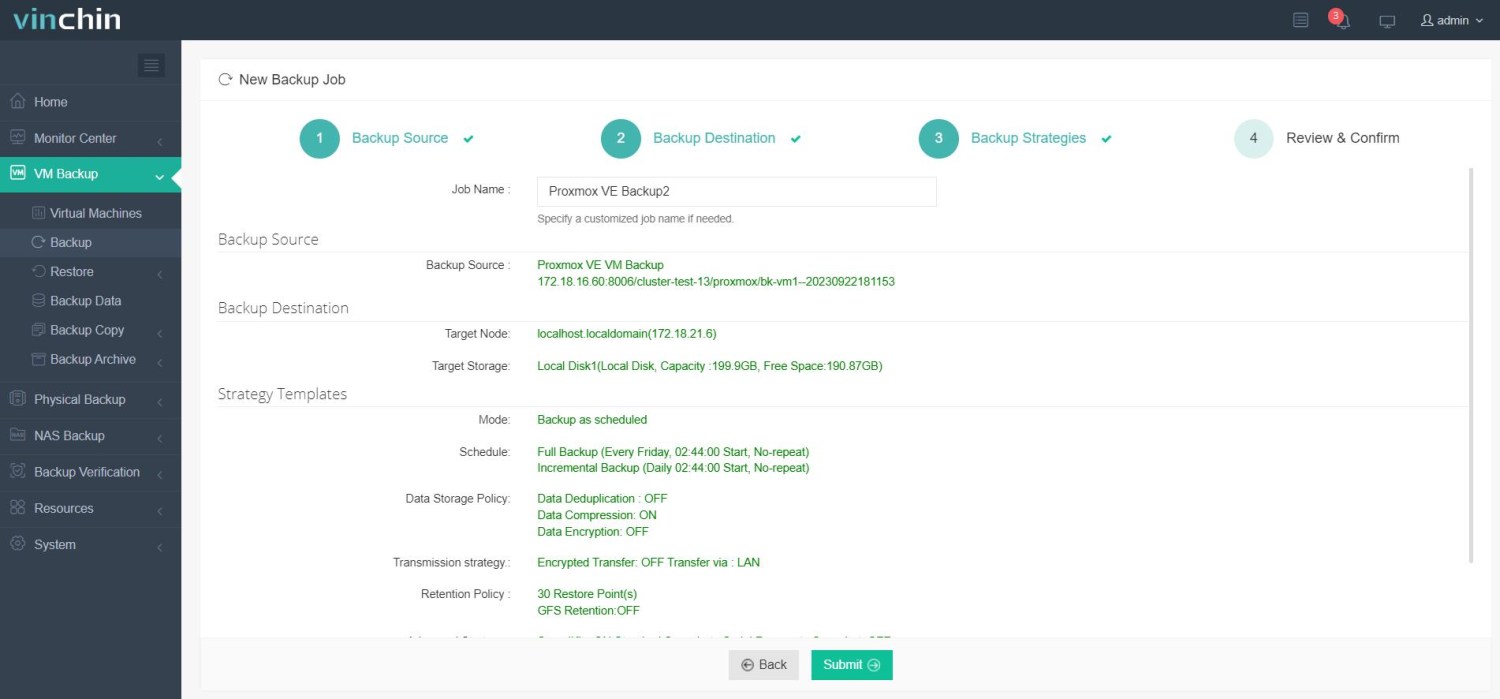
The intuitive Vinchin Backup & Recovery web console makes protecting your environment straightforward. To back up an LXC container on Proxmox VE:
✅ Step 1: Back Up the Proxmox VM

✅ Step 2: Restore to Target Platform (e.g., Azure or VMware)

✅ Step 3: Configure backup strategies;

✅ Step 4: Submit the job.

Thousands of organizations worldwide trust Vinchin Backup & Recovery for enterprise-grade data protection—try it yourself risk-free with a fully featured 60-day free trial by clicking below.
LXC Container Proxmox FAQs
Q1: Can I run Windows inside an LXC container on Proxmox?
No—you can only run Linux distributions since all containers share host's Linux kernel architecture limitations prevent Windows support here.
Q2: How do I expand disk size of existing lxc container proxmox instance?
In GUI select Resources tab click disk entry use Resize Disk button—or run pct resize CTID rootfs +10G via CLI replacing CTID appropriately.
Q3: What should I do if my lxc container won’t start after config change?
Check logs under Tasks panel look up /var/log/pve/tasks/INDEX; also run pct start CTID --debug (with stopped state) for detailed error output directly in terminal session.
Conclusion
LXC container proxmox setups deliver efficient Linux workload hosting with minimal overhead while offering robust management tools at every level With proper configuration proactive monitoring—and reliable backups powered by Vinchin—you gain peace of mind knowing both uptime/data safety are covered Try Vinchin today—it makes enterprise-grade protection simple
Share on:


