-
Understanding ESXi Downgrade
-
Preparation Before Downgrading ESXi
-
Method 1: Fresh Installation for Downgrade
-
Method 2: Recovery Image Rollback
-
How To Migrate Virtual Machines With Vinchin
-
Downgrade ESXi 7 To 6.7 FAQs
-
Conclusion
Downgrading ESXi from version 7 to 6.7 is sometimes necessary when hardware compatibility or licensing issues arise in your data center. While upgrading ESXi is usually straightforward, downgrading requires careful planning because VMware does not support direct rollbacks through its tools. In this guide, you’ll learn what an ESXi downgrade involves, why it may be needed, how to prepare safely, step-by-step downgrade methods, how to validate your environment afterward, common troubleshooting tips—and how to migrate virtual machines securely using Vinchin.
Understanding ESXi Downgrade
An ESXi downgrade means moving your VMware hypervisor from a newer release—like version 7—back to an older one such as 6.7. Unlike upgrades that preserve settings and data automatically, downgrades are not supported directly by VMware’s update tools or command line utilities. Instead, you must either perform a fresh installation of ESXi 6.7 or use a recovery image if available.
Why would anyone want to go backward? The most common reason is hardware compatibility: some servers or components only work reliably with ESXi 6.7 drivers or firmware versions certified for that release. Licensing can also force a downgrade if you lack valid keys for version 7 but have them for 6.7 instead. Sometimes bugs or performance regressions in ESXi 7 prompt administrators to return to the stable ground of version 6.7.
Whatever drives your decision—compatibility headaches or business needs—a successful downgrade restores stability but comes with risks if not done carefully.
Preparation Before Downgrading ESXi
Preparation is critical before starting any major change like an ESXi downgrade; skipping steps can lead to lost data or extended downtime.
First things first: back up all virtual machines (VMs) running on the host you plan to downgrade—and don’t forget configuration backups for networking and storage settings too! If possible, test restoring these backups so you know they work when needed most.
Next up: gather everything required for installation:
Download official ESXi 6.7 installation media from VMware.
Ensure you have valid ESXi 6.7 license keys ready.
If considering the recovery image method (see below), check whether your system still has a previous build stored—this only works if you upgraded directly from ESXi 6.7 without further changes.
Export host profiles if used; this makes reconfiguration easier later.
Document network settings (VLANs/NIC teaming), storage multipathing details (paths/LUN IDs), custom drivers/VIBs installed since these may need manual reinstallation.
Confirm that backup solutions like Vinchin are tested and functional before proceeding.
Consider disabling Secure Boot temporarily; some hardware security features in newer servers may block older hypervisors like ESXi 6.7.
Taking time now saves hours later—especially when every minute counts during maintenance windows!
Method 1: Fresh Installation for Downgrade
A fresh installation is often the most reliable way to downgrade from ESXi 7 to 6.7 when no recovery image exists—or when maximum control over disk layout is needed.
Begin by shutting down all VMs on the target host; migrate them elsewhere if possible using vMotion or backup/restore tools like Vinchin (see below). Disconnect shared storage volumes so accidental formatting doesn’t wipe important data outside this server.
Insert your ESXi 6.7 installation media into the server’s DVD drive or mount it via remote management tools such as iLO/iDRAC/IPMI KVM consoles found on enterprise hardware.
Boot from media; at prompts select Install ESXi 6.7, then accept the VMware EULA displayed onscreen.
When asked where to install:
Choose your intended boot disk carefully!
If prompted about existing datastores detected on local disks (usually labeled VMFS), select options allowing you to preserve existing datastore contents—but note this only keeps VM files themselves; all host-level configurations will be erased.
Complete setup by setting a root password as requested.
Allow reboot once finished installing core files onto disk.
After rebooting into fresh ESXi:
1. Reconnect shared storage LUNs previously detached
2. Manually re-register VMs found within preserved datastores
3. Restore network/storage configuration based on earlier documentation
4. Reinstall any custom drivers/VIBs compatible with version 6.7
Remember: while preserving datastores protects VM files themselves (.vmx/.vmdk), all other settings—including networking rules—must be rebuilt manually unless restored via exported host profiles!
This approach aligns with recommendations from both Broadcom and community experts whenever direct rollback isn’t feasible.
Method 2: Recovery Image Rollback
Some upgrades create a special “recovery partition” containing your previous hypervisor build—allowing quick rollback if something goes wrong after updating from ESXi 6.7 straight up to version 7 without further updates since then.
To check whether this option exists:
1. SSH into current host as root user
2 Run ls -la /altbootbank —if files appear here referencing “esx” builds dated prior upgrade day,
you likely have rollback capability!
Ready? Here’s how:
1 Reboot physical server hosting affected hypervisor
2 As soon as progress bar appears during POST phase,
repeatedly press Shift+R
3 If prompted “Current hypervisor will be replaced with previous build,” press Y then hit Enter key
4 Wait while system loads old kernel/modules back into place;
once complete verify login screen shows correct build number (“ESXI Release Build xxxxxxx”)
Note: This trick fails if multiple upgrades occurred since original jump—or if disk layout was changed wiping out /altbootbank contents! In those cases revert instead via full reinstall described above.
Always double-check which VMs/configurations survived rollback before resuming production workloads!
How To Migrate Virtual Machines With Vinchin
For organizations seeking efficient migration of virtual machines during infrastructure changes such as an ESXi downgrade, leveraging an enterprise-grade solution ensures minimal disruption and operational continuity. Vinchin Backup & Recovery stands out as a professional platform offering agentless VM migration alongside robust backup capabilities, enabling seamless transitions between virtual environments while reducing impact on production systems.
Vinchin Backup & Recovery supports a broad spectrum of virtualization platforms including VMware vSphere/ESXi, Hyper-V, Proxmox VE, oVirt, Oracle Linux Virtualization Manager (OLVM), Red Hat Virtualization (RHV), XCP-ng, Citrix XenServer, and OpenStack among others. The migration process with Vinchin Backup & Recovery is extremely straightforward: simply back up the source VM and restore it onto the target host—all managed through an intuitive web console designed for ease of use even in complex environments.
General steps for migrating a virtual machine from VMware to Proxmo using Vinchin Backup & Recovery:
Step 1. Select Restore Point

In the list, you can see all the available restore points. Just select the VMware restore point you want to restore, and click Next.
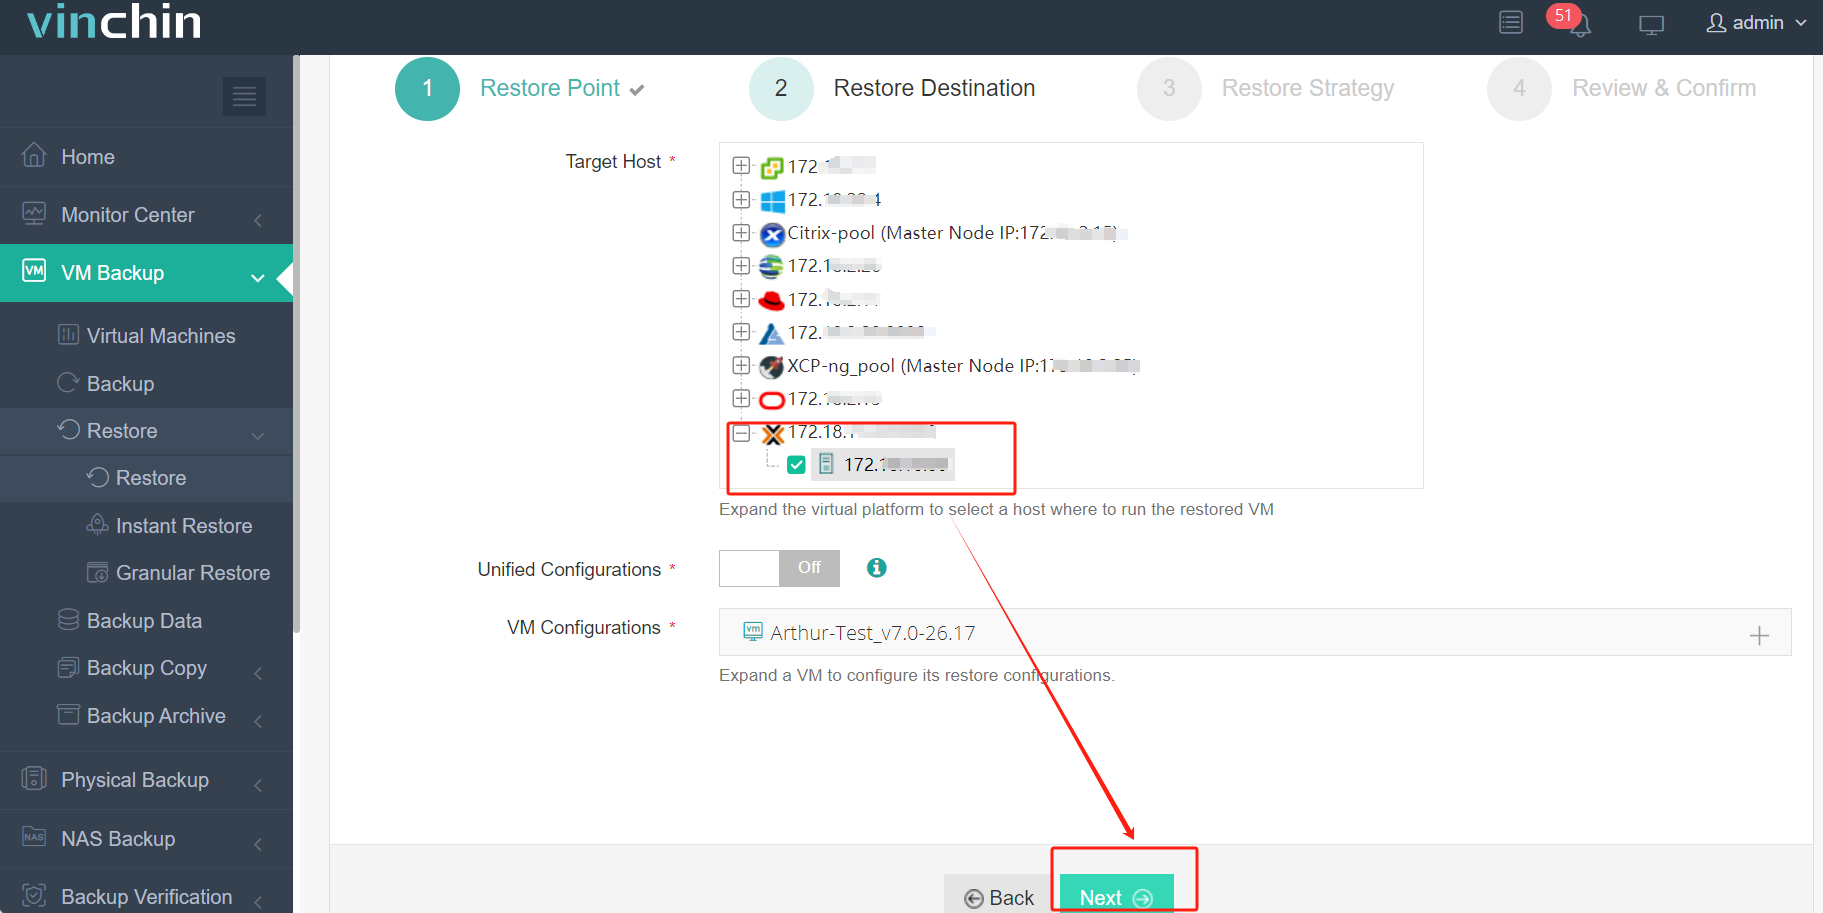
Step 2. Select Restore Destination
Select a Target Host where to run the restored VM. Here, you can simply configure the restored VM.

Here select the specific Proxmox host and you can simply configure the new VM here, such as VM name, CPU, Memory, Virtual disk and Virtual Network. After configuration, click Next.
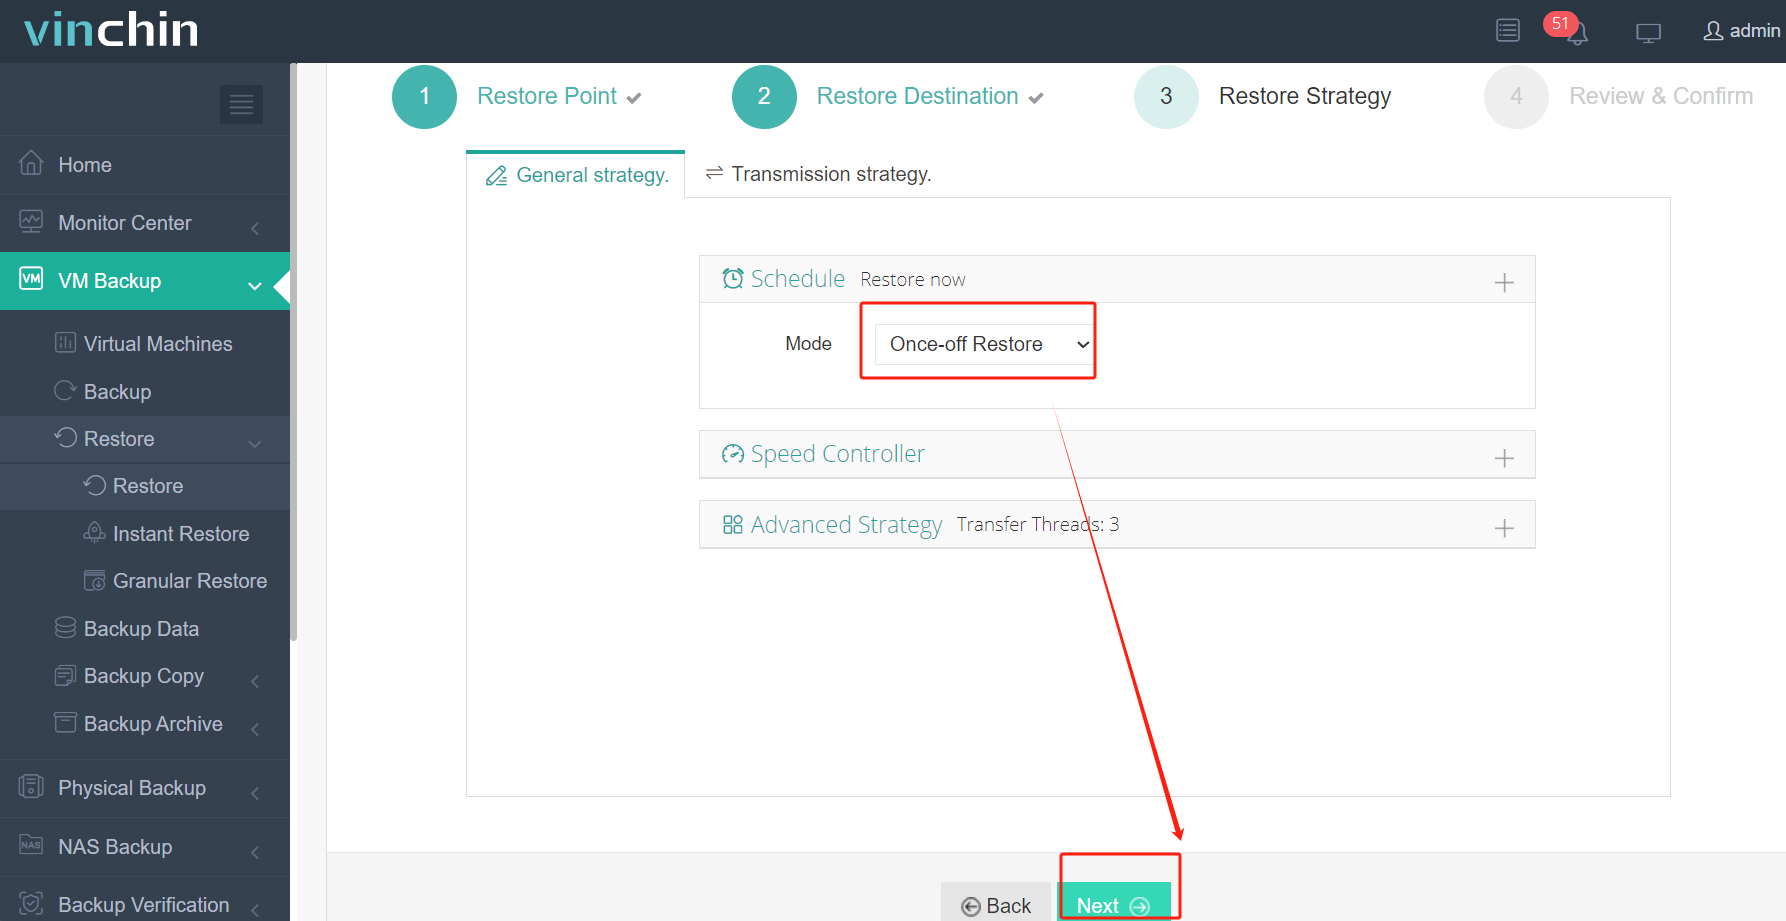
Step 3. Select Restore Strategies
In Schedule, you can choose Restore as Scheduled or Once-off Restore. Restore as scheduled will automatically restore the VMs at a specific time, and Once-off Restore will restore the VMs only once.

After configuring all recovery policies, click Next.
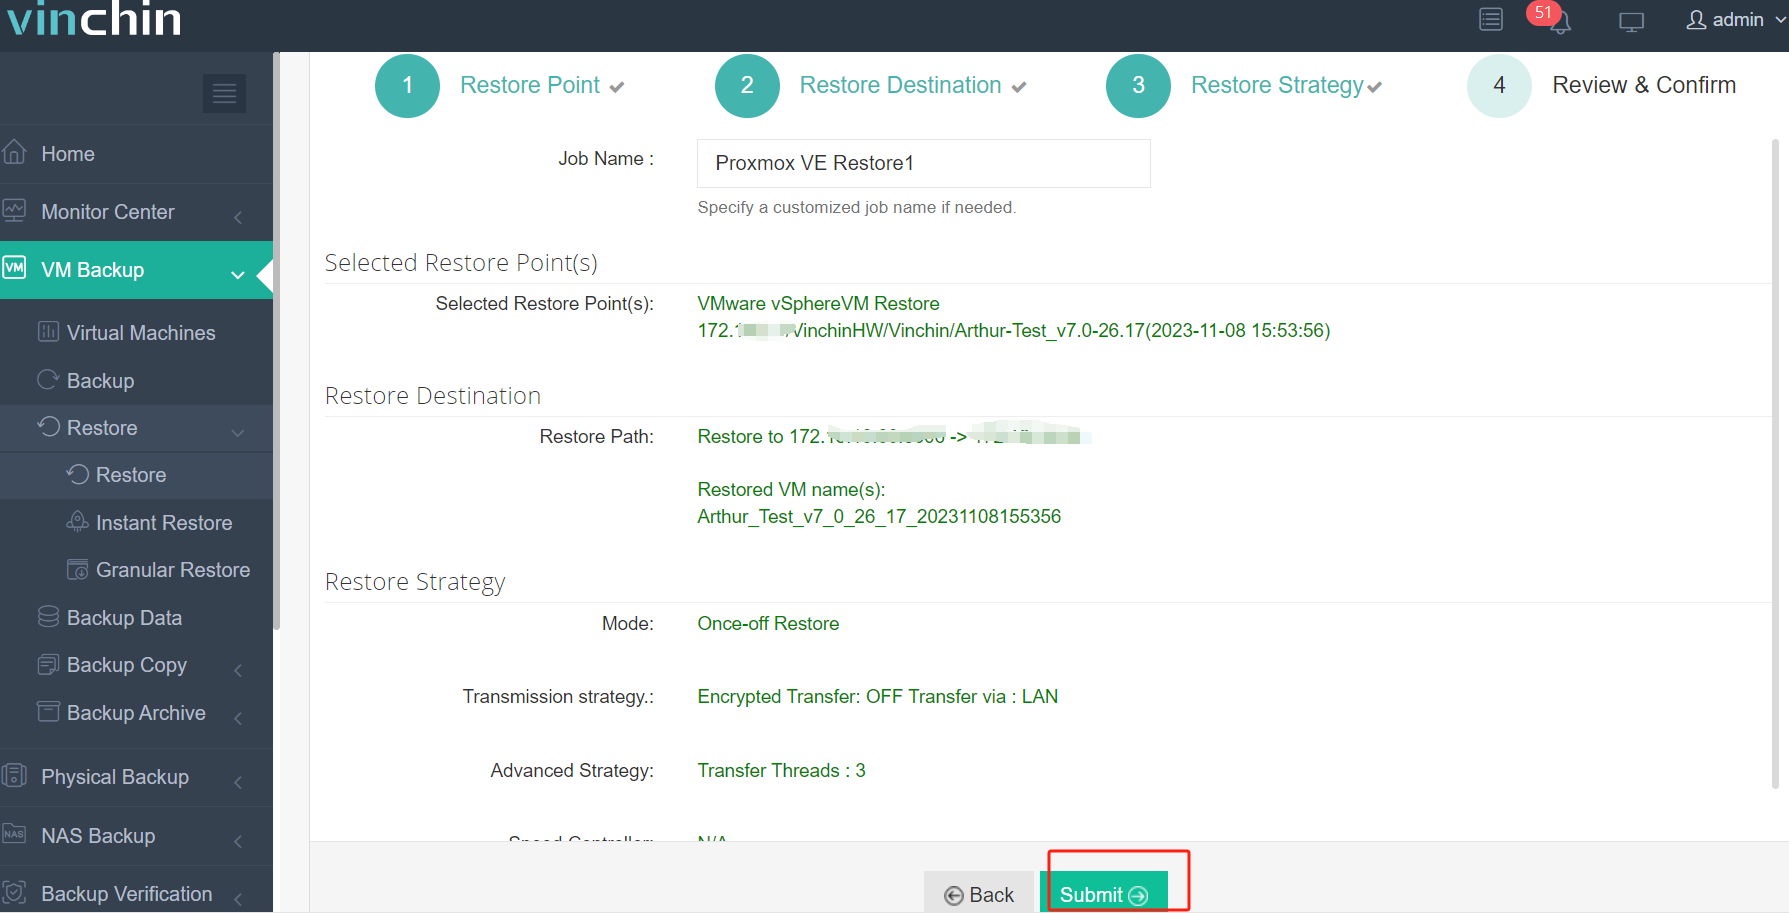
Step 4. Review and submit the job
Once the job is created, you'll be redirected to the job list page and the restore job will run now.

With thousands of global customers and consistently high product ratings, Vinchin Backup & Recovery offers peace of mind throughout critical migrations and daily operations alike—try it free for sixty days with full features enabled by downloading the installer today for rapid deployment in your environment.
Downgrade ESXi 7 To 6.7 FAQs
Q1: Can I keep my existing datastore intact while downgrading?
Yes—if performing fresh install choose option labeled “preserve datastore” during setup but always verify backups exist beforehand just in case something goes wrong unexpectedly later on!
Q2: What happens if my server uses Secure Boot?
Disable Secure Boot temporarily before installing older hypervisors like vSphere 6.x series otherwise installer may halt due unsupported firmware signatures/hardware modules present newer platforms only…
Q3: How do I manually register orphaned virtual machines after reinstall?
Open Host Client click “Register Existing VM,” browse datastore locate .vmx file click NEXT follow prompts until completed successfully.
Conclusion
Downgrading ESXi from version 7 down legacy release such as vSphere 6.x requires careful prep validated backups plus clear understanding available rollback paths unique each environment involved… Always safeguard production workloads first—and consider leveraging Vinchin solutions streamline migrations protect critical assets every step along journey!
Share on:


