User Case
"I need to migrate dozens of VMs from one Proxmox host to another, but doing it one by one is time-consuming and disruptive. Is there an efficient way to perform a bulk migration while minimizing downtime?"
As Proxmox environments grow, administrators often need to migrate multiple VMs when upgrading hardware, balancing workloads, or moving to a new cluster. However, manual migration can be inefficient and difficult to manage at scale. In this article, we'll explore four practical methods for performing Proxmox bulk migration and help you choose the best approach for your environment.
What Is Proxmox Bulk Migrate?
Proxmox bulk migrate refers to moving multiple virtual machines (VMs) or containers simultaneously from one Proxmox host, storage, or cluster node to another, rather than migrating them individually.
Method 1: Bulk Migrate VMs with Proxmox Cluster
If your source and target hosts belong to the same Proxmox cluster, you can use Proxmox's built-in migration feature to move virtual machines between nodes. While Proxmox does not provide a dedicated "bulk migrate" button, administrators can efficiently migrate multiple VMs using built-in commands and automation scripts.
Step1. Verify Cluster Status
First, confirm that both nodes are online and belong to the same cluster.
pvecm status
Example output:
Cluster information
-------------------
Name:             pve-cluster
Config Version:   3

Node list:
Nodeid      Votes Name
1           1     pve-node1
2           1     pve-node2
Step2. Check Available Resources on the Target Node
Before migration, ensure the destination node has enough CPU, memory, and storage resources.
Step3. Review Existing VMs
List all VMs on the source node:
qm list
Example:
VMID NAME       STATUS
100  WebServer  running
101  Database   running
102  MailServer running
Step4. Migrate a Single VM
Test the migration process with one VM before moving multiple workloads.
qm migrate 100 pve-node2
Step5. Bulk Migrate Multiple VMs
Once the test migration succeeds, create a simple loop to migrate multiple VMs automatically.
for vmid in 100 101 102 103 104
do
    qm migrate $vmid pve-node2 --online
done
To migrate all VMs on the source node:
for vmid in $(qm list | awk 'NR>1 {print $1}')
do
    qm migrate $vmid pve-node2 --online
done
Step6. Verify Migration Results
After migration, check whether the VMs are running on the destination node. You can also verify cluster resources and VM locations through the Proxmox web interface.
Method 2: Bulk Migrate VMs Using qm Commands
If your Proxmox environment is not using a fully automated tool, you can still migrate VMs in batches efficiently using qm commands. The qm migrate command allows you to move virtual machines between nodes, and when combined with simple shell scripting, it becomes a practical way to migrate multiple VMs in Proxmox clusters.
Step 1. Migrate a Single VM Using QM
Before performing bulk migration, test with one VM to ensure everything works correctly:
qm migrate 100 pve-node2 --online
Step2. Bulk Migrate Multiple VMs (Manual List)
You can specify a list of VM IDs and migrate them one by one using a loop:
for vmid in 100 101 102 103 104
do
    qm migrate $vmid pve-node2 --online
done
Step3. Bulk Migrate All VMs from a Node
If you want to migrate all VMs running on the current node, you can dynamically retrieve VM IDs:
for vmid in $(qm list | awk 'NR>1 {print $1}')
do
    qm migrate $vmid pve-node2 --online
done
Step4. Monitor Migration Progress
You can track migration status in real time using:
Make sure all VMs have successfully started on the target node after migration.
Method 3: Bulk Migrate VMs via Proxmox Backup & Restore
Bulk migration via backup and restore is a widely used approach in Proxmox, especially when live migration is not possible. This method works by creating backups of multiple VMs on the source environment and then restoring them on the target node. Let’s break down the manual approach first, which is suitable for small enterprises.
Step 1: Create Backups for Multiple VMs
You can create backups using the vzdump command. To perform bulk backups for multiple VMs:
for vmid in 100 101 102 103 104
do
    vzdump $vmid --mode stop --compress zstd --storage backup-storage
done
Step 2. Move Backup Files (if needed)
If the backup storage is not shared between nodes, you need to transfer the backup files manually. Optionally, you can use rsync for a more efficient transfer:
scp /backup/dump/*.vma.zst root@target-node:/backup/
Step 3: Restore VMs on Target Node
After the backup files are available on the destination node, restore them using qmrestore:
for file in /backup/*.vma.zst
do
    vmid=$(echo $file | grep -o '[0-9]\+')
    qmrestore $file $vmid
done
Method 4: Simplify Migration with Vinchin Backup & Recovery
While manual backup and restore works well for small environments, it becomes time-consuming and complex when migrating a large number of VMs. In enterprise scenarios, a dedicated solution like Vinchin Backup & Recovery can greatly simplify the process by providing a centralized and automated approach to bulk VM migration.
To migrate multiple Proxmox VMs in Vinchin, just follow:
Bulk Back up VMs:
1. Go to VM Backup > Backup and select multiple Proxmox VMs from the list to create a single task.
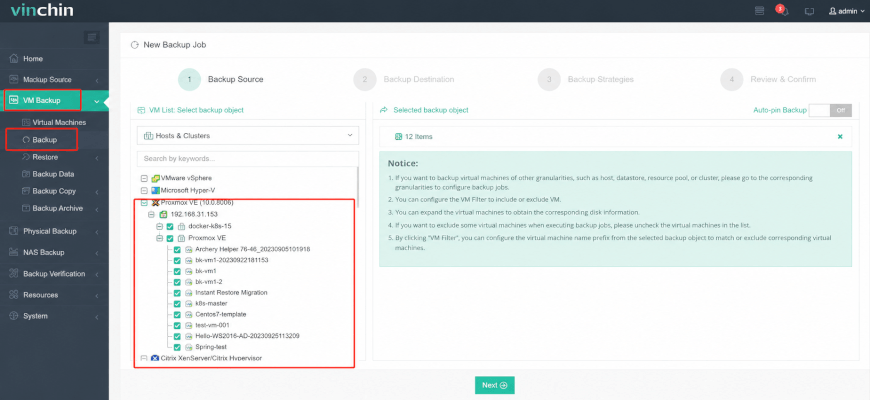
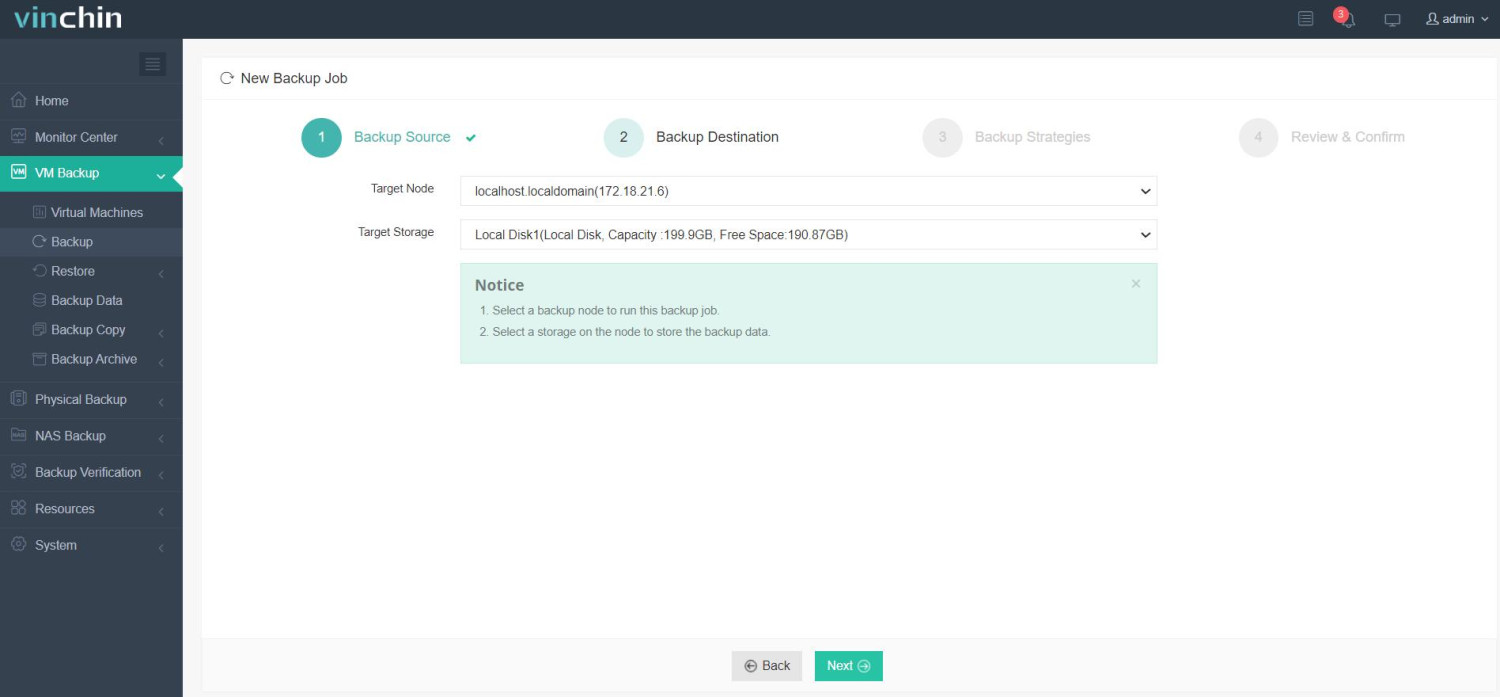
2. Then choose the target storage device and node to unify the backup storage path.
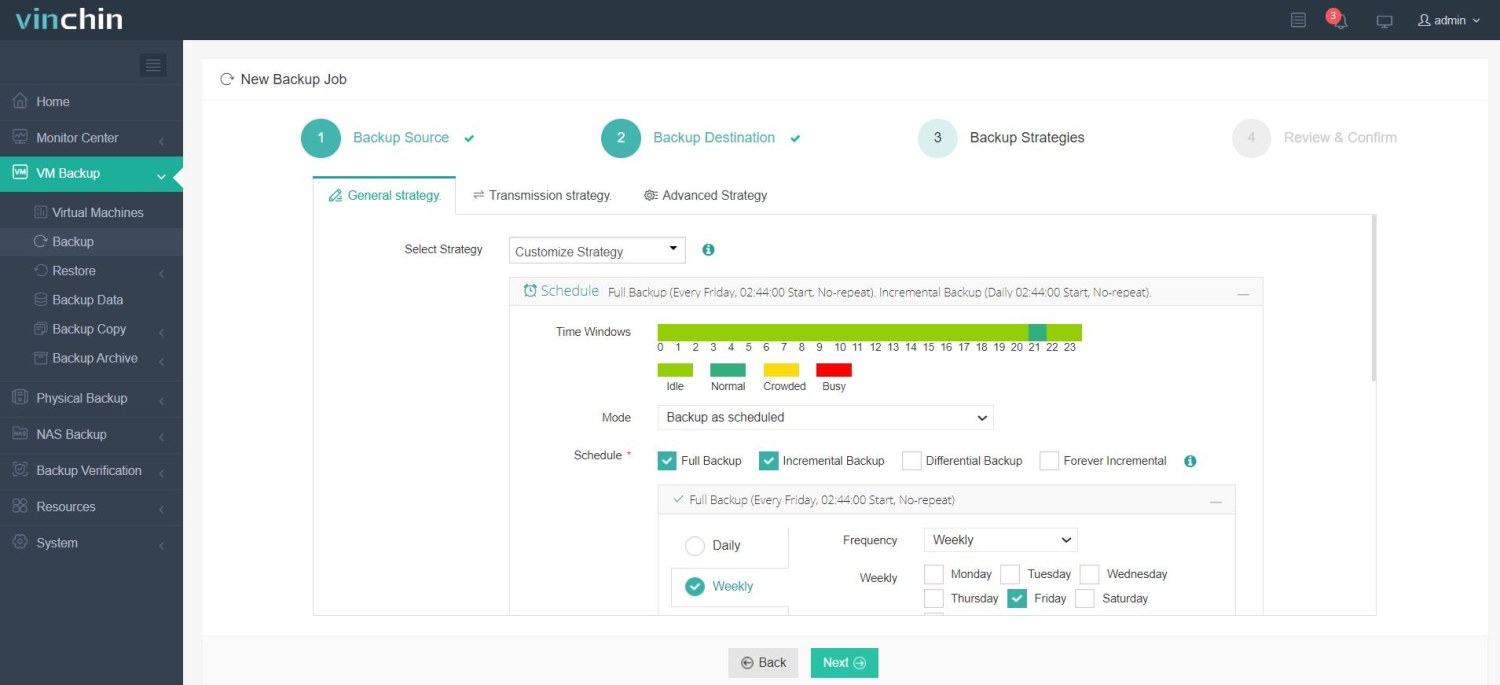
3. Configure backup strategies by customizing backup plans, time windows, schedules, throttling policies, and other related settings.
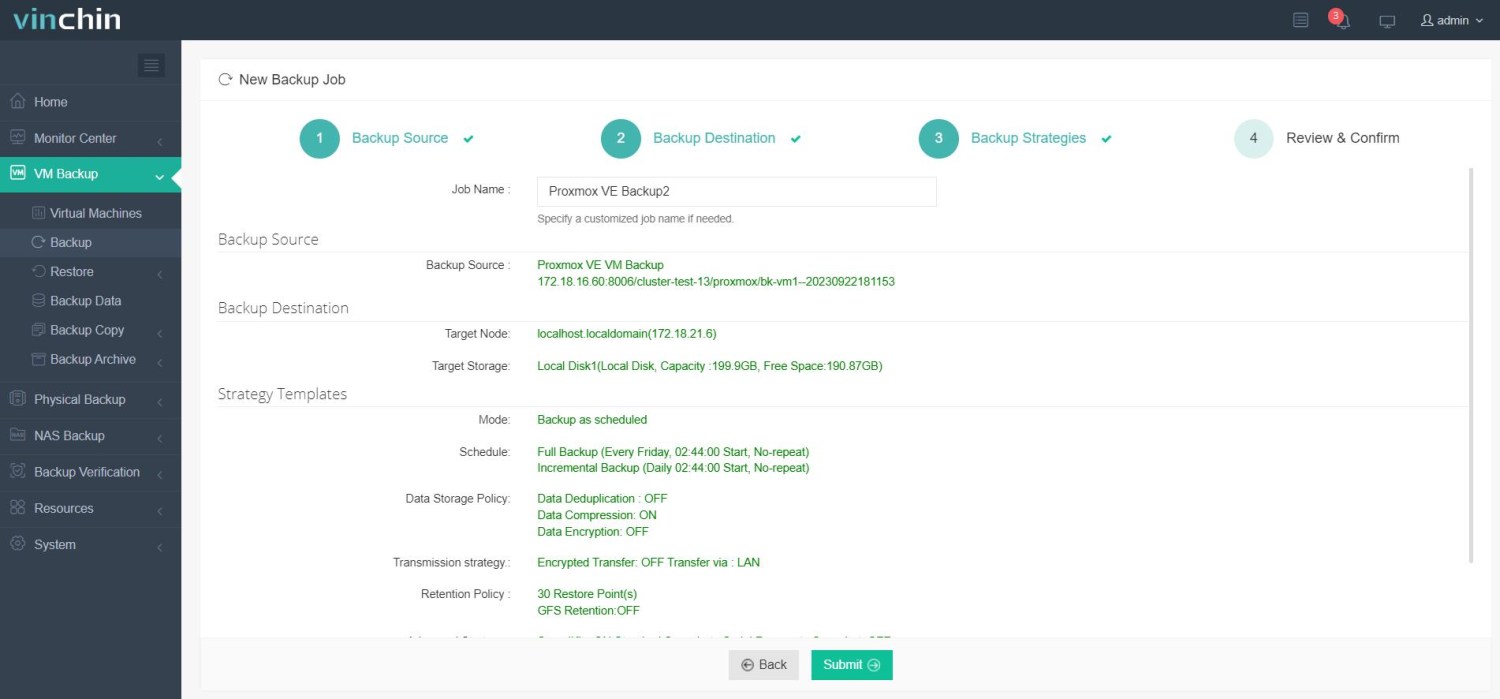
4. Review the backup details and click Submit to run the bulk backup job.
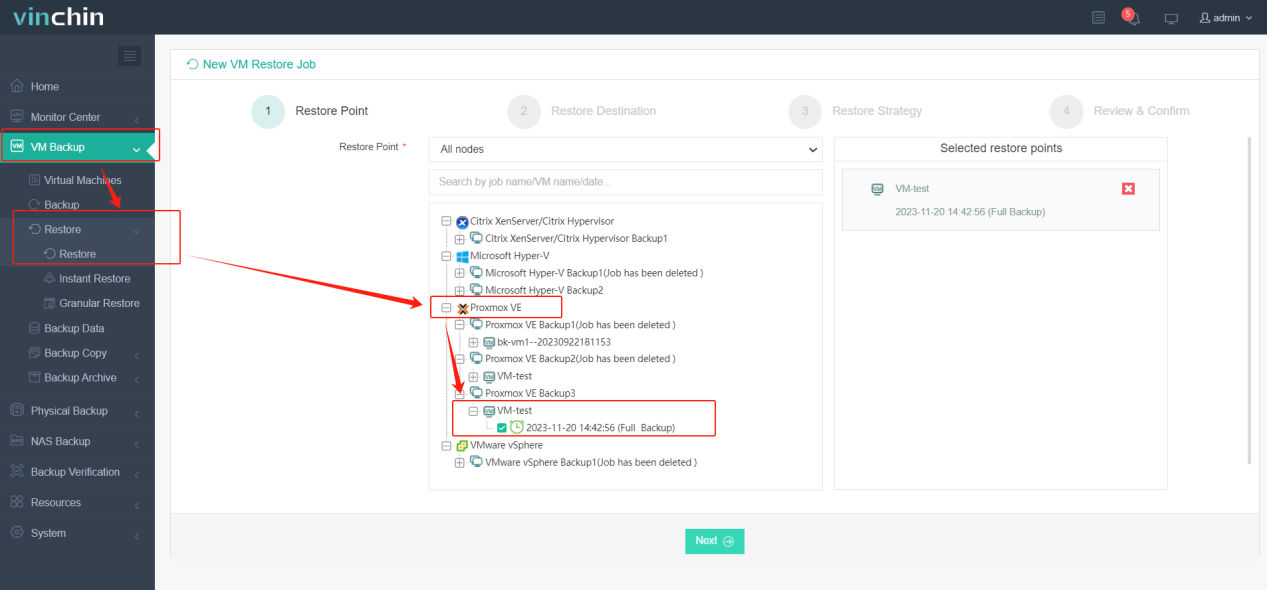
Bulk Restore VMs:
1. Go to VM Backup > Restore and select the backup job you created as the restore point.
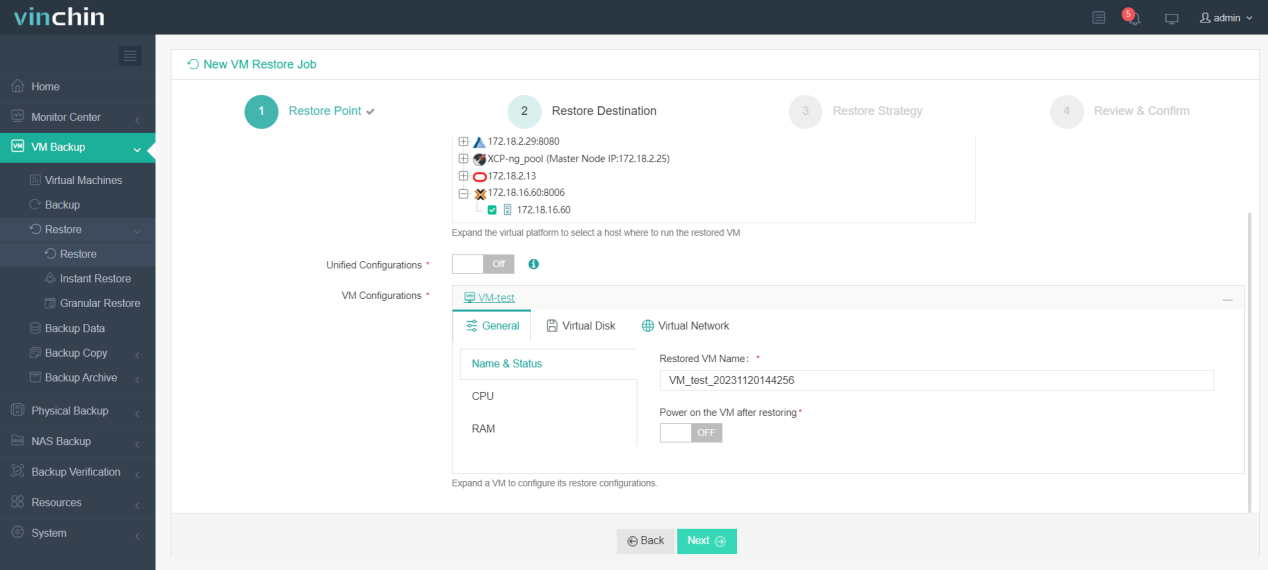
2. Next, choose the target restore host and configure VM settings if needed.
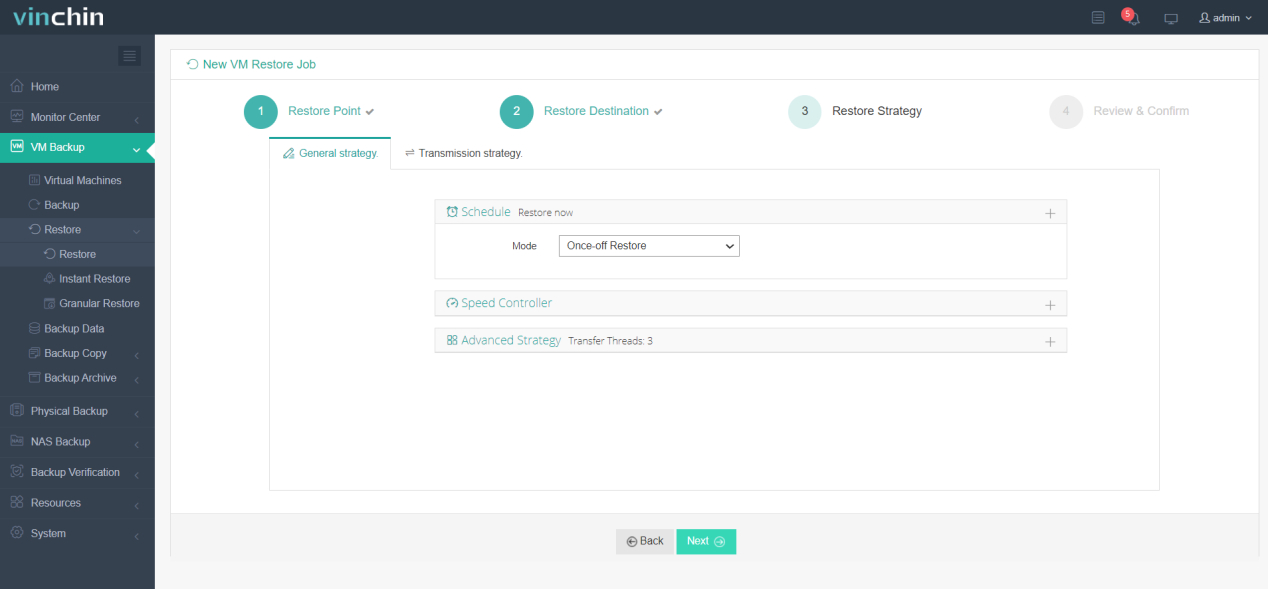
3. Specify the restore strategy; run the task instantly or schedule it at a particular time.
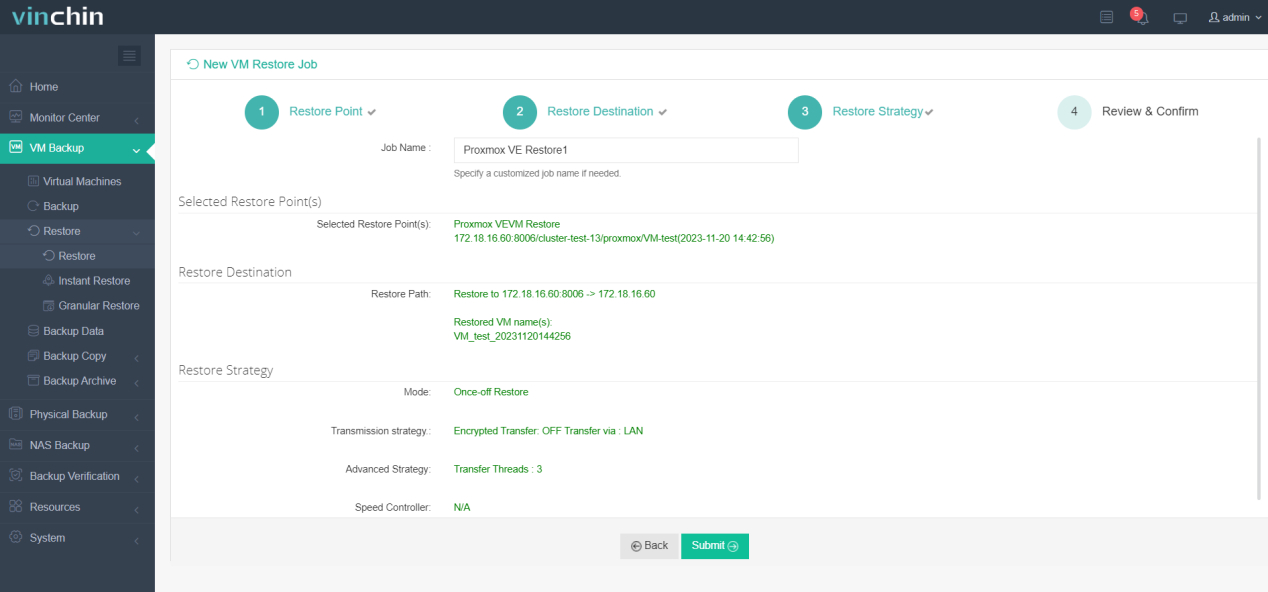
4. Check the restore details and hit Submit to initiate the current job.
With secure and robust data protection, Vinchin Backup & Recovery has been the top choice by thousands of organizations needing disaster recovery plans. It now offers a 60-day free trial with full features; click the Download button below to safeguard every crucial data.
Bonus Tip: How to Reduce Downtime During Bulk Migration?
Downtime is one of the biggest concerns during Proxmox bulk migration, especially when business-critical workloads are involved. However, proper planning and the right migration strategy can significantly minimize the impact on users and applications.
Here are several best practices to reduce downtime during bulk VM migration:
1. Use Live Migration
If your Proxmox hosts are part of the same cluster and use compatible storage, live migration allows running VMs to be moved with little or no service interruption. This is often the best option for maintenance and hardware upgrade scenarios.
2. Migrate During Off-Peak Hours
Schedule migration tasks during periods of low system activity, such as evenings, weekends, or maintenance windows. This helps reduce the impact on end users and allows more resources to be dedicated to the migration process.
3. Ensure Sufficient Network and Storage Performance
Bulk migration can generate significant network and storage traffic. Before starting the migration, verify that the network bandwidth and storage performance are adequate to handle the workload and avoid unnecessary delays.
4. Keep Recent Backups Available
Always create and verify backups before performing bulk migration. Having a reliable backup ensures that VMs ca n be restored quickly if an unexpected issue occurs during the migration.
Note: incremental backup is recommended as it reduces data transfer and helps shorten the migration window.
Proxmox Bulk Migrate FAQs
Q1: Does Proxmox support bulk live migration?
Proxmox does not provide a dedicated bulk live migration feature. To migrate multiple VMs in Proxmox, administrators typically perform migrations individually through the GUI or automate the process using qm migrate scripts.
Q2: How long does a Proxmox bulk migration take?
The migration time depends on several factors, including the number of VMs, VM disk size, network bandwidth, storage performance, and the migration method used. Live migration within a cluster may take only a few minutes per VM, while backup-and-restore-based migrations can take significantly longer due to data transfer and restoration processes.
Q3: What are the requirements for bulk migrating VMs in Proxmox?
The requirements vary by migration method. For cluster-based migration, the source and target nodes must belong to the same Proxmox cluster and have sufficient compute and storage resources. For backup-and-restore migration, you need accessible backup storage and enough capacity on the target environment. In all cases, a stable network connection and verified backups are recommended to ensure a successful migration.
Final Thoughts
Migrating Proxmox VMs in bulk helps improve operational efficiency across multiple workloads and ensures business continuity at scale. This post introduces four practical methods for Proxmox bulk migration, including cluster-based migration, qm command-line tools, Proxmox native backup and restore, and an enterprise solution like Vinchin Backup & Recovery.
For users comfortable with CLI operations, the first three methods may be sufficient for most scenarios. However, for those seeking a simpler, more intuitive, and highly automated approach, Vinchin Backup & Recovery provides a more streamlined alternative that should not be overlooked.