-
What Is an Ubuntu Virtual Machine?
-
Method 1: Create an Ubuntu Virtual Machine with VirtualBox
-
Method 2: Set Up an Ubuntu Virtual Machine on VMware
-
Method 3: Create an Ubuntu Virtual Machine Using Hyper-V
-
How to Backup Your Ubuntu Virtual Machine with Vinchin Backup & Recovery
-
Frequently Asked Questions About Running an Ubuntu Virtual Machine
-
Conclusion
Running an Ubuntu virtual machine is a core skill for any IT operations administrator today. Why? Because it lets you sandbox risky tasks, validate patches in disposable environments, or standardize your team’s development stack—all without touching your main system or hardware setup. In this guide, we’ll walk through what an Ubuntu VM is, how to create one on leading platforms, tune its performance, automate deployment at scale, and protect it with reliable backup.
What Is an Ubuntu Virtual Machine?
An Ubuntu virtual machine is a software-based computer that runs the Ubuntu Linux operating system inside another OS like Windows or macOS. This means you can run Linux-only tools or test changes without dual-booting or buying extra hardware. VMs are isolated from your host system by design—making them ideal for testing software updates or running potentially unsafe code safely.
There are two main types of hypervisors that power these VMs:
Type 1 (Bare-Metal): Runs directly on hardware (like Hyper-V).
Type 2 (Hosted): Runs as an app within your existing OS (like VirtualBox or VMware Workstation Player).
Understanding this difference helps you choose the right tool for your needs—Type 1 often offers better performance; Type 2 is easier to set up on desktops.
Method 1: Create an Ubuntu Virtual Machine with VirtualBox
VirtualBox is a free tool that works across Windows, macOS, and Linux hosts—a favorite for quick tests and labs.
To get started:
First download and install VirtualBox from its official website. Also grab the latest Ubuntu ISO image from ubuntu.com/download if you haven’t already.
Here’s how to set up your ubuntu virtual machine:
1. Open VirtualBox and click New.
2. Enter a name like “Ubuntu VM,” set Type to Linux, then choose Ubuntu (64-bit) under Version; click Next.
3. Assign memory—at least 2048 MB RAM recommended; click Next.
4. Select Create a virtual hard disk now, then click Create.
5. Choose disk type (VDI) and storage mode (Dynamically allocated saves space); click through.
6. Set disk size—25 GB minimum suggested—and finish creation.
7. With your new VM selected in the left pane, click Settings > Storage, select the empty optical drive under Controller: IDE, then click the disk icon beside it; choose your downloaded Ubuntu ISO file.
8. Click OK to save settings.
9. Start the VM by clicking Start; follow installer prompts: pick language/keyboard layout/install type (Erase disk and install Ubuntu, which only affects this VM).
10. Set username/password as prompted; complete installation.
11. When asked to restart after installation finishes, do so—and remove the ISO by going to Devices > Optical Drives > Remove disk from virtual drive if needed.
For smoother operation:
After booting into Ubuntu desktop for the first time,
Go to Devices > Insert Guest Additions CD image
Run installer inside Ubuntu terminal (
sudo sh /media/<your_user>/VBox_GAs*/VBoxLinuxAdditions.run)Enable shared clipboard/drag-and-drop via Settings > General > Advanced tab
This unlocks features like full-screen display and easy file transfer between host/guest systems.
Method 2: Set Up an Ubuntu Virtual Machine on VMware
VMware Workstation Player is widely used in enterprise settings thanks to its stability and integration features.
Begin by installing VMware Workstation Player from vmware.com if not already present; download your preferred version of the Ubuntu ISO as well.
To create your ubuntu virtual machine:
1. Open VMware Workstation Player, select Create a New Virtual Machine.
2. Choose option labeled “Installer disc image file (iso)” then browse/select your downloaded ISO file; click Next.
3. Pick guest OS type as Linux/Ubuntu 64-bit; continue.
4. Name your VM (“Ubuntu_VM”) and specify where files should be stored locally.
5. Allocate at least 25 GB of disk space using “Store virtual disk as a single file”; proceed next/finalize setup with Finish button.
6. Highlight new VM entry in left panel; hit Power On This Virtual Machine button atop window.
7–9: Follow on-screen instructions during installation just like physical hardware—language selection/user account/password/setup options (“Erase disk…” only impacts this VM).
10: After install completes/restart prompt appears—disconnect ISO via menu path: VM > Removable Devices > CD/DVD > Disconnect
Tip for seamless integration:
Most recent Ubuntus come preloaded with open-vm-tools package—but if copy-paste/shared folders don’t work out-of-the-box,
open Terminal inside guest OS:
sudo apt update && sudo apt install open-vm-tools-desktop
Then reboot guest OS for changes to take effect!
This ensures smooth mouse movement between windows/fullscreen support/file sharing capabilities between host/guest systems.
Method 3: Create an Ubuntu Virtual Machine Using Hyper-V
Hyper-V comes built-in with Windows Pro/Enterprise editions—a solid choice when running multiple VMs natively on Windows servers/desktops without third-party apps.
Pre-requisites
Enable Hyper-V
Go to Control Panel > Programs & Features > Turn Windows features on/off.
Check all Hyper-V options.
Reboot if prompted.
Download Ubuntu ISO
Get the latest supported Ubuntu Server or Ubuntu Desktop ISO from the official Ubuntu website.
Installation Steps
Launch Hyper-V Manager
Open the Hyper-V Manager application.
Create a New VM
Click New > Virtual Machine.
In the wizard, enter a name (e.g.,
Ubuntu_VM) and select the storage location.Choose VM Generation
Select Generation 2 (recommended for modern Ubuntu versions supporting UEFI and Secure Boot).
Assign Memory
Allocate at least 2048 MB of RAM.
Configure Networking
Connect the network adapter to the Default Switch, unless custom networking is required.
Create Virtual Hard Disk
Allocate at least 25 GB of disk capacity.
Attach Installation Media
Under Installation Options, select Install an operating system from a bootable image file.
Browse and select the downloaded Ubuntu
.iso.For Generation 2 VMs, it will be attached automatically via the SCSI controller.
Finish Wizard
Click Finish to complete VM creation.
Start the VM
Right-click the VM entry in Hyper-V Manager → Connect → Start.
The console window will launch, showing the boot sequence and installation screens.
Run the Installer
Follow the standard graphical or text-based Ubuntu installer prompts until installation is complete.
Post-Installation
In the console window, go to Media > Remove.
After the first login, remove the mounted
.isoif necessary;
How to Backup Your Ubuntu Virtual Machine with Vinchin Backup & Recovery
When safeguarding data within every ubuntu virtual machine becomes critical, leveraging professional solutions ensures reliability across diverse infrastructures such as VMware ESXi/vSphere clusters, Microsoft Hyper‑V, Proxmox VE, oVirt/RHV/OLVM, XCP-ng/XenServer, OpenStack, ZStack and more—over fifteen mainstream virtualization environments are supported centrally by Vinchin Backup & Recovery's enterprise-level platform.
Among its extensive feature set tailored for multi-hypervisor protection—including full backup modes (full/incremental/differential/forever-incremental backup), granular restore capabilities for recovering specific files/directories instantly after accidental loss or corruption events, cross-platform V2V migration simplifying moves between vendors/clouds, data deduplication and compression optimizing storage efficiency—the solution also provides scheduled backups and robust encryption policies ensuring both operational flexibility and compliance readiness throughout backup lifecycles.
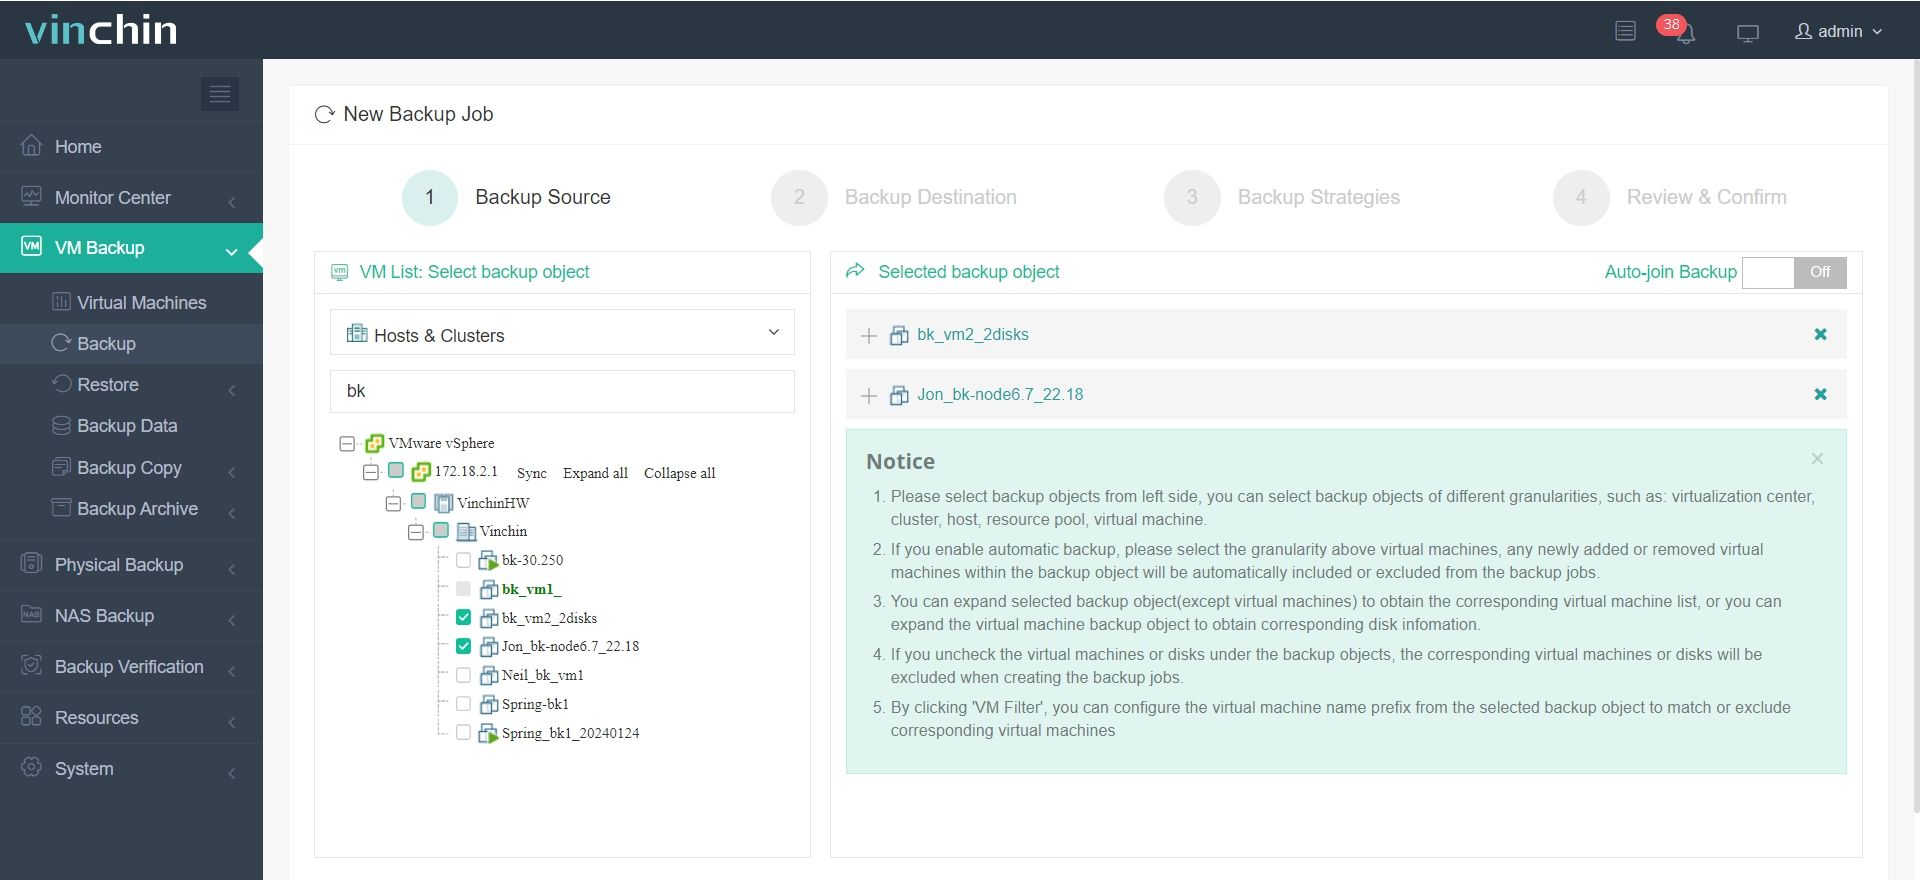
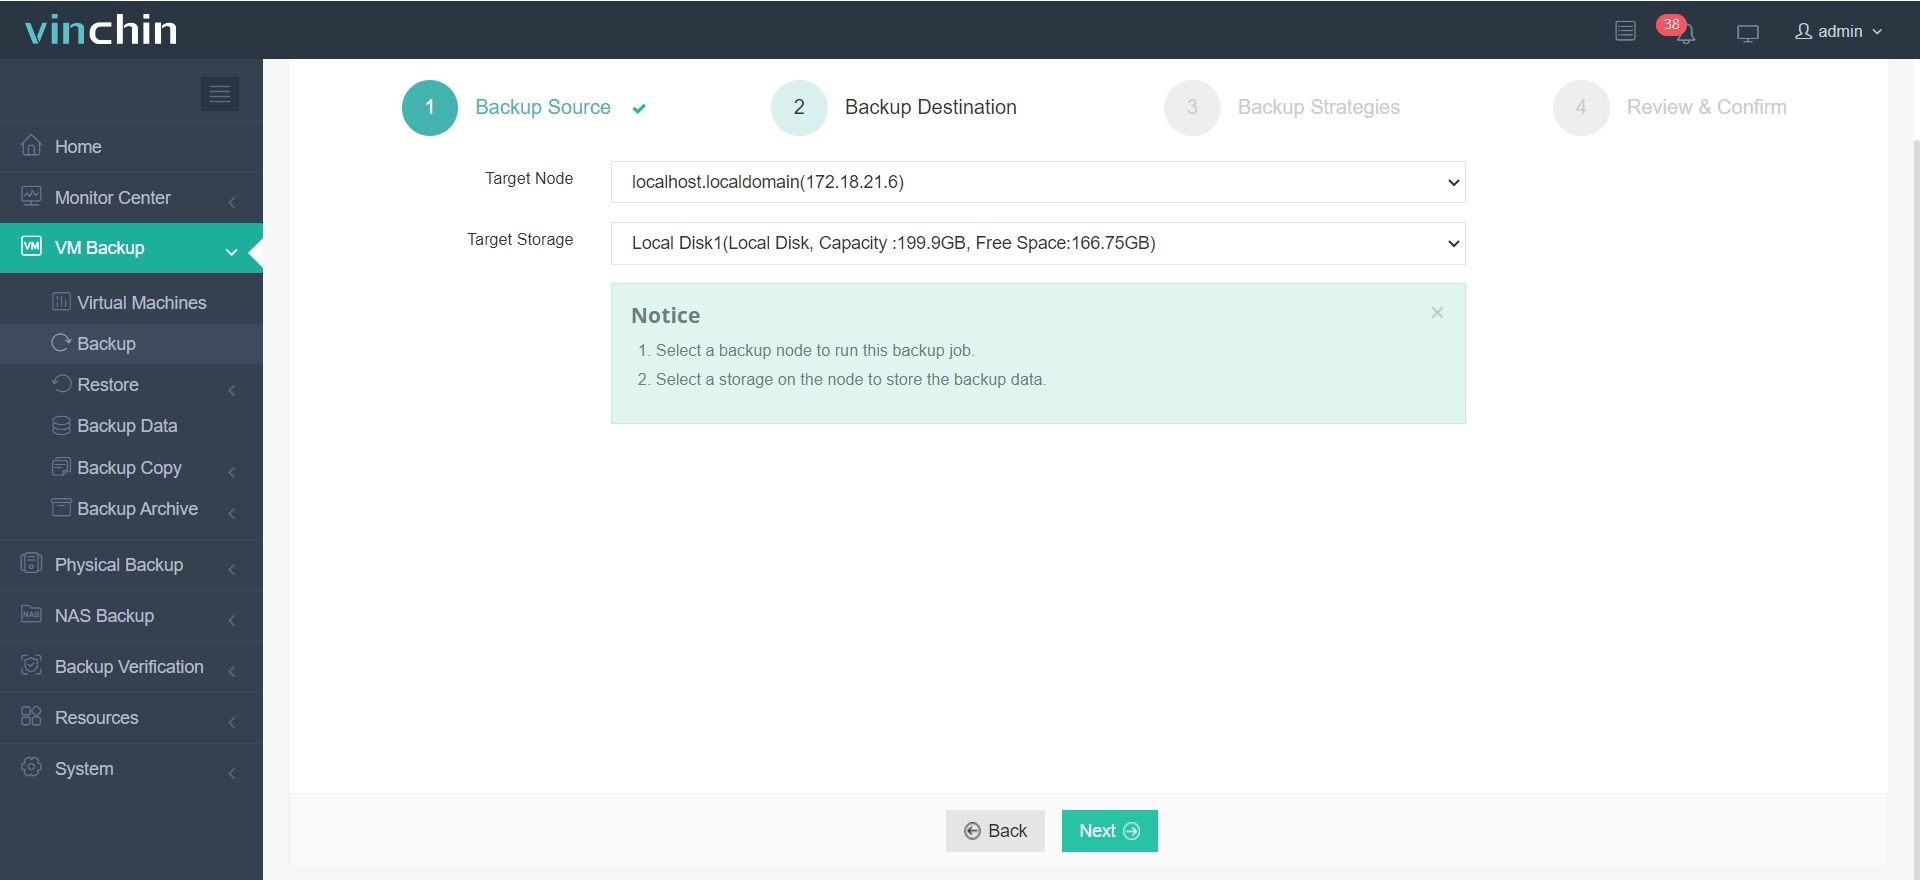
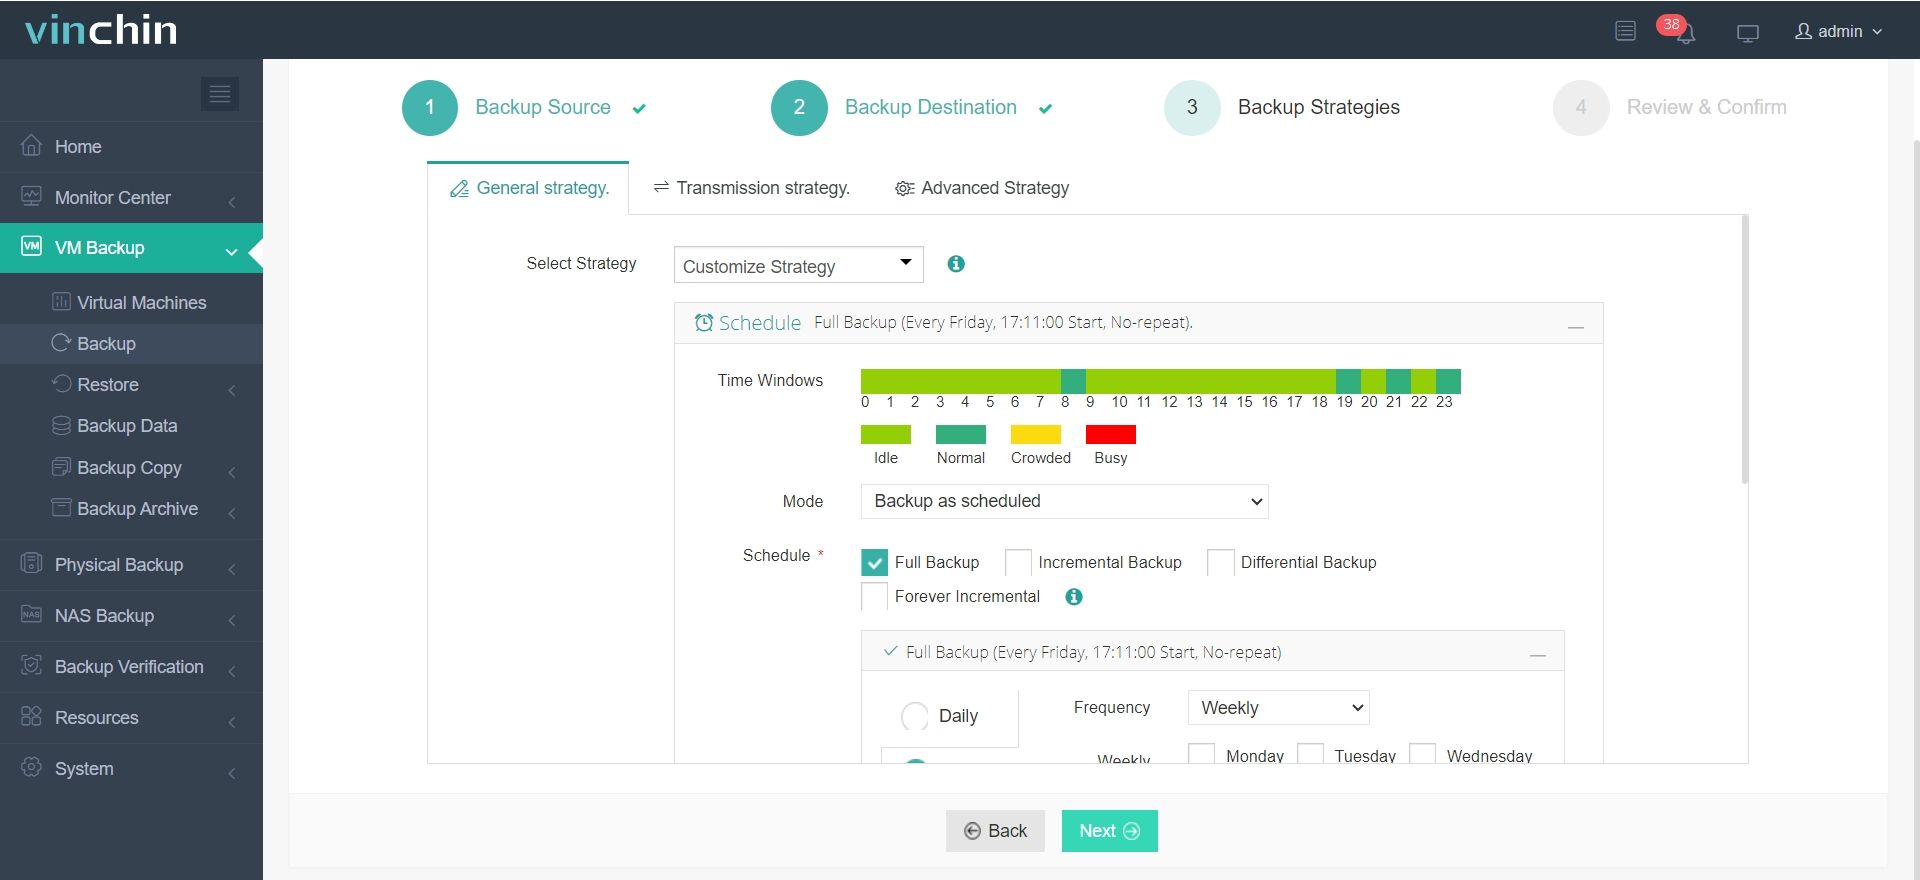
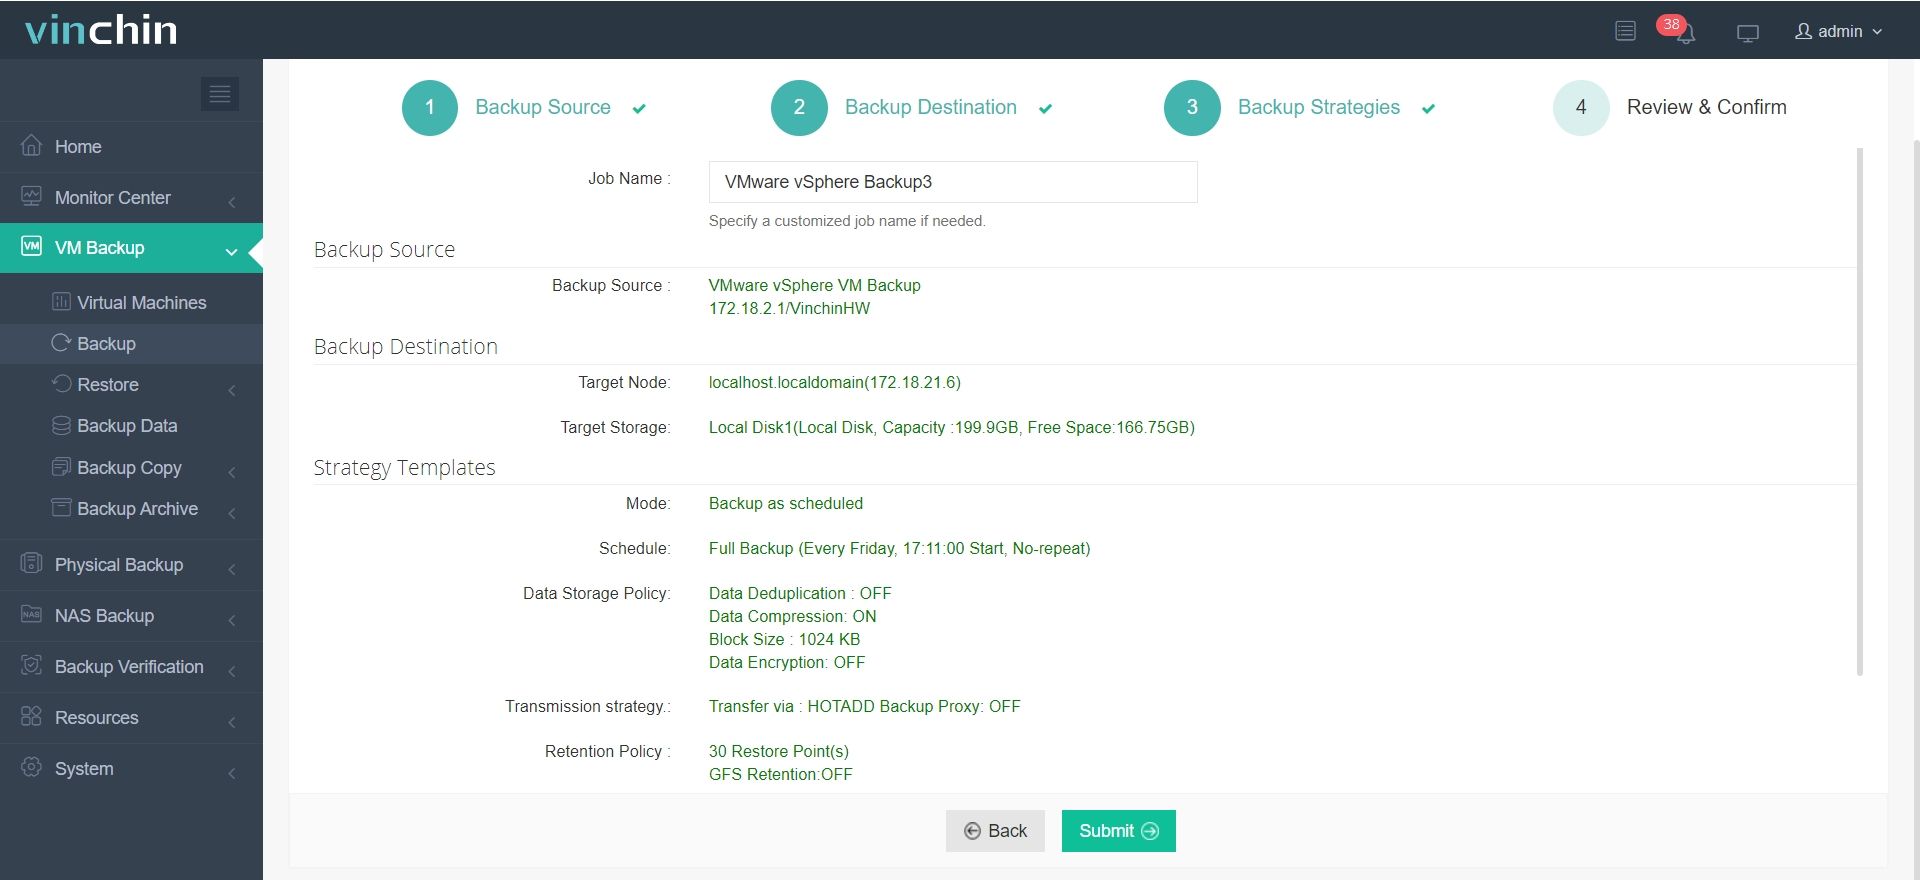
Backing up an ubuntu virtual machine with Vinchin Backup & Recovery is straightforward thanks to its intuitive web console:
Step 1: Select the VMware VM to back up

Step 2: Choose the backup storage

Step 3: Configure the backup strategy

Step 4: Submit the job

Recognized globally among enterprise users—with top ratings and strong customer adoption—Vinchin Backup & Recovery offers a comprehensive data-protection suite backed by a fully functional free trial lasting sixty days; experience industry-leading resilience firsthand by downloading today.
Frequently Asked Questions About Running an Ubuntu Virtual Machine
Q1: How do I assign a static IP address inside my ubuntu virtual machine?
A1: Edit /etc/netplan/*.yaml config file specifying desired address/gateway/DNS values then run sudo netplan apply within guest OS shell session after saving changes.
Q2: My copy-paste isn't working between host PC & my ubuntu vm—is there a fix?
A2: Yes—install Guest Additions package (VirtualBox)/open-vm-tools-desktop package (VMware)/enable Enhanced Session Mode integration services (Hyper-V), then check shared clipboard options enabled within respective UI menus/settings tabs afterward!
Q3: Can I automate mass deployment/configuration of multiple identical ubuntu vms?
A3: Absolutely—with tools like Vagrant (vagrant init + vagrant up) or cloud-init scripts injected during provisioning phase depending upon chosen hypervisor/platform/environment requirements...
Conclusion
Mastering ubuntu virtual machines means faster testing cycles, safer patch validation processes, streamlined automation pipelines—and less downtime overall! From initial setup/tuning/troubleshooting through automated deployment/backups/restores—it pays off long-term. For peace of mind protecting these vital assets try Vinchin’s powerful backup solution today—it keeps every environment resilient no matter what challenges arise tomorrow!
Share on:


