-
What Is Terraform?
-
What Is Proxmox?
-
Why Use Terraform With Proxmox?
-
Method 1: How To Set Up Terraform For Proxmox
-
Method 2: Provisioning Virtual Machines With The Terraform Proxmox Provider
-
Backup Proxmox VMs With Vinchin Backup & Recovery
-
Using Terraform With Proxmux FAQs
-
Conclusion
Managing virtual machines can be tedious when you need to deploy or update many at once. Wouldn’t it be easier if you could automate these tasks? That’s where Terraform and Proxmox come together. With them, you manage your infrastructure as code—saving time and reducing errors. Let’s explore how “terraform proxmox” can transform your daily operations.
What Is Terraform?
Terraform is an open-source tool that lets you build, change, and manage infrastructure safely using code. You write simple configuration files to describe what resources you want—servers, networks, storage—and Terraform creates them for you. It works across many platforms. HashiCorp maintains Terraform, making it a trusted choice in DevOps.
What Is Proxmox?
Proxmox Virtual Environment (VE) is a robust open-source platform for virtualization. It allows you to run both virtual machines (VMs) and containers on your hardware. Proxmox offers a web-based interface with clustering features and supports live migration of VMs between hosts. It’s popular in both home labs and enterprise data centers.
Why Use Terraform With Proxmox?
Combining Terraform with Proxmox gives you powerful automation tools. You define your VM infrastructure as code so deployments are consistent every time. If you need ten identical VMs, why click through menus ten times? With “terraform proxmox,” write the configuration once—then apply it whenever needed.
You also get version control over your infrastructure changes. This means fewer manual mistakes and faster recovery if something goes wrong.
Method 1: How To Set Up Terraform For Proxmox
Automating Proxmox with Terraform starts with setting up both tools correctly on your management machine.
Install Terraform
First things first—install Terraform itself on your local system or wherever you'll manage infrastructure from. Download the latest version from the official website. Follow instructions specific to Windows, Linux, or macOS; installation usually takes just a few minutes.
After installing, check that it works by running terraform --version in your terminal or command prompt.
Configure The Proxmox Provider
Next comes connecting Terraform to your Proxmox server using a provider plugin—the Telmate provider is widely used for this purpose.
Create a new directory for your project files (for example: mkdir terraform-proxmox). Inside this folder create a file called main.tf:
terraform {
  required_providers {
    proxmox = {
      source  = "Telmate/proxmox"
      version = ">=2.9.11"
    }
  }
}

provider "proxmox" {
  pm_api_url      = "https://your-proxmox-server:8006/api2/json"
  pm_user         = "root@pam"
  pm_password     = "yourpassword" # Use API token or environment variable instead of hardcoding
  pm_tls_insecure = true           # Only use 'true' for testing; see below
}
Replace your-proxmox-server with your actual server address; replace yourpassword with credentials—but never hardcode passwords in production! For better security use API tokens or environment variables (see next section).
If you're just testing locally or have self-signed certificates on Proxmox VE set pm_tls_insecure to true; otherwise use valid SSL certificates in production environments.
Initialize the project by running:
terraform init
This downloads necessary plugins so you're ready to proceed when you see “Terraform has been successfully initialized!”
Securing Credentials With Environment Variables Or API Tokens
Hardcoding sensitive information like passwords is risky—even more so if sharing code among teams! Instead:
1. Use Environment Variables:
Define variables such as:
TF_VAR_pm_api_urlTF_VAR_pm_userTF_VAR_pm_password
In Unix-like systems:
   export TF_VAR_pm_api_url="https://your-prox-server:8006/api2/json"
   export TF_VAR_pm_user="root@pam"
   export TF_VAR_pm_password="supersecret"
2. Use API Tokens:
Generate an API token via Datacenter > Permissions > API Tokens in the Proxmox web interface.
Then update your provider block:
   provider "proxmox" {
     pm_api_url          = var.pm_api_url
     pm_api_token_id     = var.pm_api_token_id
     pm_api_token_secret = var.pm_api_token_secret
     pm_tls_insecure     = false # Recommended for production!
   }
3. Define Variables In Files:
Create a separate file (variables.tf) listing all variables used above so they’re easy to manage without exposing secrets directly in code repositories.
Using these methods keeps credentials out of plain sight—a must-have practice!
Method 2: Provisioning Virtual Machines With The Terraform Proxmox Provider
Once setup is complete it's time to actually create VMs automatically using configuration files rather than clicking through menus each time!
Preparing A Proxmox VM Template For Cloning
The most efficient way to deploy multiple similar VMs is by cloning from an existing template—a base image pre-configured with OS settings but not yet assigned unique identities like hostname or IP address.
To prepare one:
1. Create a new VM via Create VM wizard in the web UI.
2. Install an operating system (like Ubuntu Server).
3. Customize settings as needed (disk size/network).
4. Shut down the VM after installation completes.
5. Right-click its name under Datacenter, then select Convert To Template.
6. Now this template can be cloned repeatedly!
Without this step cloning will fail since no source exists—so always prep templates first before automating mass deployments!
Define VM Configuration Using HCL Files
Now let's define what our new VM should look like inside another file called vm.tf. Here's an example resource block:
resource "proxmox_vm_qemu" "ubuntu_vm" {
  name        = "ubuntu-vm"
  target_node = "prox-node1"
  clone       = "ubuntu-template" # Must match prepared template name!
  cores       = 2
  memory      = 2048

  disk {
    size    = "20G"
    type    = "scsi"
    storage = "local-lvm"
  }

  network {
    model  = "virtio"
    bridge = "vmbr0"
  }

  os_type    = "cloud-init"
  ciuser     = var.vm_user         # Use variable here!
  cipassword = var.vm_password     # Never hardcode passwords!

  ipconfig0 =
    "ip=192.168.1.100/24,gw=192.168.1.1"

}
Make sure "clone" matches exactly whatever template name was created earlier! Adjust CPU/memory/disk/network values per requirements—and always use variables instead of plain text secrets where possible.
Using Cloud-Init For Dynamic Configuration
Notice "os_type" is set as "cloud-init" above? Cloud-Init lets you inject user data like usernames/passwords/IP addresses at boot time—making each cloned VM unique even though they share one base image!
To enable Cloud-Init support:
1 . Upload official Cloud-Init ISO images via Datacenter > Storage > Content > Upload menu.
2 . Attach that ISO as CD-ROM drive during initial template creation.
3 . When defining resources in HCL (os_type, ciuser, etc.), specify dynamic values per deployment needs.
4 . Optionally use advanced parameters like "cicustom" if providing custom scripts/configurations.
This approach saves hours compared to manual customization after cloning!
Apply The Configuration And Manage Lifecycle
Ready to launch? Run these commands from within your project directory:
terraform plan
This previews what changes will occur—always review output before applying major updates!
If satisfied run:
terraform apply
Terraform now instructs Proxmox VE server(s) via its API—to create new VMs matching all specified parameters! Progress appears both onscreen & inside web UI dashboard.
Destroying Resources Safely
Need cleanup later?
terraform destroy
removes everything defined by current configs—including deleting VMs permanently! Be careful here; consider adding lifecycle rules such as:
lifecycle {
 prevent_destroy = true
}
to critical resources so accidental wipes don't happen.
Backup Proxmox VMs With Vinchin Backup & Recovery
After automating deployment of virtual machines using terraform proxmox workflows, ensuring reliable backup becomes essential for business continuity and data protection efforts across environments like Proxmox VE and beyond (including VMware, Hyper-V, oVirt, OLVM, RHV, XCP-ng, XenServer, OpenStack, ZStack and more than 15 mainstream virtualization platforms). Vinchin Backup & Recovery stands out as an enterprise-grade solution designed specifically for virtual machine backup across diverse infrastructures.
With broad compatibility—including full support for incremental backup modes such as CBT-based backups on supported hypervisors—Vinchin Backup & Recovery delivers robust features tailored for modern IT needs: forever-incremental backup strategies minimize storage usage; deduplication/compression accelerates jobs while saving space; granular restore enables precise recovery scenarios; scheduled backups ensure regular protection without manual intervention; cross-platform V2V migration streamlines workload mobility between different hypervisors—all managed through one intuitive console interface that simplifies complex operations into clear workflows.
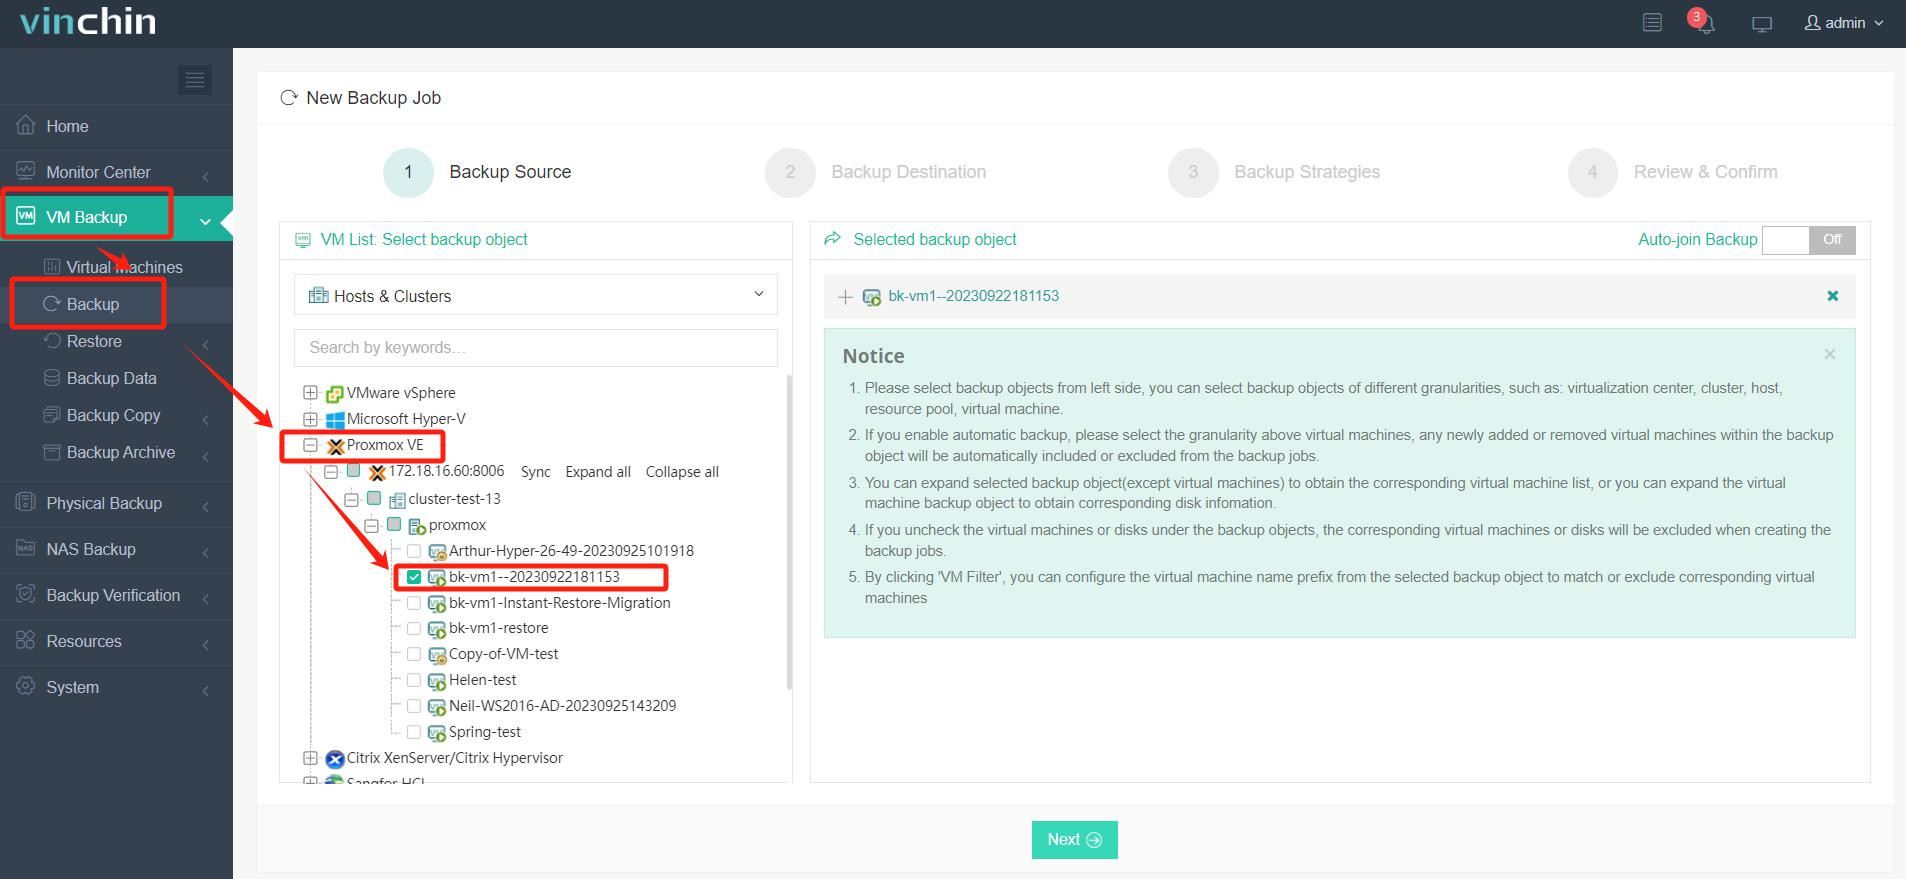
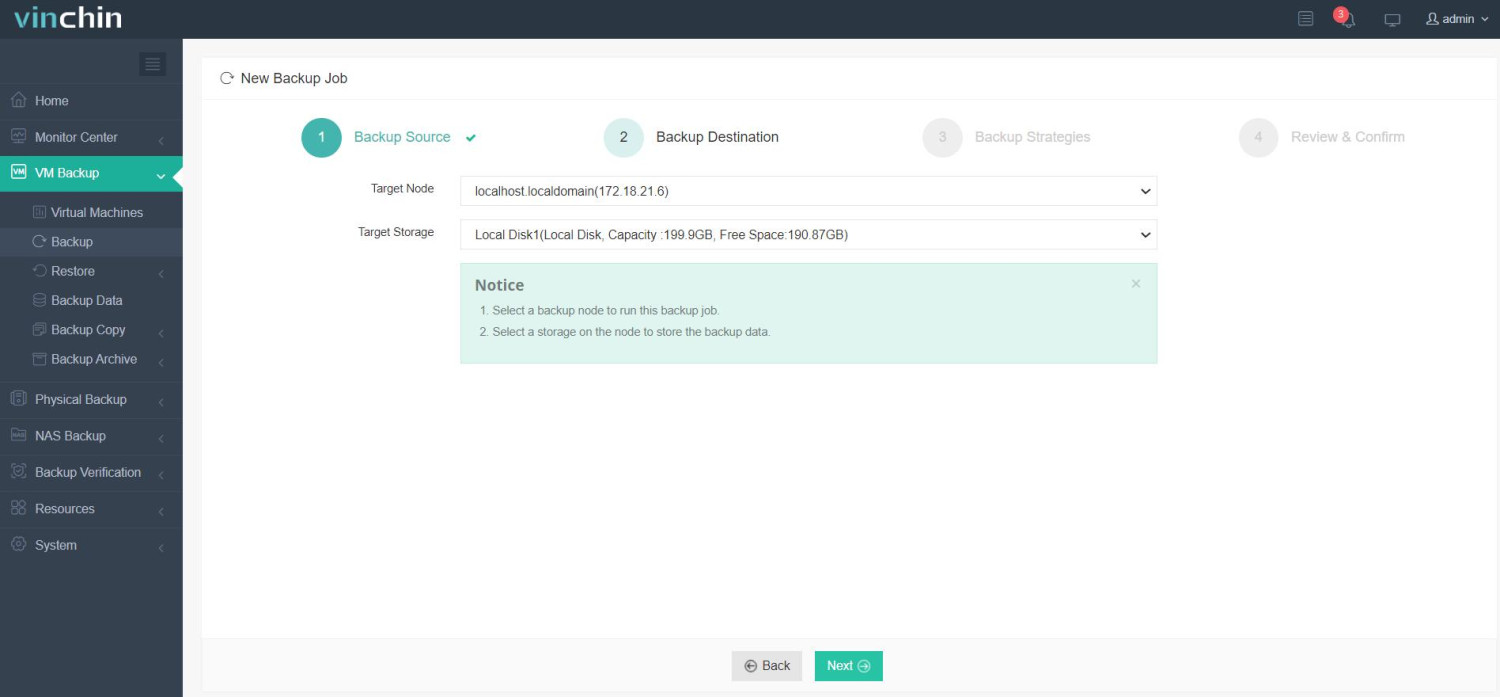
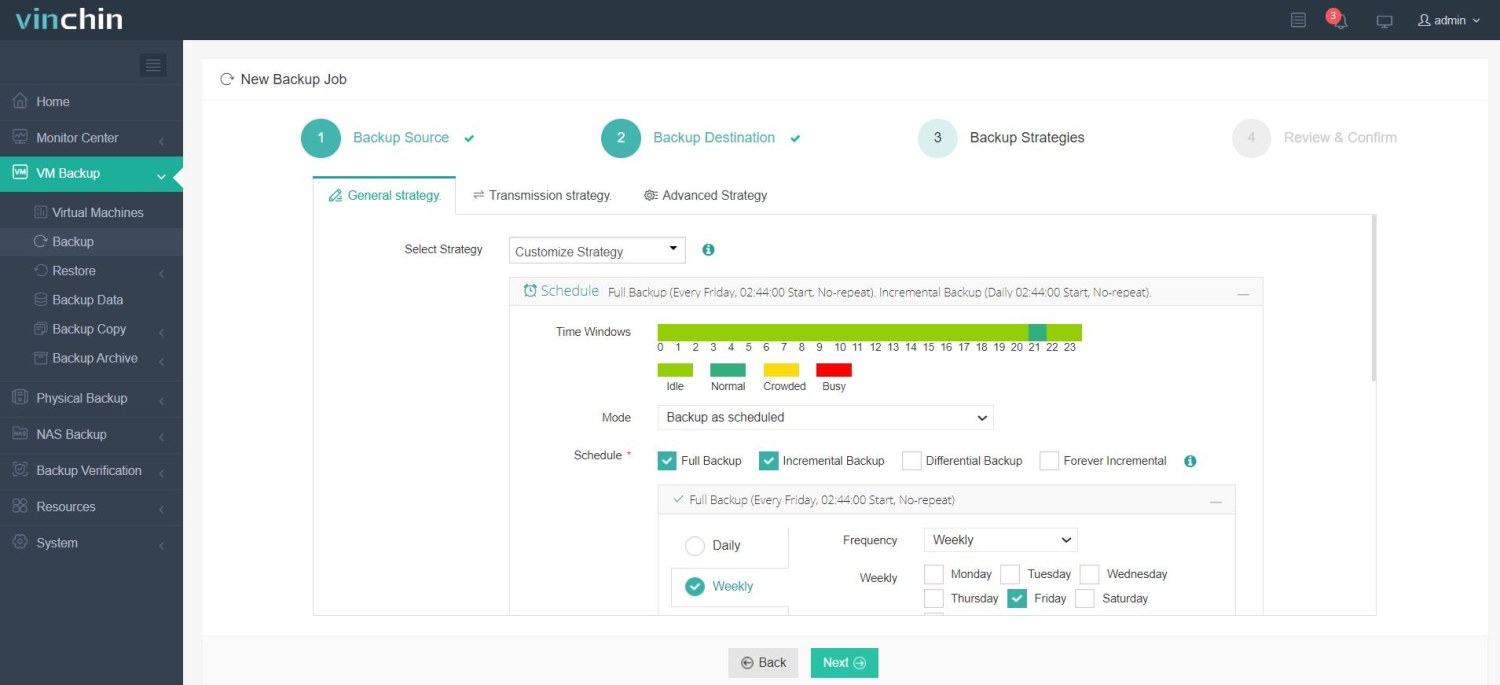
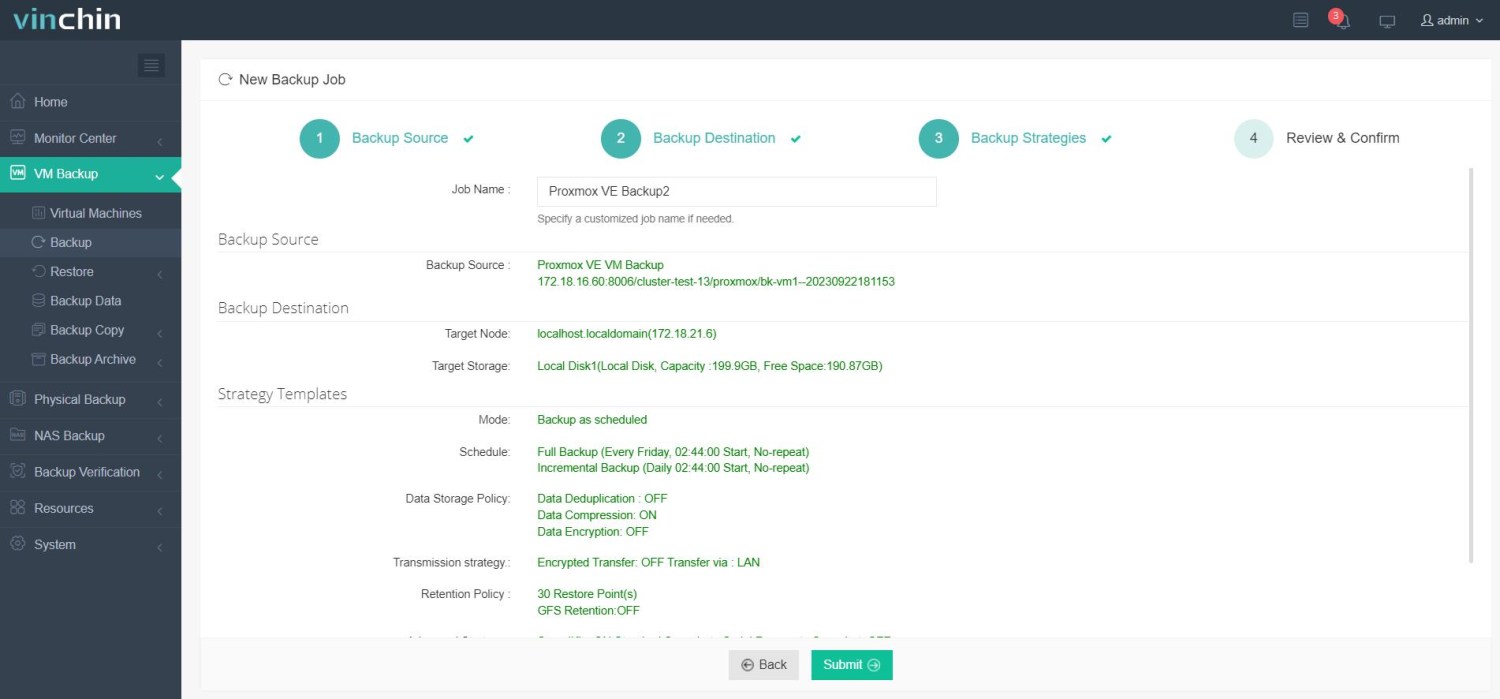
Backing up a newly provisioned VM with Vinchin Backup & Recovery involves just four steps through its user-friendly web console:
✅ Step 1: Back Up the Proxmox VM

✅ Step 2: Restore to Target Platform (e.g., Azure or VMware)

✅ Step 3: Configure backup strategies;

✅ Step 4: Submit the job.

Recognized globally by thousands of enterprises—with top ratings and strong customer trust—Vinchin Backup & Recovery offers a fully featured free trial valid for 60 days; click below to experience comprehensive data protection firsthand!
Using Terraform With Proxmux FAQs
Q1: Can I automate container creation alongside virtual machines using terraform proxmux?
Yes—you can manage both QEMU-based VMs and LXC containers through supported resource types within the same configurations.
Q2: How do I securely rotate credentials used by my automation scripts?
Store secrets outside codebase—in environment variables—or integrate external secret managers then reference those dynamically during runs.
Q3: What should I do if my cloud-init customization isn't applied after cloning?
Check that cloud-init ISO was attached properly during template creation then verify correct syntax/values were passed into resource definitions.
Conclusion
Automating virtual machine management through terraform proxmux boosts efficiency while reducing risk of human error across IT operations teams everywhere! For reliable backups integrated seamlessly into these workflows consider Vinchin—a proven solution trusted globally by professionals just like yourself.
Share on:


