-
What is Clonezilla?
-
What is Hyper-V?
-
Why Use Clonezilla for Hyper-V?
-
Method 1: Cloning a Hyper-V Virtual Machine with Clonezilla
-
Method 2: Restoring a Virtual Machine in Hyper-V Using Clonezilla
-
How to Backup a Hyper‑V Virtual Machine with Vinchin Backup & Recovery
-
FAQs about Using "Clonezilla Hyper V"
-
Conclusion
Managing virtual machines often means you need to clone or restore systems—sometimes for backup, sometimes for migration or disaster recovery. Many IT administrators look to Clonezilla when working with Hyper-V environments because it’s free, flexible, and reliable at disk imaging tasks that go beyond what built-in tools offer. But how do you actually use Clonezilla with Hyper-V? What should you watch out for? This guide explains everything step by step—from basics through advanced tips—to help you master “clonezilla hyper-v” workflows without headaches.
What is Clonezilla?
Clonezilla is a free open-source tool that lets you create exact images of disks or partitions—whether physical or virtual. You can use these images for system backups, migrations between hardware platforms, or rapid deployments across many computers at once. It supports most common file systems used by Windows and Linux servers alike.
You can run Clonezilla from a bootable ISO image called Clonezilla Live on almost any machine—including virtual ones inside Hyper-V—or even automate it over networks using PXE booting if needed. Because it works at the block level rather than just copying files, it captures everything: operating system files, installed applications, settings—even hidden partitions like bootloaders or recovery areas.
What is Hyper-V?
Hyper-V is Microsoft’s virtualization platform built into Windows Server editions—and also available on some desktop versions of Windows 10/11 Pro or Enterprise via an optional feature install (“Turn Windows features on or off”). With Hyper-V you can run multiple virtual machines on one physical server; each VM acts like its own computer with its own OS and resources such as CPU cores, RAM allocation, storage disks, network adapters—even USB passthrough if configured right.
Hyper-V supports both Generation 1 VMs (which emulate BIOS-based hardware) and Generation 2 VMs (which use UEFI firmware). Most legacy operating systems work best with Generation 1 VMs; newer OS versions may require Generation 2 for full compatibility with secure boot features or GPT partition layouts.
Why Use Clonezilla for Hyper-V?
Why would an admin choose Clonezilla instead of native export/import tools? Sometimes you need more control over exactly what gets imaged—or want to move workloads between different types of hardware without worrying about licensing restrictions tied to proprietary formats.
With “clonezilla hyper-v,” you get a way to capture every byte on a VM’s disk—then restore it anywhere else: another VM on the same host; a different server running Hyper-V; even back onto bare metal if disaster strikes your virtualization stack entirely! This flexibility makes it ideal not only for backups but also migrations from old servers to new ones—or testing upgrades safely before rolling them out company-wide.
However: using Clonezilla requires manual attention at every step since there’s no direct integration with Hyper-V management consoles yet. You must handle ISO mounting yourself; check disk sizes carefully; match BIOS/UEFI settings between source/destination VMs—and sometimes repair bootloaders after restoring images due to driver mismatches or hardware abstraction layer changes.
Method 1: Cloning a Hyper-V Virtual Machine with Clonezilla
Cloning a VM using “clonezilla hyper-v” involves making an image of its entire disk so you can later restore this snapshot elsewhere—either as backup insurance or when moving workloads around your infrastructure.
Start by shutting down the target VM completely within Hyper-V Manager—not just pausing or saving state—to ensure data consistency across all volumes.
Next:
1. Attach the latest version of the Clonezilla Live ISO file as a virtual DVD drive under your VM’s settings.
2. Set this DVD drive as first in the boot order under Firmware options.
3. Power on the VM so it boots directly into Clonezilla Live.
4. When prompted by the menu screen select your preferred language then choose Start_Clonezilla.
5. Select device-image mode which tells Clonezilla you want to create an image file rather than clone disk-to-disk live.
6. Choose where to save your image archive—a local attached volume works but most admins prefer network shares via SSH server (ssh_server), NFS (nfs_server), or Samba/Windows share (samba_server) depending on their environment.
7. Follow prompts until asked which device contains data to image—usually this appears as /dev/sda unless extra disks are attached.
8. Name your backup set clearly so future restores are easy to identify.
9. Pick compression options if desired (gzip/lz4/bzip2)—note that higher compression saves space but increases CPU usage during imaging/restoration.
10. Confirm all selections then let Clonezilla process until complete—it shows progress bars along with estimated time remaining based on disk size/speed/network throughput.
Once finished shut down the VM again before detaching both ISO media AND any temporary storage volumes used during imaging—for safety always verify that your backup archive exists where expected before deleting anything!
Method 2: Restoring a Virtual Machine in Hyper-V Using Clonezilla
Restoring means taking an existing image created earlier via “clonezilla hyper-v” methods—and applying it onto either a fresh new VM instance OR overwriting an existing one after failure/corruption/migration needs arise.
Begin by creating a new blank VM inside Hyper-V Manager:
For older OS images originally captured from BIOS-based systems always pick Generation 1
For newer UEFI/GPT-based OSes select Generation 2—but make sure original source was also UEFI otherwise restored system may fail at POST/bootloader stage
Attach a virtual hard disk equal-to-or-larger-than original imaged size—smaller disks won’t work since block-level clones require matching capacity!
Mount same Clonezilla Live ISO as above then set DVD drive first in boot order again
Boot up into menu > select language > choose Start_Clonezilla
This time pick image-device mode which tells tool you’re restoring FROM archived image TO local device
Point browser dialog toward correct location holding saved backup set—network shares often easiest here especially if large archives involved
Select destination device carefully—it should show up like /dev/sda unless multiple drives present
Confirm overwrite warnings then proceed through final prompts until restoration completes successfully
Afterwards power off guest machine remove ISO media reset firmware order back normal try standard boot sequence—you may need extra steps:
If restored system fails initial POST check whether Secure Boot needs toggling OFF temporarily
For Windows guests sometimes running automatic startup repair fixes BCD/MBR issues (
bootrec /rebuildbcdfrom recovery console)Linux guests might require
update-grubcommand after chrooting into root partition via rescue shell
Always test restored VMs thoroughly before putting them back into production!
How to Backup a Hyper‑V Virtual Machine with Vinchin Backup & Recovery
For organizations seeking streamlined protection beyond manual "clonezilla hyper v" workflows, Vinchin Backup & Recovery offers professional enterprise-level backup capabilities supporting Microsoft Hyper‑V alongside more than 15 mainstream virtualization platforms including VMware, Proxmox, oVirt, OLVM, RHV, XCP-ng, XenServer, OpenStack, ZStack and others worldwide. Vinchin Backup & Recovery delivers robust features such as forever-incremental backup, LAN-free backup across supported platforms including Proxmox and others listed above, granular restore options for precise recovery needs, advanced deduplication and compression technologies for efficient storage utilization, and cross-platform V2V migration—all managed centrally through an intuitive web console designed for ease of use while minimizing administrative overhead.
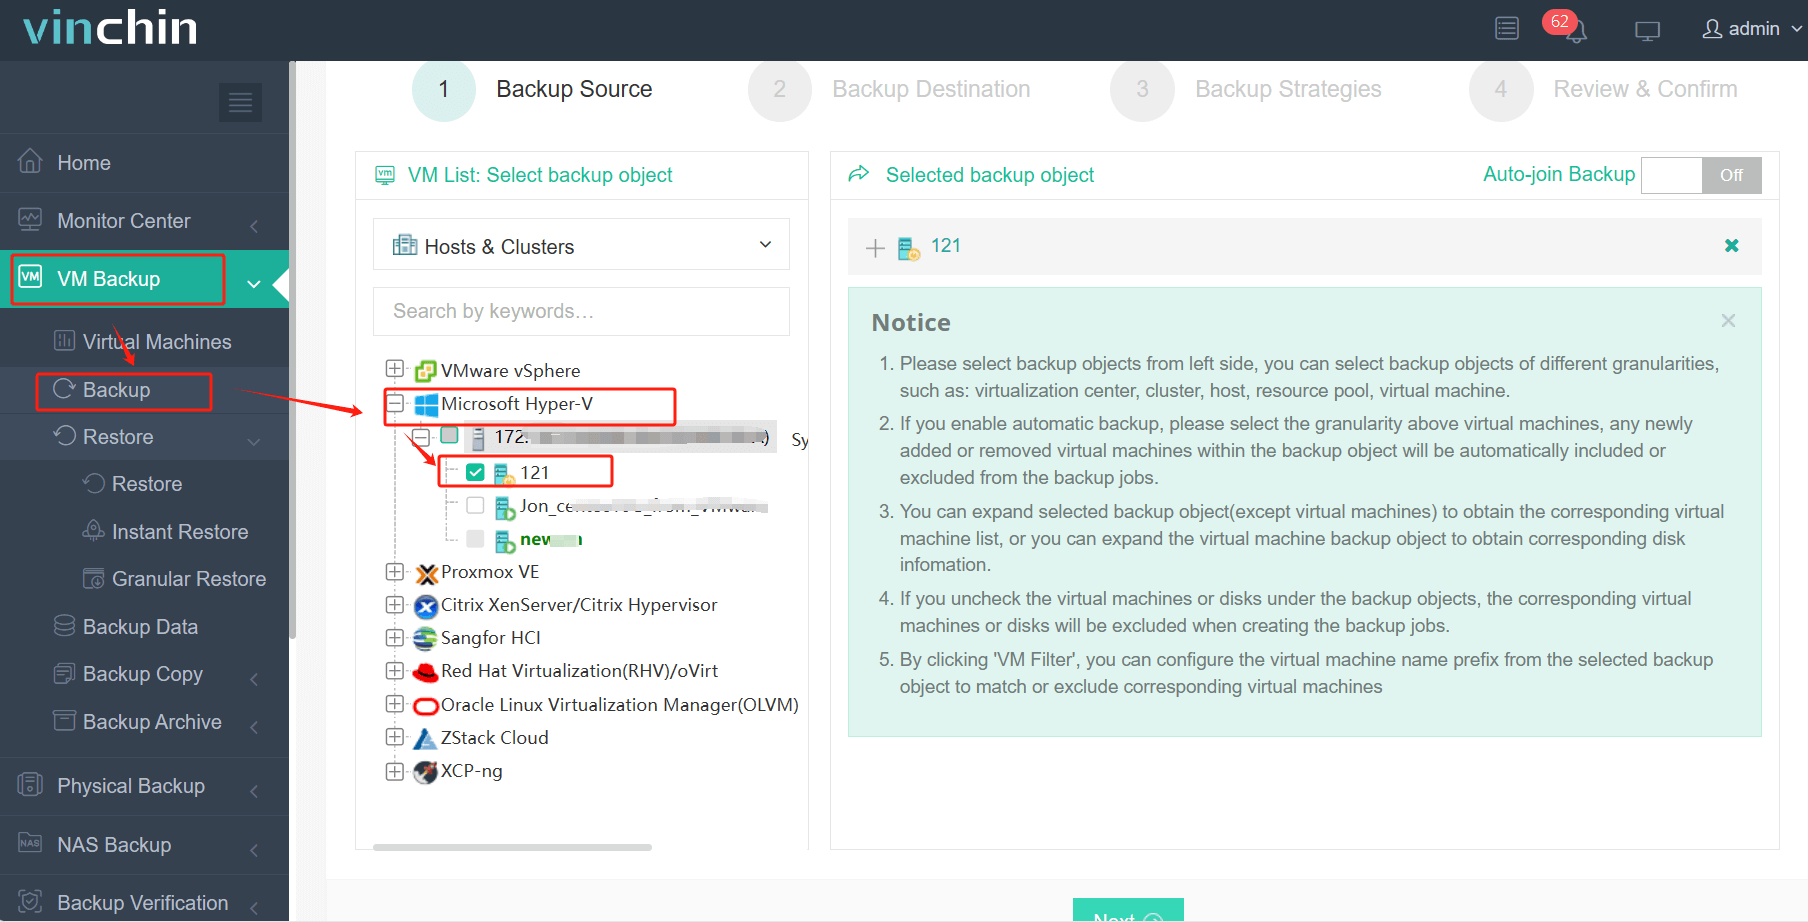
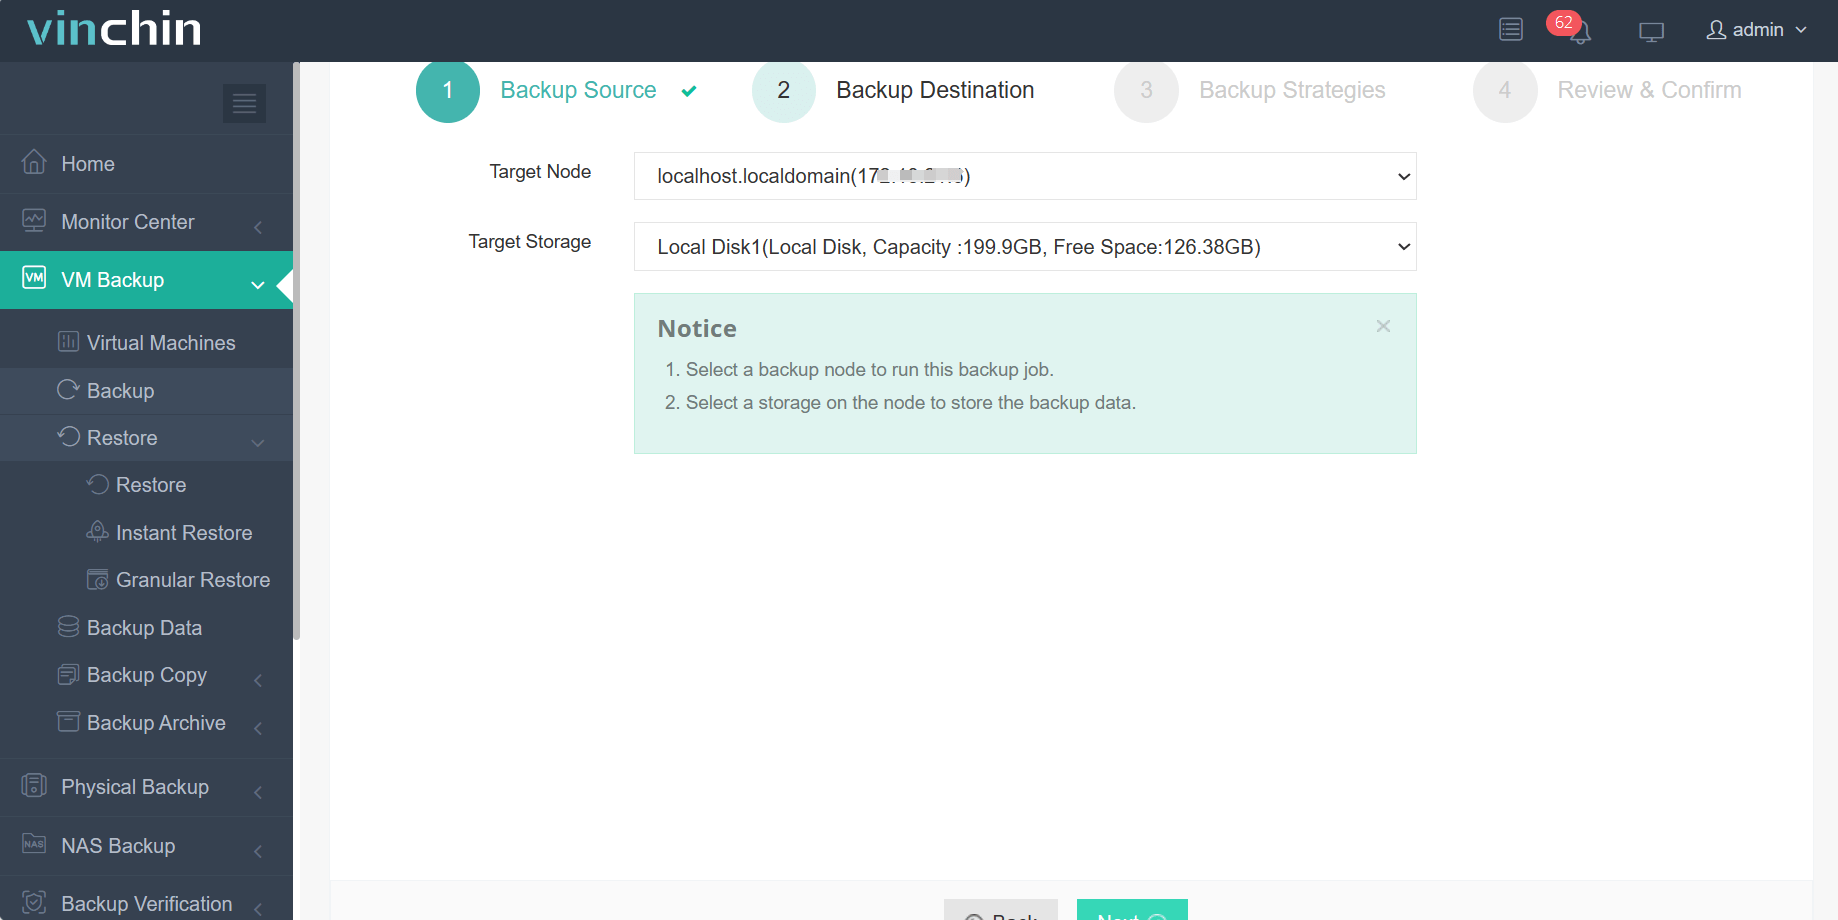
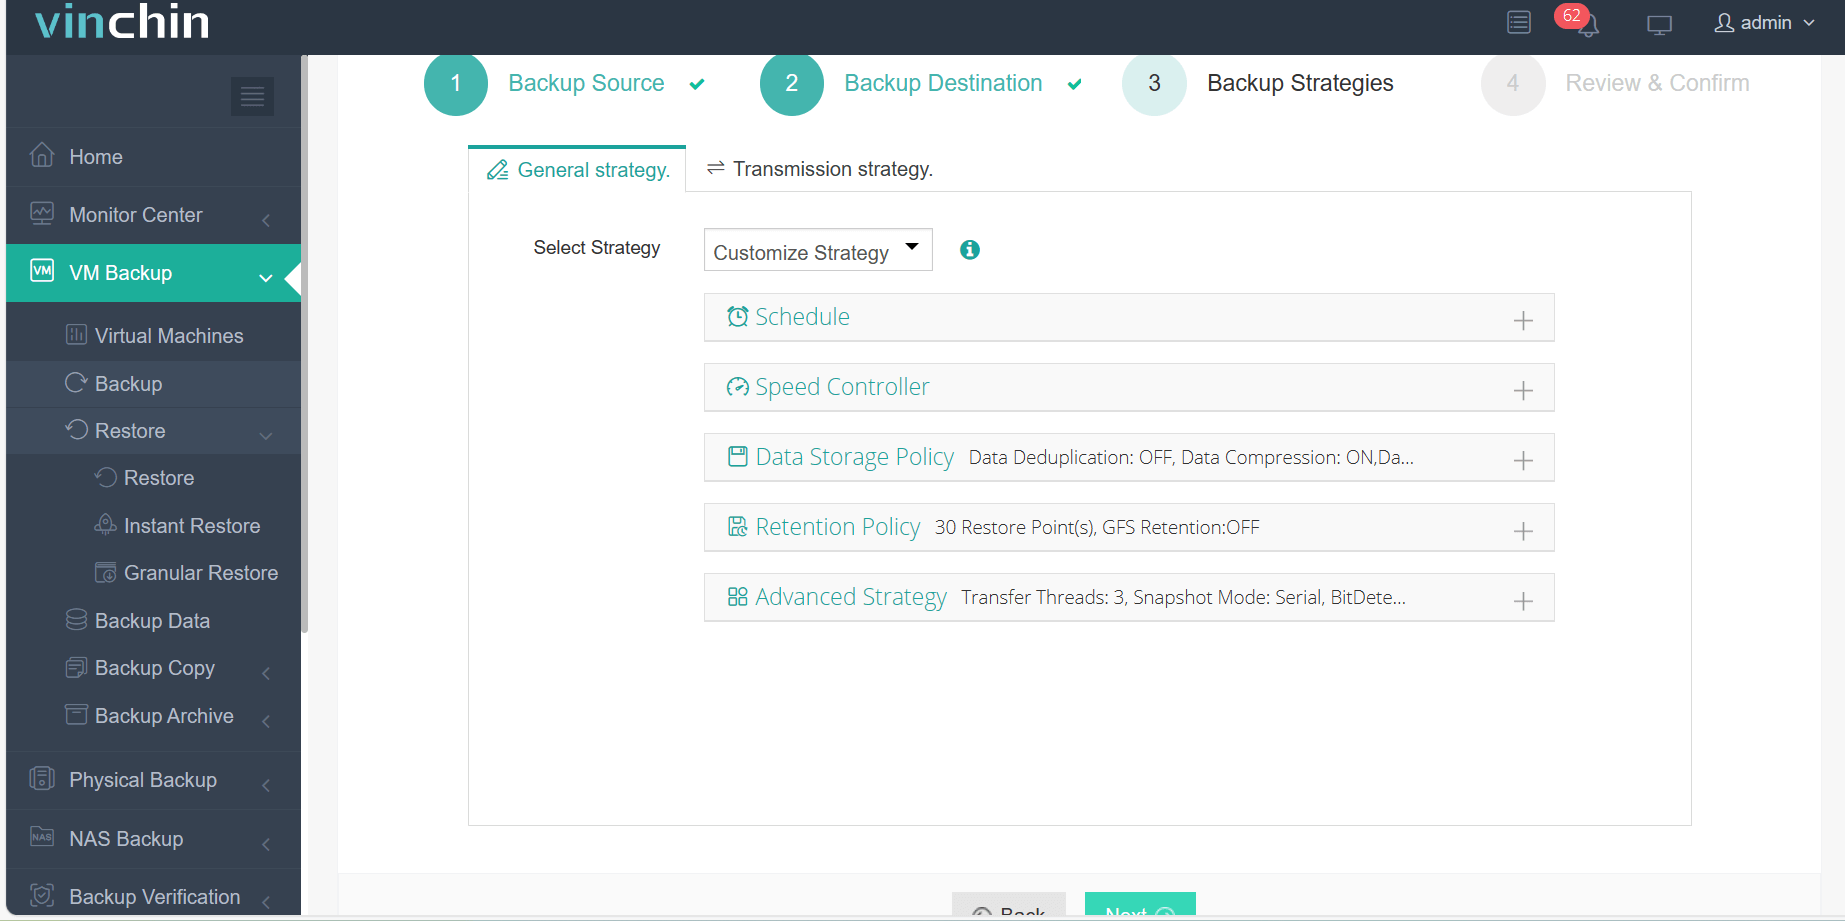
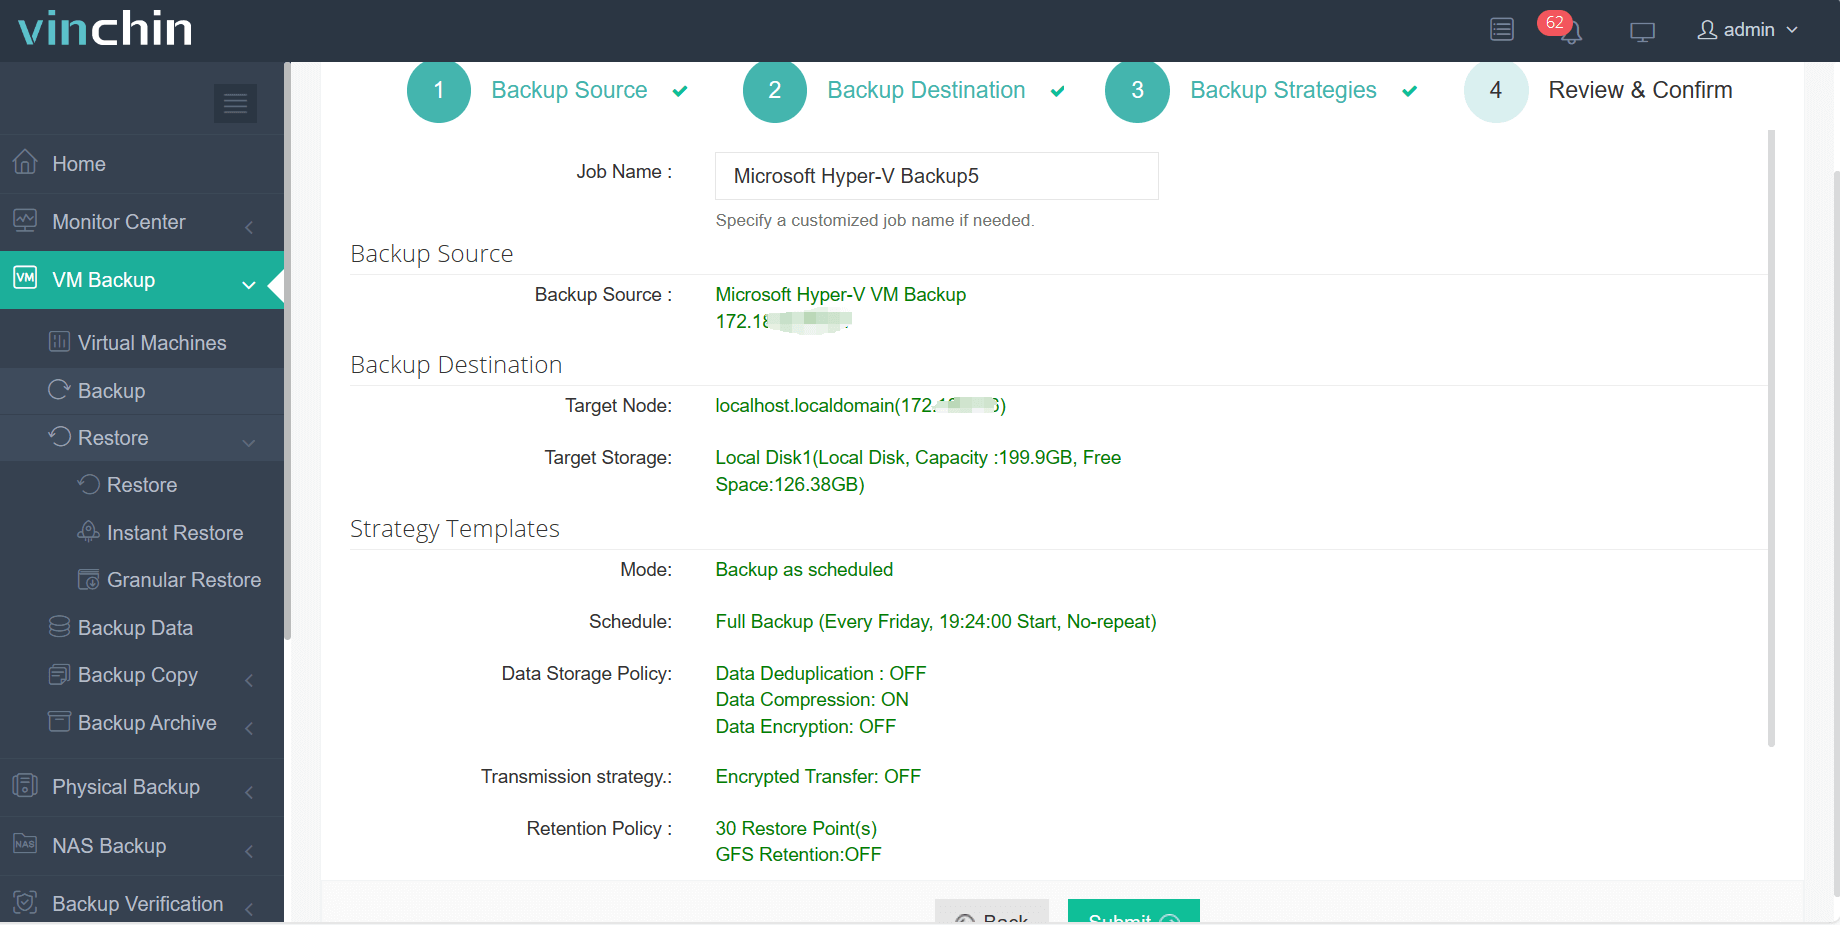
To back up your Hyper‑V virtual machine using Vinchin Backup & Recovery's user-friendly web console:
Step 1: Select the Hyper-V VM to back up.

Step 2: Choose the backup storage.

Step 3: Configure the backup strategy.

Step 4: Submit the job.

Recognized globally among enterprise data-protection solutions—with thousands of customers and top industry ratings—Vinchin Backup & Recovery offers a fully-featured 60-day free trial; click below to experience comprehensive protection firsthand!
FAQs about Using "Clonezilla Hyper V"
Q1: Can I migrate my old physical server straight into a new Gen2 UEFI-enabled Hyper‑V VM using only Clonezilla?
Yes—but make sure original system uses UEFI/GPT layout otherwise stick with Gen1 BIOS emulation for best compatibility after restoration finishes successfully.
Q2: My restored Linux guest boots fine but networking doesn’t work—is this related?
Often yes! Check MAC address assignments inside both guest config files AND DHCP reservations/router ACLs outside—they must match expected values otherwise interfaces stay DOWN post-clone until fixed manually via console access/tools like ip link.
Q3: Is there any way to automate repeated mass deployments using "clonezilla hyper v" techniques?
Yes—you can script batch operations leveraging PXE/netboot setups combined with preseeded answer files/custom hooks though setup complexity rises sharply compared single-use manual jobs described above!
Conclusion
Using "clonezilla hyper v" gives IT teams powerful control over cloning/restoring virtual machines—but demands careful planning plus hands-on troubleshooting skills along way! For automated reliable protection across diverse platforms consider trying Vinchin’s purpose-built solution today—it streamlines every aspect of modern data center backup strategy while saving valuable time/resources overall!
Share on:


