-
What is Kubernetes MySQL Dump?
-
Why Perform MySQL Dumps in Kubernetes?
-
Method 1: Using kubectl exec for MySQL Dump
-
Method 2: Automated Backups with Kubernetes CronJobs
-
Enterprise-Level Protection with Vinchin Backup & Recovery
-
Kubernetes MySQL Dump FAQs
-
Conclusion
Backing up your MySQL database inside Kubernetes is not just a good habit—it’s essential protection against data loss. A single misconfiguration or hardware failure can wipe out critical information in seconds. With workloads running in containers that come and go, you need a backup strategy that fits Kubernetes' dynamic nature. In this guide, we walk through what a Kubernetes MySQL dump is, why it matters for your cluster's safety, and how to perform it using proven methods suitable for both beginners and seasoned admins.
What is Kubernetes MySQL Dump?
A Kubernetes MySQL dump refers to creating a logical backup of your MySQL database running within a Kubernetes cluster by using the mysqldump tool from inside a Pod. This process exports all your schema definitions and data as SQL statements into a file—essentially capturing everything needed to rebuild your database elsewhere or restore after disaster strikes.
Because databases often run inside Pods managed by Deployments or StatefulSets in Kubernetes, accessing them requires container-aware tools like kubectl. Logical backups are portable across clusters or cloud providers since they’re just text files containi ng SQL commands rather than raw disk images.
Why Perform MySQL Dumps in Kubernetes?
Performing regular MySQL dumps in Kubernetes protects you from accidental deletions, failed upgrades, ransomware attacks—or even simple human error during maintenance windows. Logical dumps are especially useful because:
They allow easy migration between clusters or cloud environments.
You can restore individual tables or entire databases without restoring full disk snapshots.
Dumps provide an extra layer of insurance beyond persistent volume snapshots—which may not always be portable across storage backends.
Kubernetes adds complexity due to its ephemeral Pods and dynamic storage provisioning—but with the right approach, you can achieve consistent backups every time.
Method 1: Using kubectl exec for MySQL Dump
One straightforward way to create a Kubernetes MySQL dump is by running mysqldump directly inside your database Pod using kubectl exec. This method works well for small-to-medium databases when you need quick ad-hoc exports or migrations.
Before starting:
Make sure you have access credentials (username/password) with sufficient privileges.
Confirm that
kubectlis installed on your workstation and configured for the correct cluster context.Identify which namespace hosts your database Pod(s).
Let’s break down each step:
Step 1: Identify Your MySQL Pod
First, list all Pods in your target namespace so you know which one runs MySQL:
kubectl get pods -n <namespace>
Replace <namespace> with the actual namespace name (for example: default, prod, etc.).
Step 2: Run mysqldump Inside the Pod
You have two main options here—either open an interactive shell inside the Pod first or run mysqldump directly via kubectl:
Option A: Open Shell Then Run mysqldump
kubectl exec --stdin --tty <mysql_pod_name> -n <namespace> -- bash
mysqldump -u<user> -p<password> <database_name> > /tmp/db_dump.sql
This creates /tmp/db_dump.sql inside the container itself.
Option B: Stream Output Directly To Local Machine
kubectl exec <mysql_pod_name> -n <namespace> -- mysqldump -u<user> -p<password> --single-transaction <database_name> > ./db_dump.sql
This command pipes output straight from the container to your local filesystem as db_dump.sql.
Tip: The flag --single-transaction ensures consistency during export if all tables use InnoDB. For large datasets consider adding --compress.
Step 3: Compressing & Copying Dumps
If you created the dump file within the Pod:
kubectl exec <mysql_pod_name> -n <namespace> -- tar czvf /tmp/db_dump.tar.gz /tmp/db_dump.sql
kubectl cp <namespace>/<mysql_pod_name>:/tmp/db_dump.tar.gz ./db_dump.tar.gz
Now you have a compressed copy on your local machine—ready for archiving or transfer offsite.
Step 4: Restoring From Dump
When restoring:
kubectl cp ./db_dump.sql <namespace>/<mysql_pod_name>:/tmp/db_dump.sql
kubectl exec -it <mysql_pod_name> -n <namespace> -- mysql -u<user> -p<password> <database_name> < /tmp/db_dump.sql
Method 2: Automated Backups with Kubernetes CronJobs
Manual backups work—but people forget things! Automating regular dumps using native CronJobs ensures reliable coverage without daily intervention from admins. CronJobs let you schedule recurring tasks at fixed times (like Linux cron).
Here’s how to automate daily logical backups:
Step 1: Store Credentials Securely Using Secrets
Create a Secret manifest holding base64 encoded username/password values:
apiVersion: v1
kind: Secret
metadata:
  name: mysql-secret
type: Opaque
data:
  username: <base64-user>
  password: <base64-password>
Encode values using echo 'yourvalue' | base64.
Apply it via:
kubectl apply -f mysql-secret.yaml
Step 2: Create PersistentVolumeClaim For Backup Storage
Define where backup files will live persistently—even if Pods restart:
apiVersion: v1
kind: PersistentVolumeClaim
metadata:
  name: mysql-backup-pvc
spec:
  accessModes:
    - ReadWriteOnce
  resources:
    requests:
      storage: 5Gi
Apply this claim so future jobs mount it automatically.
Step 3: Define The CronJob Resource
Here’s an example manifest that runs every day at 01:00 AM UTC:
apiVersion: batch/v1
kind: CronJob
metadata:
 name: mysql-backup
spec:
 schedule: "0 1 * * *"
 jobTemplate:
   spec:
     template:
       spec:
         containers:
         - name: mysql-backup
           image: mysql:8.0
           envFrom:
           - secretRef:
               name: mysql-secret
           volumeMounts:
           - name: backup-storage
             mountPath: /backup
           command:
           - /bin/sh
           - "-c"
           - |
             mysqldump \
               --user=$MYSQL_USER \
               --password=$MYSQL_PASSWORD \
               --single-transaction \
               --all-databases > /backup/mysql-$(date +\%F).sql
         restartPolicy: OnFailure
         volumes:
         - name : backup-storage
           persistentVolumeClaim :
             claimName : mysql-backup-pvc
Apply it via:
kubectl apply -f mysql-backup-cronjob.yaml
Each day at scheduled time you'll find new timestamped .sql files under /backup/.
Enterprise-Level Protection with Vinchin Backup & Recovery
Beyond manual scripts and automation, organizations seeking robust protection should consider advanced solutions tailored for enterprise needs. Vinchin Backup & Recovery stands out as a professional-grade platform designed specifically for comprehensive Kubernetes backup scenarios. It supports features such as full/incremental backups, fine-grained recovery at cluster/namespace/application/PVC/resource levels, policy-based scheduling alongside one-off jobs, encrypted transmission with WORM protection, cross-cluster/cross-version recovery—including heterogeneous multi-cluster environments—and high-speed PVC throughput acceleration through configurable multithreading streams. Together, these capabilities ensure secure, efficient data protection while simplifying compliance and operational continuity across diverse production landscapes.
The intuitive web console of Vinchin Backup & Recovery makes safeguarding your Kubernetes workloads straightforward:
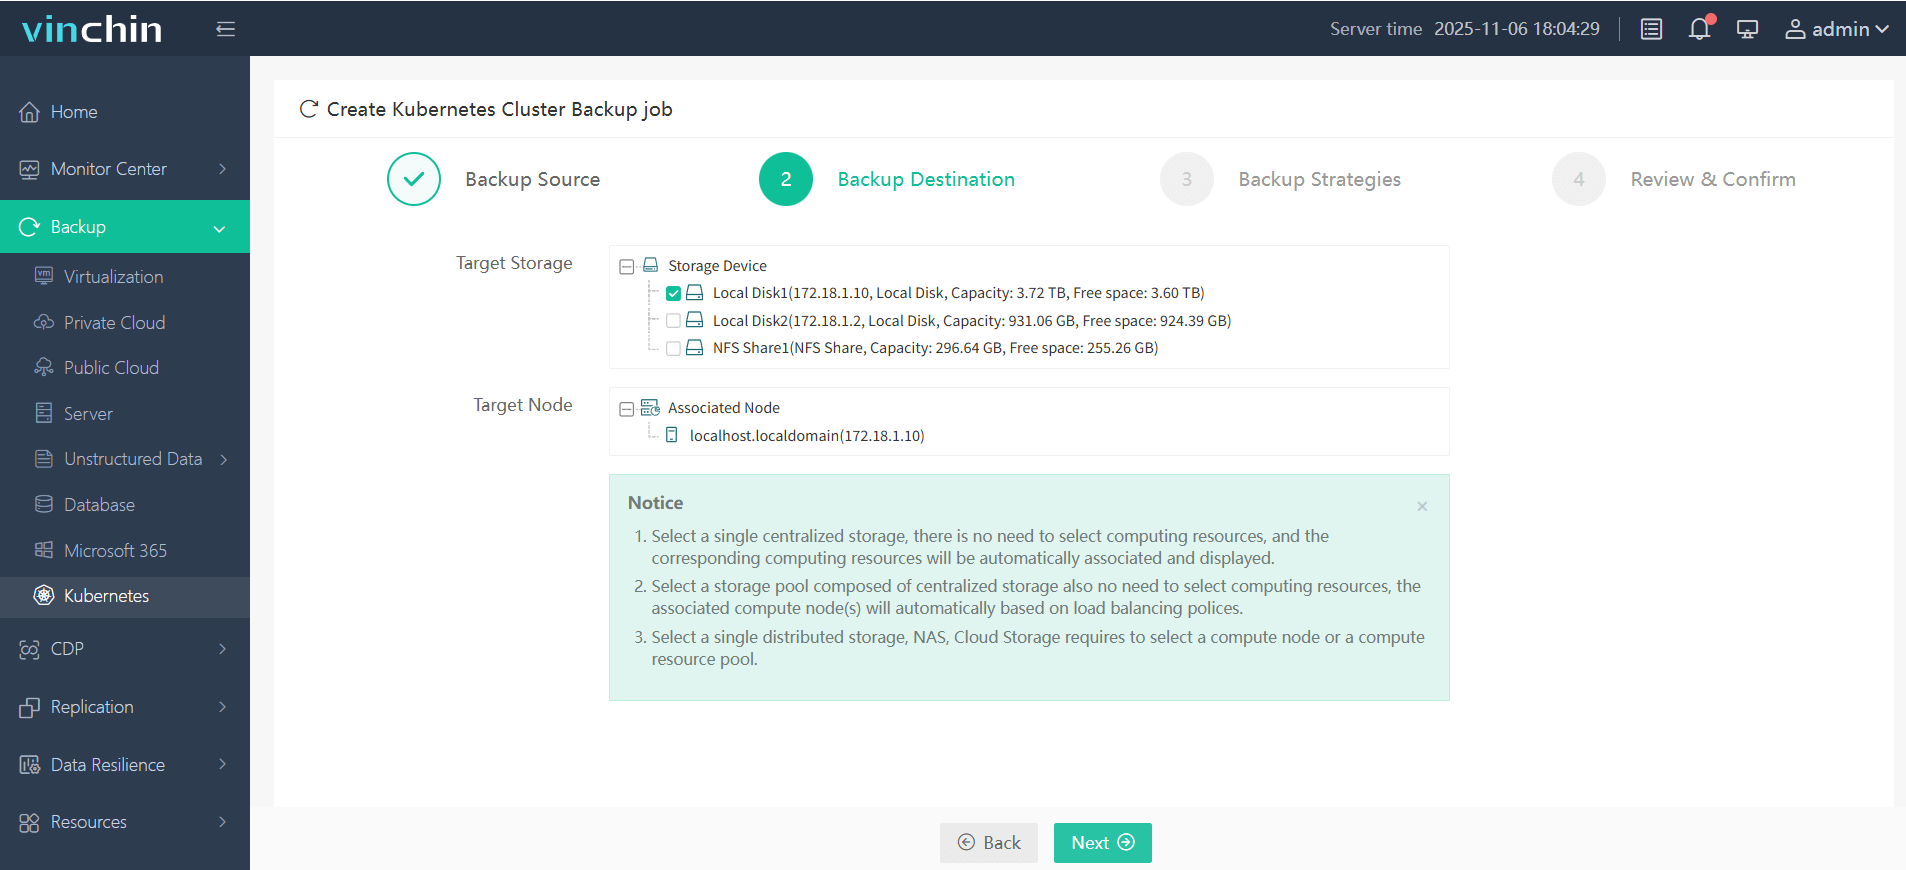
Step 1. Select the backup source

Step 2. Choose the backup storage

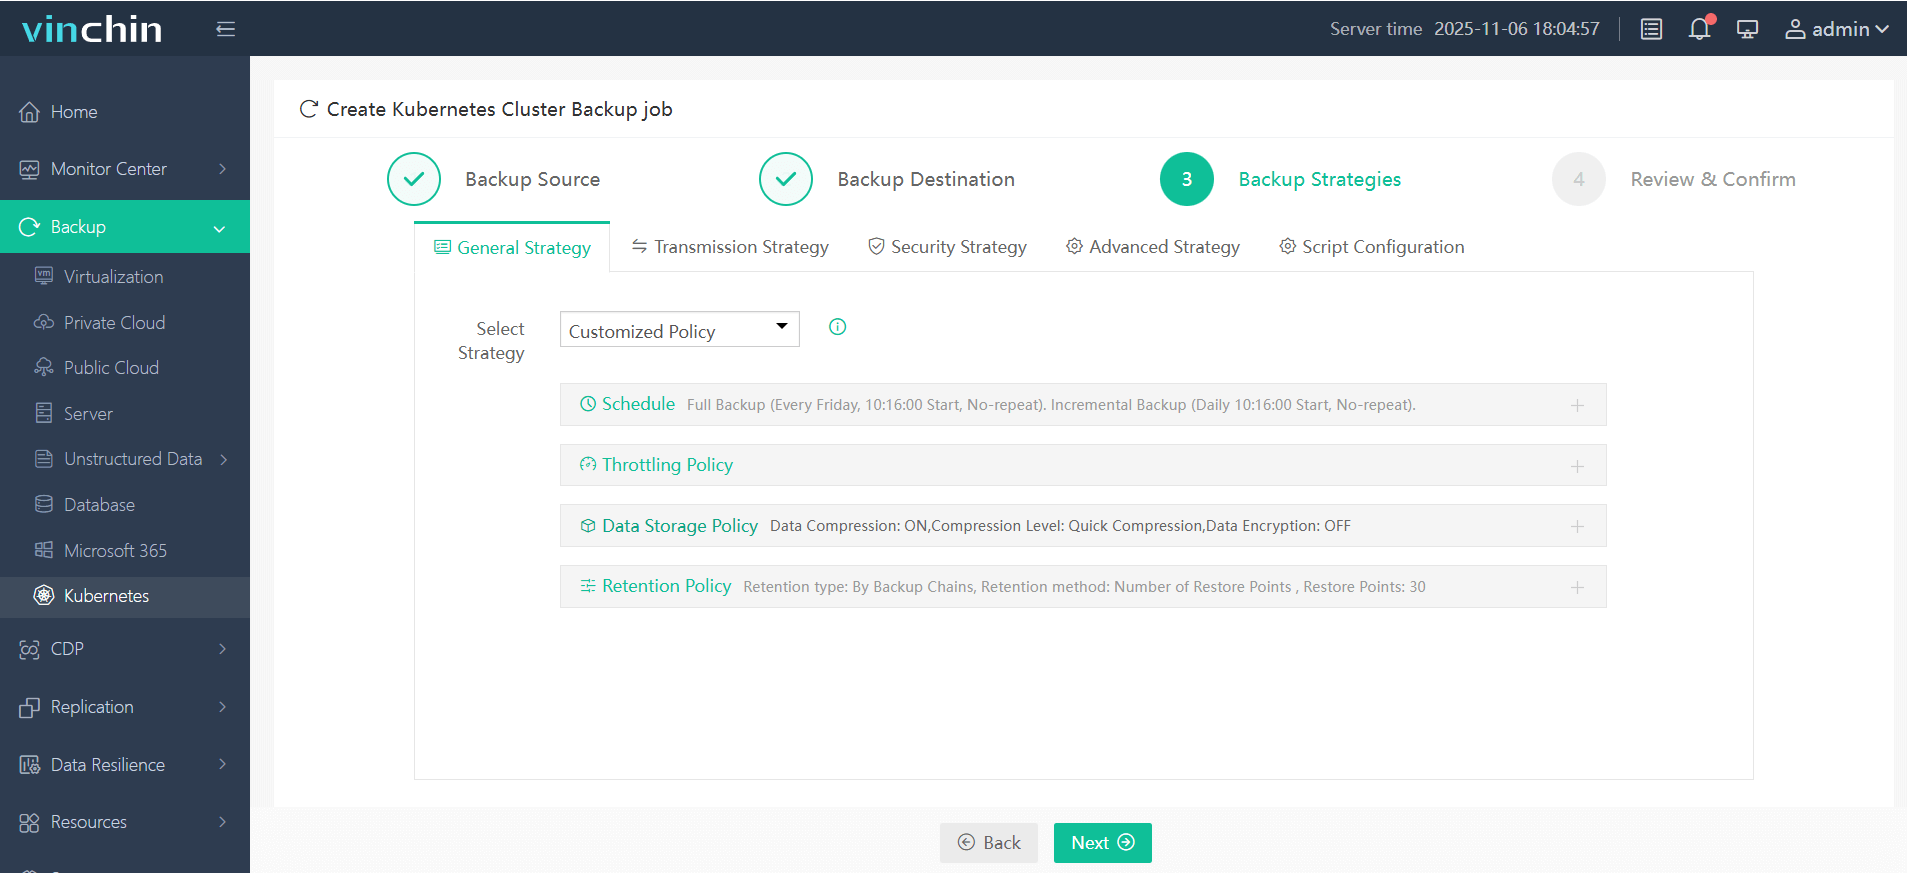
Step 3. Define the backup strategy

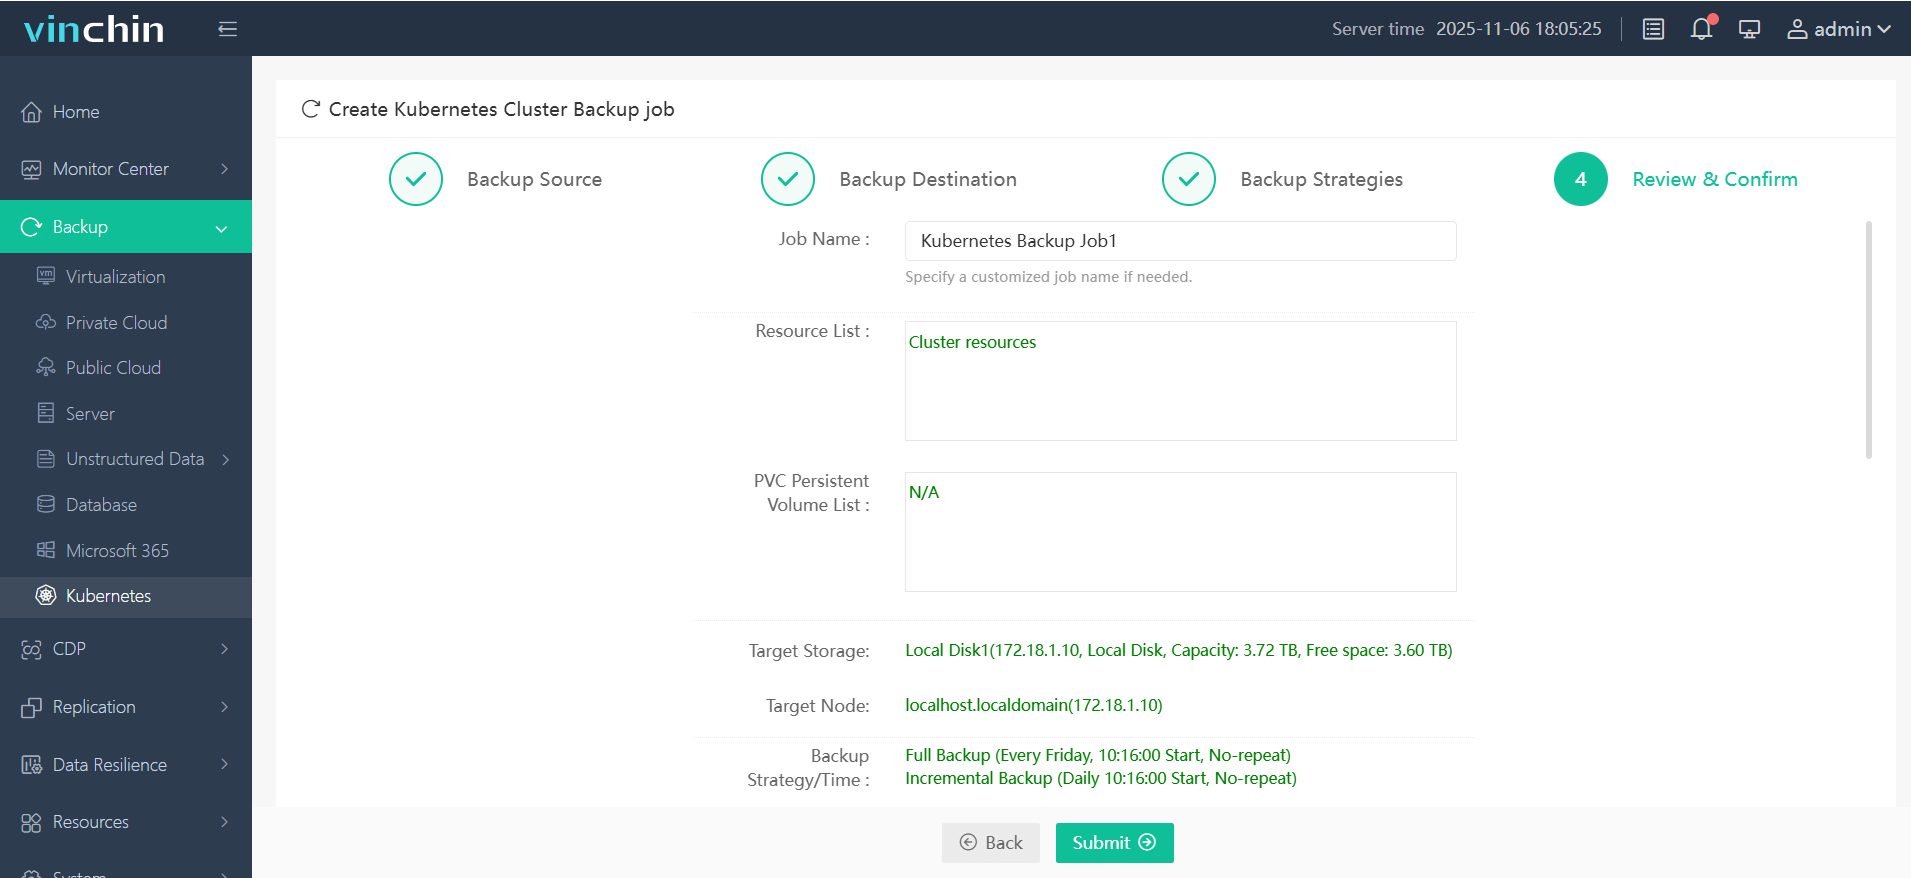
Step 4. Submit the job

Recognized globally with top ratings and trusted by thousands of enterprises worldwide, Vinchin Backup & Recovery offers a fully featured free trial valid for 60 days—click below to experience industry-leading data protection firsthand!
Kubernetes MySQL Dump FAQs
Q1: How do I automate uploading my daily dumps from CronJobs directly into Amazon S3?
A1 Add AWS CLI tools into your job container image then append aws s3 cp /backup/file.sql s3://bucket/path after each successful dump; store credentials securely via Secrets/env vars.
Q2: Can I migrate my existing standalone VM-based database into my new K8s cluster using these methods?
A2 Yes—create a logical dump outside K8s then import it into any K8s-hosted pod following kubectl cp plus kubectl exec steps described above; adjust usernames/databases accordingly!
Q3: How do I monitor whether my scheduled CronJob actually ran successfully last night?
A3 Run kubectl get cronjobs,jobs,pods – look for completed Jobs matching expected timestamps; check logs/events if failures occurred.
Conclusion
Protecting data with regular “kubernetes mysql dump” routines keeps business-critical applications resilient against disaster—whether done manually through kubectl exec or automated via native CronJobs backed by persistent volumes! For advanced needs—including granular restores across namespaces—Vinchin delivers robust enterprise-grade solutions worth exploring today.
Share on:


