-
What Is Kubernetes?
-
Why Use Kubernetes?
-
What Are Key Components of Kubernetes?
-
How Components Work Together?
-
Monitoring & Logging Basics
-
Method 1: Setting Up a Simple Cluster with Minikube
-
Method 2: Setting Up a Simple Cluster with kind
-
How to Protect Your Cluster with Vinchin Backup & Recovery
-
kubernetes for dummies FAQs
-
Conclusion
If you've ever wondered what Kubernetes means or why IT teams rely on it so much, you’re not alone. This kubernetes for dummies guide explains everything in plain English. We’ll start simple: what Kubernetes is, why it matters, how its parts work together—and then walk through setting up your own cluster step by step. By the end, you’ll know how to protect your workloads like a pro.
What Is Kubernetes?
Kubernetes is an open-source platform that helps manage containers at scale. Containers are lightweight packages that hold everything an application needs—code, libraries, settings—so they run reliably anywhere. Instead of running apps directly on servers or virtual machines, you put them in containers.
Kubernetes automates where these containers run across many computers (called nodes). It handles starting apps when needed, scaling them up or down based on demand, fixing failures automatically, and rolling out updates without downtime. Think of Kubernetes as air traffic control for your applications: always watching over them so they stay healthy.
Why Use Kubernetes?
Modern businesses depend on applications that must be reliable—even during heavy traffic or hardware failures. Managing dozens or hundreds of containers by hand quickly becomes impossible. That’s where Kubernetes shines.
With Kubernetes:
You can deploy new versions without taking services offline.
If one server fails, workloads move automatically to healthy ones.
Scaling up during busy hours—or down when things are quiet—is automatic.
Resource usage stays efficient because unused containers get cleaned up.
In short: Kubernetes saves time while making systems more robust. No wonder IT teams everywhere trust it with their most important apps.
What Are Key Components of Kubernetes?
Before diving into setup or management tasks, let’s break down the main building blocks inside every cluster.
Cluster: A group of computers (nodes) managed together as one system by Kubernetes.
Node: An individual machine—physical or virtual—that runs containerized applications.
Pod: The smallest deployable unit in Kubernetes; usually holds one container but can have several tightly coupled ones sharing resources like storage or network addresses.
Deployment: A set of rules describing how pods should be created and updated; ensures there are always enough healthy copies running.
Service: Provides a stable way to access pods even as they come and go; acts like a load balancer within the cluster.
Namespace: Divides cluster resources among users or projects; useful for organizing large environments or separating development from production workloads.
ConfigMap & Secret: Store configuration data separately from code; Secrets encrypt sensitive info like passwords while ConfigMaps handle general settings.
Volume: Persistent storage attached to pods; keeps data safe even if pods restart or move between nodes.
Control Plane: The “brain” managing all activity in the cluster—deciding where pods run and monitoring their health continuously.
Kubelet: An agent running on each node that talks to the Control Plane; makes sure assigned containers stay healthy and report status back regularly.
How Components Work Together?
Each part plays a unique role—but they only shine when working together. For example: When you create a Deployment describing your app’s desired state (like three replicas), the Control Plane schedules Pods onto available Nodes using Kubelets as local managers. Services make sure users can reach those Pods no matter which Node they land on.
Monitoring & Logging Basics
Keeping clusters healthy means knowing what’s happening inside them at all times. Built-in tools like kubectl logs, kubectl describe pod, and resource metrics help spot problems early—from failed deployments to slow responses caused by resource limits. Many admins also add external monitoring solutions such as Prometheus plus Grafana dashboards for deeper insights into performance trends.
Method 1: Setting Up a Simple Cluster with Minikube
Minikube lets you run a full-featured local Kubernetes cluster right on your laptop—a great way to learn without risk. Here’s how you get started:
First install Minikube along with kubectl, which is used to talk to clusters:
On Windows: Install via Chocolatey
On macOS: Use Homebrew
On Linux: Try your package manager
Check official Minikube docs for exact commands per OS version.
Once installed:
1. Open Terminal
2. Start your cluster by typing minikube start
3. Check status using minikube status—you should see both Cluster and Node marked “Running”
4. List nodes with kubectl get nodes—expect one named minikube
5. Deploy an app:
Run
kubectl create deployment hello-minikube --image=kicbase/echo-server:1.0Expose it using
kubectl expose deployment hello-minikube --type=NodePort --port=8080
6. Access your app by typing minikube service hello-minikube—follow the URL shown
Method 2: Setting Up a Simple Cluster with kind
kind (“Kubernetes IN Docker”) creates clusters inside Docker containers rather than virtual machines—it’s fast and lightweight but still powerful enough for real testing scenarios.
To begin:
1. Install Docker Engine if not already present
2. Download kind following official quick-start guide
3. Create a cluster using kind create cluster
4. Verify node presence via kubectl get nodes—look for kind-control-plane
5. Deploy an app:
Type
kubectl create deployment hello-kind --image=nginxExpose it using
kubectl expose deployment hello-kind --type=NodePort --port=80
6. Find service port via kubectl get service hello-kind, then connect using Docker host IP plus listed port
How to Protect Your Cluster with Vinchin Backup & Recovery
After setting up your Kubernetes environment, ensuring robust protection for critical data and workloads becomes essential in enterprise operations today. Vinchin Backup & Recovery stands out as a professional-grade solution purpose-built for comprehensive backup and disaster recovery across modern container platforms like Kubernetes clusters at scale.
Among its extensive capabilities are fine-grained backup and restore (by namespace/application/PVC/resource), policy-based automated scheduling alongside manual jobs, encrypted transmission plus WORM protection against tampering, cross-cluster/cross-version recovery supporting heterogeneous environments, and high-speed multithreaded PVC backup acceleration—all designed to maximize reliability while minimizing operational overheads for administrators managing dynamic cloud-native infrastructures.
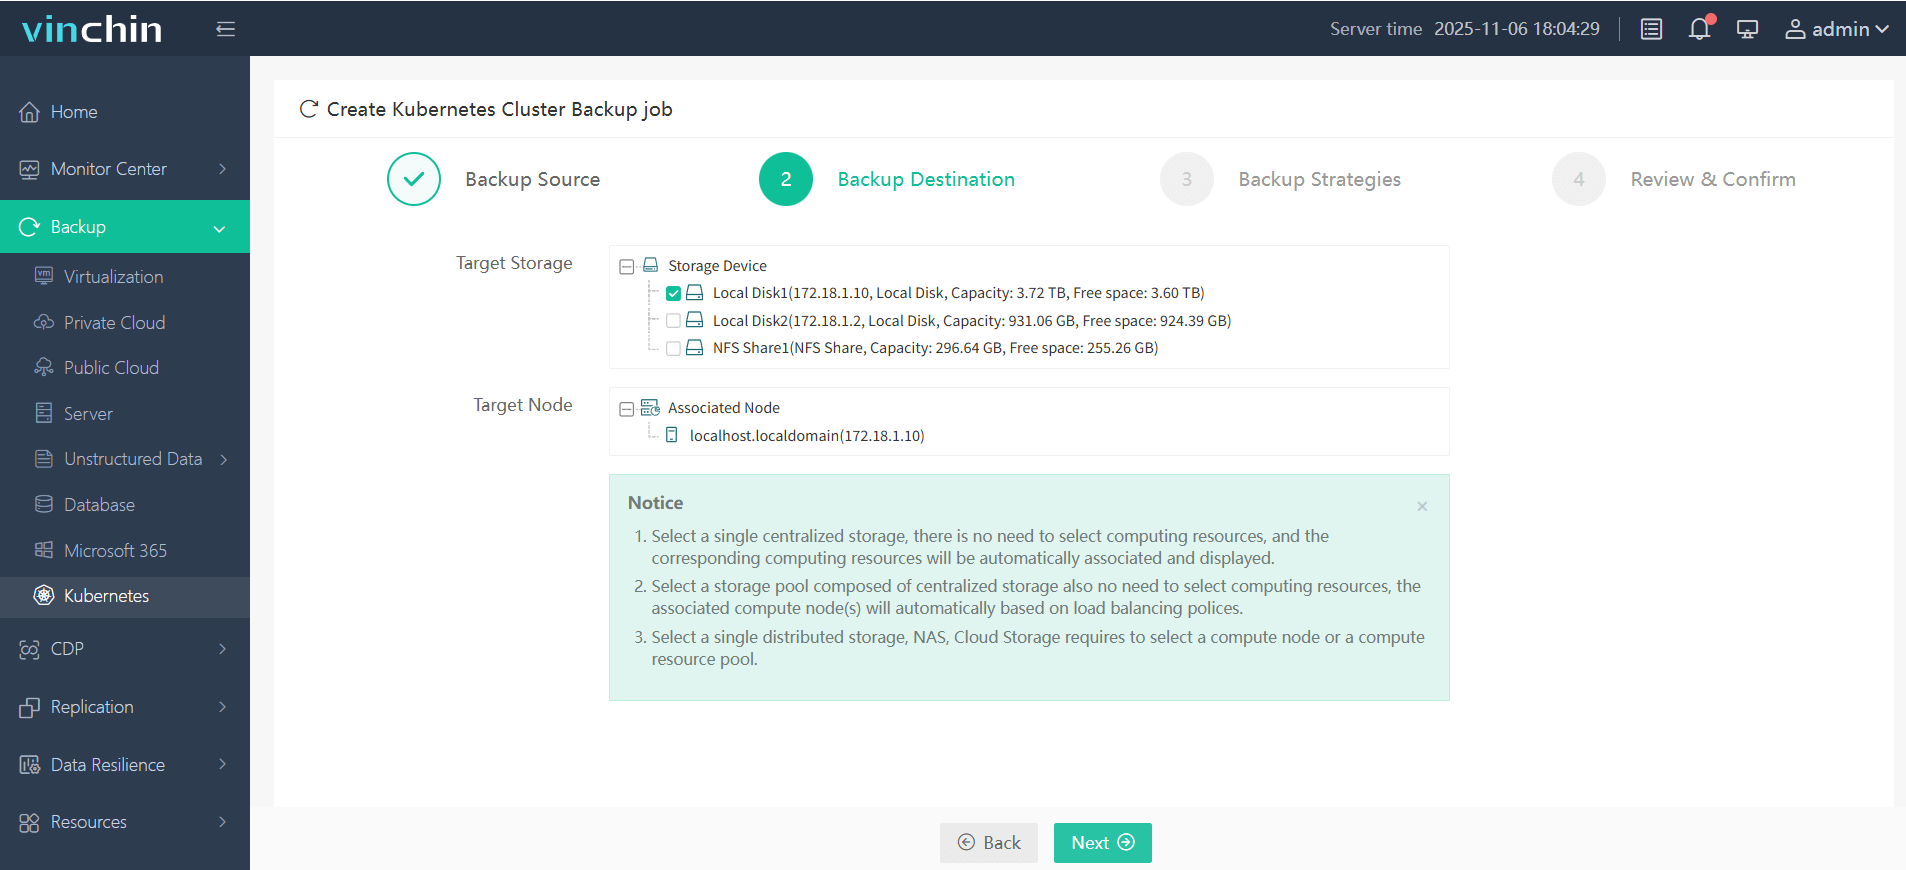
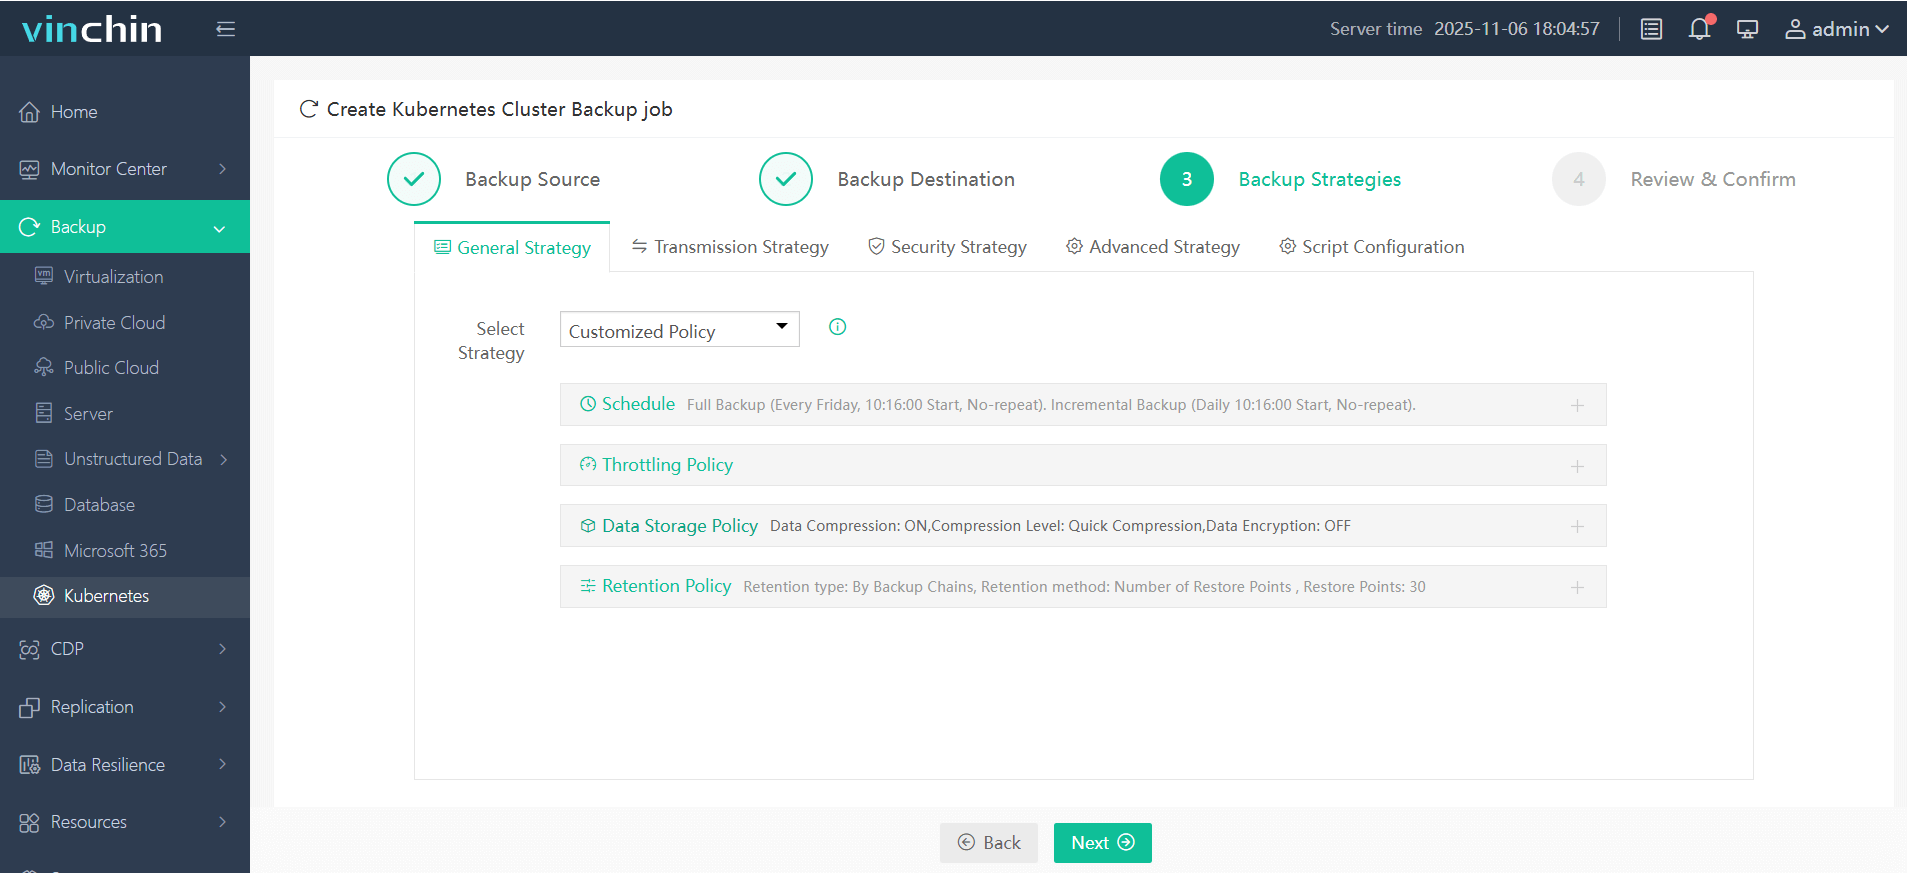
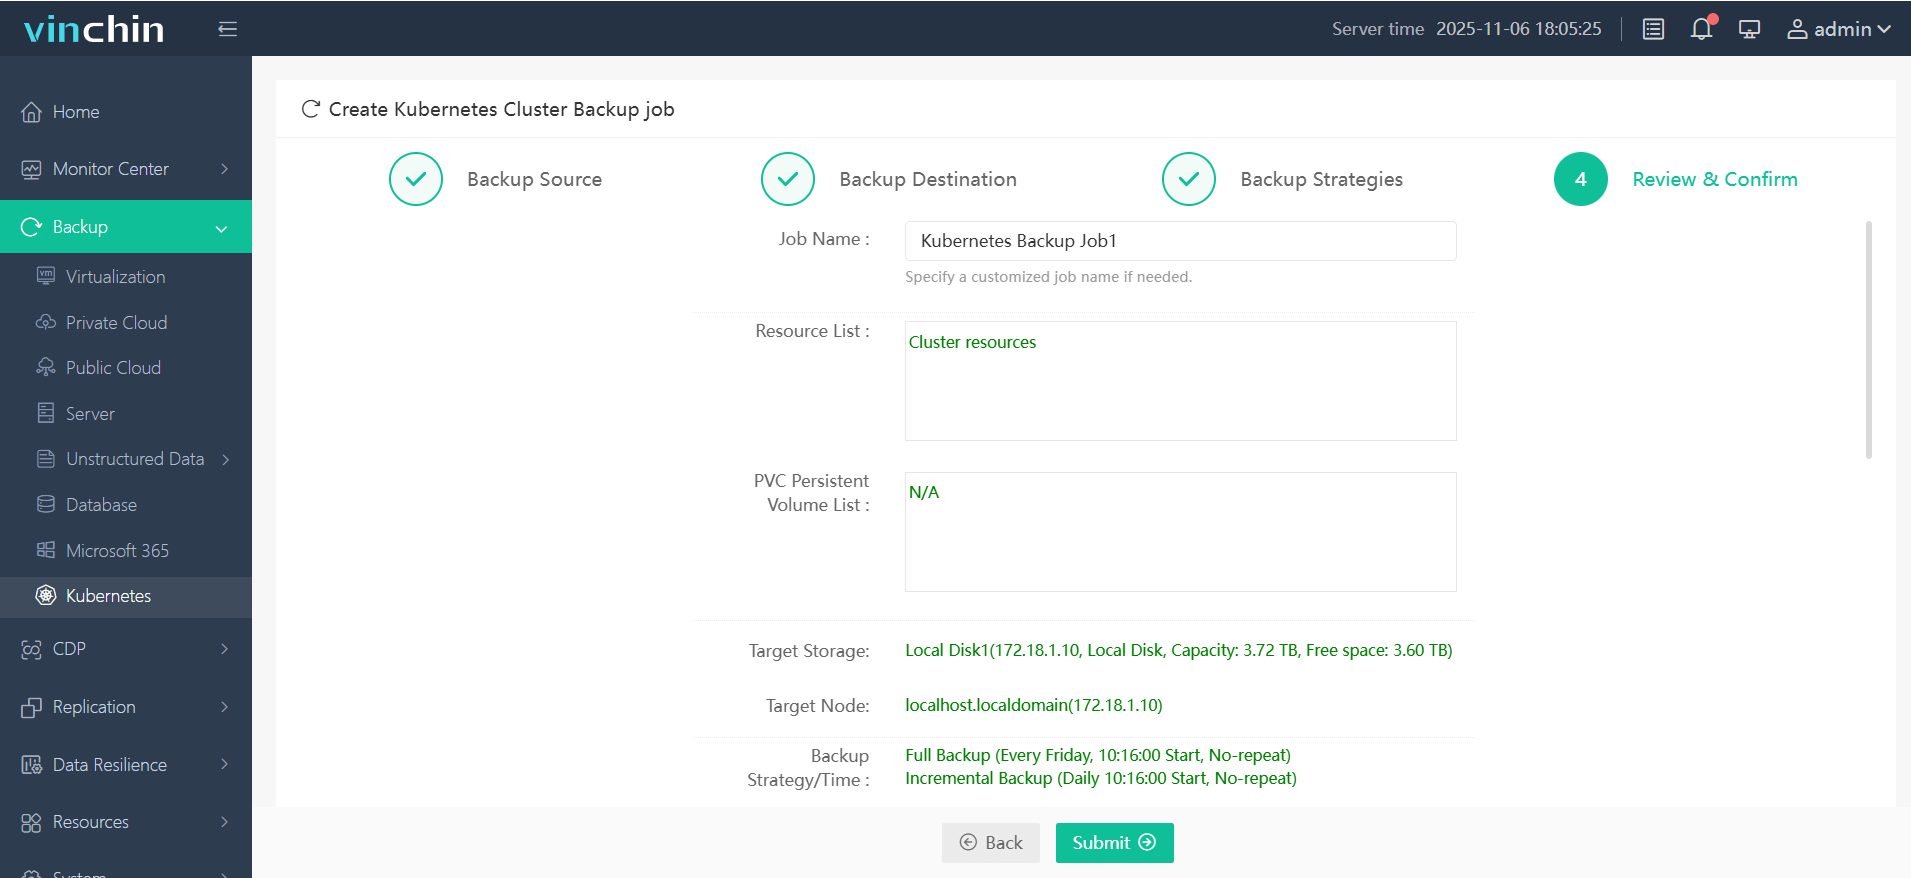
The intuitive web console streamlines backup management into four straightforward steps tailored specifically for Kubernetes workflows:
Step 1. Select the backup source

Step 2. Choose the backup storage

Step 3. Define the backup strategy

Step 4. Submit the job

Recognized globally with top ratings from thousands of enterprise customers, Vinchin Backup & Recovery offers a fully featured 60-day free trial—click below to experience industry-leading data protection firsthand!
kubernetes for dummies FAQs
Q1: Can I run multiple isolated environments on my laptop?
A1: Yes—with Namespaces in Minikube/kind you can separate dev/test/prod easily without extra hardware investment!
Q2: How do I recover accidentally deleted application data?
A2: Restore affected Namespace/Application/PVC from latest Vinchin backup directly through its web console interface—it takes just minutes!
Q3: What if my Pod keeps crashing after deploying updates?
A3: Use kubectl describe pod POD_NAME plus log inspection (kubectl logs POD_NAME) to diagnose errors quickly before rolling back changes!
Conclusion
Learning kubernetes for dummies style means breaking complex ideas into simple steps anyone can follow—from first install all the way through advanced protection strategies! With tools like Minikube/kind setup takes minutes—and Vinchin delivers peace-of-mind backups trusted worldwide by IT pros everywhere!
Share on:


