Backing up your server is not just smart—it’s essential. Data loss can strike at any time due to hardware failure, ransomware attacks, or simple mistakes. Using an external hard drive for server backup gives you a reliable way to protect business data without complex infrastructure or high costs. But what does it take to set this up? Let’s explore everything from basic manual copies to advanced automation so you can keep your servers safe—no matter your experience level.
What Is an External Hard Drive for Server Backup?
An external hard drive for server backup is a portable storage device that connects directly to your server—usually by USB or Thunderbolt—and stores copies of critical data outside the main system disks. These drives range from small portable models with a few terabytes of space to large desktop units holding more than 20TB.
External hard drives are popular because they’re easy to use, affordable, and flexible enough for both manual and automated backups. You can disconnect them after each job or move them offsite as part of disaster recovery planning.
Why Use External Hard Drive for Server Backup?
Why do so many organizations rely on external hard drives? First, setup is simple—you don’t need network configuration or extra software just to get started. Second, these drives offer physical separation from production systems; if malware hits your network or someone deletes files by accident, your backups stay safe if the drive was unplugged at the time.
Many IT teams use external hard drives as part of a broader 3-2-1 backup strategy: three total copies of data, stored on two different media types (like disk plus tape), with one copy kept offsite. This approach reduces risk from fire, theft, or natural disasters while keeping costs low compared to cloud-only solutions.
How to Manually Back Up a Server to an External Hard Drive?
Manual backups are straightforward but require discipline—they work well in small environments where automation isn’t needed yet.
Manual Backup on Windows Servers
1. Start by connecting your external hard drive via USB or Thunderbolt port.
2. If prompted by Windows Security pop-ups about new hardware found—approve installation.
3. Open File Explorer, select folders/files you want backed up.
4. Right-click selection > choose Copy.
5. Navigate into the external hard drive under “This PC,” right-click inside folder area > select Paste.
6. For very large datasets—or when copying fails midway—use Command Prompt’s built-in tool:
7. Open Command Prompt as Administrator
8. Type robocopy C:\Data E:\Backup\Data /MIR /Z /R:3 (replace paths as needed)
This command mirrors source directory structure onto destination while retrying failed transfers automatically.
Once finished always eject safely using “Safely Remove Hardware” icon near clock—or through File Explorer right-click menu—to avoid corruption risks!
Manual Backup on Linux Servers
1. Plug in the external disk; most modern distributions auto-mount under /media or /run/media.
2. If not visible run lsblk in terminal—to find device name such as /dev/sdb1.
3. Mount manually if needed:
sudo mount /dev/sdb1 /mnt/external
4. To copy files use either cp -a (preserves attributes) or rsync:
rsync -avh /srv/data/ /mnt/external/server-backup/
5. After transfer completes unmount cleanly:
sudo umount /mnt/external
Manual methods suit occasional backups—but remember they depend entirely on human action!
How to Automatically Back Up a Server Using Windows Server Backup?
Automated tools save time—and reduce risk from forgotten jobs! Most recent versions of Windows include built-in scheduling through Windows Server Backup utility.
1. Connect formatted NTFS/MFT-compatible external disk first.
2. If not detected open Disk Management via right-click Start Menu > choose “Disk Management.”
3. Check that partition style matches requirements (MBR preferred by older WSB versions).
4. To convert between GPT/MBR right-click disk label > select “Convert To MBR Disk” (Warning: this erases all existing partitions).
5. Now launch Server Manager, go into top-right menu labeled Tools, then pick Windows Server Backup.
6. In left pane click “Local Backup,” then look under Actions pane at right side—choose “Backup Schedule.”
7. Wizard opens:
Select either “Full server” (entire image) OR “Custom” (pick folders/drives).
8. When asked where backups should be saved choose connected external disk—it appears under available destinations list.
9. Set frequency (“Daily,” “Weekly”) based on business needs.
10. Review summary screen carefully before clicking Finish!
From now onward scheduled jobs run automatically—even if no user logs in—as long as disk remains attached during window specified!
Always monitor logs inside WSB console after each run; errors here signal problems needing attention quickly!
How to Automatically Back Up a Linux Server Using Rsync?
Linux admins often prefer rsync—a robust tool designed specifically for efficient file synchronization across local/removable storage devices.
1. First ensure target disk mounts consistently every reboot—for true automation edit /etc/fstab adding entry like:
UUID=xxxxxxx /mnt/external ext4 defaults,nofail,x-systemd.device-timeout=10 0 2
2. Find UUID using blkid; adjust filesystem type accordingly!
3. With mount point ready create script such as:
#!/bin/bash
rsync -av --delete /home/ /mnt/external/home-backup/
4. Make executable (chmod +x scriptname.sh). Test manually first!
5. Schedule regular runs using cron:
6. Type crontab -e, then insert line like
0 2 * * * /path/to/scriptname.sh
7. This triggers daily sync at 2 AM sharp!
8. Monitor output logs (--log-file=/var/log/rsync.log) so failures never go unnoticed!
9. Unmount safely after completion (sudo umount /mnt/external) especially if rotating multiple disks weekly/monthly!
Enterprise File Protection With Vinchin Backup & Recovery
As organizations scale their infrastructure and demand more robust protection beyond manual processes, adopting an enterprise-grade solution becomes crucial. Vinchin Backup & Recovery stands out as a professional file backup platform supporting nearly all mainstream storage types—including direct-attached storage like external hard drives for server backup, along with NAS devices and S3 object storage. Its proprietary technologies such as simultaneous scanning/data transfer and merged file transmission enable exceptionally fast backup speeds that outperform other vendors significantly.
Vinchin Backup & Recovery delivers advanced capabilities including incremental backup strategies, wildcard filtering options for precise selection, multi-level compression algorithms, automatic re-connection handling during interruptions, and seamless cross-platform restore functionality—allowing any file backup job to be restored flexibly across file servers, NAS appliances, or object storage targets. Together these features ensure maximum efficiency while minimizing resource consumption and operational complexity.
The intuitive web console makes managing backups effortless—even at scale—with just four steps required:
Step 1. Select the files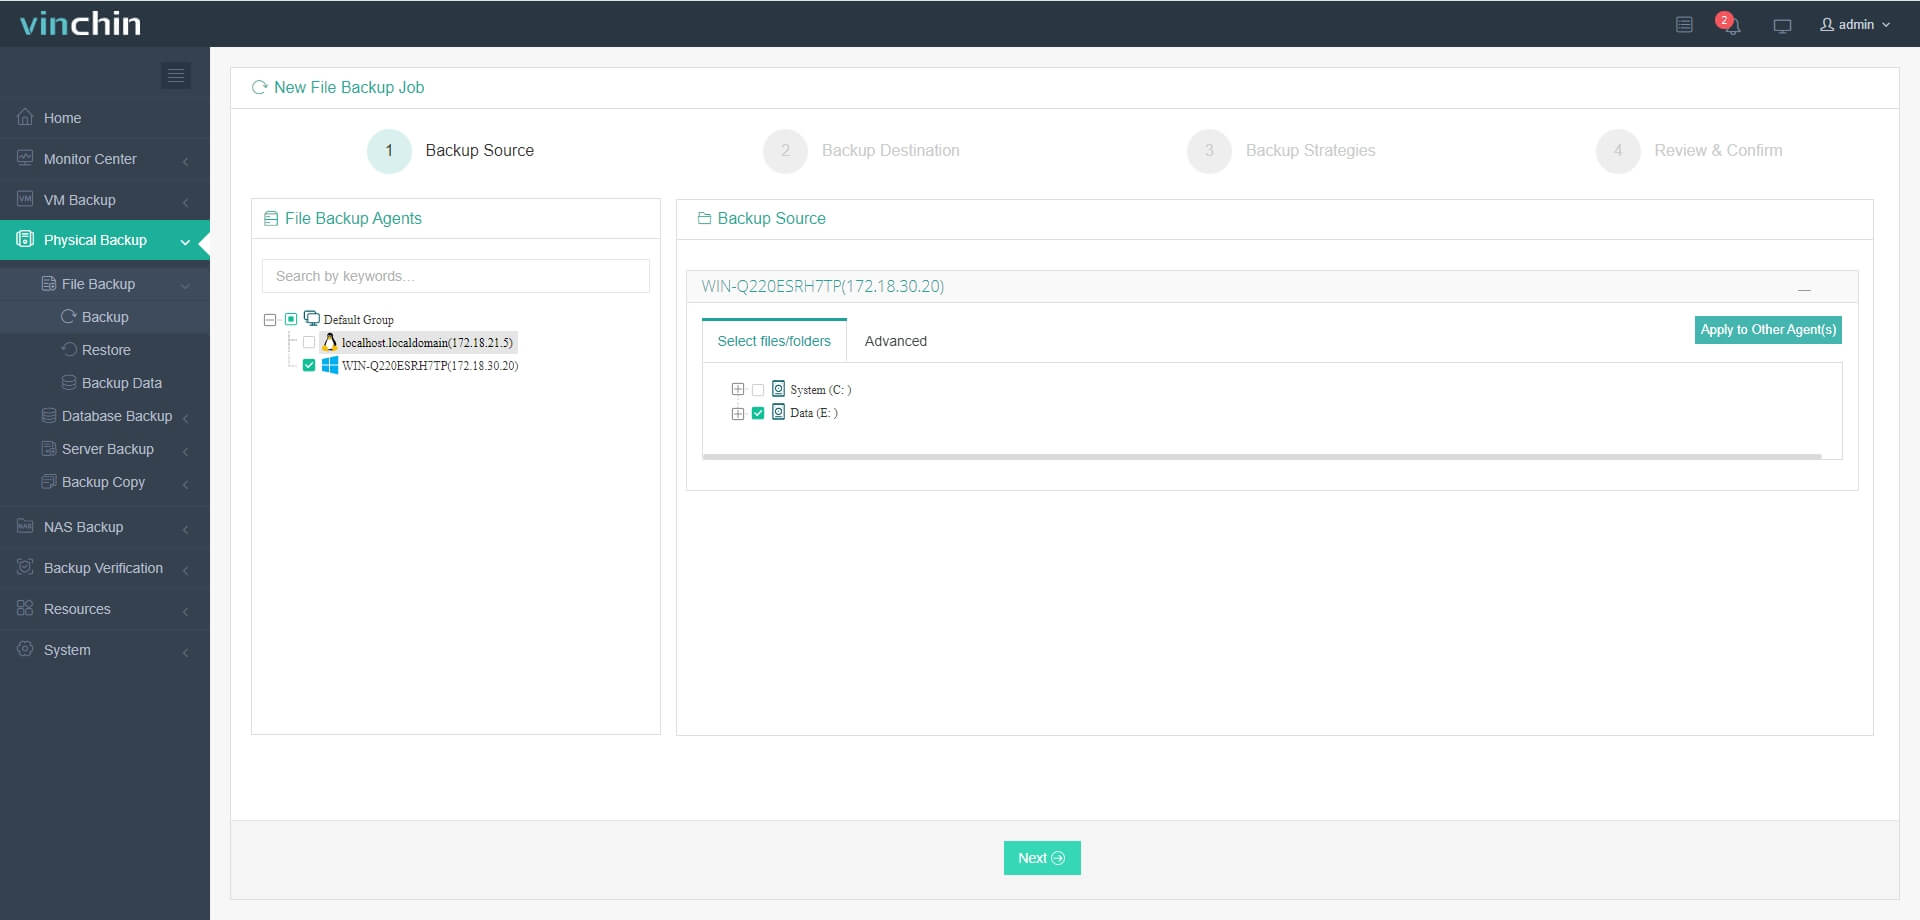
Step 2. Choose the desired backup destination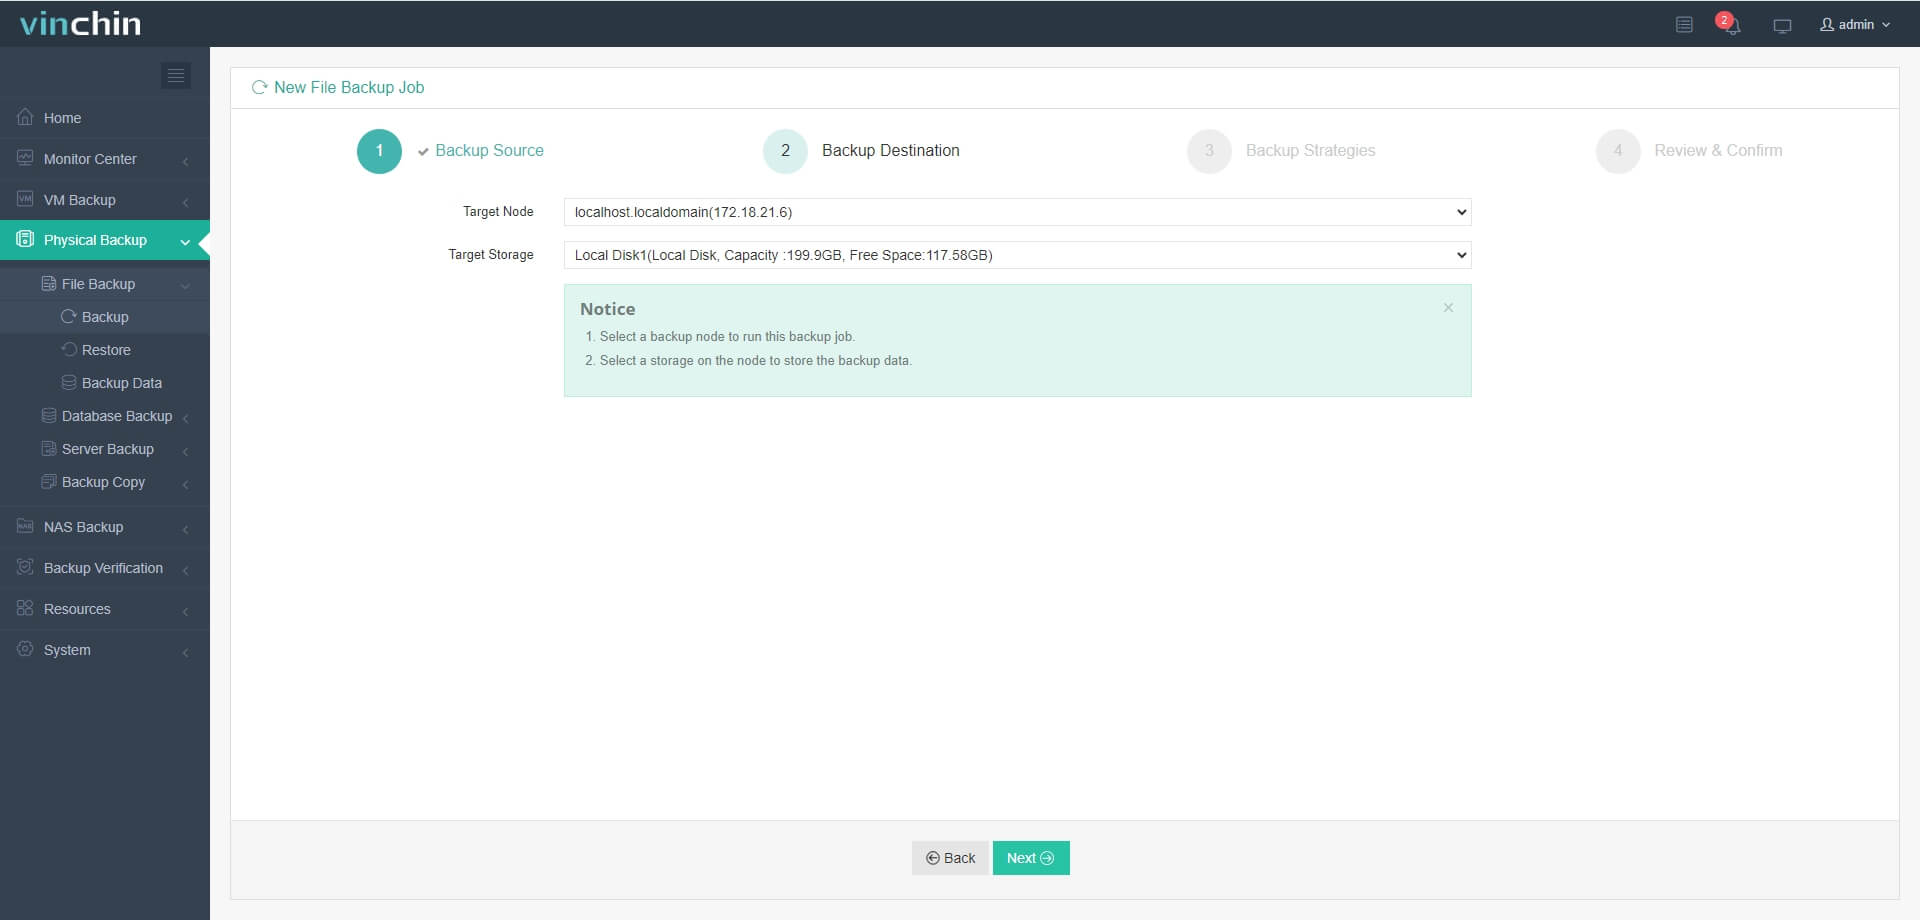
Step 3. Define policy details such as schedule and retention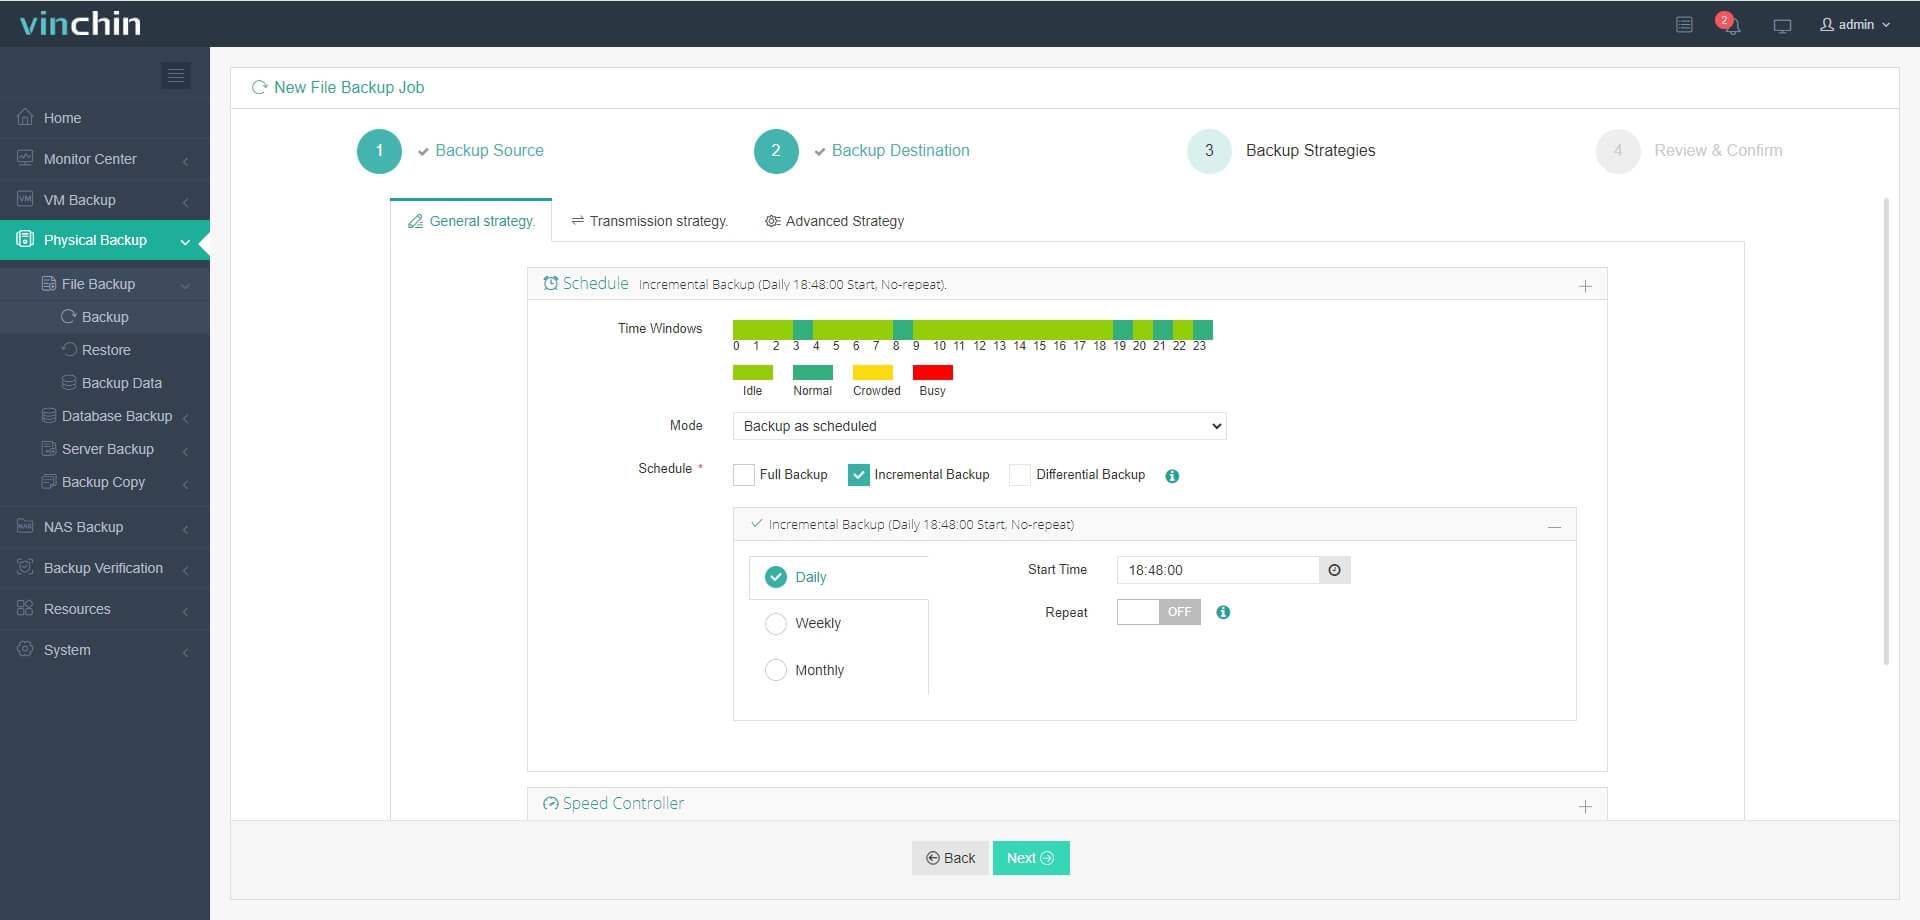
Step 4. Submit the job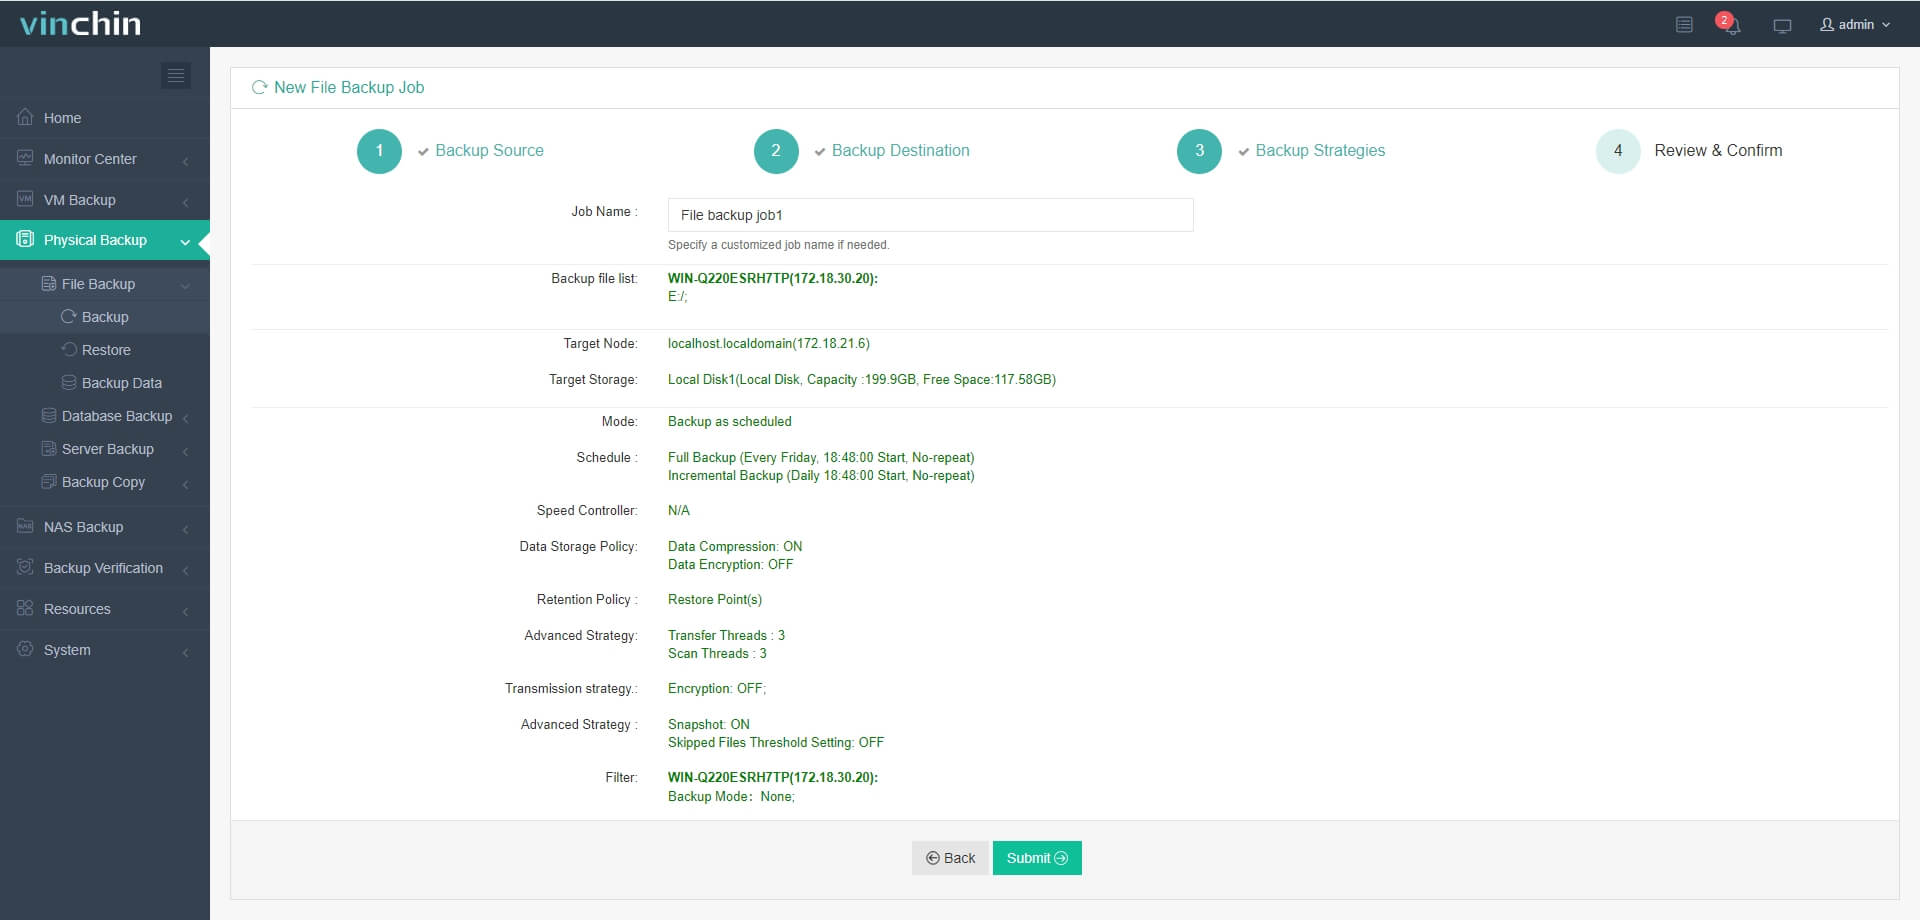
Recognized globally by thousands of enterprises and highly rated by industry experts, Vinchin Backup & Recovery offers a fully featured free trial valid for 60 days—click below to experience leading-edge enterprise data protection firsthand!
Conclusion
Using an external hard drive for server backup is a practical, cost-effective, and reliable strategy to safeguard critical business data. Whether you opt for manual copies for occasional use or automate the process with tools like Windows Server Backup or rsync, this approach offers physical isolation from network threats and operational errors. By integrating external drives into a broader 3-2-1 backup plan, you ensure resilience against disasters while maintaining control over your data. Start protecting your servers today—every backup brings peace of mind and strengthens your defense against unexpected data loss.