-
What Is Cloudera Manager?
-
Why Use Cloudera Manager?
-
How to Install Cloudera Manager?
-
How to Configure Cloudera Manager?
-
How to Protect Hadoop HDFS Files with Vinchin Backup & Recovery?
-
Cloudear Manger FAQs
-
Conclusion
Managing big data clusters can be overwhelming without the right tools. Cloudera Manager brings order to this complexity by offering a single platform for control, monitoring, automation, and security of your data infrastructure. Whether you’re just starting out or have years of experience in operations administration, mastering Cloudera Manager is key to running reliable big data services at scale.
What Is Cloudera Manager?
Cloudera Manager is an enterprise-grade application designed to manage clusters running Cloudera Data Platform (CDP) components such as HDFS, YARN, Hive, Impala, and others. Its architecture includes several core parts:
The Cloudera Manager Server, which acts as the central brain.
Lightweight agents, installed on every cluster host.
A web-based Admin Console, where you perform most management tasks.
A robust RESTful API, enabling automation and integration with other IT systems.
With these components working together, you can install software across many nodes at once, monitor health metrics in real time, enforce security policies like role-based access control (RBAC), automate routine jobs through scripts or API calls—and much more—all from a single pane of glass.
Why Use Cloudera Manager?
Why do so many enterprises rely on Cloudera Manager? It centralizes all aspects of cluster management into one dashboard—no more jumping between servers or manual configuration files. You gain:
Automated deployment: Install Hadoop ecosystem services across dozens or hundreds of machines with guided wizards.
Centralized monitoring: View live dashboards showing CPU usage, memory consumption, disk space trends—even drill down into individual service health.
Proactive alerting: Receive notifications when thresholds are breached so you can act before small problems become outages.
Security controls: Implement fine-grained permissions using Role-Based Access Control, integrate with Kerberos authentication for strong identity management.
Custom automation: Use the REST API to script repetitive tasks or connect with external orchestration tools for seamless workflows.
For advanced users managing large-scale environments or hybrid clouds, these features save countless hours while reducing risk—a win-win for any operations team.
How to Install Cloudera Manager?
Setting up Cloudera Manager is straightforward if you follow each step carefully. Let’s walk through what’s involved—from prerequisites to first login—so your deployment goes smoothly from day one.
Before installing anything:
Make sure your operating system is supported (RHEL/CentOS 7+, SLES 12+, Ubuntu 18+).
Install Java (OpenJDK 8 recommended).
Prepare a database server (PostgreSQL is common; MariaDB/MySQL/Oracle also work).
Confirm network connectivity between all nodes—firewalls must allow traffic on ports like 7180 (web console) and agent-server communication ports.
Ensure you have root or sudo privileges on all hosts involved.
Step 1: Install Required Packages
On your designated server node:
For RHEL/CentOS:
sudo yum install cloudera-manager-daemons cloudera-manager-agent cloudera-manager-server
For SLES:
sudo zypper install cloudera-manager-daemons cloudera-manager-agent cloudera-manager-server
For Ubuntu:
sudo apt-get install cloudera-manager-daemons cloudera-manager-agent cloudera-manager-server
Step 2: Prepare Your Database
Cloudera Manager stores its metadata in an external database—not locally by default—for reliability and scalability. Create a dedicated database user/schema first according to your DBMS documentation. Then run:
/usr/share/cmf/schema/scm_prepare_database.sh postgresql scm scm_user scm_password
Replace scm_user/scm_password with your chosen credentials; adjust postgresql if using another DBMS type like mysql.
Step 3: Start Core Services
Start both server and agent processes:
sudo systemctl start cloudera-scm-server
sudo systemctl start cloudera-scm-agent
Note: The initial startup may take several minutes as services initialize databases—monitor logs under /var/log/cloudera-scm-server/ if needed.
Step 4: Access Admin Console
Open your browser at http://<server-host>:7180. Log in using default credentials (admin/admin) unless changed during setup prompts—you’ll be asked to set a new password immediately after first login for security reasons.
Once inside the Admin Console dashboard you’re ready to configure clusters!
How to Configure Cloudera Manager?
Now comes cluster configuration—the heart of daily operations management with Cloudera Manager:
After logging into the Admin Console:
Step 1: Connect Database
You’ll be prompted for database connection details if not already set up during installation wizard steps—enter hostname/IP address of DB server plus username/password created earlier.
Step 2: Add Cluster Hosts
Click Add Cluster then follow prompts to specify which hosts will join this cluster; agents should already be installed but can be pushed remotely via SSH if needed from within wizard screens (“Install Agents”).
Step 3: Select Services & Assign Roles
Choose core services like HDFS (for storage), YARN (for resource scheduling), Hive (for SQL analytics), etc.—the wizard guides you through assigning roles such as NameNode/DataNode/YARN ResourceManager based on hardware specs per host node.
Want better performance? For example—increase HDFS block size under service configuration settings if storing large files (>128MB); tune YARN container memory allocation based on available RAM per worker node for optimal throughput.
Step 4: Configure & Launch Services
Review suggested defaults—or customize parameters further based on workload needs—and click Continue until prompted to deploy/start selected services automatically across all assigned hosts; progress bars show status live so you know when everything’s ready!
Step 5: Monitor Health & Metrics
Once running smoothly use the Status tab plus built-in charts/dashboards under Charts Library menu item—to track CPU/memory/disk utilization over time per service/node basis; set custom alerts so potential bottlenecks never catch you off guard again!
Security tip: Enable Kerberos integration via Admin Console Security settings for strong authentication across Hadoop ecosystem components—a must-have in production environments handling sensitive data sets!
(References included above)
How to Protect Hadoop HDFS Files with Vinchin Backup & Recovery?
While robust storage architectures like Hadoop HDFS provide inherent resilience, comprehensive backup remains essential for true data protection. Vinchin Backup & Recovery is an enterprise-grade solution purpose-built for safeguarding mainstream file storage—including Hadoop HDFS environments—as well as Windows/Linux file servers, NAS devices, and S3-compatible object storage. Specifically optimized for large-scale platforms like Hadoop HDFS, Vinchin Backup & Recovery delivers exceptionally fast backup speeds that surpass competing products thanks to advanced technologies such as simultaneous scanning/data transfer and merged file transmission.
Among its extensive capabilities, five stand out as particularly valuable for protecting critical big-data assets: incremental backup (capturing only changed files), wildcard filtering (targeting specific datasets), multi-level compression (reducing space usage), cross-platform restore (recovering backups onto any supported target including other file servers/NAS/Hadoop/object storage), and integrity check (verifying backups remain unchanged). Together these features ensure efficient operations while maximizing security and flexibility across diverse infrastructures.
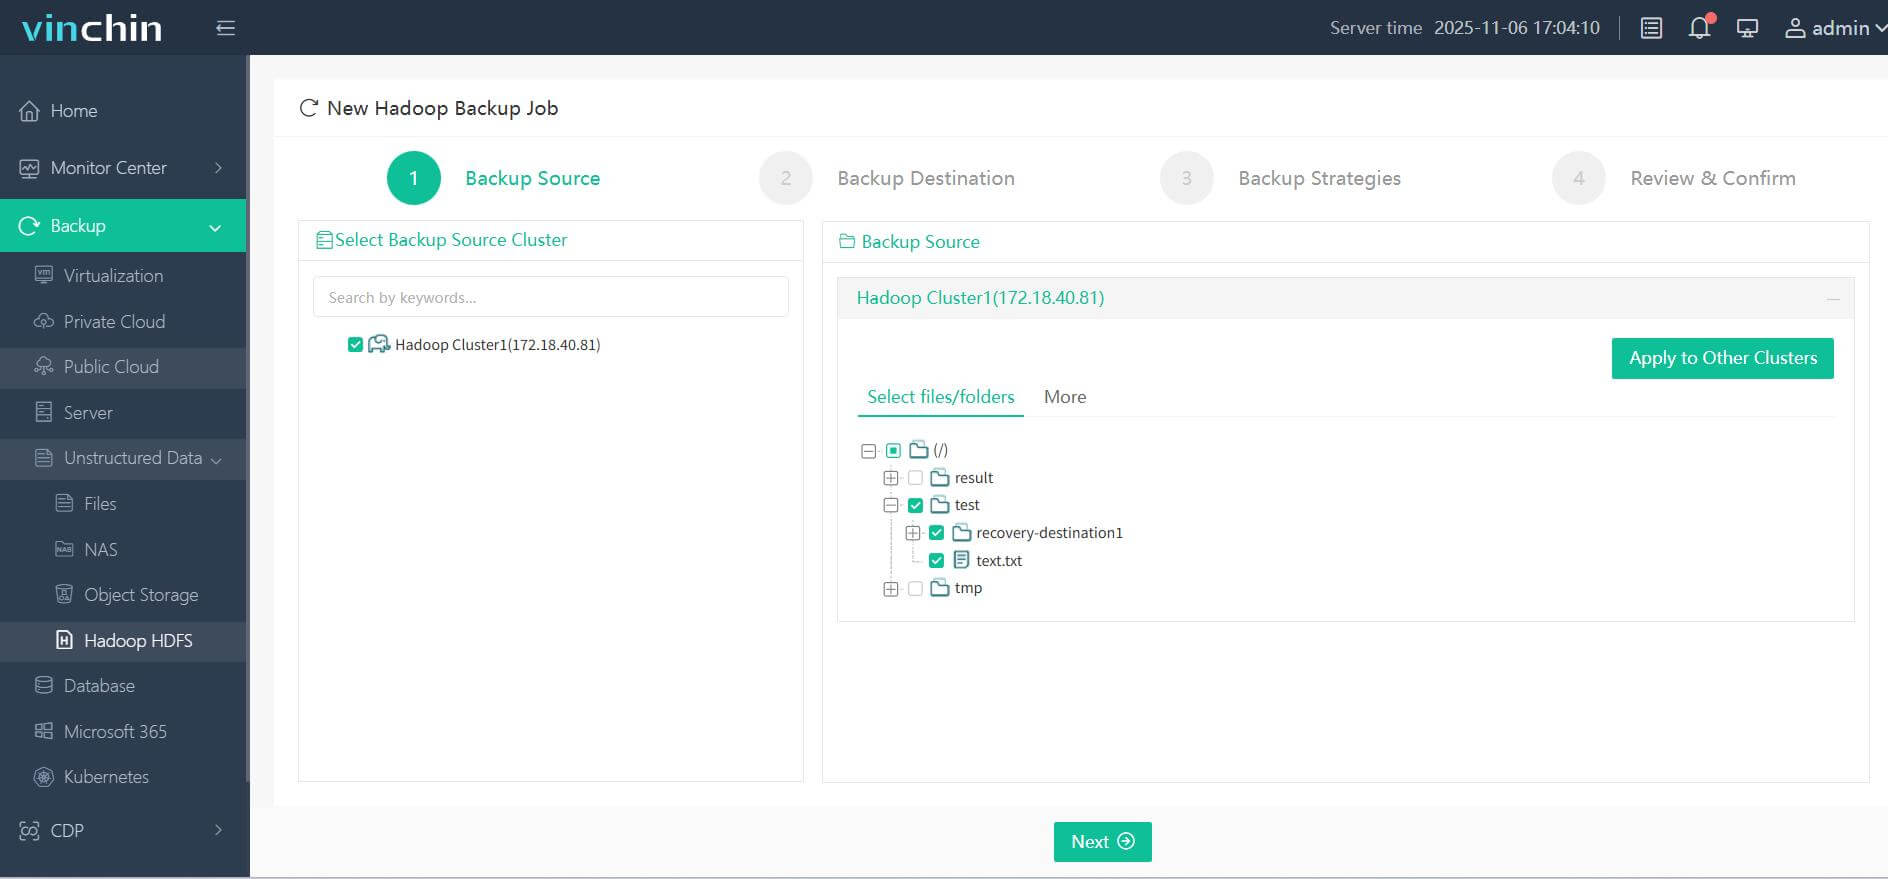
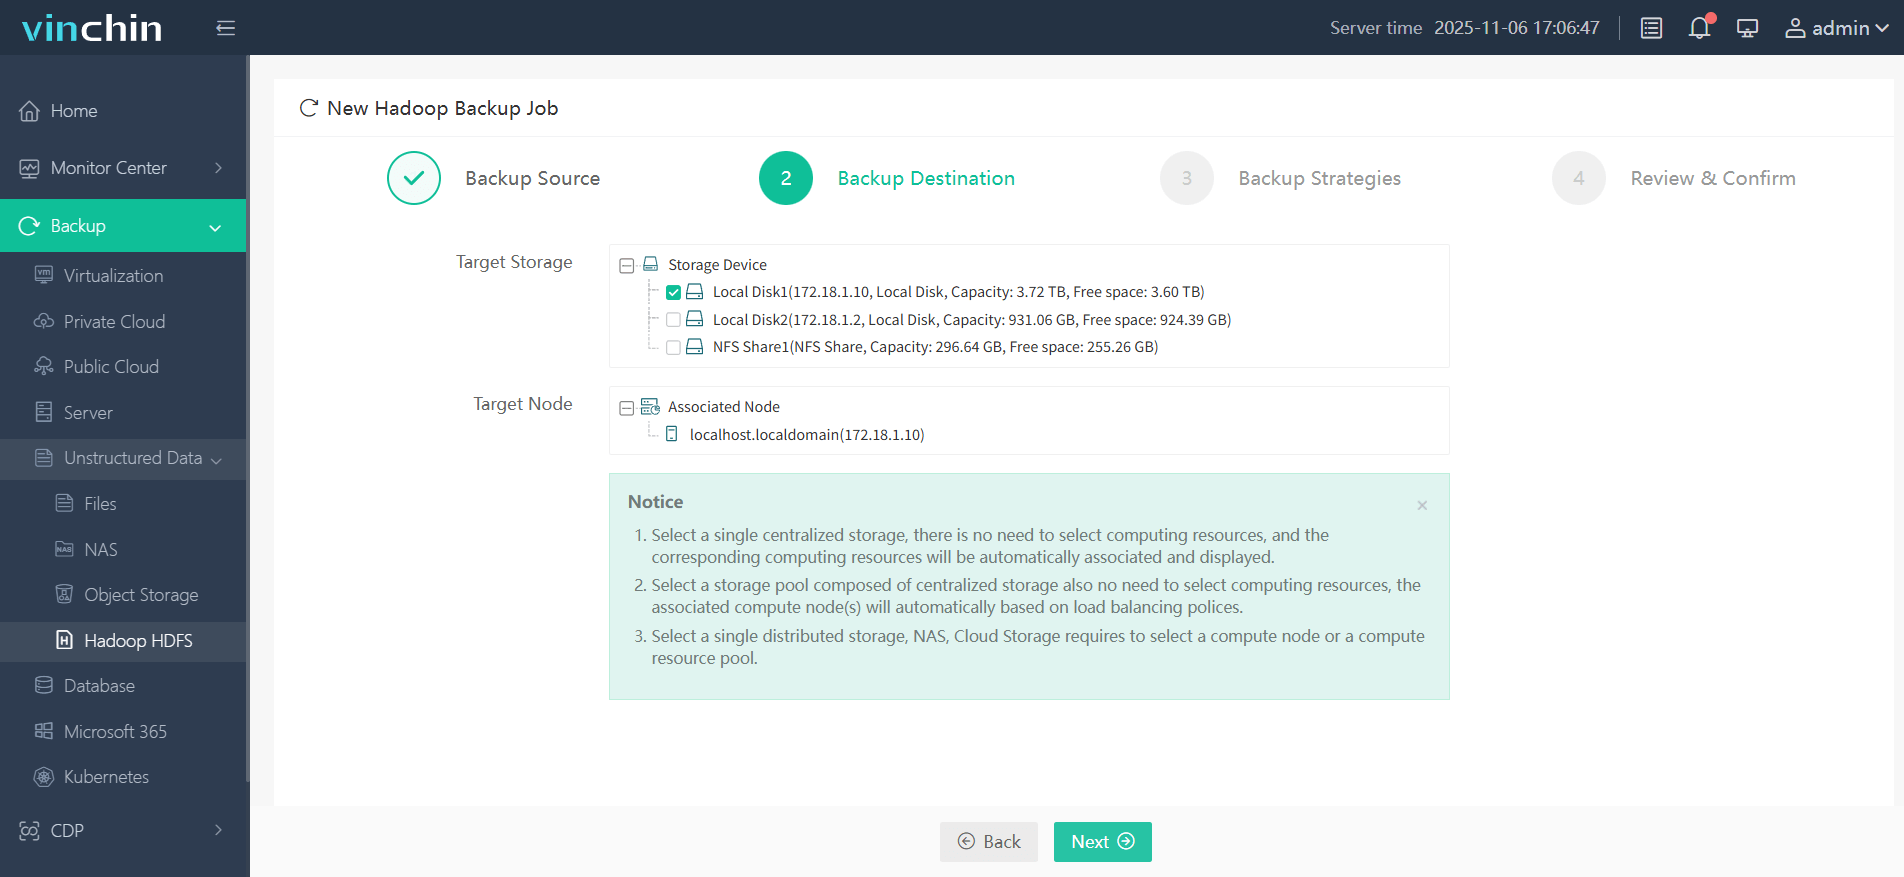
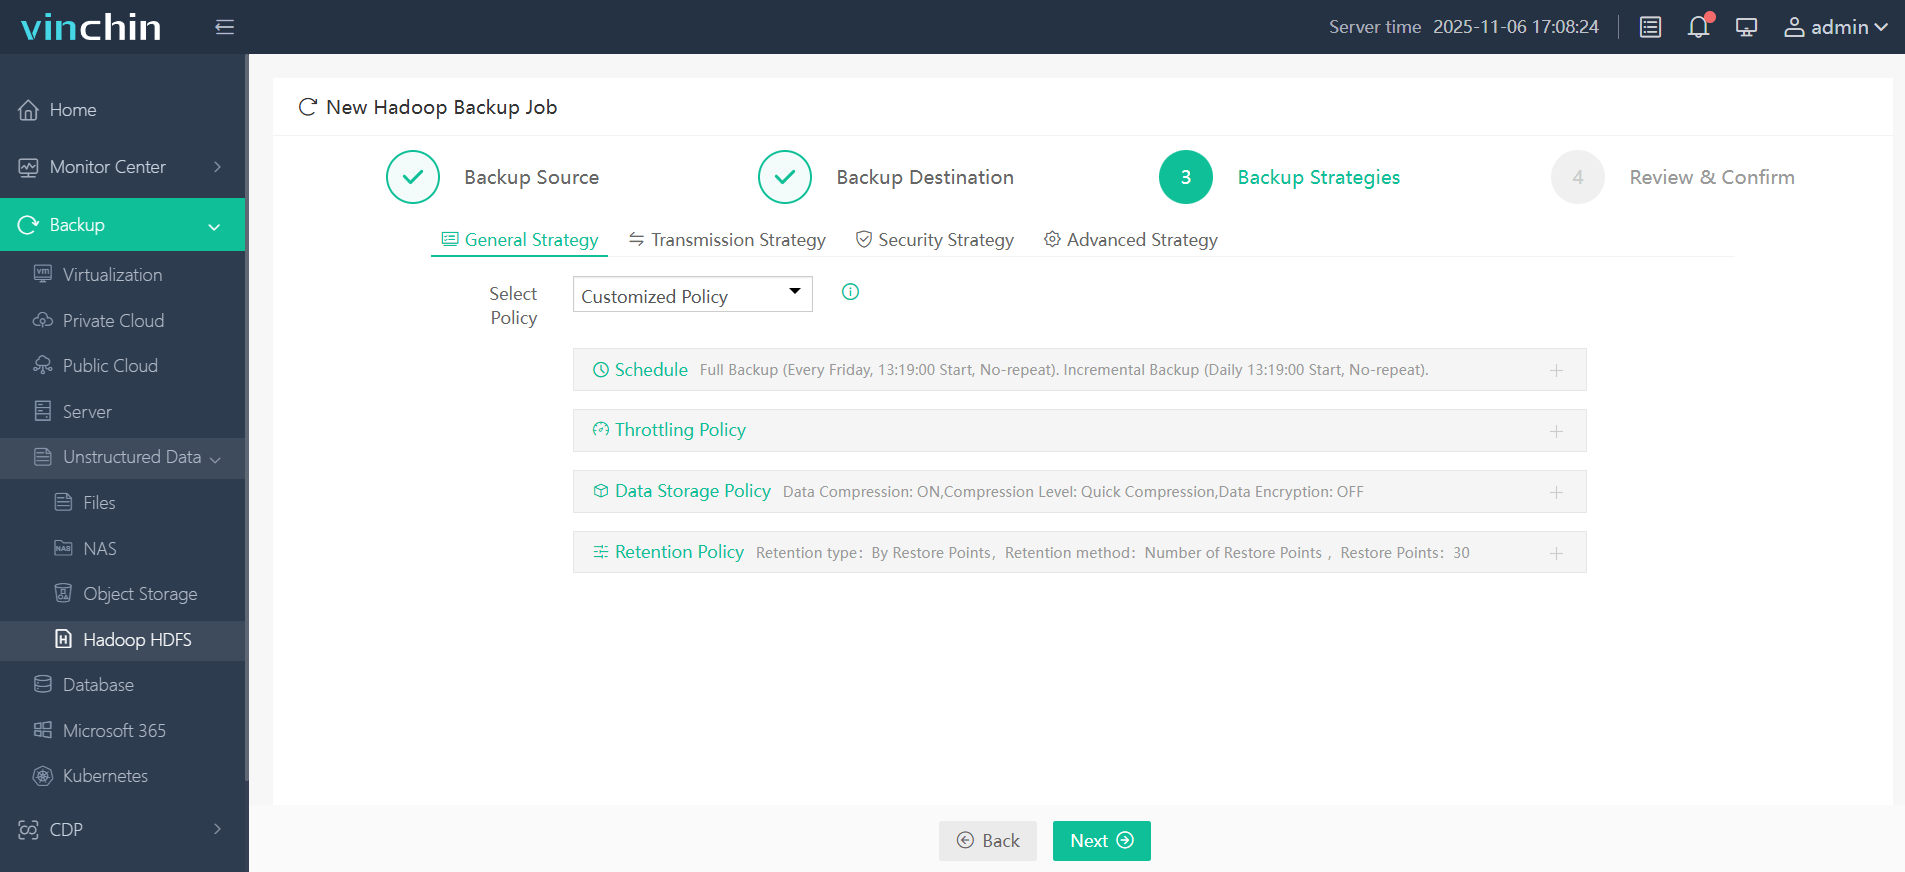
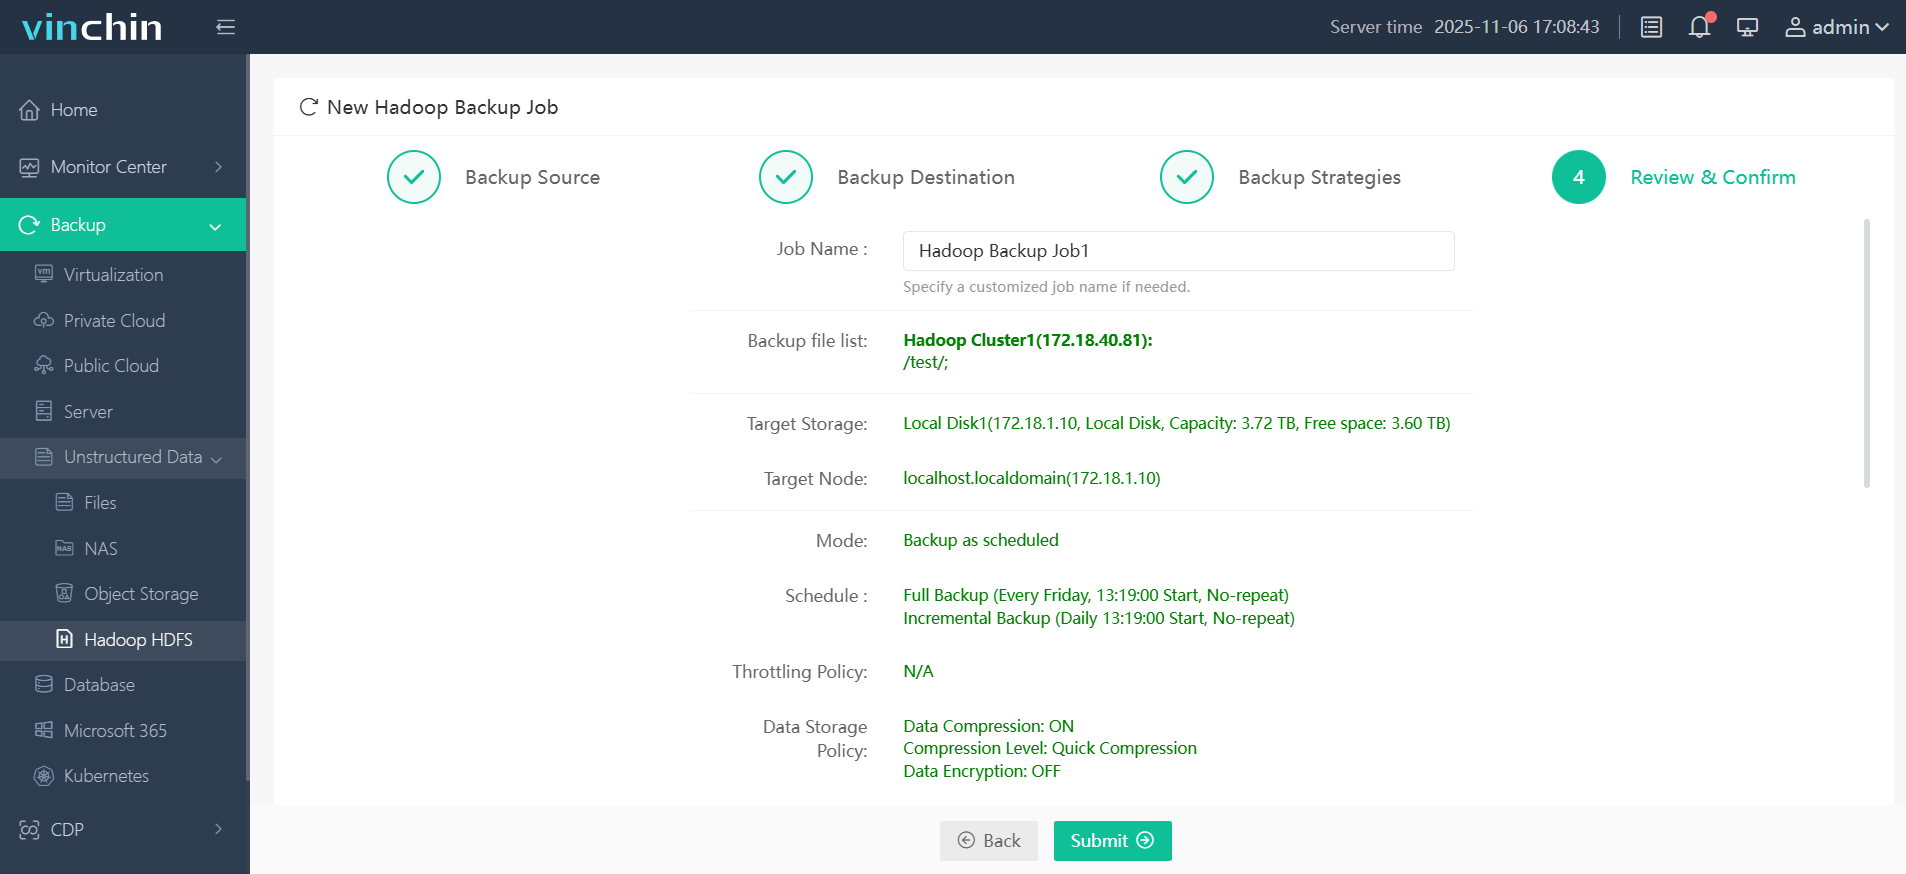
Vinchin Backup & Recovery offers an intuitive web console designed for simplicity. To back up your Hadoop HDFS files:
Step 1. Select the Hadoop HDFS files you wish to back up

Step 2. Choose your desired backup destination

Step 3. Define backup strategies tailored for your needs

Step 4. Submit the job

Join thousands of global enterprises who trust Vinchin Backup & Recovery—renowned worldwide with top ratings—for reliable data protection. Try all features free with a 60-day trial; click below to get started!
Cloudear Manger FAQs
Q1: How do I enable high availability mode?
A1: In Admin Console go to Clusters > Add Service, select desired HA-enabled component (e.g., HDFS NameNode HA), then follow guided setup steps provided by wizard interface within console itself.
Q2: What should I do if adding new hosts fails due to SSH errors?
A2: Check network/firewall connectivity between manager and server nodes, ensure SSH keys are exchanged, fix any issues, then use the Admin Console Retry Failed Hosts action and verify all hosts show green before proceeding.
Q3: How can I monitor long-term resource usage trends?
A3: Open the Charts Library tab, select the metric or service you want, export the chart data to CSV, and analyze it offline in your preferred spreadsheet tool for repeatable, organization-wide reporting.
Conclusion
Cloudear Manger streamlines big data cluster management—from deployment through daily operation—with robust monitoring/security built right in every step along way! For reliable VM protection try Vinchin today—it makes safeguarding mission-critical workloads simple yet powerful.
Share on:


