-
What Are AWS EC2 Snapshots?
-
Why Restore EC2 Snapshot to Existing Instance?
-
Method 1: Restoring Snapshot Using AWS Console
-
Method 2: Restoring Snapshot Using AWS CLI
-
How to Backup AWS EC2 Instances with Vinchin Backup & Recovery
-
FAQs about "AWS Restore EC2 Snapshot To Existing Instance"
-
Conclusion
Restoring an AWS EC2 snapshot to an existing instance is a vital skill for any operations administrator. Whether you need to recover from accidental deletion, undo unwanted changes, or fix corrupted data, knowing how to restore your EBS volumes quickly can save time and prevent downtime. In this guide, you’ll learn what EC2 snapshots are, why you might restore them to an existing instance instead of launching a new one, and how to perform the process using both the AWS Console and AWS CLI—from beginner basics through advanced automation techniques.
What Are AWS EC2 Snapshots?
AWS EC2 snapshots are point-in-time backups of your Amazon Elastic Block Store (EBS) volumes. When you create a snapshot in AWS, it saves all the data from your EBS volume into Amazon S3 storage behind the scenes. Snapshots are incremental after the first one; only changed blocks since your last backup are saved each time you create another snapshot. This makes them efficient for storage costs while still allowing full recovery if needed.
You can use these snapshots not just for disaster recovery but also for cloning environments or migrating workloads between regions or accounts by copying snapshots across regions.
Why Restore EC2 Snapshot to Existing Instance?
There are many reasons why you might want to restore a snapshot directly onto an existing EC2 instance rather than spinning up a new one:
You need to roll back after a failed software update without changing IP addresses or security groups.
You want to recover lost files that were deleted accidentally.
Your application’s data became corrupted due to bugs or hardware issues.
You must maintain continuity—keeping all network settings intact—while reverting only specific storage volumes.
By restoring only what’s necessary onto your current running server, you minimize disruption while keeping configuration consistent across your environment.
Method 1: Restoring Snapshot Using AWS Console
The AWS Console provides a visual way to manage EBS snapshots and volumes attached to instances. Here’s how you can restore either root or data volumes step by step:
Restoring a Root Volume
Restoring the root volume means replacing the operating system disk itself—so extra care is needed:
First stop your instance so no writes occur during replacement:
1. Open the Amazon EC2 Console.
2. Go to Elastic Block Store, then select Snapshots.
3. Find your desired snapshot; click it once.
4. Click Actions, then choose Create Volume; ensure it’s created in the same Availability Zone as your target instance.
5. Go back under Instances, select yours; note down its device name under Root device (e.g., /dev/xvda).
6. With your instance selected: click Instance State, then choose Stop Instance; wait until status shows stopped.
7. Under Volumes, find the current root volume; click it; select Actions, then choose Detach Volume.
8. Select your newly created volume from earlier; click it; choose Actions, then pick Attach Volume—select your stopped instance as target and enter exactly the same device name noted earlier (/dev/xvda).
9. Start up your instance again via Instance State > Start Instance.
If using Linux: After booting up with restored root volume attached,
Check logs at
/var/log/messagesor/var/log/cloud-init-output.logfor errorsConfirm services start normally
If using Windows: Watch startup progress via RDP console access; check Event Viewer logs if needed
Restoring a Data Volume
For non-root (data) disks holding application files or databases:
1. In the console go again under Snapshots, pick yours
2. Click Actions > Create Volume in same AZ as target
3. Under Volumes list find old data disk attached currently
4a (Linux): SSH into server first; run lsblk or df -h command lines so you know which mount point matches which device name
4b: Unmount old disk at OS level (umount /dev/xvdf1)
5a: Back in console select old disk > Actions > Detach Volume
6a: Select new disk > Actions > Attach Volume > pick running instance > assign available device name (/dev/xvdf)
7a (Linux): On server run lsblk; mount new disk where needed (mount /dev/xvdf1 /mnt/data)
8a: Run fsck /dev/xvdf1 if filesystem check is required before mounting
9a: Confirm files appear as expected with ls /mnt/data
For Windows servers:
Use Disk Management tool inside Windows OS
Right-click old drive letter > Offline
Detach via console as above
Attach new volume via console
Bring online in Disk Management tool again; assign original drive letter if desired
Always double-check that device names match expectations before detaching anything
Method 2: Restoring Snapshot Using AWS CLI
The AWS Command Line Interface lets experienced admins automate restores efficiently—even across multiple servers at once! Here’s how:
Restoring a Root Volume via CLI
First stop target server:
aws ec2 stop-instances --instance-ids i-yourinstanceid
aws ec2 wait instance-stopped --instance-ids i-yourinstanceid
Find current root volume ID:
aws ec2 describe-instances --instance-id i-yourinstanceid --query "Reservations[0].Instances[0].BlockDeviceMappings"
Detach current root disk:
aws ec2 detach-volume --volume-id vol-oldrootid --instance-id i-yourinstanceid --device /dev/xvda --no-cli-pager
Create new EBS volume from snapshot:
aws ec2 create-volume --snapshot-id snap-yoursnapshotid --availability-zone us-east-1a --volume-type gp3
Wait until state is "available" (describe-volumes) then attach:
aws ec2 attach-volume --volume-id vol-newrootid --instance-id i-yourinstanceid --device /dev/xvda
Restart server:
aws ec2 start-instances --instance-ids i-yourinstanceid
Restoring Data Volumes via CLI
Unmount at OS level first!
(Linux example)
sudo umount /mnt/data
lsblk # confirm unmounted
Then detach old disk:
aws ec2 detach-volume --volume-id vol-olddataid
Create replacement from snapshot:
aws ec2 create-volume --snapshot-id snap-datasnapid --availability-zone us-east-1a
# Wait until 'available'
Attach replacement:
aws ec2 attach-volume --volume-id vol-newdataid --instance-id i-yourinstanceid --device /dev/xvdf
# Wait until 'attached'
sudo mount /dev/xvdf1 /mnt/data # remount on Linux
ls /mnt/data # verify contents present
fsck /dev/xvdf1 # optional integrity check before mounting
How to Backup AWS EC2 Instances with Vinchin Backup & Recovery
To further enhance protection of your cloud workloads, consider leveraging Vinchin Backup & Recovery—a professional enterprise-level virtual machine backup solution supporting over 15 mainstream virtualization platforms including VMware, Hyper-V, Proxmox, oVirt, OLVM, RHV, XCP-ng, XenServer, OpenStack, ZStack, and notably AWS EC2 among others. Designed for diverse IT environments found in modern enterprises, Vinchin Backup & Recovery delivers comprehensive VM backup coverage regardless of platform complexity.
Among its extensive feature set tailored for virtualized infrastructure protection—including forever incremental backup, scheduled backup strategies, V2V migration capabilities across platforms such as VMware and Hyper-V, robust data deduplication/compression technologies for optimal storage efficiency, and granular restore options—Vinchin Backup & Recovery enables fast recovery times while minimizing resource consumption and operational risk.
Backing up an AWS EC2 VM with Vinchin Backup & Recovery is straightforward thanks to its intuitive web console interface:
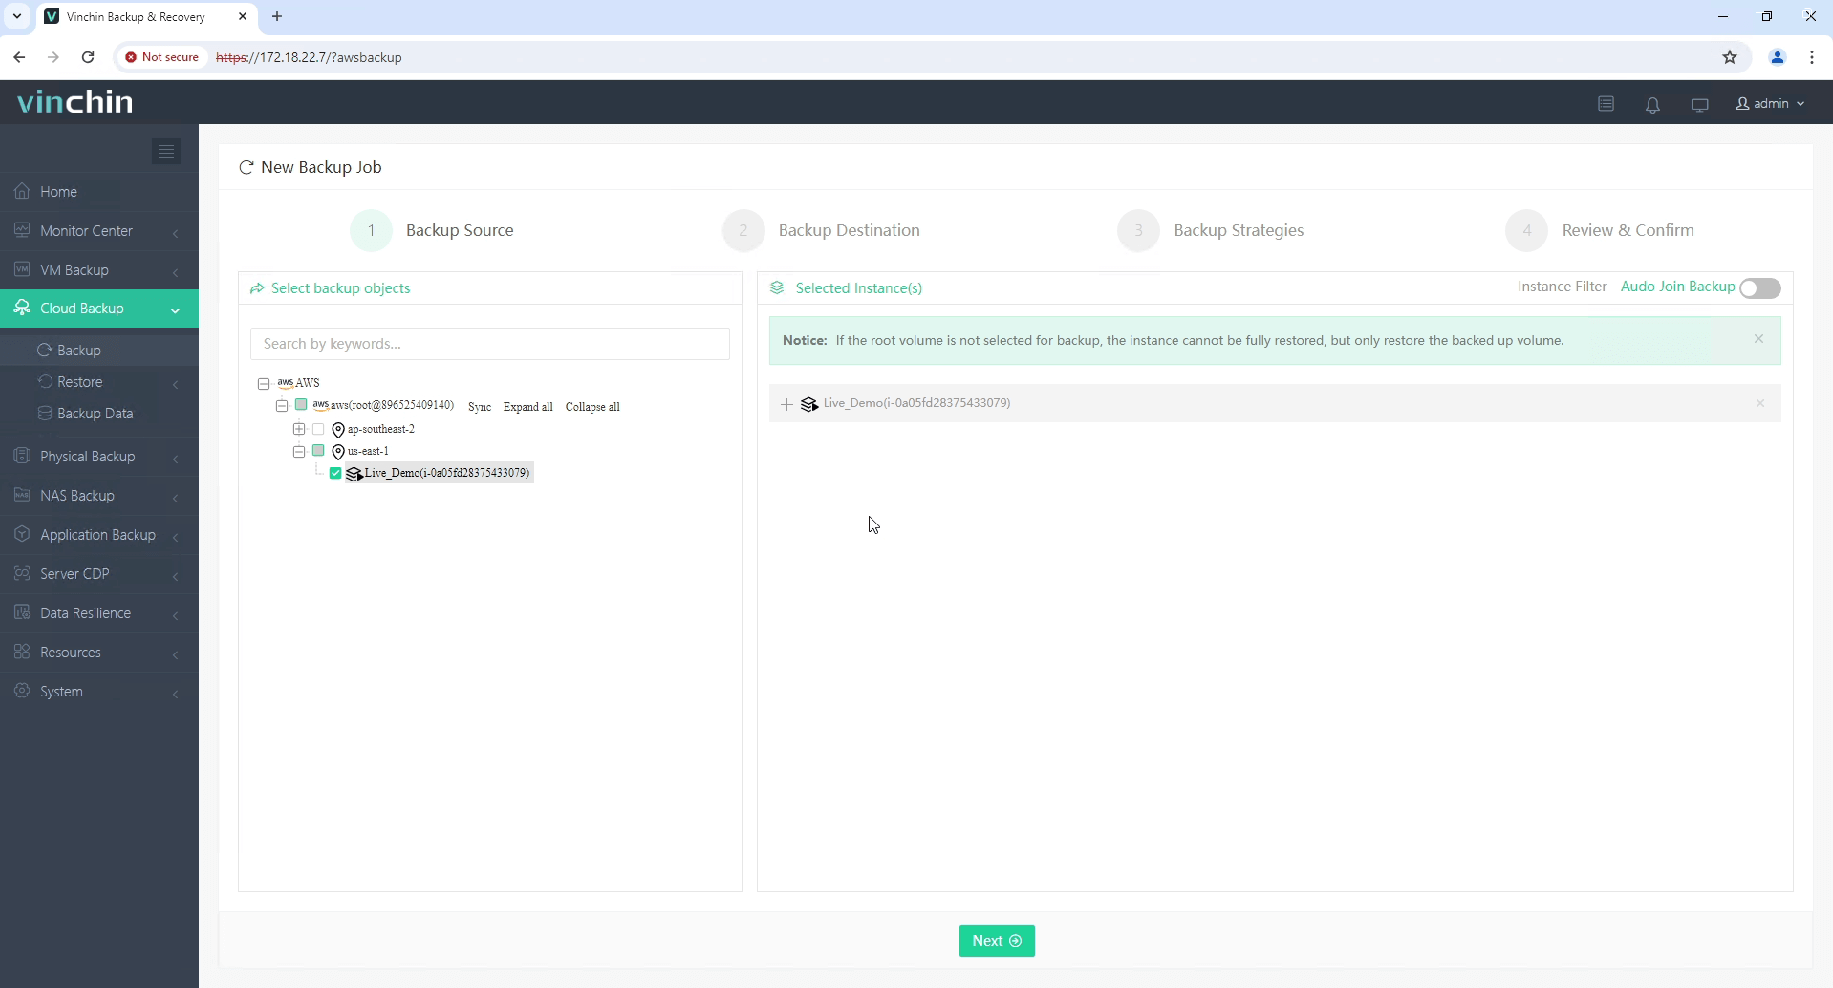
Step 1: Select the Amazon EC2 instance(s) you wish to back up

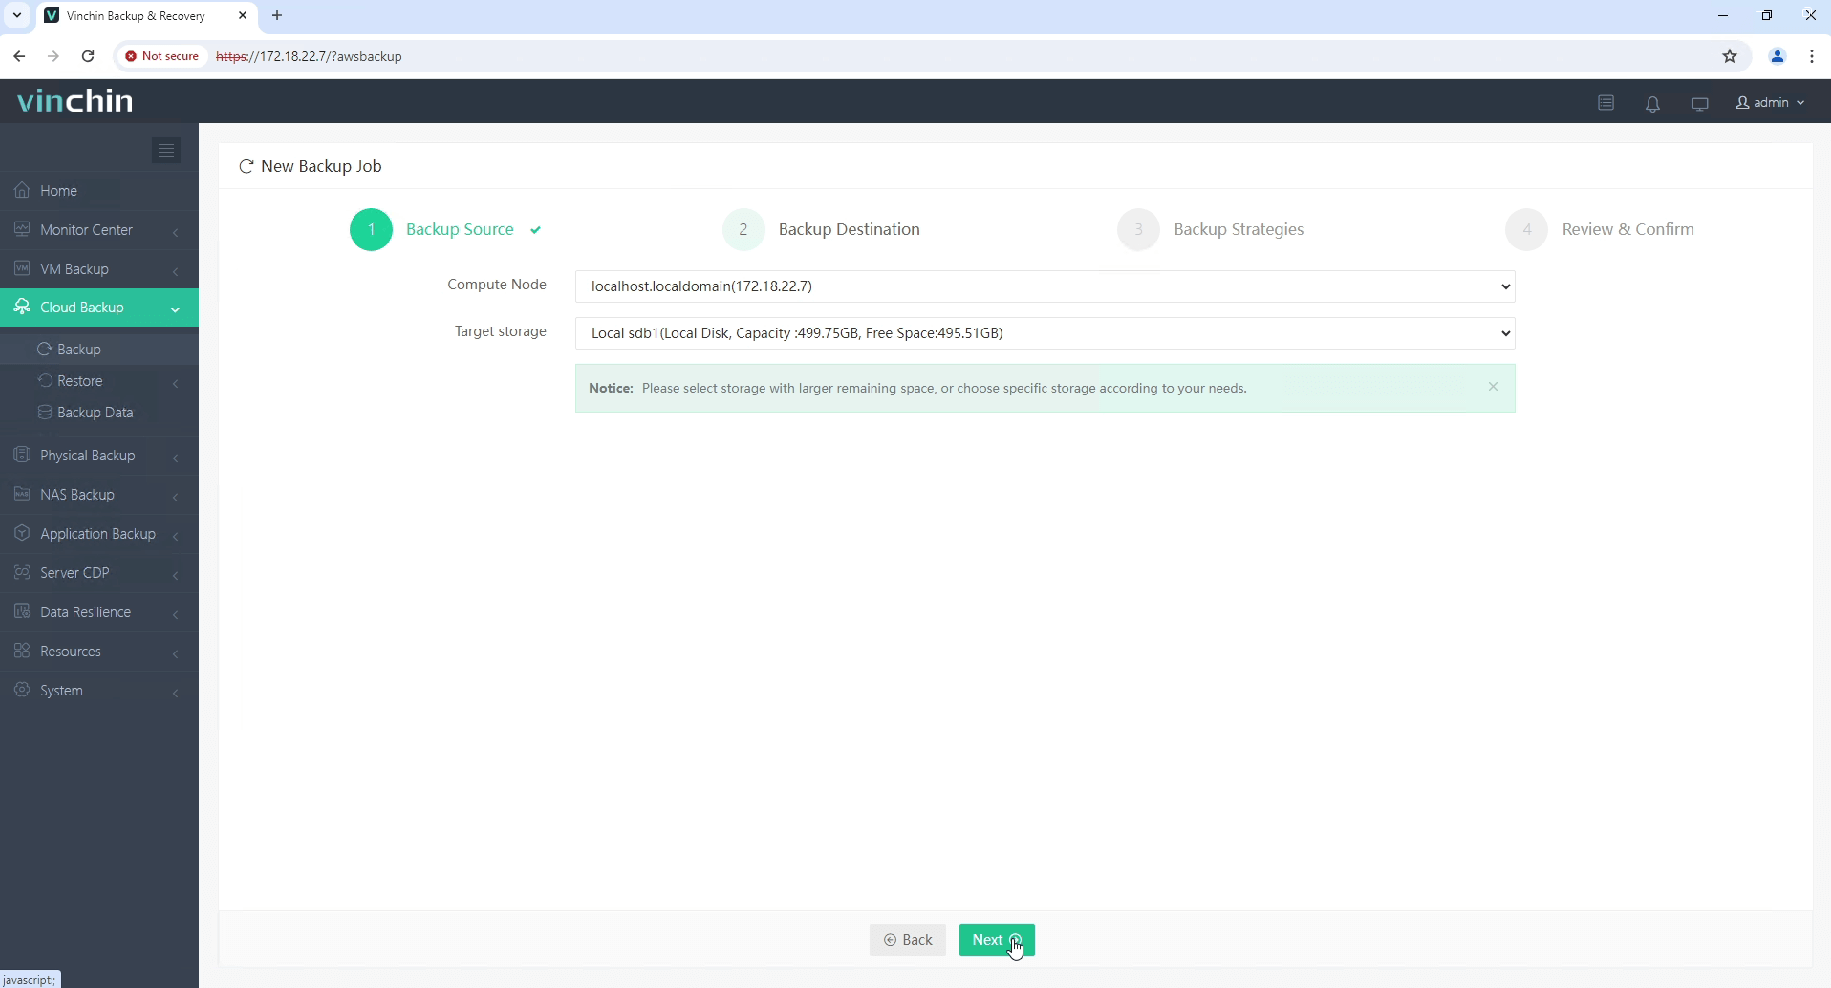
Step 2: Choose target backup storage

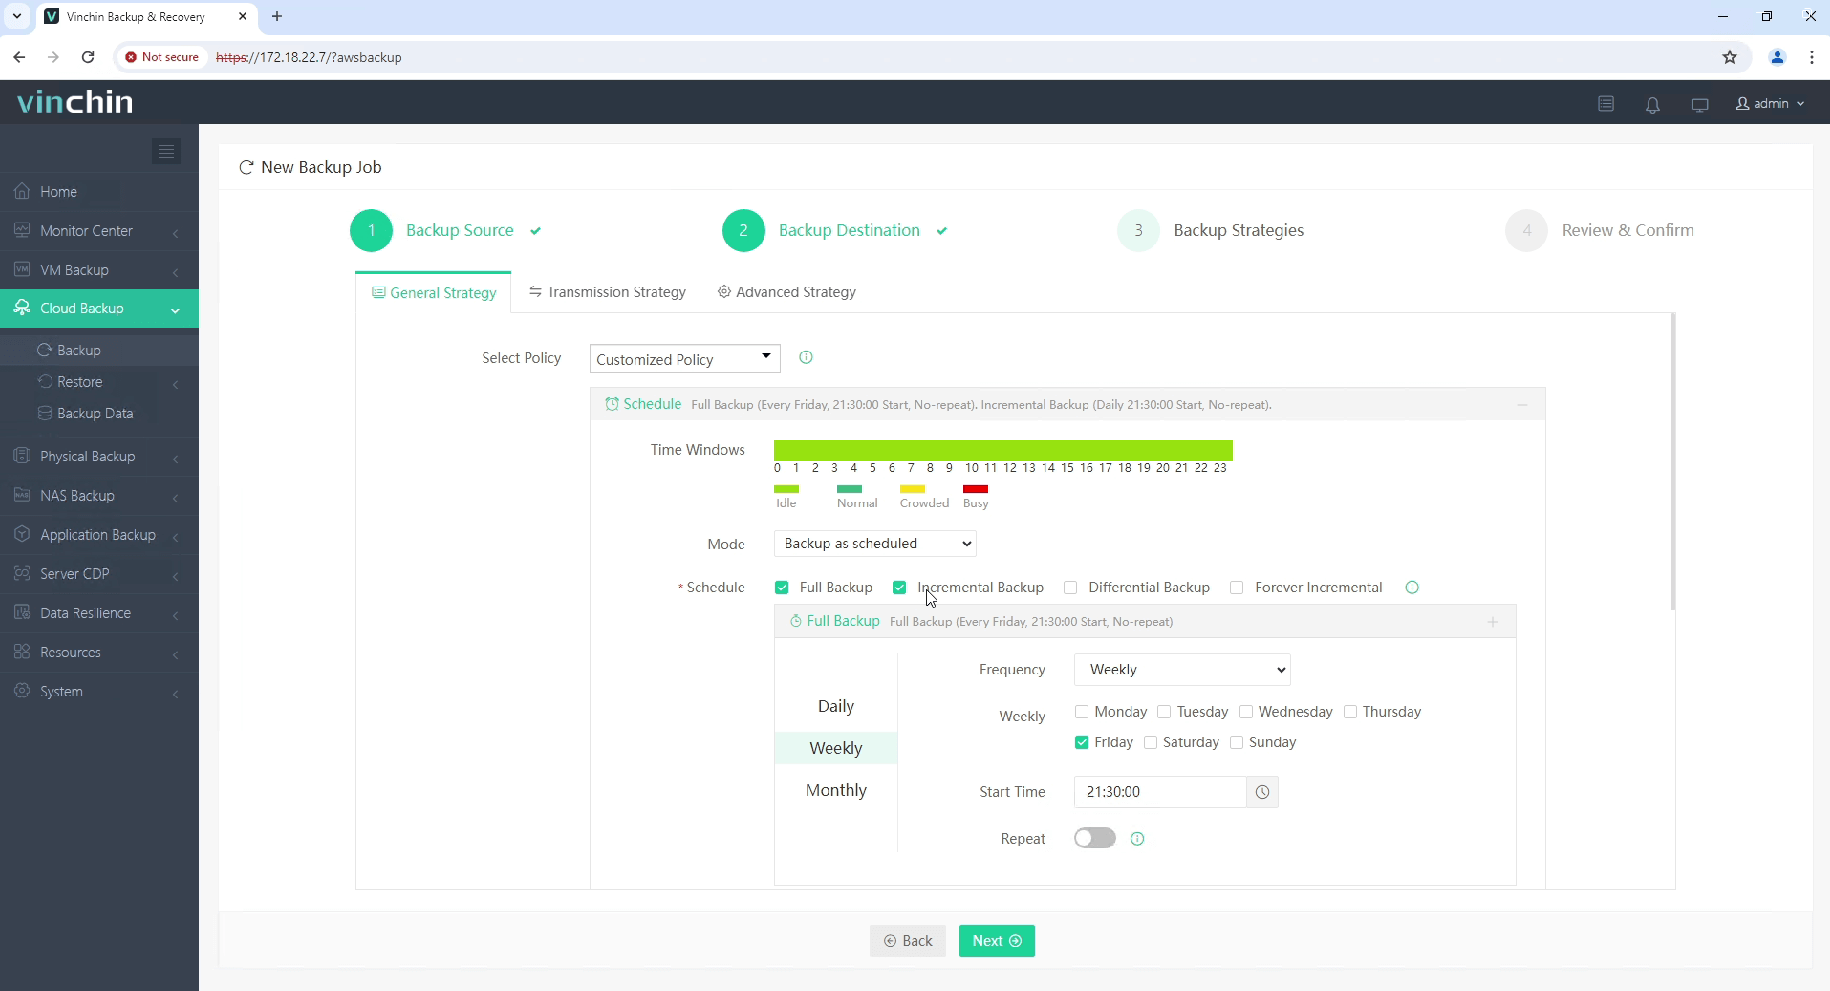
Step 3: Configure desired backup strategy

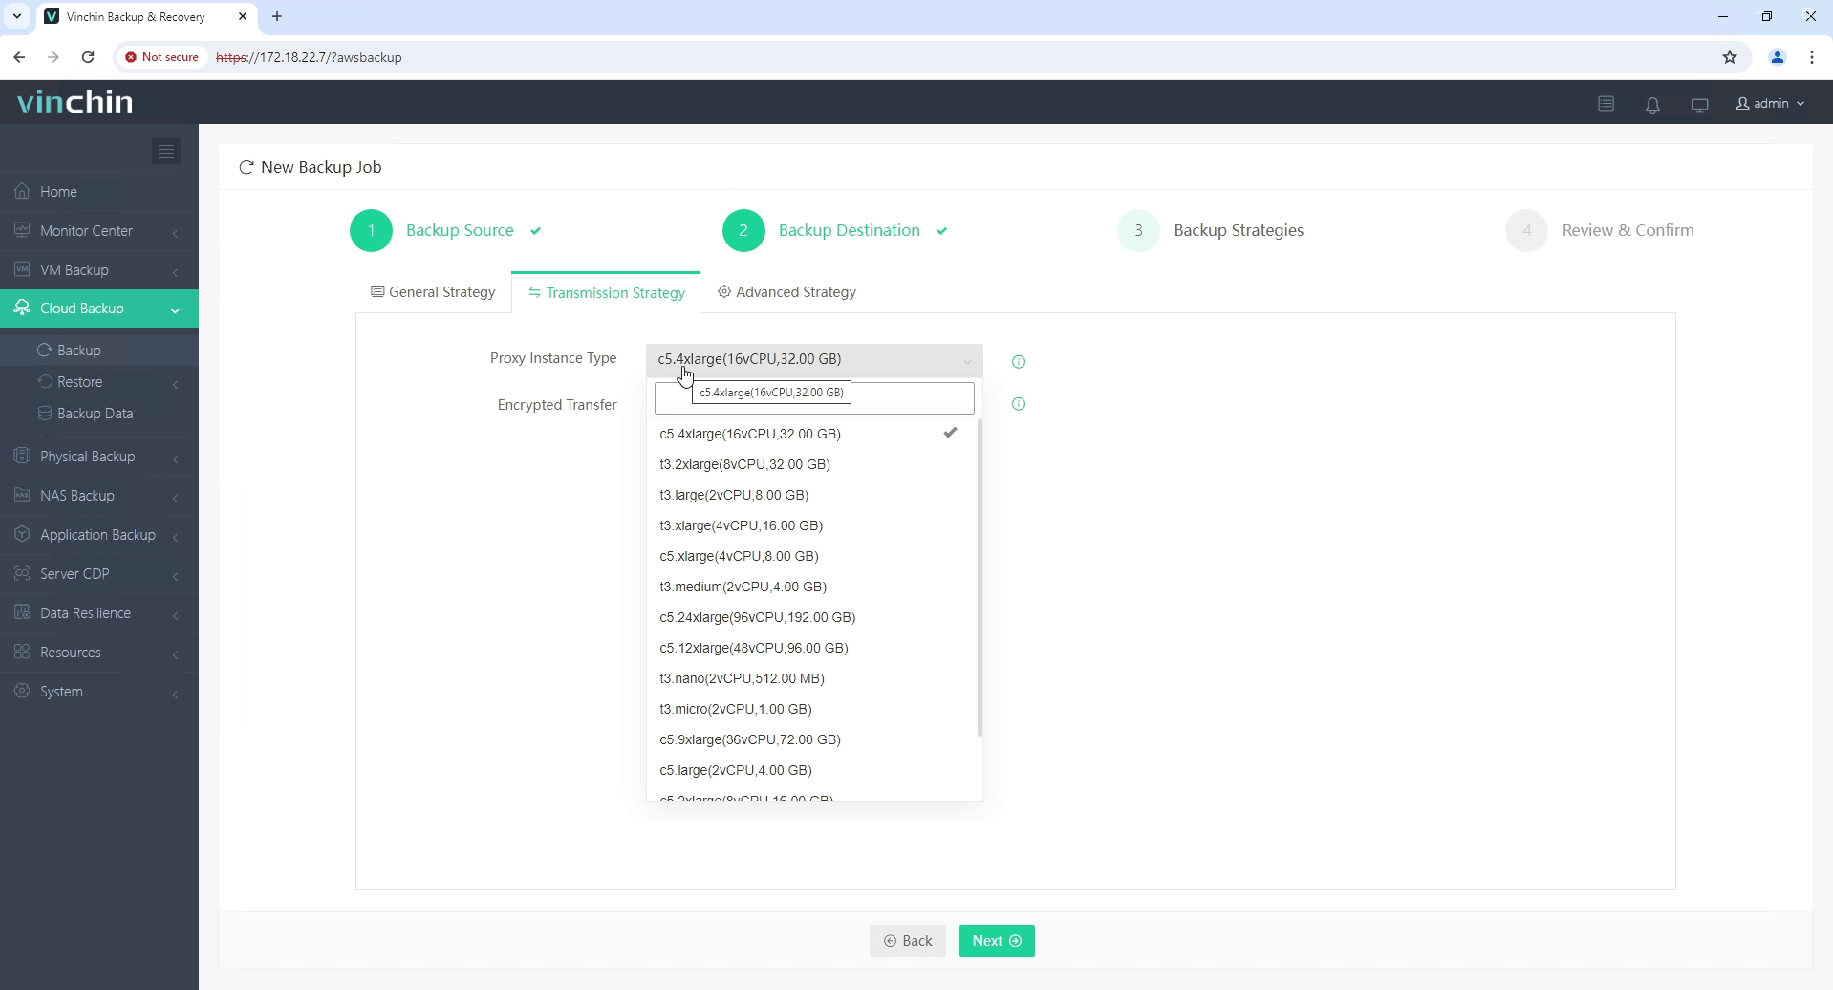
Step 4: Submit the job

Recognized globally by thousands of organizations and rated highly by industry analysts for reliability and innovation,Vinchin Backup & Recovery offers a fully functional 60-day free trial—click below to get started today!
FAQs about "AWS Restore EC2 Snapshot To Existing Instance"
Q1: Can I restore an encrypted EBS snapshot onto my running production server?
A1: Yes—as long as both source snapshot encryption keys are accessible by destination account/region during creation/attachment steps.
Q2: Is there downtime when replacing large database disks?
A2: For non-root disks downtime can be minimized by unmounting/remounting quickly—but always plan maintenance windows around peak usage times just in case validation takes longer than expected!
Q3: How do I move my restored snapshot across regions?
A3: Copy original snapshot into target region first using "Copy Snapshot" action—then repeat standard restoration workflow within destination Availability Zone.
Conclusion
Restoring an AWS EC2 snapshot onto an existing instance keeps business running smoothly after accidents or failures strike—and now you know every step involved! Whether working through Console clicks or automating everything via scripts/Vinchin integration—you’re ready for safe cloud recoveries ahead!
Share on:


