-
What is SAN?
-
Advantages of using a SAN with Proxmox
-
How to configure Promox VE cluster to use iSCSI SAN?
-
Fully protecting your Proxmox environment
-
Proxmox storage FAQs
-
Conclusion
Proxmox is an open-source platform for enterprise virtualization that integrates KVM for virtual machines and LXC for containers. Alongside these capabilities, Proxmox can also be configured to work with SAN to provide scalable and high-performance storage solutions for the virtualized environment.
What is SAN?
A “SAN” stands for Storage Area Network, which is a network that provides access to consolidated, block-level data storage. Usually, SAN backup has more advantages than LAN backup. SANs are typically used to enhance storage devices, such as disk arrays and tape libraries, that are accessible to servers so that the devices appear to the operating system as locally attached devices. A SAN’s architecture works in a way that makes it ideal for high-availability and high-performance scenarios, such as those required by large virtualization platforms like Proxmox.
Proxmox can be configured to connect to a SAN via iSCSI, Fibre Channel, or other storage protocols to provide the virtual machines with storage resources. This is a common setup in enterprise environments where large amounts of storage are needed and where storage needs to be highly available and scalable.
Advantages of using a SAN with Proxmox
Performance: SANs can deliver high bandwidth and low latency, which is beneficial for storage-intensive applications running on Proxmox VMs.
Scalability: SANs can be scaled out by adding more storage hardware without disrupting existing services.
High Availability: SANs often come with features such as redundant hardware and network paths, ensuring high availability of storage.
Centralized Management: Storage can be centrally managed and allocated to Proxmox servers as needed, simplifying the overall administration.
How to configure Promox VE cluster to use iSCSI SAN?
To configure a Proxmox VE cluster to use iSCSI SAN storage and leverage Multipath I/O to increase performance and redundancy, follow these steps:
1. Install necessary software packages
Install “multipath-tools” on all Proxmox nodes:
apt update
apt install multipath-tools
2. Create and configure Multipath
Create the “/etc/multipath/conf.d/ ” directory if it does not exist:
mkdir -p /etc/multipath/conf.d/
Create or edit the “/etc/multipath/conf.d/multipath.conf” file and add your configuration:
nano /etc/multipath/conf.d/multipath.conf
3. Configure WWID
Edit the “/etc/multipath/wwids” file and add the WWID of your storage device:
nano /etc/multipath/wwids
4. Restart the Multipath service
Restart the “multipathd” service to apply the new configuration:
systemctl restart multipath-tools.service
5. Verify Multipath configuration
Use the following command to view multipath devices:
multipath -ll
6. Partition, format and create LVM
Partition the multipath device on one of the nodes, format it, and create the LVM structure:
fdisk /dev/mapper/mpatha
# Follow the prompts to create a new partition
pvcreate /dev/mapper/mpatha1
vgcreate pve-san /dev/mapper/mpatha1
7. Create cluster shared storage
Run the “partprobe” command on each Proxmox node:
partprobe
If “partprobe” is not available, install it:
apt install parted
8. Add storage in Proxmox VE
Log in to the web interface of Proxmox VE and navigate to “Datacenter” -> “Storage” -> “Add” -> “LVM”.
Input ID: e.g. “pve-san”
Select Volume group: “pve-san” just created
Configure other options as needed
9. Test storage
Create a test virtual machine or a test disk to ensure it can be successfully stored on the newly configured SAN.
One thing to note is to make sure that all Proxmox nodes can see the iSCSI device and have the same Multipath settings configured.
Once the SAN is configured and connected to the Proxmox VE cluster, administrators can enjoy the robustness of a setup that is designed to handle the demands of an enterprise-grade virtualization platform. Moreover, the use of Multipath I/O ensures that storage remains accessible even if one path fails, thus maintaining the continuity of services and data availability.
Fully protecting your Proxmox environment
Integrating a SAN with Proxmox VE can significantly enhance the virtualization environment by providing high-performance, scalable, and highly available storage. But an external backup solution is essential for comprehensive data protection.
Vinchin Backup & Recovery stands out as an optimal solution for Proxmox VM backups, offering a suite of features tailored for virtual environments. It provides automated, agentless backups with both LAN and LAN-Free options, along with offsite copying and instant recovery capabilities. Additional safeguards include data encryption and ransomware measures for enhanced protection. Moreover, Vinchin facilitates easy V2V migration between all supported virtual platforms, offering a comprehensive and secure backup solution.
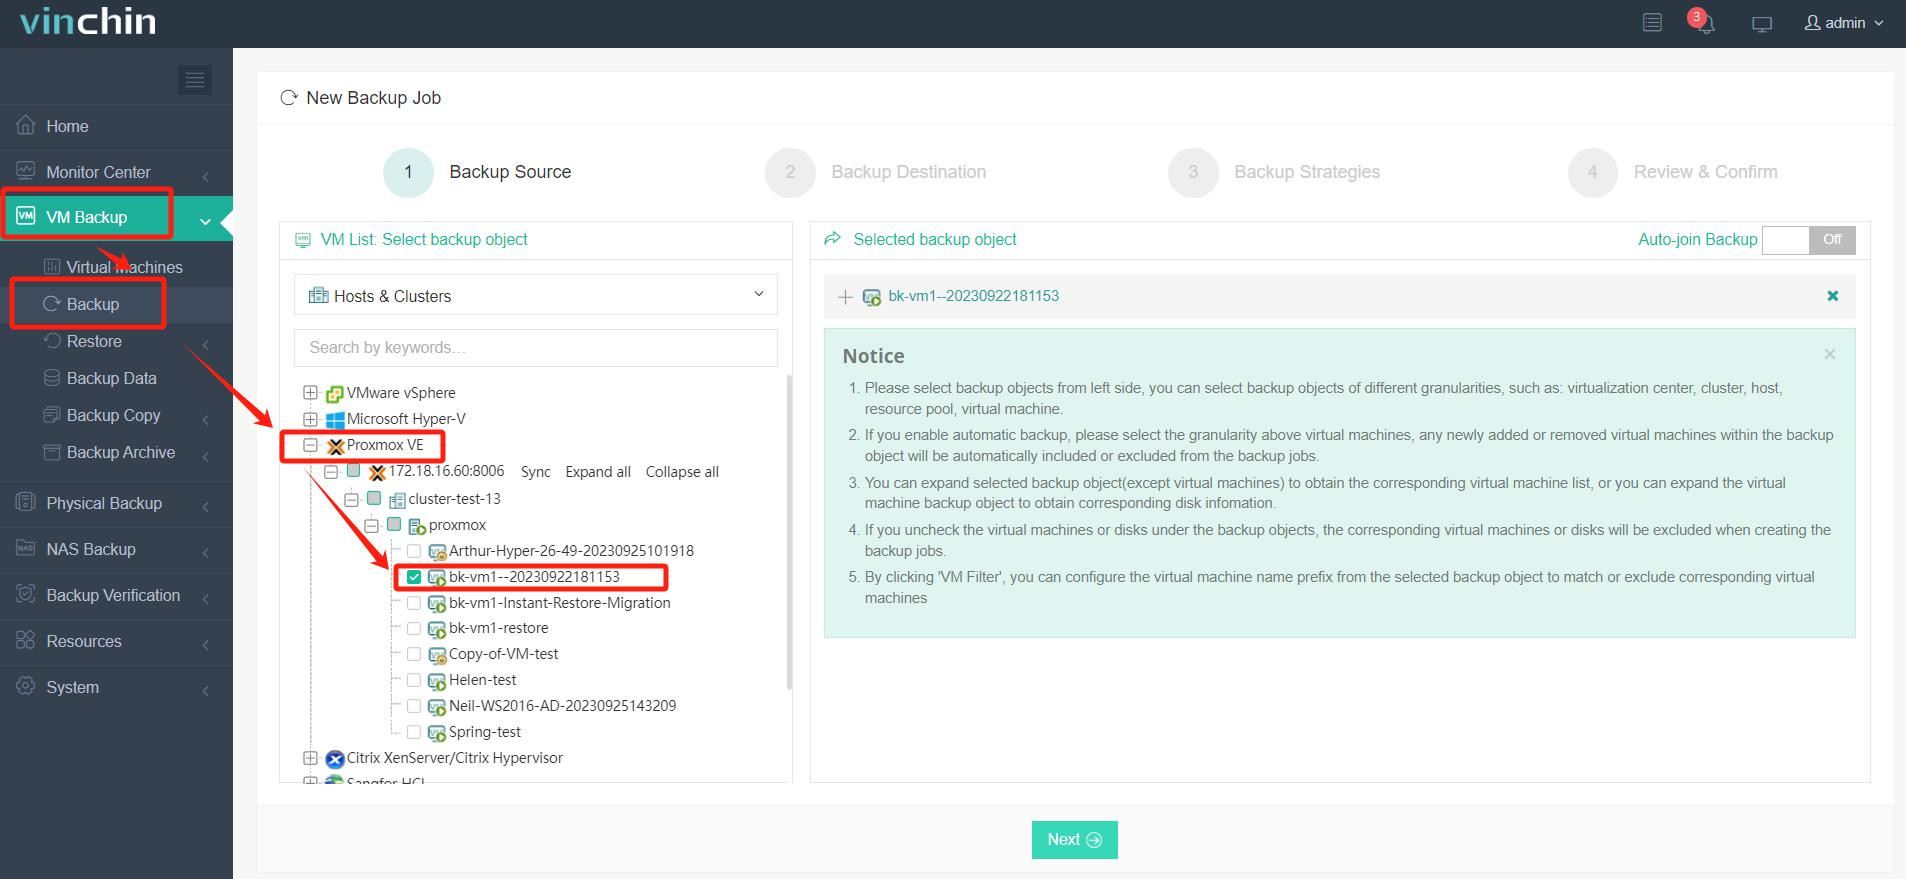
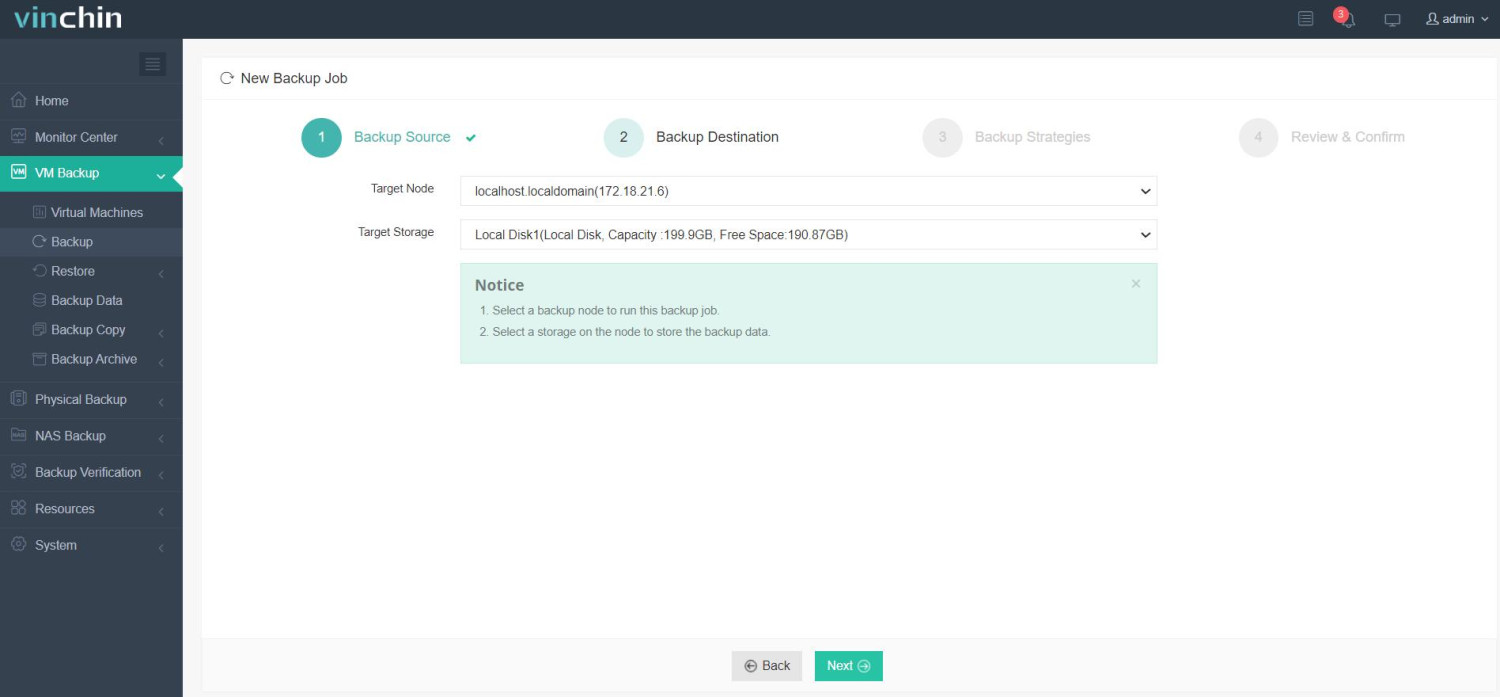
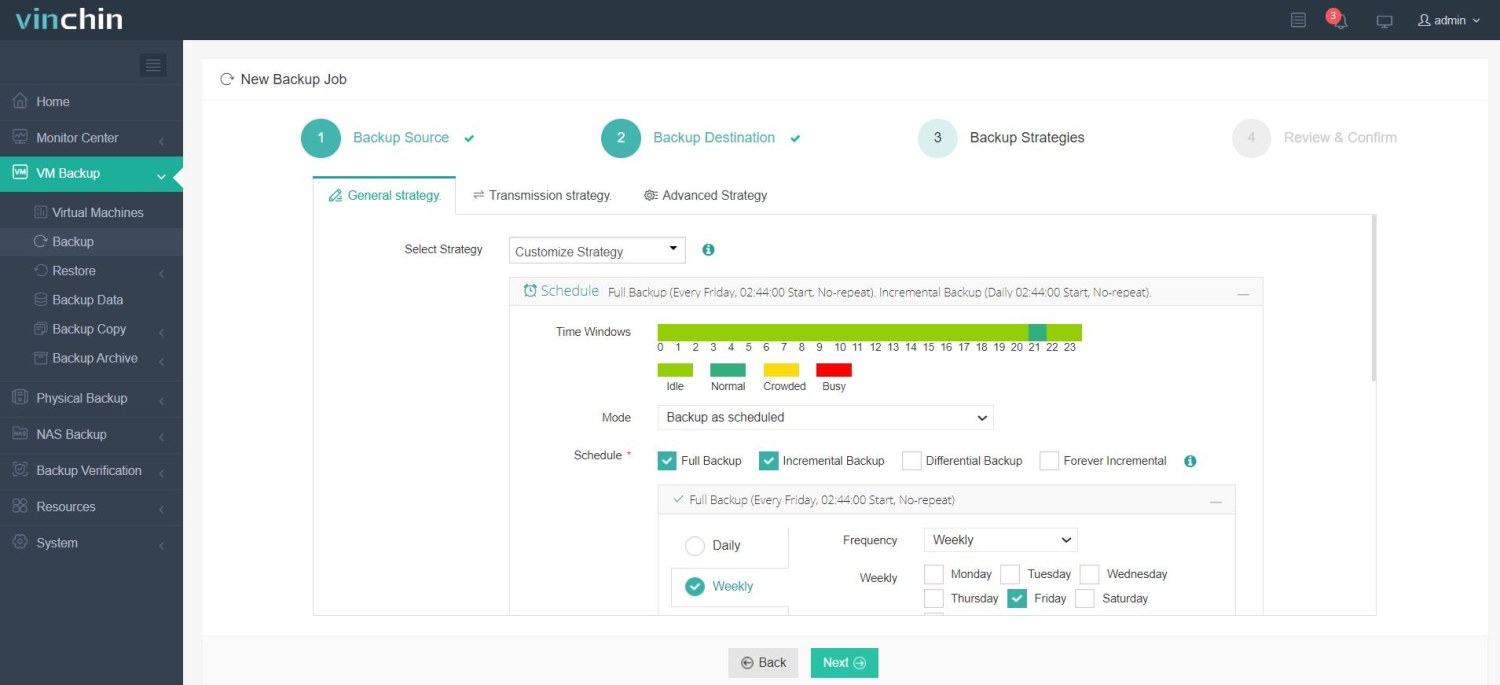
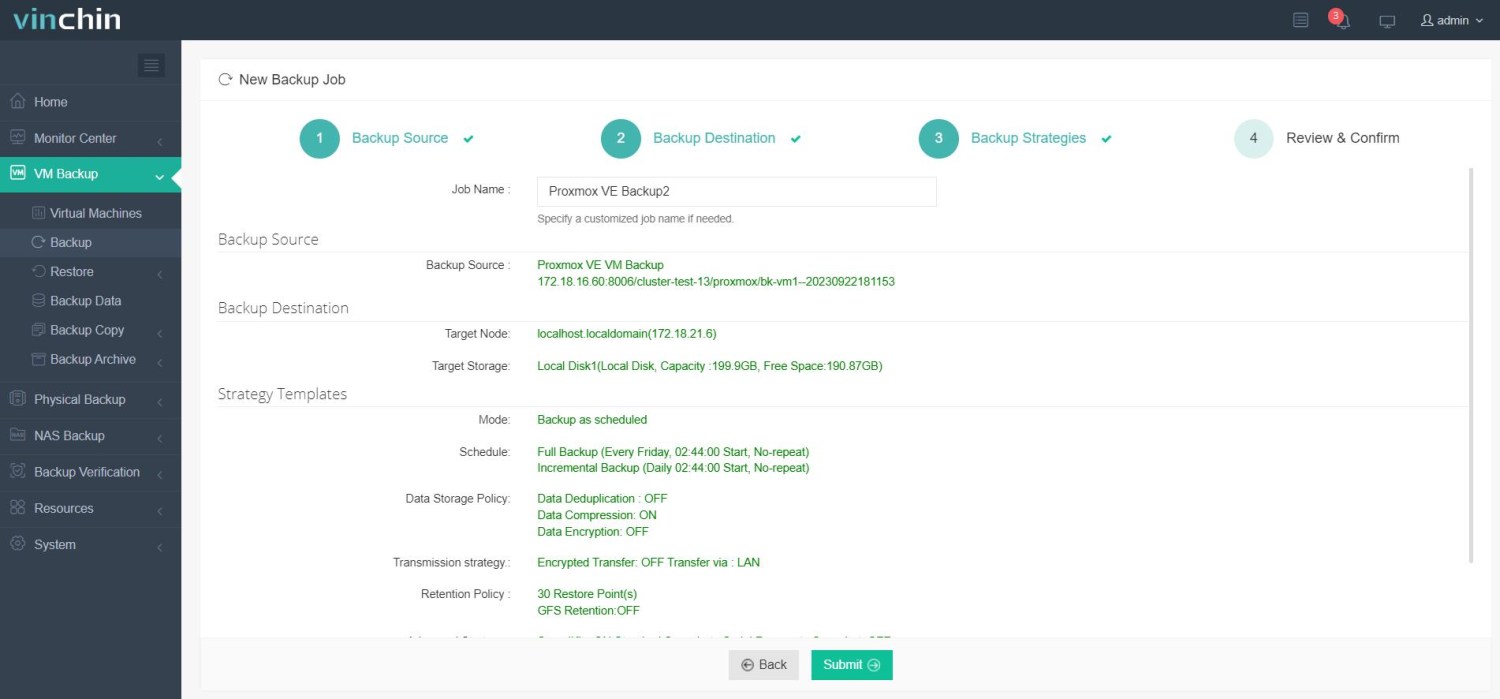
It only takes 4 steps to backup Proxmox VE VMs:
1. Select the backup object.

2. Select backup destination.

3. Enable LAN-Free backup when selecting strategies.

4. Review and submit the job.

Vinchin Backup & Recovery has been selected by thousands of companies and you can also start to use this powerful system with a 60-day full-featured trial! Also, contact us and leave your needs, and then you will receive a solution according to your IT environment.
Proxmox storage FAQs
1. Q: What storage types are supported by Proxmox VE?
A: Proxmox VE supports various storage types, including local storage (LVM, directories, ZFS), network storage (iSCSI, NFS, Ceph), and SAN.
2. Q: How can I optimize Proxmox storage?
A: You can try Proxmox ZFS compression to reduce the physical storage space required for your data, leading to cost savings on storage hardware. Moreover, it minimizes the data footprint, which translates into less data to transfer over the network — enhancing network performance and reducing bandwidth costs.
Conclusion
Integrating SAN storage into Proxmox VE can greatly enhance the capabilities of your virtualized environment. It provides a high-performance, scalable, and reliable storage solution that can support the demanding workloads typically associated with enterprise virtualization. By following the steps outlined above, you can configure your Proxmox VE cluster to take full advantage of the benefits that SAN storage offers.
Share on:


