-
What is Proxmox and DigitalOcean?
-
Why combine Proxmox with DigitalOcean?
-
Pre-Migration Checklist
-
Scenario 1: Migrating VM from Proxmox to DigitalOcean
-
Scenario 2: Migrating VM from DigitalOcean to Proxmox
-
How to migrate Proxmox virtual machines with Vinchin?
-
Proxmox Digital Ocean FAQs
-
Conclusion
Managing virtual machines across different platforms can be tricky. Many IT teams use Proxmox for on-premises virtualization but turn to DigitalOcean when they need cloud resources. What happens if you want to move a VM from Proxmox to DigitalOcean—or bring one back? This guide will show you how to migrate VMs in both directions. We’ll also explain why using both platforms together makes sense and how Vinchin can simplify your workflow.
What is Proxmox and DigitalOcean?
Proxmox Virtual Environment (Proxmox VE) is an open-source platform that lets you run virtual machines and containers on your own hardware. It uses KVM for VMs and LXC for containers—all managed through a web interface. Many organizations choose Proxmox because it’s flexible, cost-effective, and works well in private data centers.
DigitalOcean is a popular cloud provider known for its simple approach. Its main product is the Droplet—a virtual machine running in the cloud. With fast deployment times, predictable pricing, and support for many Linux distributions or BSD systems, DigitalOcean appeals to developers who want quick results without complex setup.
Why combine Proxmox with DigitalOcean?
Combining Proxmox with DigitalOcean gives you flexibility that neither platform offers alone. You can keep sensitive workloads on-premises with Proxmox while using DigitalOcean's scalable resources when demand spikes or disaster recovery is needed.
For example: imagine running your company’s databases on local servers using Proxmox—keeping control over compliance—while moving web servers or test environments into the cloud during busy periods. If uptime matters most during certain events or launches, migrating VMs from your data center to DigitalOcean ensures high availability without buying extra hardware.
This hybrid approach helps with disaster recovery planning too; if something goes wrong locally, you can quickly spin up copies of critical VMs in the cloud. Or maybe you want to save costs by bringing less-used cloud VMs back home onto your own infrastructure when demand drops.
Pre-Migration Checklist
Before starting any migration between Proxmox and DigitalOcean, take time to prepare properly. Skipping these checks often leads to failed migrations or broken VMs later.
For all migrations:
Always back up your VM before making changes or exporting images.
Check available storage space at both source and destination locations.
Make sure you have admin access on both platforms so you can manage disks or network settings as needed.
For moving from Proxmox to DigitalOcean:
1. Confirm that your VM runs Linux or BSD; Windows images are not supported by DigitalOcean custom images.
2. Ensure total disk usage stays under 100 GB—the maximum allowed size for custom images on DigitalOcean.
3. Your VM must use ext3 or ext4 filesystems; other types may not work reliably after upload.
4. Install cloud-init inside your VM if it isn’t already present; this tool helps configure networking and SSH keys automatically after migration.
5. Set up cloud-init so it uses ConfigDrive as its data source:
echo "datasource_list: [ ConfigDrive ]" > /etc/cloud/cloud.cfg.d/90_dpkg.cfg
6. Make sure SSH starts at boot so you can log in once migrated.
7. Shut down the VM before exporting its disk image—this prevents file system corruption during export.
For moving from DigitalOcean to Proxmox:
1. Plan enough storage space on your target Proxmox server; raw disk images can be large even after compression.
2. Note down current network settings (IP addresses may change after import).
3. Prepare access credentials—you’ll need root privileges inside recovery mode on your Droplet.
4. Attach a backup volume if necessary so there’s room to store exported disk images temporarily before transfer.
Taking care of these details now saves hours of troubleshooting later!
Scenario 1: Migrating VM from Proxmox to DigitalOcean
Moving a VM from Proxmox into the cloud requires careful preparation because only certain image formats work—and only if they meet strict requirements set by DigitalOcean.
First steps: make sure your VM meets all requirements listed above (see checklist). If anything is missing—like cloud-init—install it now using package managers such as apt or yum. For Ubuntu/Debian-based systems:
apt update
apt install cloud-init
echo "datasource_list: [ ConfigDrive ]" > /etc/cloud/cloud.cfg.d/90_dpkg.cfg
systemctl enable ssh
Once ready:
1. Shut down your VM completely through the web interface or command line (qm shutdown <VM_ID>).
2. Export its primary disk image in raw format using this command:
qm export <VM_ID> /path/to/image.img --format raw
Replace <VM_ID> with your actual virtual machine ID number; pick an output path with enough free space available.
3. Log into the DigitalOcean Control Panel, go to Images, then select Custom Images, followed by Upload Image.
4. Choose your .img file created earlier; follow prompts until upload completes successfully (this may take time depending on file size).
Note: If your exported image exceeds 100 GB—even slightly—it will be rejected by DigitalOcean’s uploader! In that case,
reduce partition sizes within Proxmox first using tools like GParted before re-exporting—or manually copy only essential data instead of full disks (see below).
5. Once uploaded appears under Custom Images list,
go back into Droplets, click Create Droplet, then select uploaded image under Custom Images tab during setup wizard process;
finish configuring CPU/memory/network options as usual before launching new instance based off imported disk image.
If automated migration fails due missing requirements—for example no working cloud-init—
create a fresh Droplet from scratch instead,
then transfer files manually via secure copy (scp) or remote sync (rsync). For example:
rsync -avz /path/to/source/ user@new_droplet:/path/to/destination/
After launch,
test SSH connectivity right away;
if login fails double-check firewall rules inside new instance plus verify correct public key was injected via metadata service at boot time.
Scenario 2: Migrating VM from DigitalOcean to Proxmox
Bringing a Droplet home from the cloud takes more effort since there's no built-in export button—but it's still possible if you follow each step carefully.
Start by shutting down services inside your Droplet so no data changes mid-transfer;
then reboot into recovery mode using the official Recovery ISO provided through the Control Panel (Power, then choose Recovery Mode).
Once booted into recovery environment:
1. Mount root filesystem somewhere writable (often /mnt/backup);
attach extra block storage volume if needed for temporary space.
2. Use this command inside recovery shell:
dd if=/dev/vda of=/mnt/backup/disk.img bs=4M status=progress
This captures entire virtual drive—including partition table & bootloader—not just one partition!
If space is tight,
compress output stream directly like this:
dd if=/dev/vda bs=4M | gzip > /mnt/backup/disk.img.gz
3.Transfer resulting image file(s) over network onto target Proxmox host;
for compressed files:
scp root@your_droplet_ip:/mnt/backup/disk.img.gz /path/on/proxmox/
gunzip /path/on/proxmox/disk.img.gz
Or send uncompressed files directly but expect longer transfer times especially over slow links!
On receiving end,
create new empty VM matching original specs via web UI;
do NOT add default hard drive yet—instead import downloaded disk image straight into chosen storage pool:
qm importdisk <NEW_VM_ID> /path/on/proxmox/disk.img STORAGE_NAME
Replace <NEW_VM_ID> with ID assigned by web UI wizard;
set STORAGE_NAME according where imported disks should live (e.g., local-lvm).
Next attach imported drive as primary boot device via Hardware tab;
adjust Boot Order accordingly so system tries loading OS off restored volume first rather than blank defaults!
Finally power up new guest OS—
if everything went smoothly,
it should load familiar login prompt soon after POST screen finishes.
You might need extra tweaks post-import:
Update network adapter settings since MAC addresses/IP ranges likely changed between providers;
edit /etc/network/interfaces, /etc/netplan/*.yaml, or equivalent config files depending distro type used originally inside Droplet!
Install latest virtio drivers/tools packages within guest OS for best performance under KVM hypervisor.
How to migrate Proxmox virtual machines with Vinchin?
Migrating virtual machines across diverse environments requires efficiency and reliability—a challenge faced by many businesses today as they transition between platforms such as Proxmox and DigitalOcean alongside others in their infrastructure landscape.
Vinchin Backup & Recovery delivers an enterprise-grade backup solution designed specifically for professional needs, offering agentless virtual machine migration that enables seamless movement of workloads between supported virtualization platforms while minimizing disruption to production systems.
Vinchin Backup & Recovery supports a broad range of hypervisors including VMware, Hyper-V, Proxmox, oVirt, OLVM, RHV, XCP-ng, XenServer, OpenStack—and also facilitates migration involving DigitalOcean Droplets among other compatible VMs.
The migration process with Vinchin Backup & Recovery is extremely straightforward
Step 1. Select Proxmox VM Restore Point

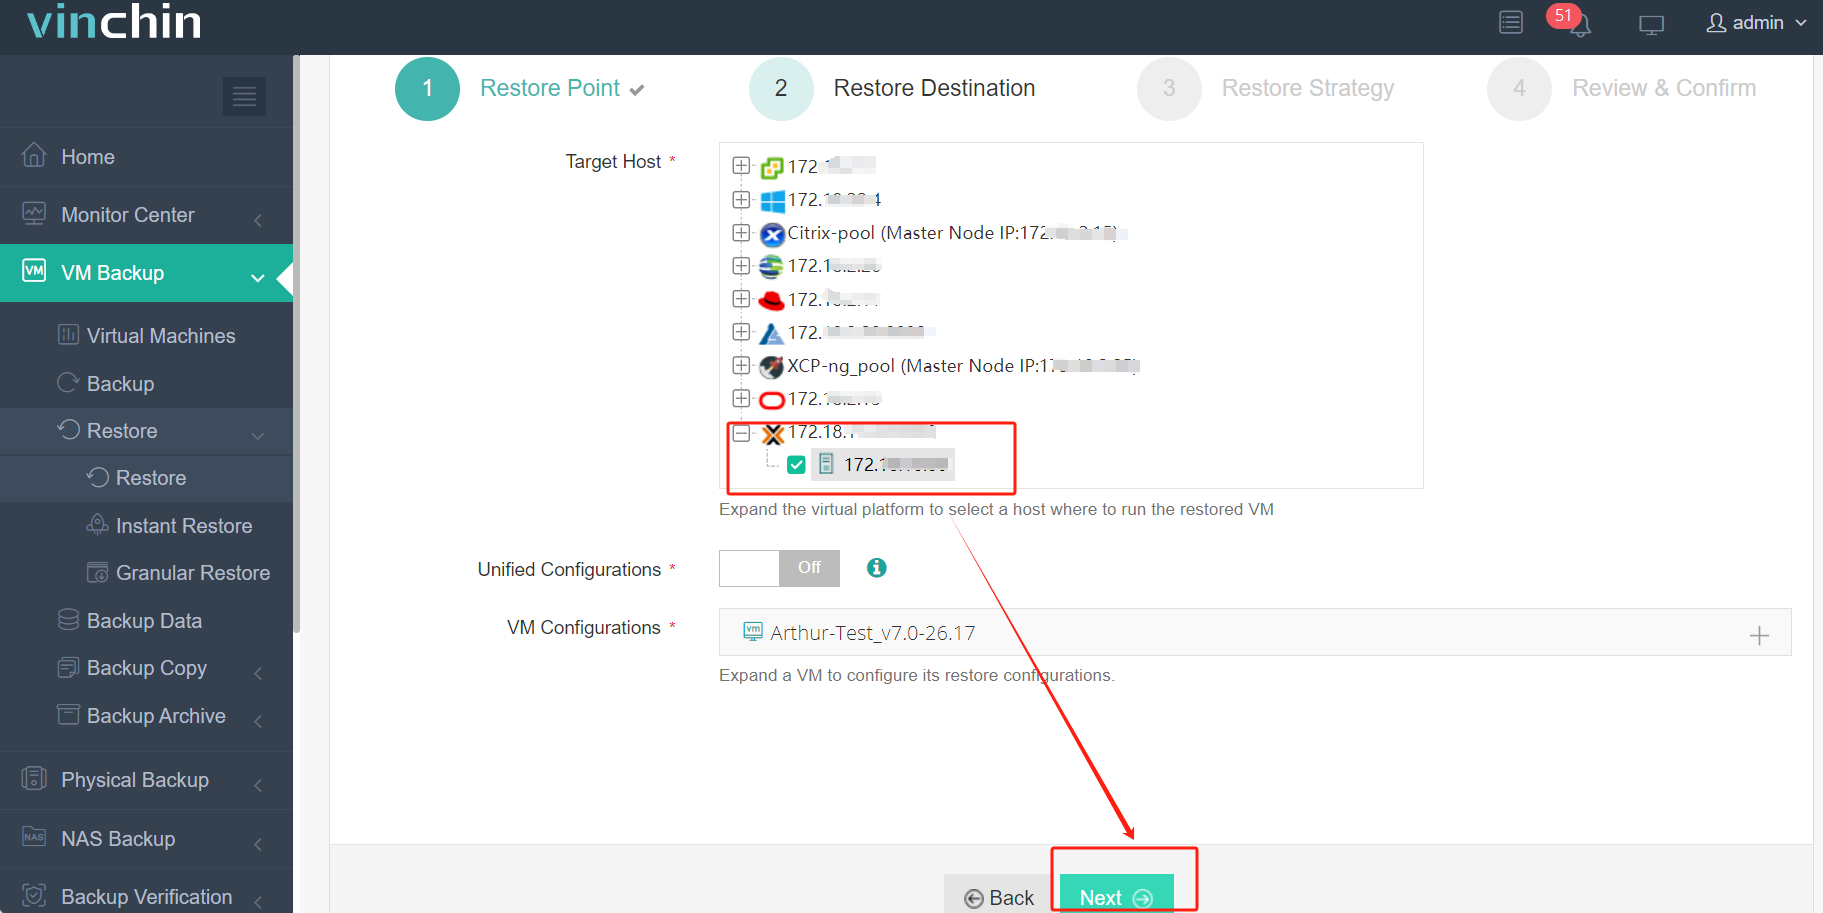
Step 2. Select Restore Destination

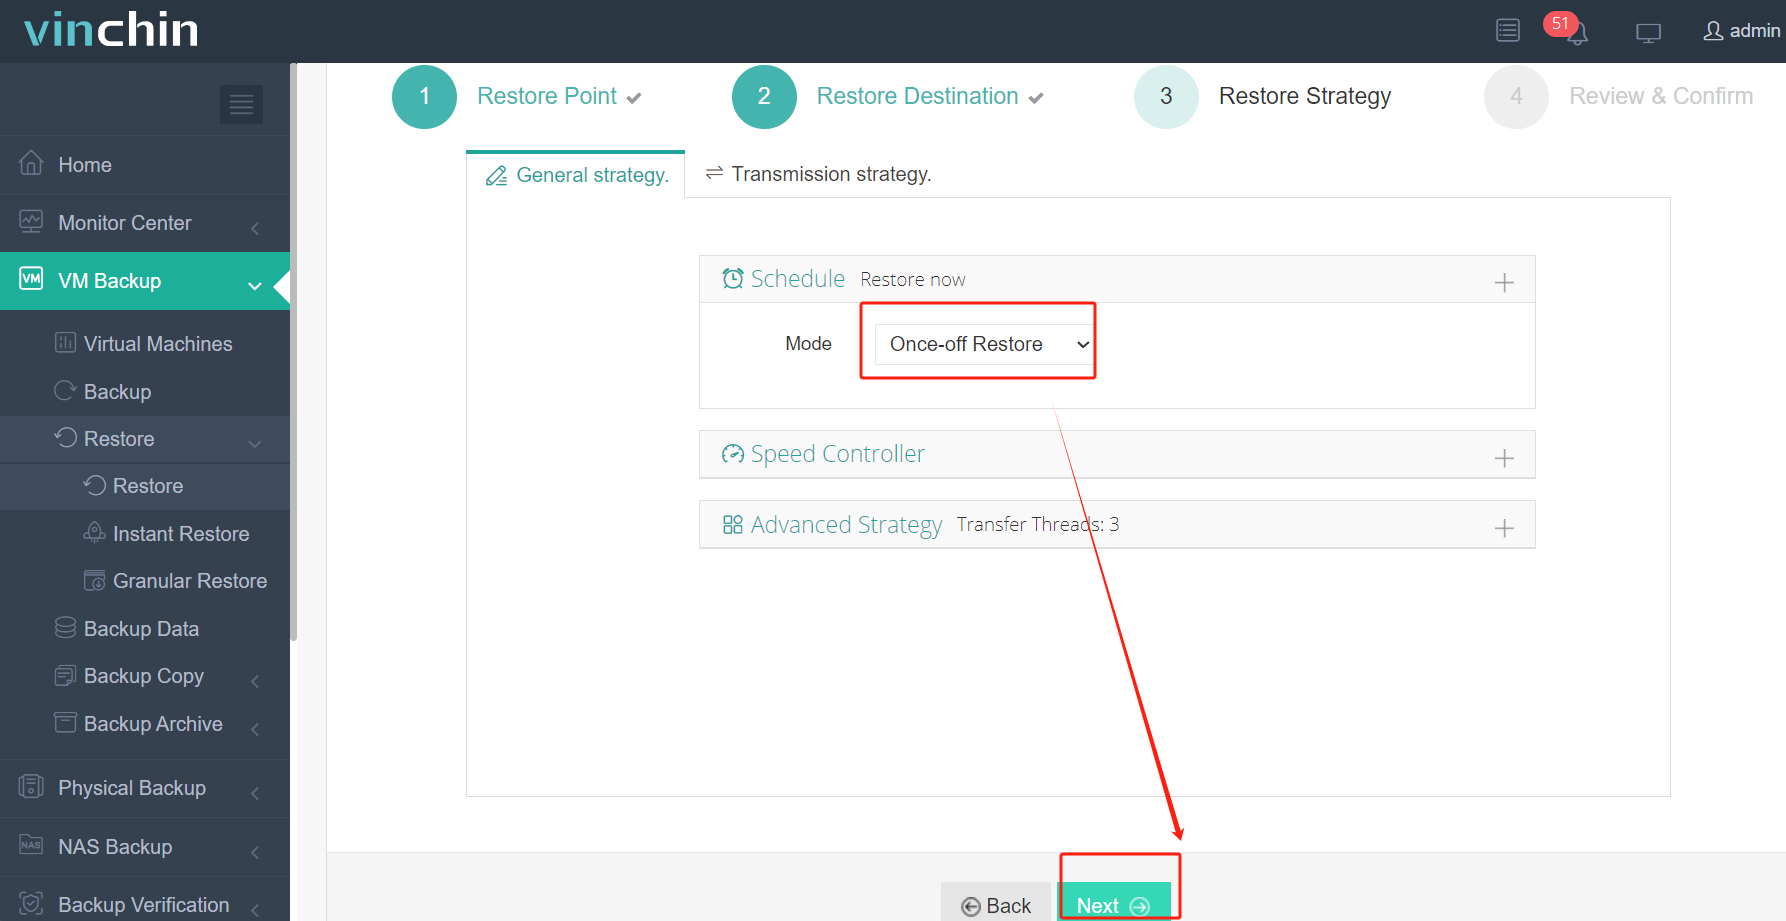
Step 3. Select Restore Strategies

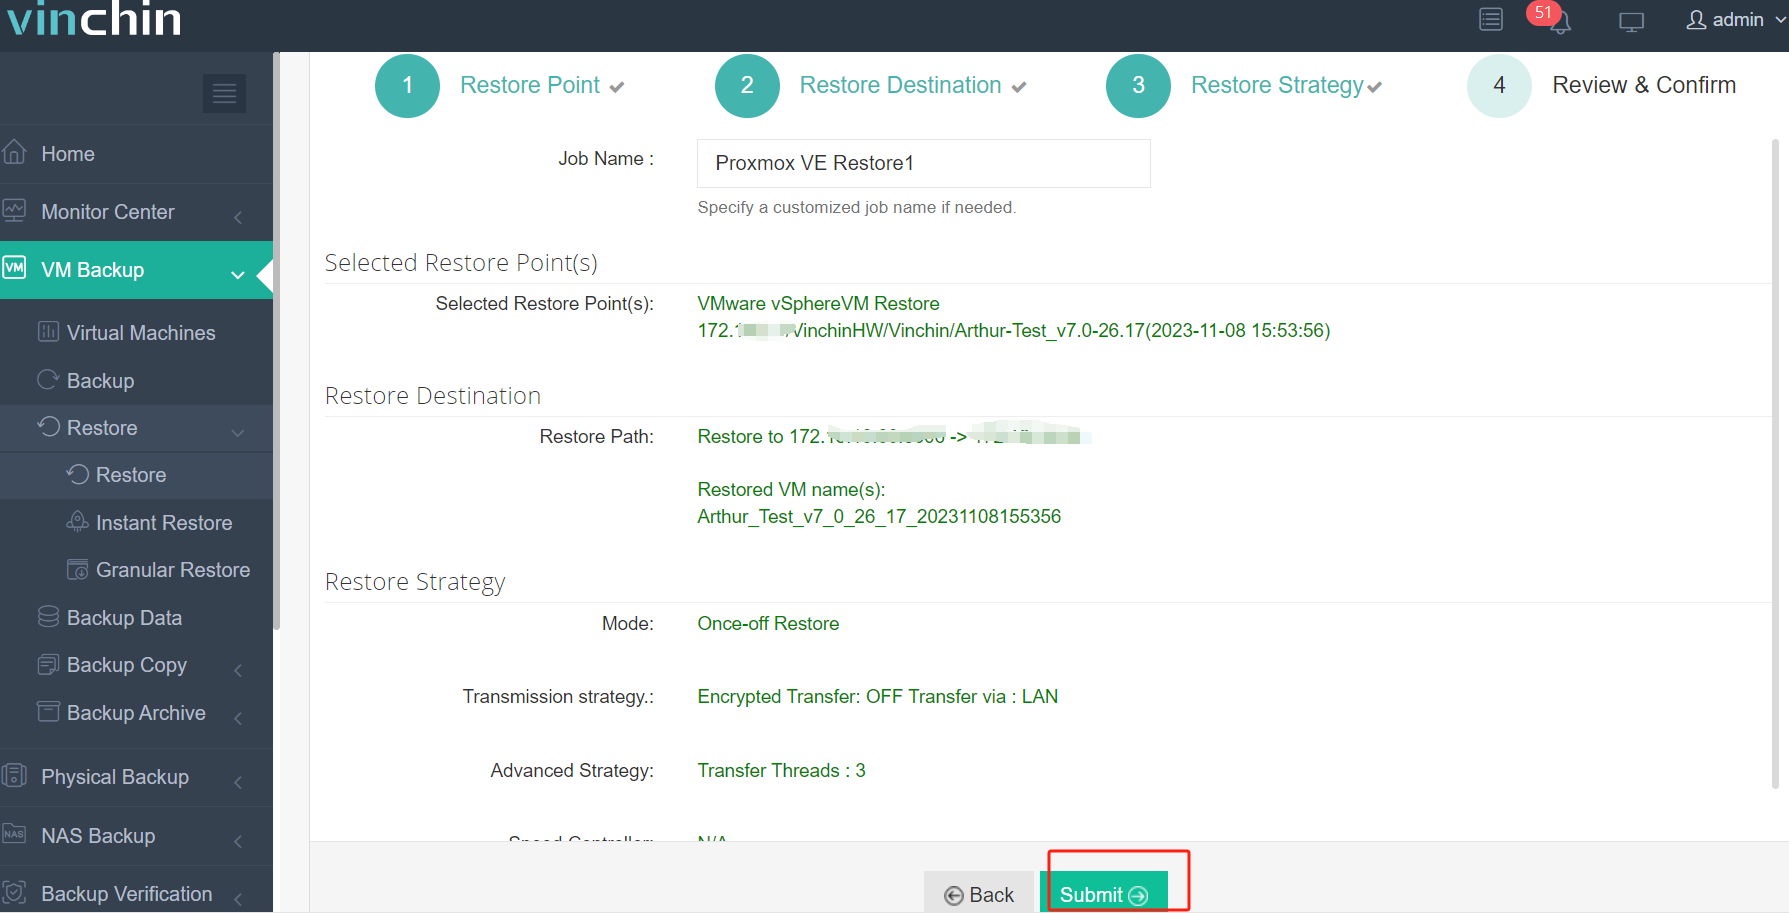
Step 4. Review and submit the job

Thousands of organizations worldwide trust Vinchin Backup & Recovery for their backup and migration needs thanks to its outstanding ratings and proven reliability.
Experience every feature risk-free—download our 60-day full-featured free trial installer now for rapid deployment!
Proxmox Digital Ocean FAQs
Q1: Can I reduce my exported image size below 100 GB before uploading it as a custom image?
A1: Yes—shrink partitions within guest OS first using GParted then zero unused blocks (zerofree) before exporting again; smaller images upload faster too!
Q2: My migrated Droplet won't start networking correctly in my local lab—what should I check?
A2: Verify adapter names haven’t changed (ip link show) & update configuration files accordingly; restart networking service afterwards for changes take effect immediately!
Q3: Is there any way automate repeated migrations between these two platforms?
A3: Yes—with scripting tools plus scheduled jobs—or use dedicated solutions like those offered by Vinchin which streamline cross-platform moves securely.
Conclusion
Migrating VMs between Proxmox and DigitalOcean takes planning but unlocks powerful hybrid workflows when done right.Vinchin makes cross-platform moves even easier thanks their robust automation features.Try out their solution today—and enjoy seamless migrations across any environment!
Share on:


