-
How to make incremental backup in KVM environment?
-
KVM Incremental Backup FAQs
-
Sum Up
Incremental backup is one of the popular backup types. It means backup only the changed or new-created data based on the previous full backup. Incremental backup saves backup and restore time and backup storage, so it is a crucial solution for voluminous data.
Server virtualization is accepted by more and more companies because hypervisor lets companies use a single physical machine as multiple virtual machines, saving a lot of budgets and increasing the work efficiency of IT environment.
KVM is one of the most popular hypervisors and it is often used together with QUMU Emulator. Compared with VMware, it is free to use and provides satisfactory performance. In KVM environment, virtual hard disks are saved as .qcow2 files sometimes .raw files, storing the applications and other data of KVM virtual machine so they are worth backing up.
The traditional method of making incremental backup of QEMU-KVM virtual machine is shutting down the virtual machine, making a full backup and making incremental backup later. The whole procedure is completed with commands like virsh and qemu-img. Some IT administrators also create KVM snapshot as incremental backup.
In fact, making KVM incremental backup can be very easy.
How to make incremental backup in KVM environment?
To easily make incremental backup for KVM virtual machine, you can choose Vinchin Backup & Recovery, a professional backup disaster recovery solution for virtual environment. It will let you quickly backup KVM virtual machines on servers agentlessly. You can add hosts like Proxmox, Red Hat Virtualization, oVirt, Oracle Linux KVM (OLVM), etc. to the backup system. (Native KVM is not supported for now)
Step 1. Add KVM host to Vinchin Backup System
Vinchin Backup & Recovery provides a user-friendly web console for KVM environment management so it will be very easy to begin with this system.
After deploying Vinchin Backup & Recovery in virtual environment, you can log in to the backup system via a web browser. To add KVM host to Vinchin backup system, you just need to click VM Backup option on the left and then select Virtual Infrastructure.
This page will present all the hosts you have added to Vinchin backup system. When you need to add new KVM host, just click the button Add.

Then you can select the platform of the host and type the credentials of the host including IP address, username, password, etc. At the same time, you need to spend a few minutes downloading and installing backup plug-in on the host. After that, click OK.
Then you will go back to Virtual Infrastructure page and see the host has been added to the list. To make VMs on the KVM host selectable later, you need to click Auth and authorize the host.
After that, the KVM host has been successfully added to Vinchin backup system.
Step 2. Select KVM virtual machines to backup
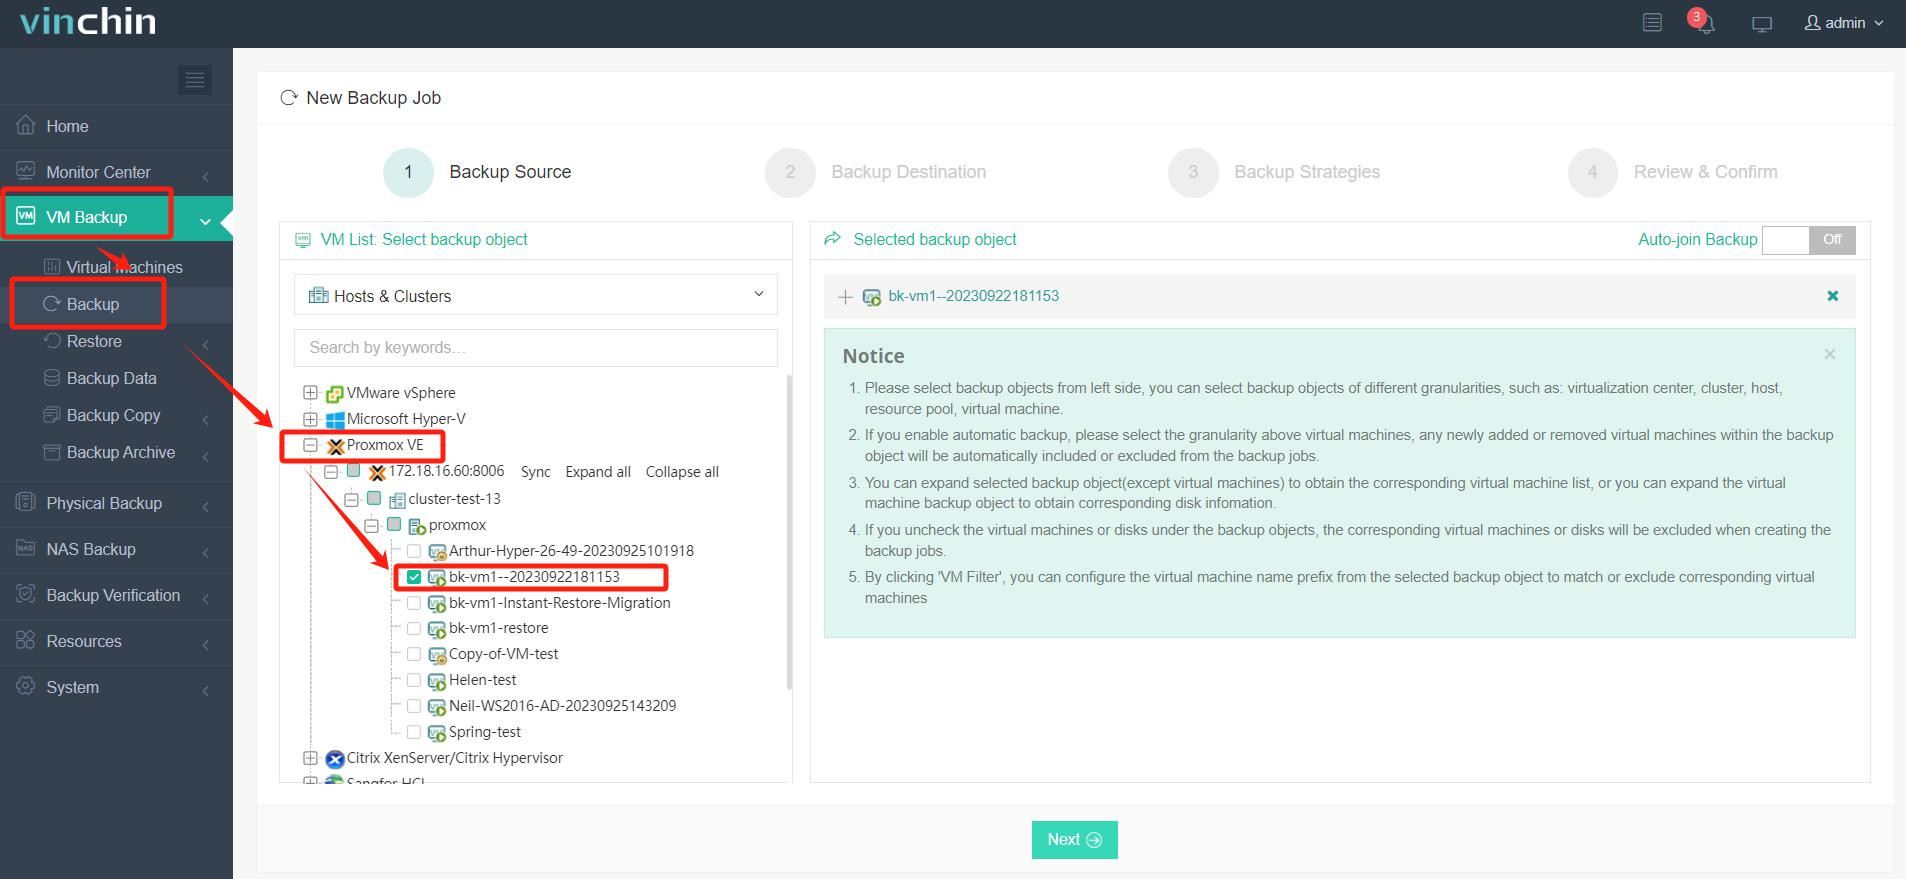
Still in VM Backup option, you need to select Backup this time. The KVM hosts will be presented and you can expand them to preview and select the virtual machines. The selected virtual machines will be presented on the right.
After adding all the virtual machines, click Next at the bottom.
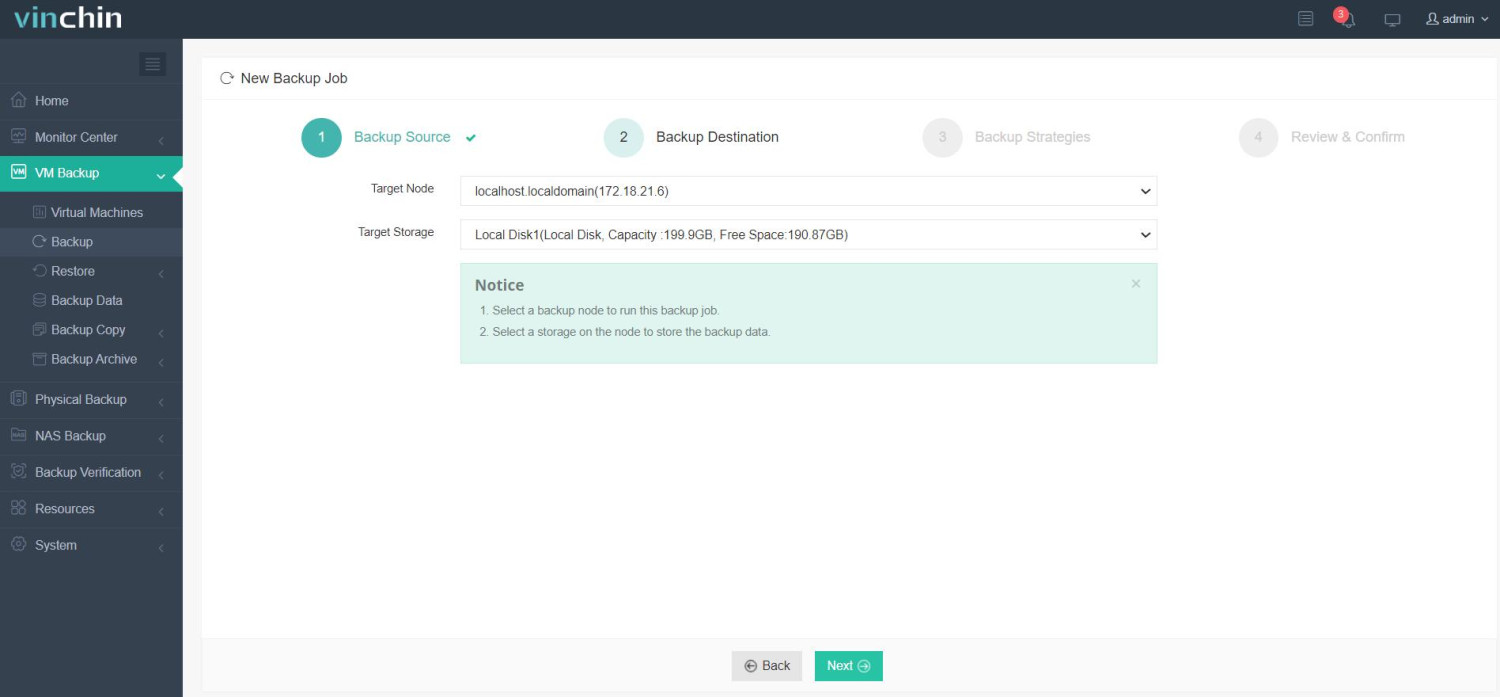
You will be then navigated to configure the backup storage. Select the Target Node and Target Storage to store the KVM backup. Click Next at the bottom.

Step 3. Configure incremental backup strategy for KVM virtual machine
Using commands to make incremental backup often requires IT administrators to create a full KVM virtual machine backup and then manually make incremental backup every time when it is needed, but in Vinchin Backup & Recovery, you just need to configure everything at once and leave the jobs to backup system.
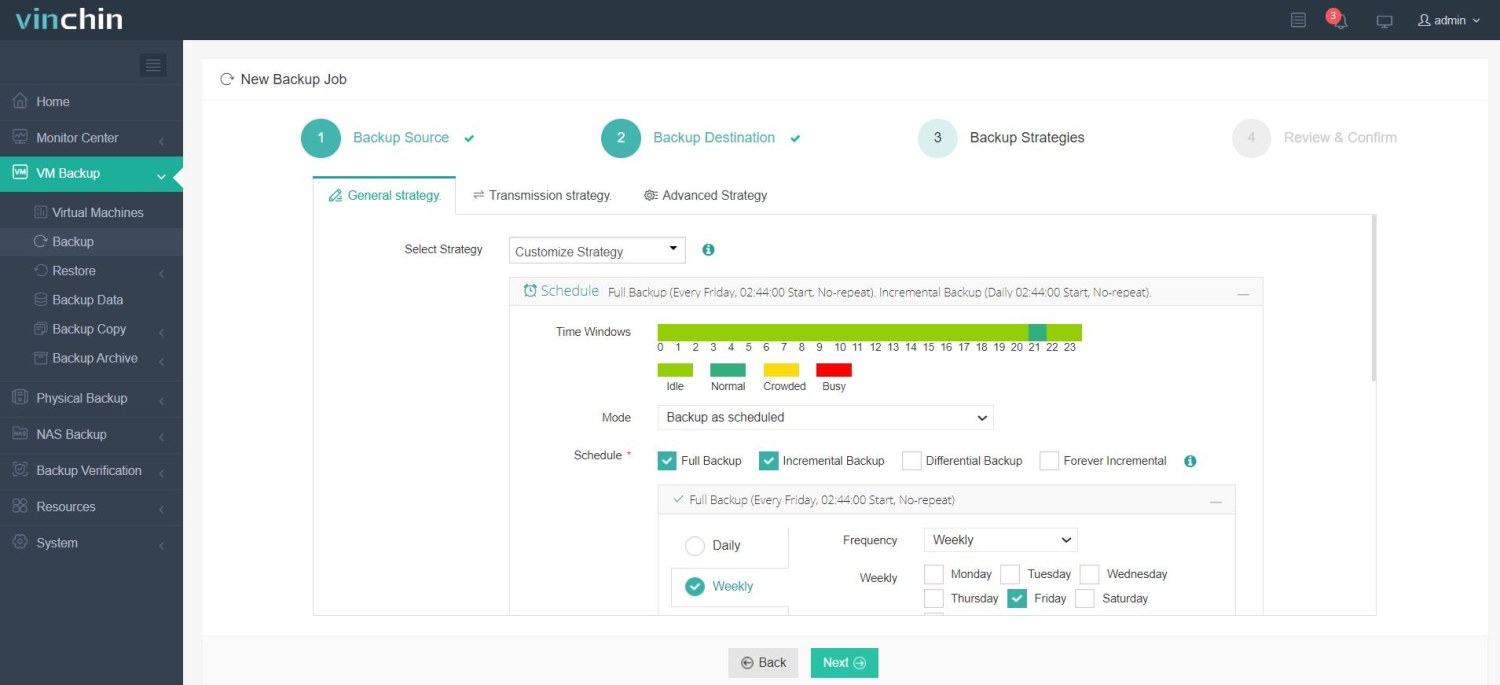
In Backup Strategies section, you can backup your KVM virtual machine in every way.
Expand Schedule tab, select Backup as scheduled and then you will find Incremental Backup option. Although it doesn’t require you to create a full backup first, you still need to check Full Backup and then you can check Incremental Backup. Vinchin Backup & Recovery also supports Forever Incremental Backup to let save backup storage.
In Backup Strategies section, you can select other strategies like Speed Kit to increase the speed of KVM incremental backup.

Step 4. Submit the job
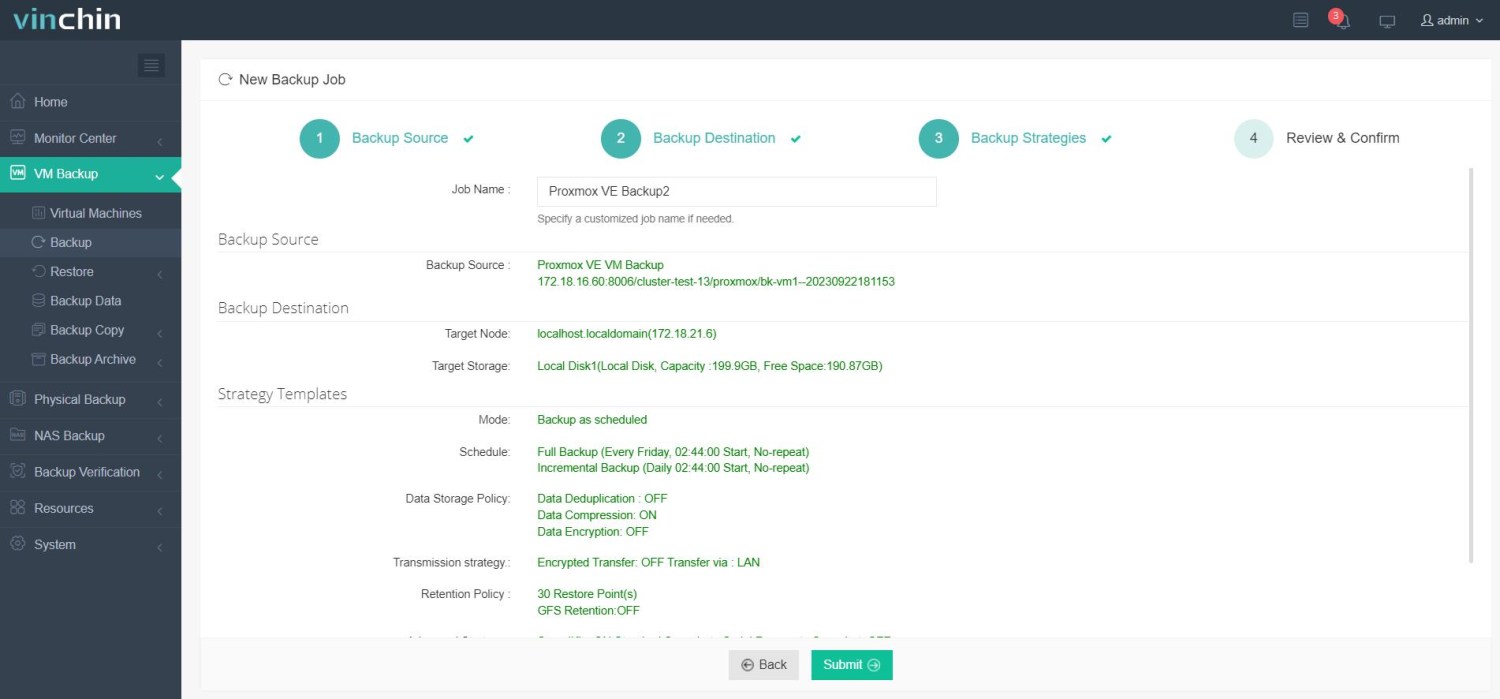
After configuring everything, you can click Next to review the job details and then submit the job. You can monitor the job in Monitor Center. Backup job will be automatically triggered at the right time. You don’t have to manually power off the KVM virtual machine because Vinchin Backup & Recovery can backup running KVM virtual machine. After the incremental backup is created, you can find the recovery point and use it to restore KVM virtual machine.

P.S. If you have different KVM hosts or hosts of other platforms like VMware, XenServer, etc., Vinchin Backup & Recovery allows you to use the recovery point to perform cross-platform migration.
You can try Vinchin Backup & Recovery with a 60-day full-featured free trial. Just click the download button to get the installation package and deploy it in a few minutes.
KVM Incremental Backup FAQs
Q1: Can I schedule incremental backups for KVM VMs to run automatically at night?
Yes, you can set up scheduled incremental backups in Vinchin Backup & Recovery by choosing Backup as scheduled and selecting your preferred time.
Q2: What should I do if my backup storage is almost full during an incremental backup?
You should either expand your storage capacity or delete old, unnecessary recovery points to free up space. Seting up backup retention policy will help automatic clear out-dated backups.
Q3: How do I verify that my incremental backup completed successfully?
Go to Monitor Center, find your backup job, and check the status column for a "Success" message. If you want to check the recoverability of the backup data, use VM backup verification feature to test it in an isolated encironment.
Sum Up
Traditional KVM incremental backup solution requires IT administrators to manually make full backup of qcow2 virtual disk files and then they can make incremental backup with complicated commands.
However, with Vinchin Backup & Recovery, incremental backup for KVM virtual machine can be easily configured and used. Don’t forget the free trial.
Share on:


