-
What Is Windows Server Virtualization?
-
Why Use Windows Server Virtualization?
-
How to Set Up Hyper-V on Windows Server?
-
How to Run Virtual Machines on Windows Server Using Oracle VirtualBox?
-
Optimizing Hyper‑V Performance for Production Workloads
-
Automating VM Deployment with PowerShell
-
Backing Up Windows Server Virtual Machines with Vinchin Backup & Recovery
-
Windows Server Virtualization FAQs
-
Conclusion
Are you tired of managing racks of physical servers? Windows server virtualization lets you run many virtual machines (VMs) on one server—cutting hardware costs, reducing energy use, and simplifying management. This guide walks you through everything from basic concepts to advanced automation and backup strategies.
What Is Windows Server Virtualization?
Windows server virtualization means running multiple VMs on a single Windows Server host. Each VM acts like its own computer—with its own operating system and applications—but shares the same hardware resources.
There are two main types of hypervisors: Type 1 (bare-metal), which runs directly on hardware (like Hyper-V), and Type 2 (hosted), which runs inside an existing OS (like Oracle VirtualBox). Hyper-V is built into Windows Server Standard and Datacenter editions, making it the default choice for most administrators.
Hyper-V creates isolated environments so workloads don’t interfere with each other. You can run different services—such as Active Directory or SQL Server—on separate VMs for better security and easier management. With windows server virtualization, IT teams can consolidate servers at ratios as high as 10:1 without sacrificing performance or reliability.
Before setting up virtualization, check that your CPU supports Second Level Address Translation (SLAT)—a feature that improves memory management in virtualized environments—and that hardware virtualization is enabled in BIOS/UEFI.
Why Use Windows Server Virtualization?
Virtualization solves many problems faced by IT operations teams today:
Hardware Efficiency: Instead of dedicating one physical machine per workload, you can run several VMs on a single host—reducing your data center footprint.
Cost Savings: Fewer servers mean lower power bills, less cooling needed, and reduced maintenance costs.
Business Continuity: If one VM fails or needs maintenance, others keep running unaffected. You can move VMs between hosts without downtime using features like live migration.
Flexibility: Quickly create or delete VMs as business needs change—ideal for testing new software or scaling up services during busy periods.
Licensing Benefits: With Windows Server Datacenter edition, you get unlimited VM rights per host—a major advantage when consolidating workloads.
Security Isolation: Separate critical services onto different VMs to reduce risk if one service is compromised.
Have you ever struggled with sprawling racks of underused servers? Virtualization helps solve this by letting you do more with less—while keeping your environment secure and easy to manage.
How to Set Up Hyper-V on Windows Server?
Hyper-V is Microsoft’s native hypervisor for windows server virtualization—and it’s included at no extra cost in most editions of Windows Server. Setting up Hyper-V takes only a few steps but requires careful preparation.
First, make sure your hardware meets these requirements:
A 64-bit processor supporting SLAT
Hardware-assisted virtualization enabled in BIOS/UEFI (look for Intel VT-x or AMD-V)
Enough RAM to support both the host OS and all planned VMs
For production networks using NIC teaming (LBFO), configure this before installing Hyper-V
To install Hyper-V:
1. Open Server Manager.
2. Click Manage > Add Roles and Features.
3. Choose Role-based or feature-based installation, then click Next.
4. Select your local server from the list; click Next again.
5. On the roles page, check Hyper-V, then proceed through prompts to add required features.
6. Click Install; restart if prompted after installation completes.
After rebooting:
1. Open Hyper-V Manager from the Tools menu in Server Manager.
2. Right-click your host name; select New > Virtual Machine.
3. Follow the wizard: set name/location; assign memory; connect network adapter; create a virtual hard disk (fixed-size VHDX disks offer better performance than dynamically expanding ones for production workloads).
4. Attach an ISO file for OS installation; finish wizard steps; start your new VM!
If installation fails due to missing virtualization support:
Reboot into BIOS/UEFI settings
Enable Intel VT-x / AMD-V
Save changes and retry setup
For advanced users: Hyper-V supports live migration between hosts without downtime if shared storage is configured correctly—a key feature for high availability setups.
How to Run Virtual Machines on Windows Server Using Oracle VirtualBox?
Sometimes you need flexibility beyond what Hyper-V offers—for example when testing cross-platform apps or running lightweight labs where clustering isn’t required. Oracle VirtualBox is a popular Type 2 hypervisor that works well on Windows Servers but lacks some enterprise features like clustering or live migration found in Hyper-V.
To set up VirtualBox:
1. Download the latest installer from Oracle’s official website.
2. Run setup; follow prompts until complete.
3. Launch Oracle VM VirtualBox from Start menu.
4. Click New, enter a name (e.g., "TestVM"), select type (Microsoft Windows) and version (Windows Server 2022) then click Next.
5. Assign RAM—but never allocate more than 80% of total system memory across all active VMs to avoid contention issues!
6. Choose "Create a virtual hard disk now"; set size/type according to workload needs (dynamically allocated saves space but fixed size gives better speed).
7. After creation: select VM > click Settings > adjust network/storage options as needed—for sensitive data enable encryption via Settings > General > Encryption tab before first boot-up!
8.Select VM > click Start > choose ISO file when prompted to begin OS install process.
Remember: While convenient for labs/testing/dev workstations, VirtualBox should not be used alone in mission-critical production environments due its lack of native clustering/high availability features compared with Hyper-V. For those cases stick with windows server virtualization using Hyper-V instead!
Optimizing Hyper‑V Performance for Production Workloads
Getting great performance out of windows server virtualization means tuning both hardware allocation and software settings:
Start by planning CPU/RAM assignments carefully—avoid overcommitting vCPUs unless workloads are light-duty (a safe starting point is no more than 1–1½ vCPUs per physical core). For memory-intensive applications use Dynamic Memory settings so unused RAM can be reclaimed automatically by other VMs when possible.
For network-heavy workloads enable SR‑IOV support if available—it allows direct access between guest OSes’ NICs and physical adapters improving throughput while lowering latency (“SR‑IOV” option appears under Network Adapter properties).
Storage bottlenecks? Configure Quality of Service policies within Hyper‑V Manager so critical VMs always get enough IOPS even during heavy load periods (“Enable QoS” checkbox under Disk properties).
Finally—always keep integration services updated inside each guest OS! Outdated drivers can cause slowdowns or even crashes especially after major host updates have been applied.
Automating VM Deployment with PowerShell
Manual setup works fine at first—but what happens when you need dozens of identical test machines spun up overnight? That’s where PowerShell comes in handy!
With just one command line you can deploy new VMs instantly:
New‑VM ‑Name "WS2022‑DC" ‑MemoryStartupBytes 4GB ‑NewVHDPath "C:\VHDs\WS2022.vhdx" ‑NewVHDSizeBytes 100GB
Want regular checkpoints? Schedule them using Task Scheduler plus this command:
Checkpoint‑VM ‑Name "WS2022‑DC"
By scripting deployments—and automating routine tasks—you save time while reducing human error.
Backing Up Windows Server Virtual Machines with Vinchin Backup & Recovery
Protecting your virtualized environment requires robust backup solutions tailored for enterprise demands such as those found in Microsoft Hyper‑V deployments alongside other mainstream platforms like VMware, Proxmox VE, oVirt, OLVM, RHV, XCP-ng, XenServer, OpenStack, ZStack and more—over fifteen environments supported by Vinchin Backup & Recovery.
Among its extensive capabilities are forever-incremental backup modes that minimize storage usage over time; granular restore functions enabling precise recovery down to individual files/folders; comprehensive data deduplication/compression ensuring efficient utilization of backup targets whether local NAS/cloud/tape archives are used; scheduled backups with flexible retention policies including GFS strategy; plus cross-platform migration tools facilitating seamless movement between different hypervisors—all designed to enhance operational efficiency while safeguarding business continuity.
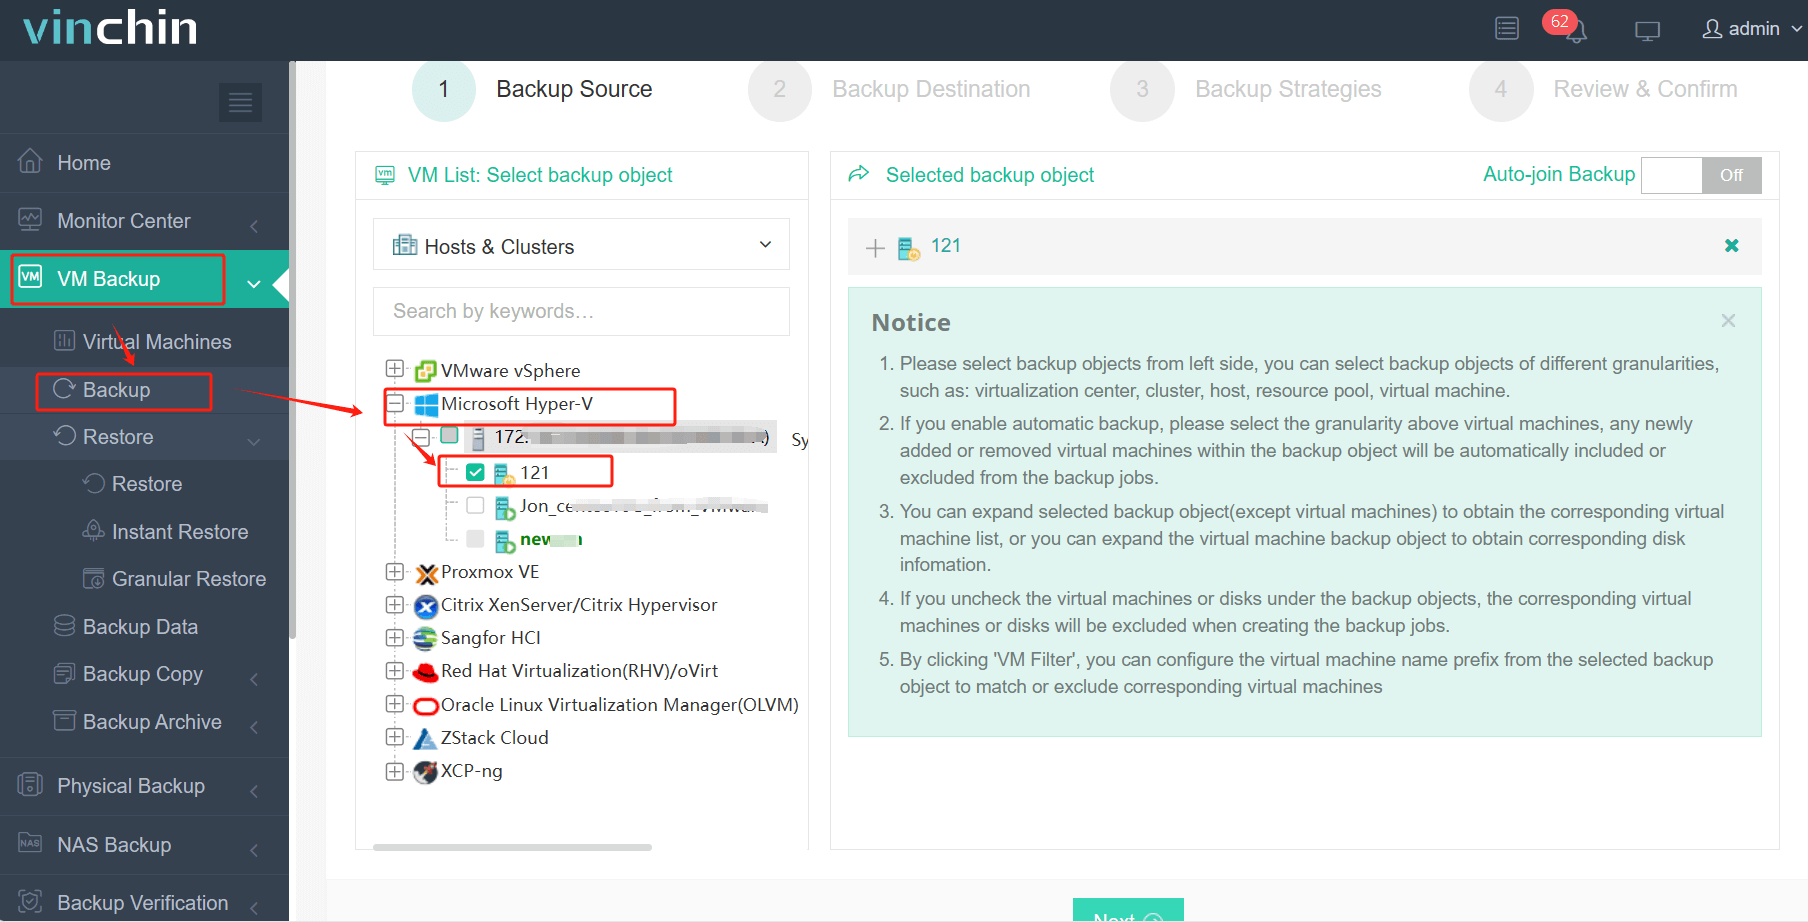
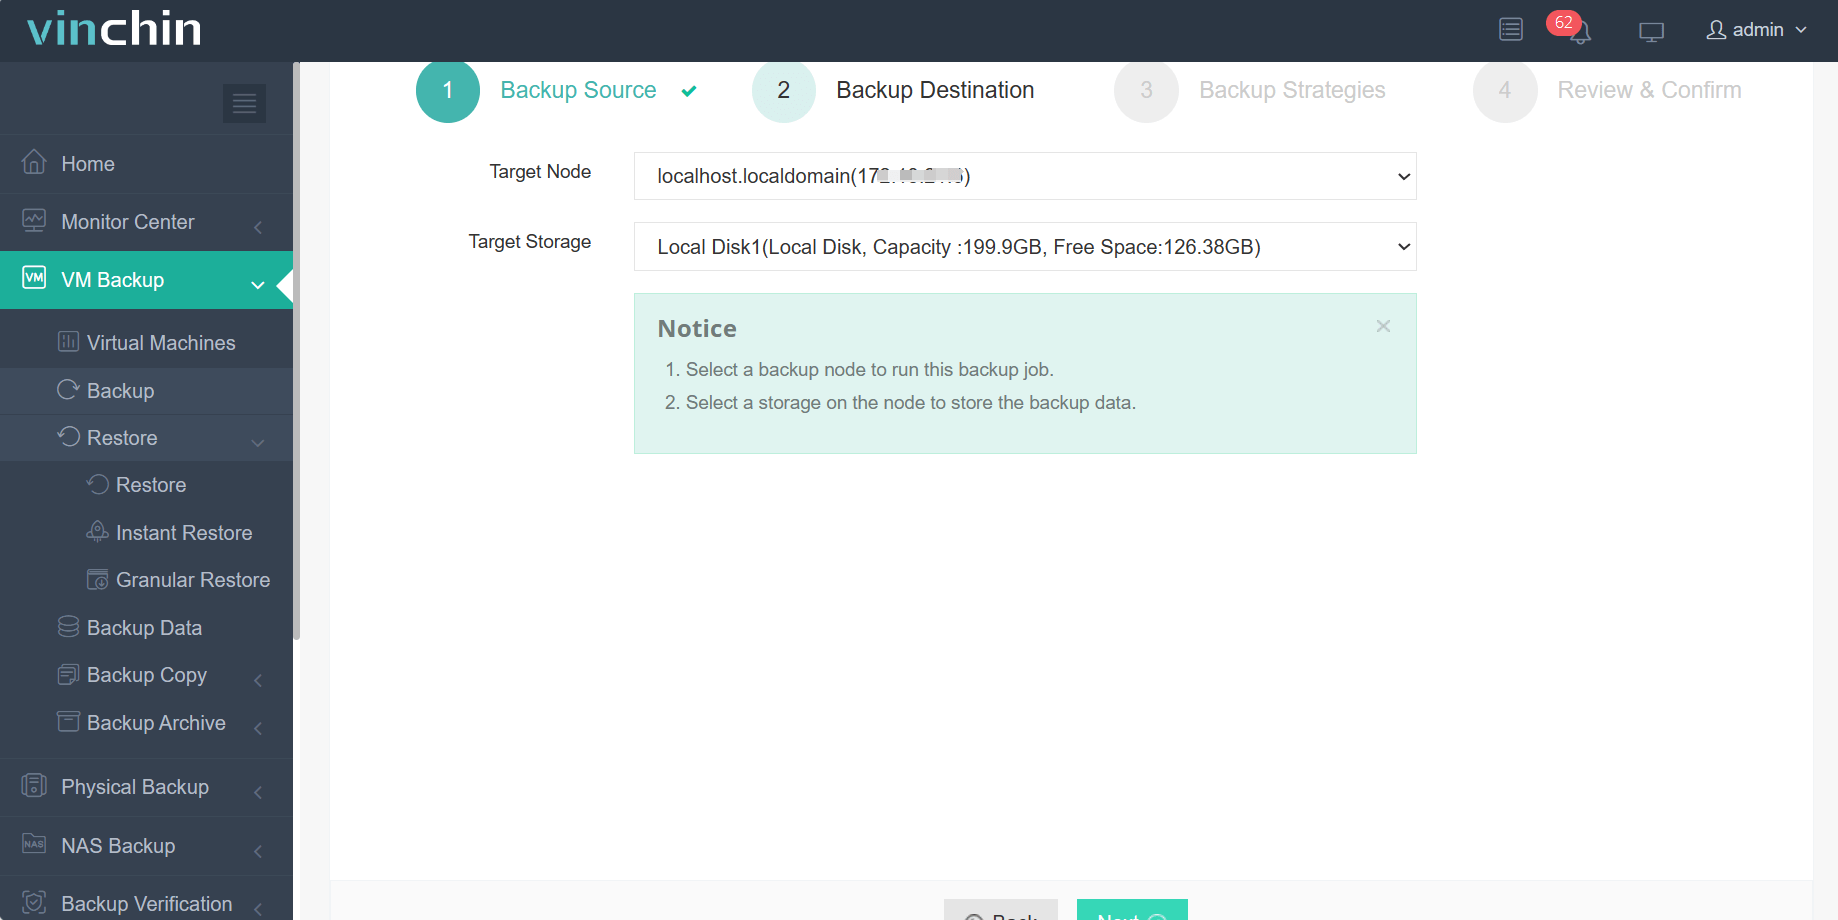
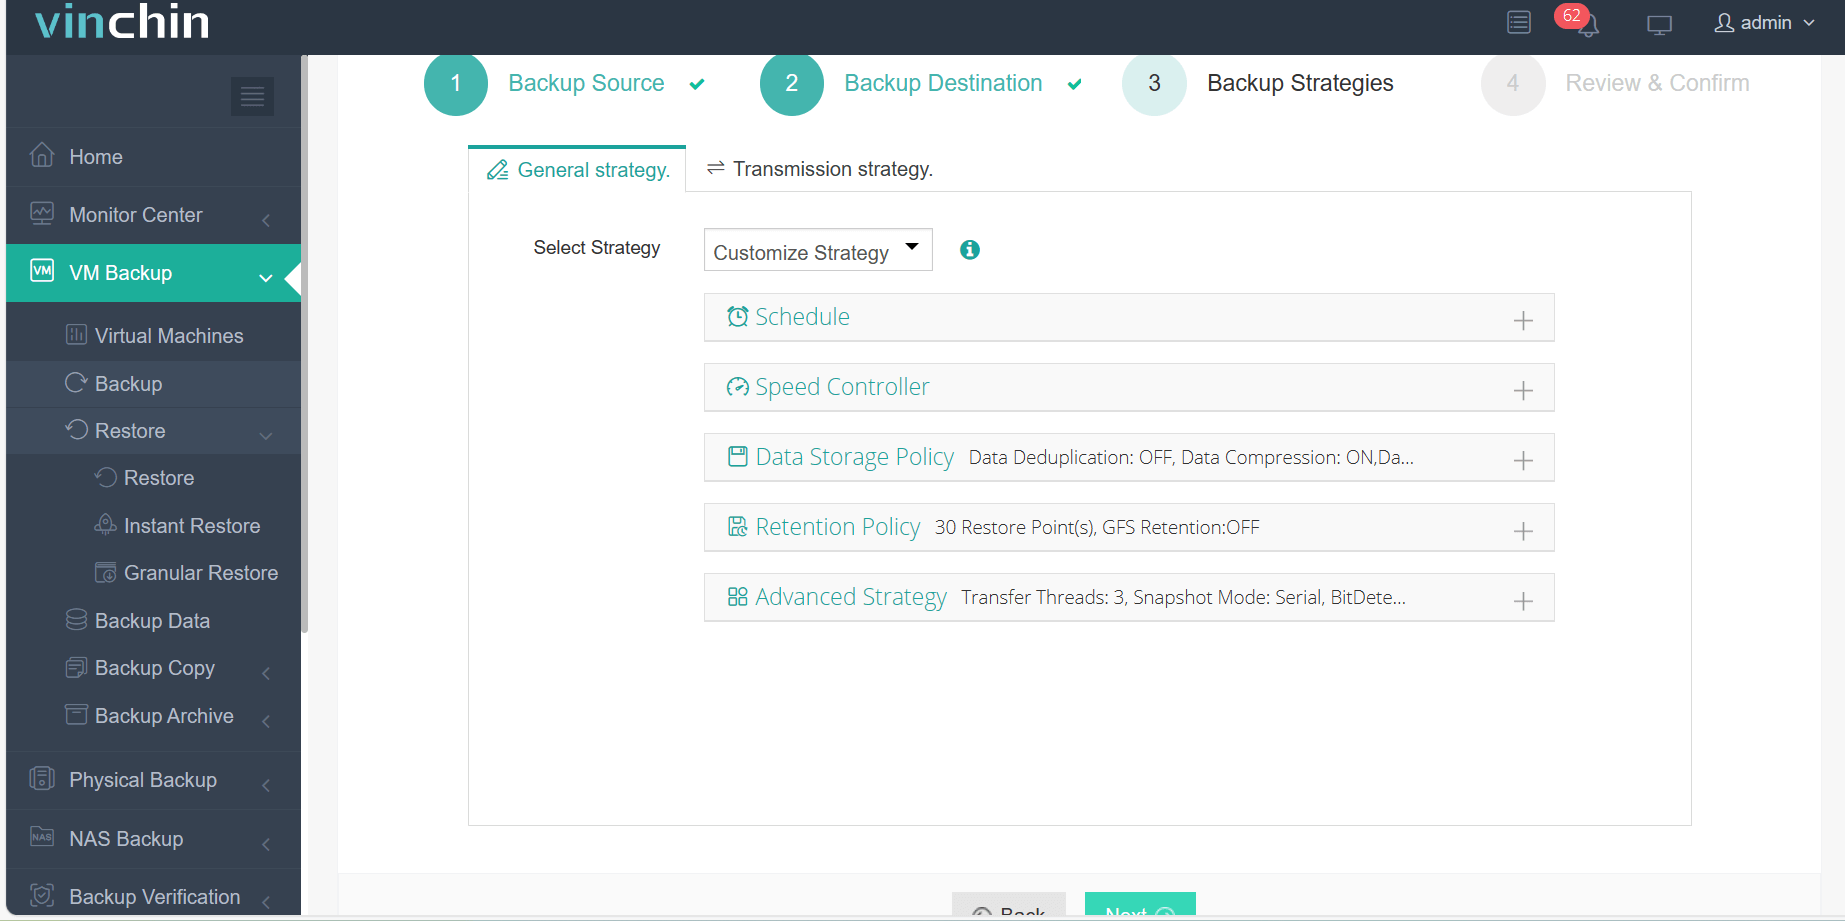
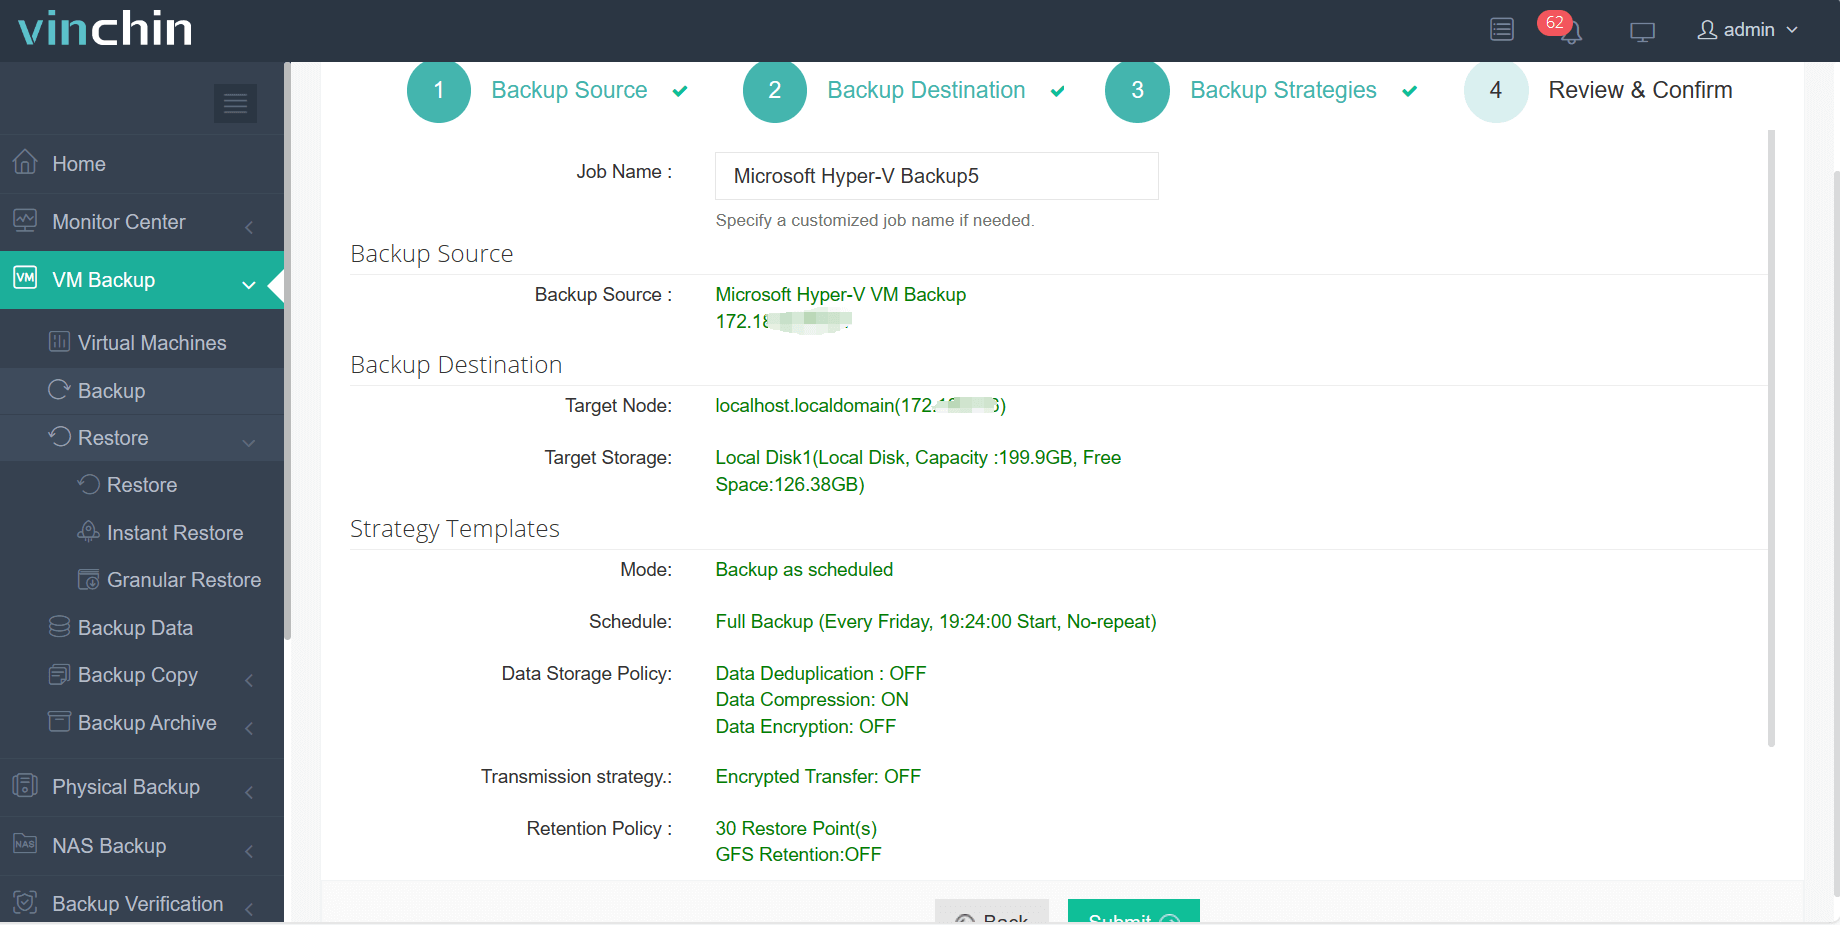
Backing up a Microsoft Hyper‑V VM using Vinchin Backup & Recovery involves four straightforward steps via its intuitive web console:
Step 1: Select the Microsoft Hyper‑V VM(s) to back up

Step 2: Choose your preferred backup storage location

Step 3: Configure backup strategy including schedule/policy options

Step 4: Submit the job—the process begins immediately

Join thousands worldwide who trust Vinchin Backup & Recovery’s proven reliability—top-rated enterprise data protection software now available as a full-featured free trial for 60 days! Try it today by clicking below.
Windows Server Virtualization FAQs
Q1: Can I run both Hyper‑V and VirtualBox together?
No—they require exclusive access to hardware-assisted virtualization so only one may be active at any time per host machine.
Q2: How do I move a VM between two different physical hosts?
Use HYPER‑V MANAGER > MOVE > MOVE THE VIRTUAL MACHINE > pick destination host > follow prompts until done
Q3: What should I do if my newly created VM won’t start after updates?
Boot from install media > REPAIR YOUR COMPUTER > open COMMAND PROMPT > uninstall latest update using wusa /uninstall /kb:[number]
Q4: How do I automate daily checkpoint creation?
Schedule CHECKPOINT‑VM commands via TASK SCHEDULER pointing at target machine names/scripts
Q5: What are best practices securing my virtualized environment?
Enable SHIELDED VMS where possible; restrict admin roles via Just Enough Administration (JEA); disable unnecessary consoles/network ports
Conclusion
Windows server virtualization lets you cut costs while boosting uptime—even complex deployments become manageable once automated properly! Remember always test your backups regularly—not just after setup—to ensure smooth recovery later if needed.For reliable protection,Vinchin makes safeguarding every workload simple.Try it free today!
Share on:


