








Product: Vinchin Backup & Recovery
Version: V9.0
KB Number: 200198
Last Modified: 2026-07-21 19:05:04
Discovered Version:v9.0.0
Question
My Huawei FusionCompute environment uses Scale-out Block Storage. When I use Vinchin to back up Huawei FusionCompute VMs, the backup fails with the following message:
Backup VM failed.
Failed to calculate the size...
Answer
Issue Description
Huawei FusionCompute KVM For virtual machine backup/recovery of DSWare storage, please install the backup plug-in at the Hypervisor. Please download the backup plug-in from the login page, and deploy it on each host (physical server) that requires backup/recovery.
Resolution
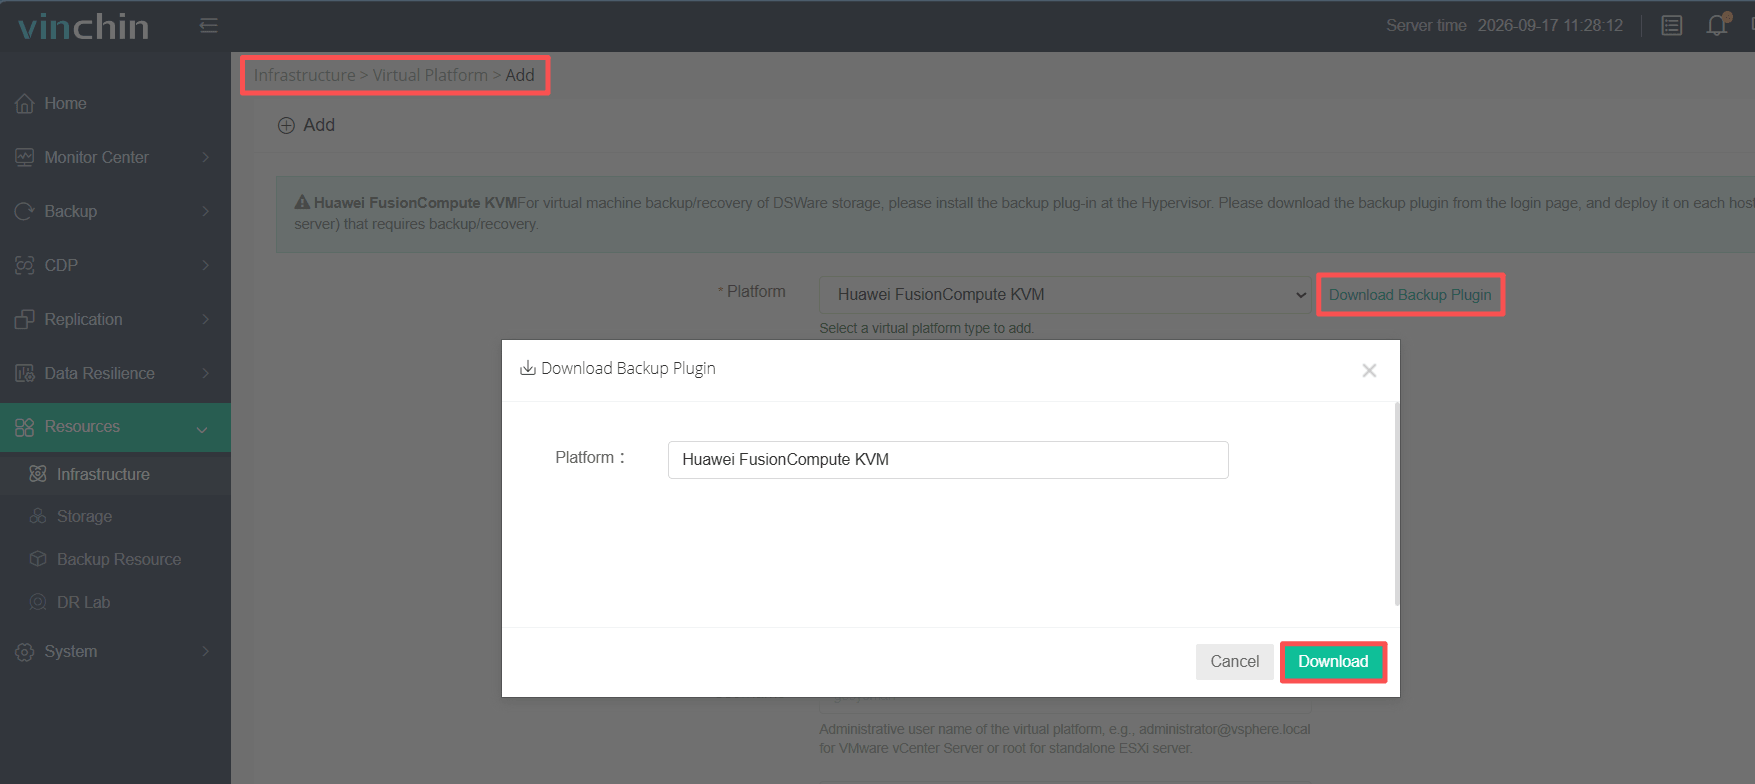
1.Download the plugin
Log in to the Vinchin Backup & Recovery console and navigate to:
Resources > Infrastructure > Add
Select Huawei FusionCompute KVM, click Download Backup Plugin, and download the plugin package.
The package name may vary depending on the Vinchin version.
For example: vinchin-stack-patch-cloud-9.0.0.xxxxx-1.el7.x86_64.rpm
2.Install the plugin and configure the firewall.
Transfer the downloaded backup plugin package to each Huawei FusionCompute KVM hypervisor host that may run the protected VMs.
Note: The plugin package name varies depending on the Vinchin version. Use the actual file name downloaded from the Vinchin Backup & Recovery console.
For example: vinchin-stack-patch-cloud-9.0.0.xxxxx-1.el7.x86_64.rpm
Log in to the hypervisor host with root privileges, navigate to the directory where the plugin package is located, and install it:
Run: sudo rpm -ivh ./vinchin-stack-patch-cloud-*.rpm
After installation, verify that the plugin has been installed successfully:
Run: rpm -qa | grep vinchin-stack-patch-cloud
To allow communication required by the backup plugin, open TCP port 23100 on the hypervisor host firewall.
3. Create the FusionStorage mapping configuration file
An additional configuration file must be created on the Vinchin Backup Server to define the mapping between each FusionStorage management node and the hypervisor hosts that use the corresponding storage.
Step 1. Create the configuration directory
Run: sudo mkdir -p /etc/backup_system/fusion_compute_kvm
Step 2. Create the configuration file
Create the agent_ip.conf file under the directory created above:
Run: sudo touch /etc/backup_system/fusion_compute_kvm/agent_ip.conf
Open the file for editing:
Run: sudo vi /etc/backup_system/fusion_compute_kvm/agent_ip.conf
Step 3. Configure the storage-to-host mapping
Enter the FusionStorage management node IP address and the IP addresses of the hypervisor hosts that use the corresponding storage.
The format is:
<FusionStorage_Management_IP>=<Hypervisor_IP_1>,<Hypervisor_IP_2>,<Hypervisor_IP_3>
For example:
7.4.2.31=7.4.2.20,7.4.2.21,7.4.2.22
8.6.4.11=8.6.4.55
In this example:
7.4.2.31and8.6.4.11are FusionStorage management node IP addresses.- Hypervisor hosts
7.4.2.20,7.4.2.21, and7.4.2.22use the storage managed by7.4.2.31. - Hypervisor host
8.6.4.55uses the storage managed by8.6.4.11.
Important:
- All configured IP addresses must be reachable from the Vinchin Backup Server.
- If multiple hypervisor hosts use the same storage management node, separate the host IP addresses with English commas (,).
- The FusionStorage management node IP can be checked in the FusionCompute interface under Resource Pool > Storage > Storage Resources.
Step 4. Verify the configuration
After saving the file,
run: cat /etc/backup_system/fusion_compute_kvm/agent_ip.conf
Verify that the storage management node and hypervisor host mappings are correct.
Then you can start the HuaweiFusionCompute VM Backup.
60-DAY FULL-FEATURED FREE TRIAL
No credit card required
Get started in 10 minutes