-
What is Oracle Database?
-
System Requirements for Oracle Database Installation
-
Method 1: Installing Oracle Database with GUI
-
Method 2: Installing Oracle Database via Command Line
-
How to Protect Oracle Databases with Vinchin Backup & Recovery?
-
Oracle Database Installation FAQs
-
Conclusion
A reliable Oracle Database installation forms the backbone of many enterprise IT environments. For operations administrators, a smooth setup means fewer headaches down the road—better performance, easier maintenance, and stronger security. This guide walks you through every step of Oracle Database installation. We start with basics for newcomers and move toward advanced tips for seasoned professionals.
What is Oracle Database?
Oracle Database is a leading relational database management system (RDBMS). It helps organizations store, retrieve, and manage large volumes of data efficiently. With features like multi-user access control, high availability options such as Real Application Clusters (RAC), robust security controls including encryption at rest and in transit, plus support for complex transactions—it’s no wonder industries from finance to healthcare rely on it daily.
System Requirements for Oracle Database Installation
Before installing Oracle Database on any platform—Windows or Linux—you must verify that your hardware and software environment meets minimum standards. Skipping this step can lead to failed installs or poor performance later.
For Windows systems:
Use a 64-bit version of Windows 10 or newer.
Ensure at least 2 GB RAM; 4 GB or more is better for production workloads.
Set aside at least 10 GB free disk space just for the database software; actual needs may grow with data volume.
Choose NTFS as your file system with a default allocation unit size.
For Linux systems:
Run Oracle Linux 7 or 8 (or compatible distributions).
Match memory and storage requirements above.
Use XFS or ext4 file systems for best results.
Confirm kernel parameters are set correctly—for example:
semmsl,semmns,shmmax,shmallshould match recommendations in Oracle documentation.Swap space should be at least equal to physical RAM up to 16 GB; beyond that use half the RAM size.
On both platforms:
Use a modern multi-core processor.
Assign a static IP address if possible; dynamic addresses can cause network issues later.
Make sure DNS resolution works reliably between client machines and the server hosting Oracle.
Always check official documentation specific to your chosen version before starting—the requirements sometimes change between releases.
Method 1: Installing Oracle Database with GUI
Most users prefer installing via graphical interface—the Oracle Universal Installer (OUI)—because it guides you step by step through each choice. This method suits beginners but also offers enough flexibility for intermediate admins setting up test labs or small production servers.
First download the correct installer ZIP from Oracle’s official site. Extract it somewhere simple—avoid spaces in folder names—to something like C:\Oracle19c.
1. Log onto Windows as an account with Administrator rights.
2. Go into your extracted folder; double-click setup.exe.
3. In the opening window labeled Welcome, click Next.
4. Accept license terms when prompted; click Next again.
5. Let OUI run its prerequisite checks—if anything fails here (like missing Visual C++ libraries), fix those issues before continuing.
6. Choose whether you want to just install software (Install database software only) or create/configure a full database (Create and configure a database) now; most users pick full creation at this stage unless prepping multiple servers first.
7. Select either Desktop class (for single-user testing) or Server class (for multi-user production). Server class lets you fine-tune more settings such as storage locations and memory allocation—a better fit for real workloads.
8. Specify an existing user account as the Oracle Home User, or let OUI create one automatically—this account runs background services securely without needing full admin rights all the time.
9. In the next screen (Typical Install Configuration) enter values like:
Global database name (
orclis common)Administrative password used by SYS/SYSTEM accounts
Storage location if different from default
10. Review all choices on summary page—double-check paths so they don’t overlap previous installs!
11. Click Install when ready; progress bars show each phase until done
12. At completion OUI launches Database Configuration Assistant automatically which creates initial tablespaces/datafiles
13. Write down connection info shown at end—including hostname/IP address plus port number
14. Click Close
Afterward confirm everything worked by opening Windows’ built-in tool called Services, making sure all entries starting with “Oracle” are running (“Started”). You can also launch SQL*Plus from Start Menu—or connect remotely using tools like SQL Developer if enabled during setup.
Method 2: Installing Oracle Database via Command Line
Advanced users often automate installations using silent mode—a lifesaver when deploying dozens of servers across data centers! Here’s how:
Start by downloading/extracting installer files as above—but this time open a terminal window instead of clicking icons.
On Linux switch user context:
su – oracle
Set required environment variables (ORACLE_HOME, ORACLE_BASE). Then generate a response file template tailored to your needs:
./runInstaller -record -destinationFile /tmp/db_install_template.rsp
Edit this template using any text editor—set options like edition type (EE for Enterprise Edition), base directory paths (/u01/app/oracle/product/19c/dbhome_1), group names (dba, oinstall), language packs needed (en).
To launch silent install:
./runInstaller -ignorePrereq -waitforcompletion -silent \
-responseFile /tmp/db_install_template.rsp \
oracle.install.option=INSTALL_DB_SWONLY \
ORACLE_HOSTNAME=mydbserver \
UNIX_GROUP_NAME=oinstall \
INVENTORY_LOCATION=/u01/app/oraInventory \
SELECTED_LANGUAGES=en \
ORACLE_HOME=/u01/app/oracle/product/19c/dbhome_1 \
ORACLE_BASE=/u01/app/oracle \
oracle.install.db.InstallEdition=EE \
oracle.install.db.OSDBA_GROUP=dba \
SECURITY_UPDATES_VIA_MYORACLESUPPORT=false \
DECLINE_SECURITY_UPDATES=true
When prompted onscreen—or within logs—run root scripts as instructed:
/u01/app/oraInventory/orainstRoot.sh
/u01/app/oracle/product/19c/dbhome_1/root.sh
To silently create an actual database instance after software install completes:
dbca -silent -createDatabase \
-templateName General_Purpose.dbc \
-gdbname myorcldb -sid myorcldb -responseFile NO_VALUE \
-characterSet AL32UTF8 \
-sysPassword MySysPass123! \
-systemPassword MySysPass123! \
-createAsContainerDatabase true \
-numberOfPDBs 1 \
-pdbName pdb1 \
-pdbAdminPassword PdbAdminPass123! \
-databaseType MULTIPURPOSE \
-memoryMgmtType auto_sga \
-totalMemory 4096 \
-storageType FS \
-datafileDestination "/u02/oradata"\
-redoLogFileSize 100\
-emConfiguration NONE\
-ignorePreReqs
Once finished edit /etc/oratab; set restart flag (“Y”) so instance starts automatically after reboot if desired.
Check logs under $ORACLE_BASE/cfgtoollogs/installActions.log whenever things go wrong—they’re invaluable!
This approach ensures repeatability across environments—from dev/test VMs up through clustered production nodes—and integrates well with configuration management tools such as Ansible or Puppet if needed later on.
How to Protect Oracle Databases with Vinchin Backup & Recovery?
After completing your Oracle Database deployment, implementing robust backup measures becomes essential for long-term reliability and compliance needs alike. Vinchin Backup & Recovery stands out as an enterprise-level solution supporting today’s mainstream databases—including comprehensive protection specifically designed for Oracle environments alongside MySQL, SQL Server, MariaDB, PostgreSQL, PostgresPro, and MongoDB platforms.
With Vinchin Backup & Recovery, organizations benefit from features such as incremental backup tailored for Oracle workloads, advanced source-side compression that optimizes storage usage during backup operations, batch database backup capabilities ideal for managing multiple instances efficiently, flexible GFS retention policies ensuring regulatory compliance over extended periods, and ransomware protection safeguarding critical assets against evolving threats—all integrated into one powerful platform designed around enterprise demands.
The web console provided by Vinchin Backup & Recovery is remarkably intuitive:
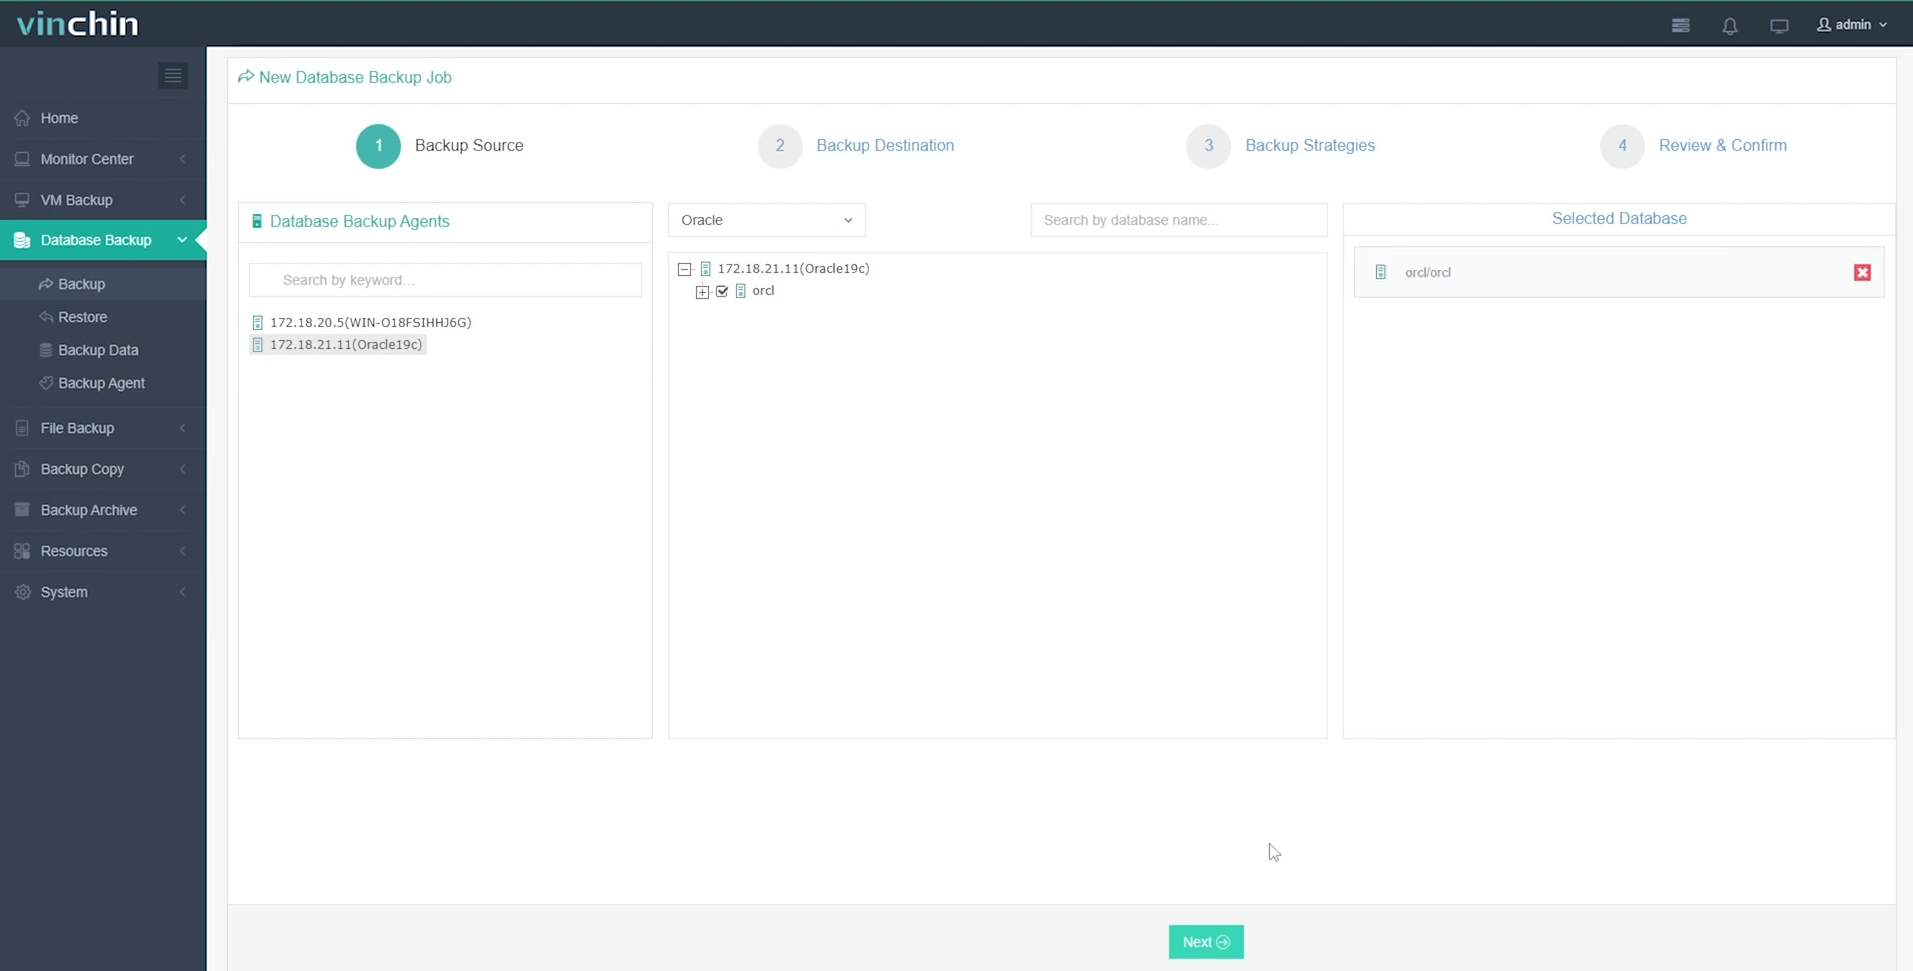
Step 1. Selecting the Oracle database you wish to protect;

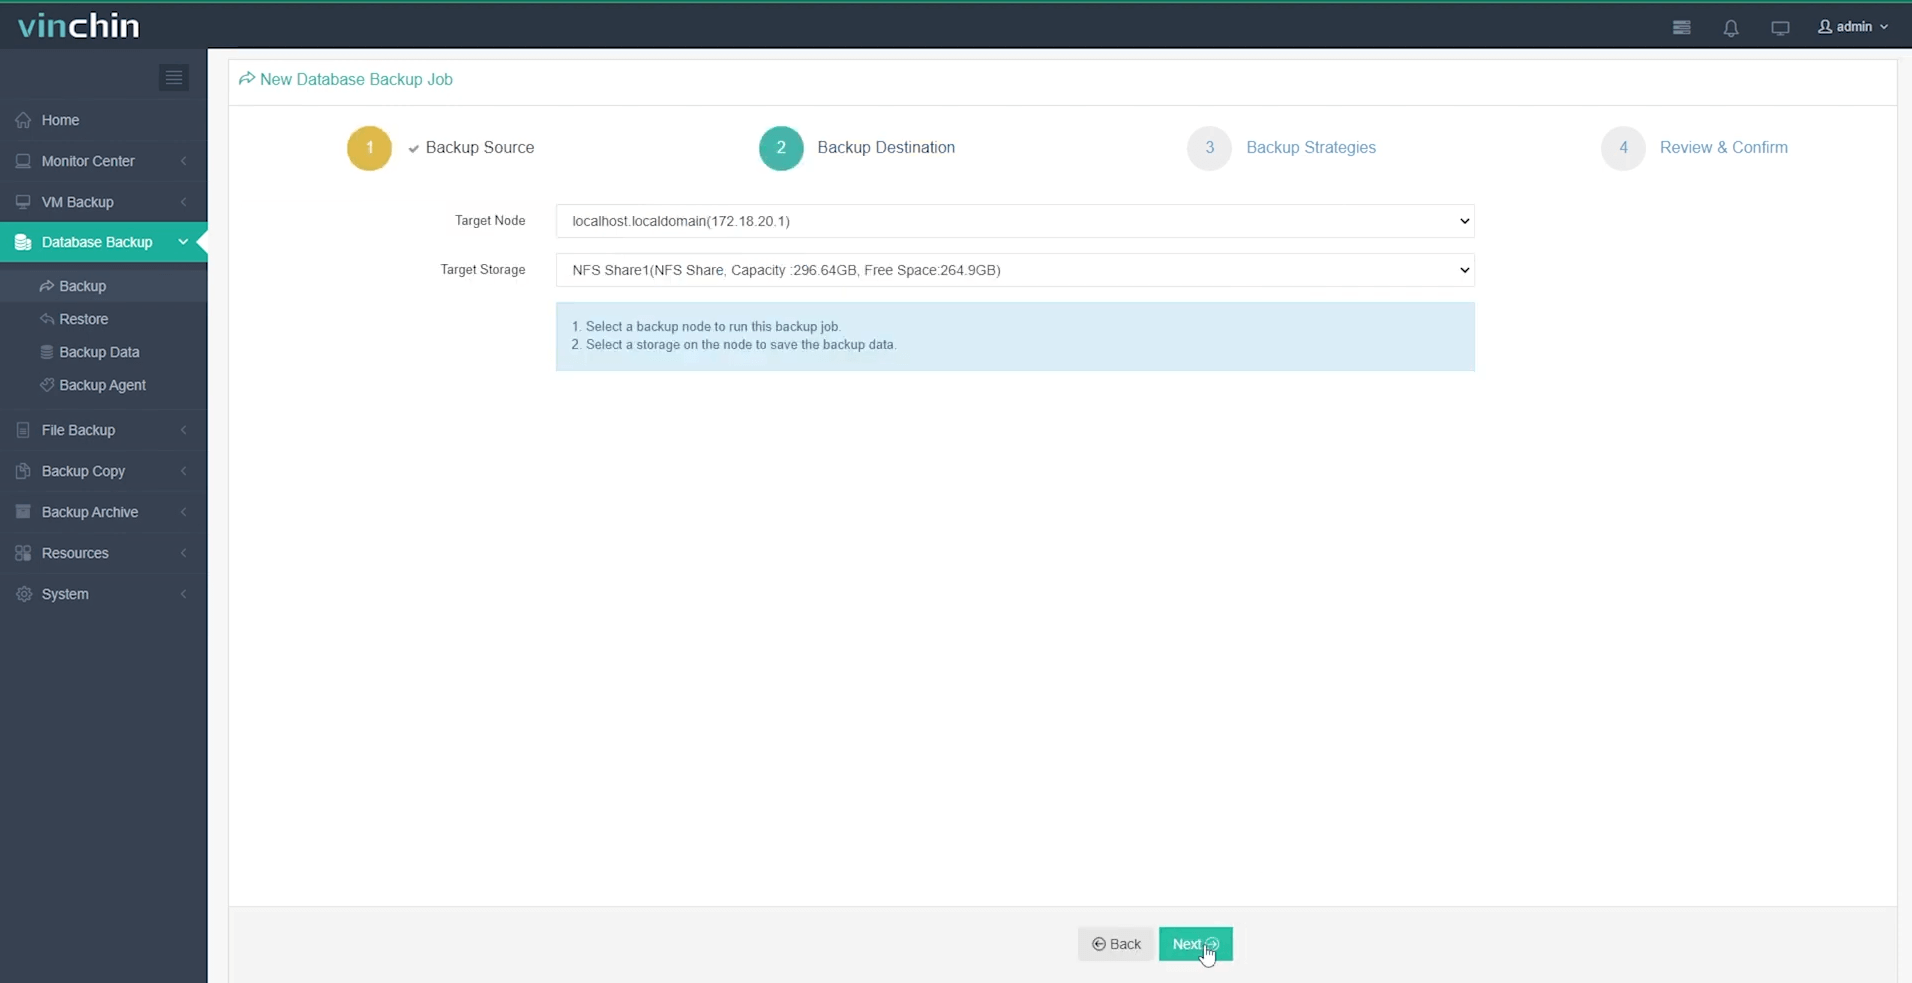
Step 2. Designates your preferred backup storage location;

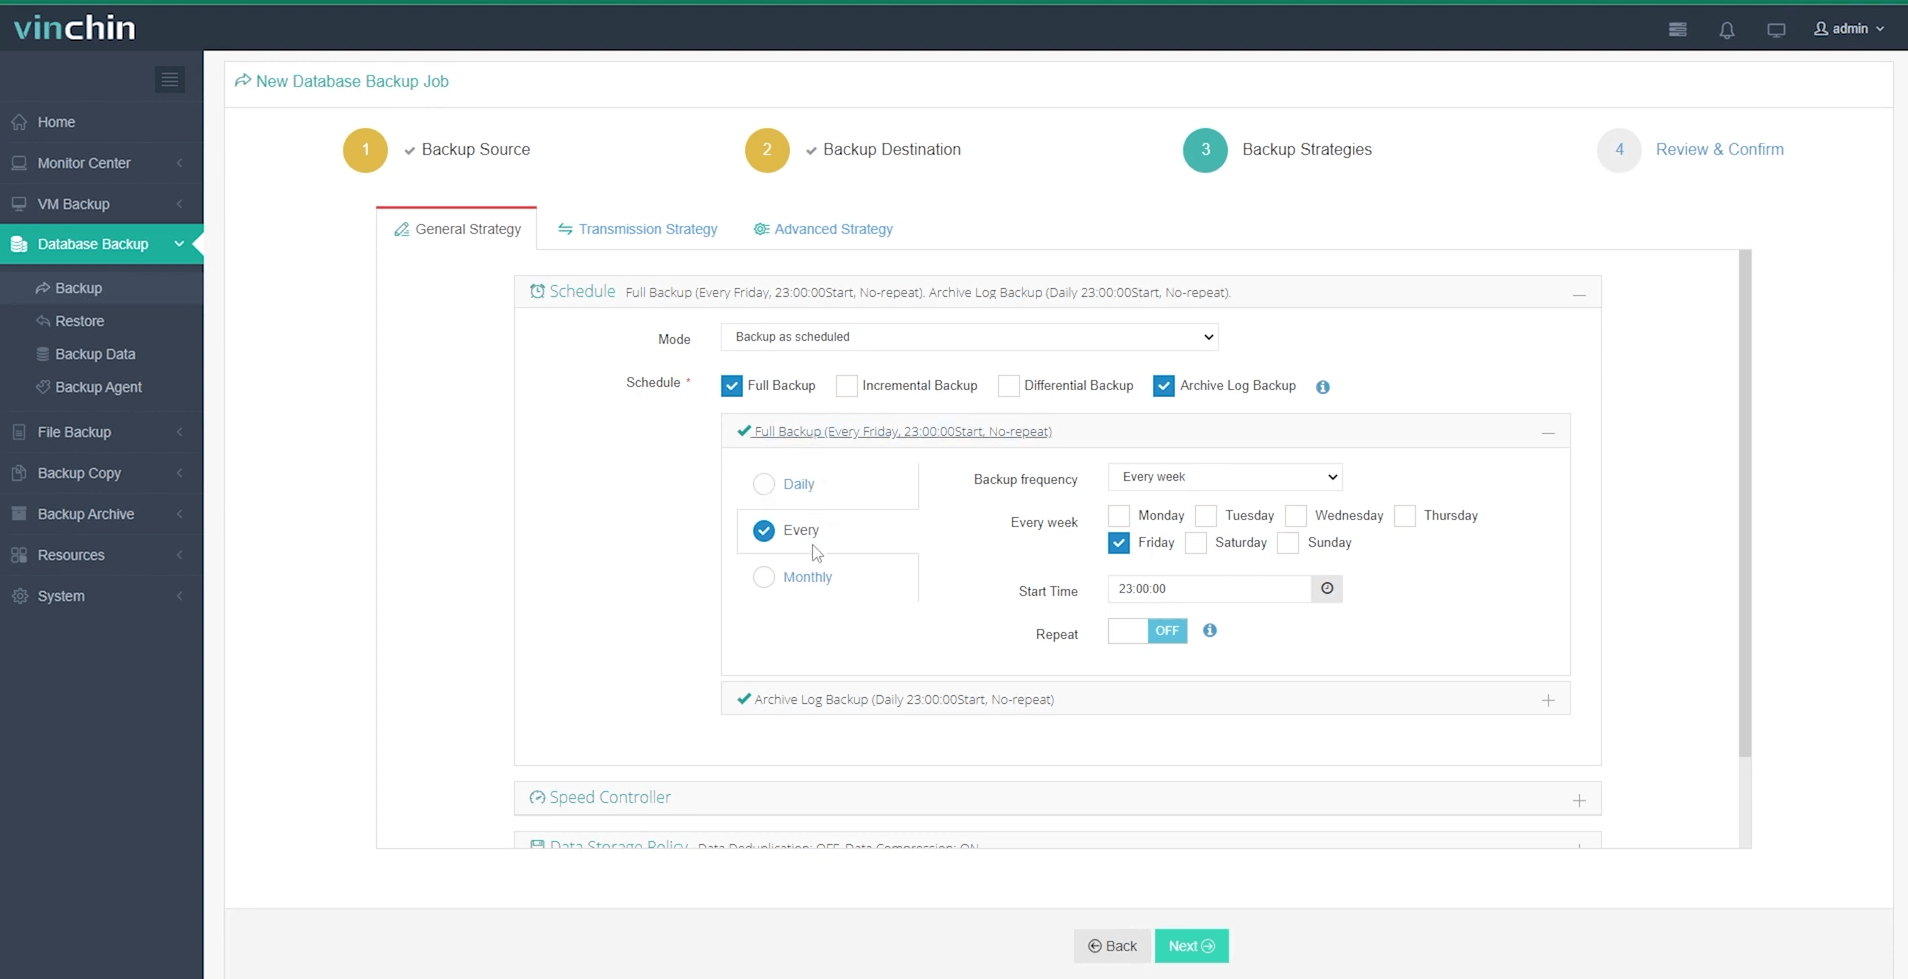
Step 3. Defines scheduling and strategy details according to business policy;

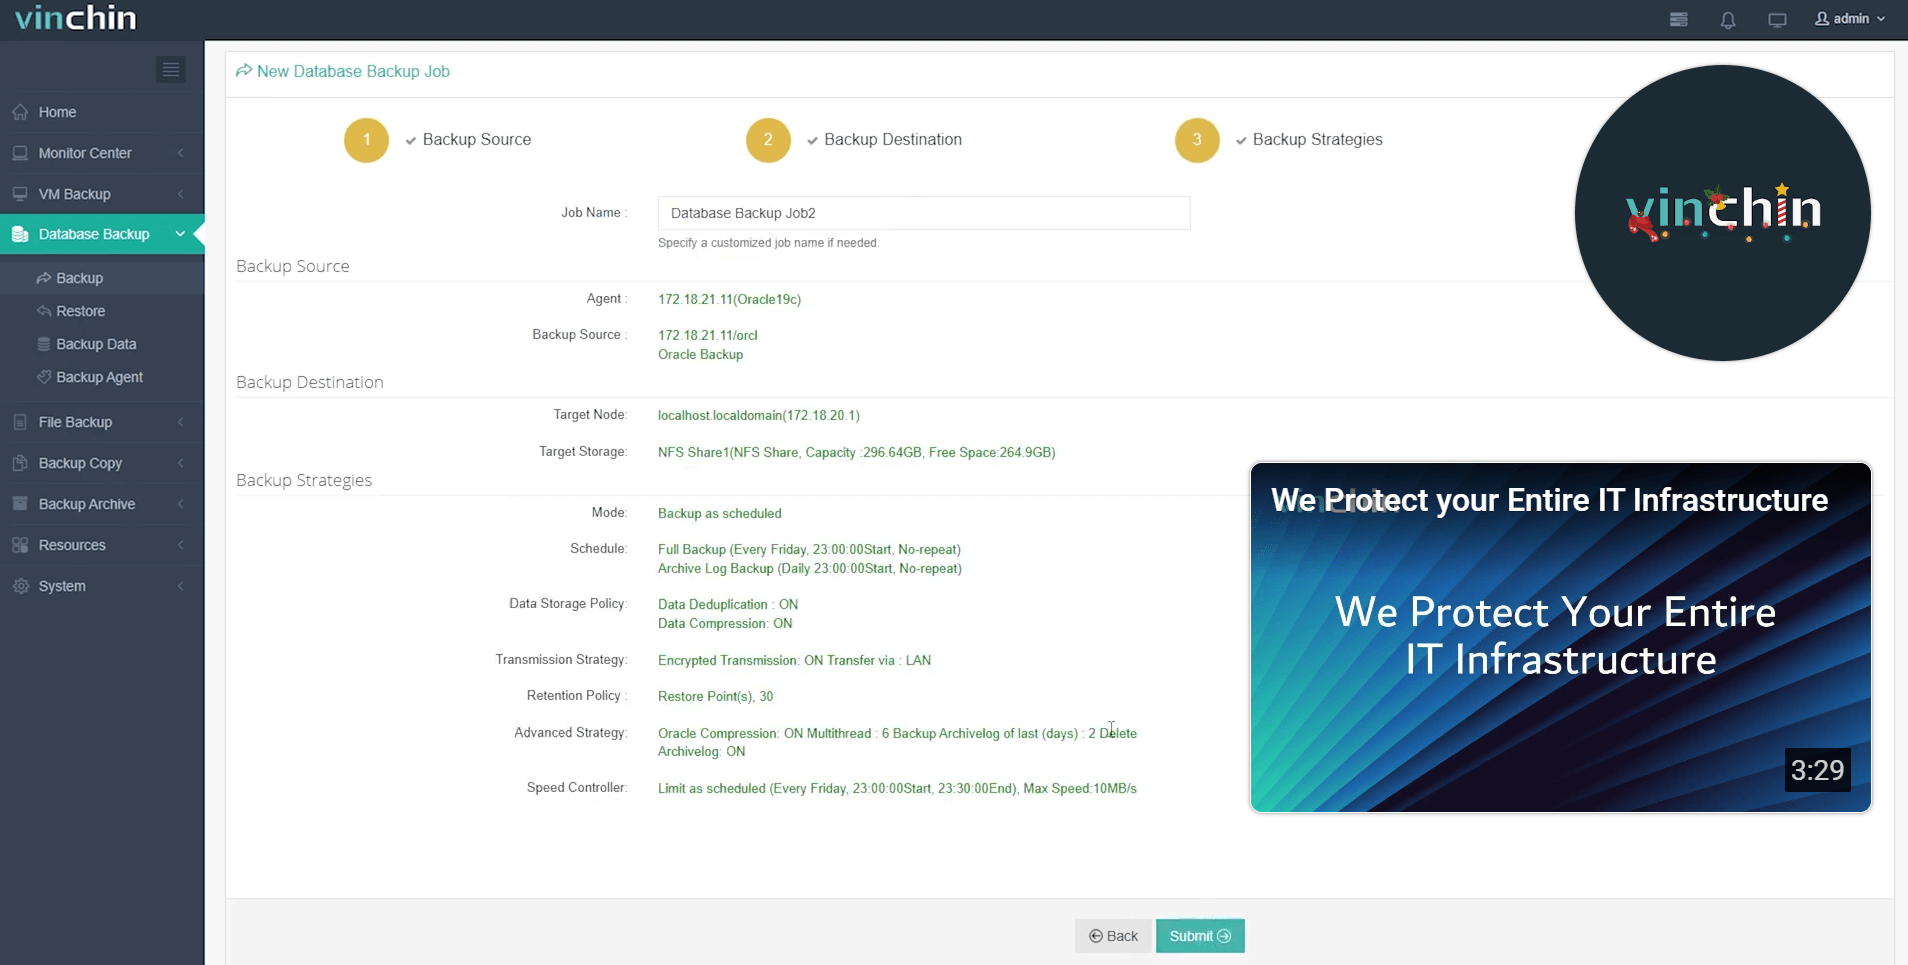
Step 4. Submits the job.

Trusted globally by thousands of enterprises—with top industry ratings—Vinchin Backup & Recovery offers a fully featured free trial valid for sixty days so you can experience its advantages firsthand before committing further investment.
Oracle Database Installation FAQs
Q1: Can I migrate my existing schema into a new installation easily?
A1: Yes—you can export schemas using Data Pump Export utility then import them into new instances after basic setup completes.
Q2: How do I verify network connectivity between clients/apps after installation?
A2: Use TNSPING utility followed by connecting through SQL*Plus specifying username/password@hostname/service_name syntax directly from remote hosts.
Q3: What steps help speed up future patching/upgrades?
A3: Keep detailed records of customizations made post-installation—including parameter changes—and script routine tasks wherever possible.
Conclusion
Whether installing via GUI wizard or automating deployment through scripts, following these steps ensures stable results every time while minimizing surprises later on—all backed up securely thanks to Vinchin’s robust protection platform designed specifically for enterprise databases like yours!
Share on:


