Oracle database is a multi-model database management system created and offered by Oracle for running online transaction processing, data warehousing, and mixed database workloads. This blog will elaborate on how to create an Oracle database in 4 ways step by step. The creation methods involve command lines and Oracle tools and are applied to Oracle 12c, 19c, 11g, 10g, and higher.
Prerequisities of Creating an Oracle Database
Creating an Oracle database requires several key prerequisites because the database depends heavily on the underlying operating system resources to run reliably and efficiently.
First, operating system privileges are necessary because Oracle installation and database creation involve low-level system operations such as creating services, managing processes, allocating ports, and accessing storage paths. Without proper administrative or dedicated Oracle user permissions, the database cannot be initialized or securely managed.
Second, sufficient memory is required to launch an Oracle instance since the database engine relies on memory structures like the System Global Area (SGA) and Program Global Area (PGA) to process queries, manage caching, and handle user sessions. If memory is insufficient, performance will degrade significantly or the instance may fail to start.
Third, enough disk space must be available on the Oracle server because the database needs storage for data files, control files, redo logs, and temporary files. Inadequate disk space can prevent database creation or lead to instability and data loss during operation.
Method 1: Create an Oracle Database with CREATE DATABASE Statement
This method creates an Oracle database using the CREATE DATABASE statement to define core components like data files and redo logs. It offers full control over configuration. Additional scripts are needed to finish setup.
The following are steps:
1. Set a scene that includes PL/SQL package installation and create views on data dictionary tables for single-instance installations only. (A single-instance database is accessed by one Oracle instance but still runs multiple instances on a host.)
2. Configure the Instance Identifier (SID) manually on UNIX or Linux, for Windows only if you install the database but not create one.
For Windows:
set ORACLE_SID=newdb
For Linux and UNIX:
Bourne, Bash, or Korn shell:
ORACLE_SID=newdb
export ORACLE_SID
C shell:
setenv ORACLE_SID newdb
3. Set the required environment:
Set ORACLE_HOME on most platforms and include ORACLE_HOME/bin in the PATH.
4. Create an initialization parameter file for the new database.
The initialization parameter file (either a text file/PFILE or a binary file/server parameter file) should be stored in the default location for convenience.
ORACLE_HOME/dbs may contain the sample init.ora file, which could be used to edit.
A server parameter file is preferred for its consistency, which could be manually created from the edited text initialization file or automatically from DBCA (Database Configuration Assistant).
The following SQL*Plus command creates a server parameter file (SPFILE) from PFILE and writes it to the default location. Offer your file path if you are not using the default location or name.
CREATE SPFILE FROM PFILE;
5. Create an instance on Windows if there isn’t one:
oradim -NEW -SID sid-parameters -STARTMODE MANUAL -PFILE text-initialization-file-full-path
6. Connect to the Oracle instance:
$ sqlplus /nolog
SQL> CONNECT SYS AS SYSDBA
Authenticate with an OS file:
$ sqlplus /nolog
SQL> CONNECT / AS SYSDBA
7. Run the idle instance.
This step is performed only during database creation or maintenance, which doesn’t connect to the database.
SQL> STARTUP NOMOUNT
8. Create the database:
CREATE DATABASE newdb

   USER SYS IDENTIFIED BY sys_password

   USER SYSTEM IDENTIFIED BY system_password

   LOGFILE GROUP 1 ('redo-log-file-path','/redo-log-file-path') SIZE value_M BLOCKSIZE value,

   MAXLOGFILES value

   MAXLOGMEMBERS value

   MAXLOGHISTORY value

   MAXDATAFILES value

   CHARACTER SET AL32UTF8

   NATIONAL CHARACTER SET AL16UTF16

   EXTENT MANAGEMENT LOCAL

   DATAFILE 'system-tablespace-system.dbf' SIZE value_M REUSE

   SYSAUX DATAFILE 'sysaux-tablespace-sysaux.dbf' SIZE value_M REUSE

   DEFAULT TABLESPACE users

     DATAFILE 'location-users.dbf' SIZE value_M REUSE AUTOEXTEND ON MAXSIZE UNLIMITED

   DEFAULT TEMPORARY TABLESPACE name

     TEMPFILE 'location-temp.dbf' SIZE value_M REUSE

   UNDO TABLESPACE name

     DATAFILE 'location-undotbs.dbf' SIZE value_M REUSE AUTOEXTEND ON MAXSIZE UNLIMITED;
Method 2: Create an Oracle Database with DBCA
This method uses Oracle DBCA (Database Configuration Assistant) to create a database through a guided graphical or command-line wizard. It simplifies the process by automatically handling configuration settings and required files. It is the recommended approach for most users due to its ease of use and lower risk of manual errors.
Follow the steps below:
1. Start Database Configuration Assistant and select Create a database. Click Next.
2. On Creation Mode, select Advanced configuration and click Next.
3. On Deployment Type, choose General Purpose or Transaction Processing. Click Next.
4. In Storage Option, choose Use template for database storage attributes and click Next.
5. Specify Fast Recovery Option configurations and click Next.
6. Configure Network Configuration for a new listener. Click Next.
7. Optionally set up Data Vault Option.
8. On Configuration Options → Memory, opt for Automatic Shared Memory Management and specify SGA/PGA sizes. Click Next.
Specify the maximum number of OS user processes that can be simultaneously connected to the Oracle DB on Sizing tab.
In Character sets section, choose Use Unicode (AL32UTF8) and AL16UTF16 as National character set.
Select Dedicated server mode on Connection mode tab.
Check the Add sample schemas to the database on the last tab, and click Next.
9. On Management Options, choose Configure Enterprise Manager (EM) express and set port. Click Next.
10. Opt for Use the same administrative password for all accounts and input user password on User Credentials. Click Next.
11. On the Creation Option page, specify the database creation. You can build a DB creation script for repeating the whole creation process, save the new DB as a template, and specify the scripts to run when the DB is formed. Click Next.
12. Click Finish on the Summary page. You will be notified once the process is over. Unlock database accounts by clicking Password Management…. Click OK.
Method 3: From an Existing Database
This method creates a new Oracle database by duplicating or cloning an existing one. It reuses the existing structure and data as a base, which simplifies setup. It is commonly used for testing, development, or migration scenarios.
1. Launch DBCA, choose Manage Templates and click Next.
2. On the Template Management page, input the name and location, and click Next.
3. On the Create Template Option page, choose Create template from an existing database, choose the Oracle DB, enter user credentials, and click Next.
4. On the File Location Structure section, choose either to maintain the file locations or convert them to use OFA structure.
5. Review all the settings on the Summary page and hit Finish. Wait for it to generate and click Close.
Method 4: Create an Oracle Database with the Oracle SQL Developer
This method uses Oracle SQL Developer’s graphical interface to create a database through guided steps. It simplifies configuration by providing built-in wizards for key settings. It is suitable for users who prefer a visual and user-friendly approach.
1. Download the Oracle SQL Developer, extract files from the downloaded zip, and run SQL Developer.
2. On the Start Page under the Connections, find the green plus sign, click the down arrow, and choose New Database Connection…
3. Configure the database on the New/Select Database Connection window. Enter your name, username, password, and more information. Click Test, and you will see Status: Success in the bottom left, after that, you could hit Connect. The new database is located in the Oracle Connections list.
Oracle Database Full Protection With Vinchi Backup & Recovery
Database backup and recovery are very essential for organizations with data stored in such media. Take Oracle database backup with RMAN is a common way, and you could also Restore the database from RMAN backups. However, they are very tricky for beginners and non-techies, thus the simple database backup and recovery using a third-party solution are favored.
Vinchin Backup & Recovery facilitates data backup and recovery operations for Oracle Database, MySQL, SQL Server, PostgreSQL, Postgres Pro, MariaDB, Linux & Windows Servers, and NAS with clear and easy options to automate the process. It also supports centralized management, policy-based scheduling, and fast recovery capabilities, helping reduce manual effort while improving data protection efficiency and reliability in enterprise environments.
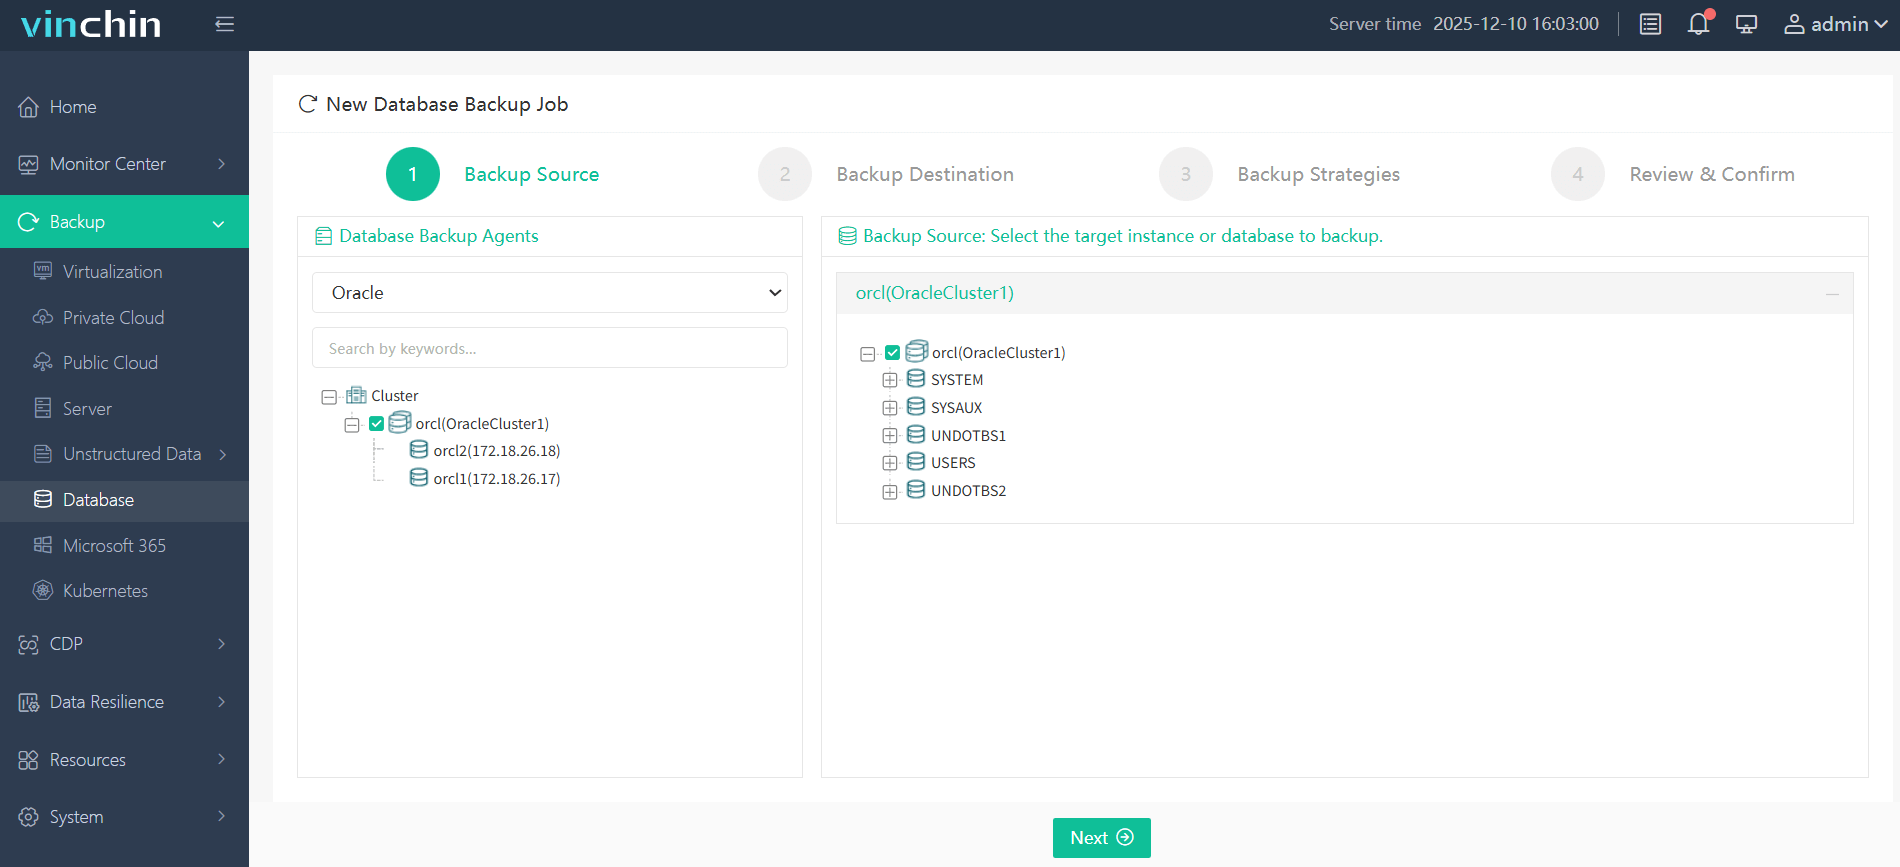
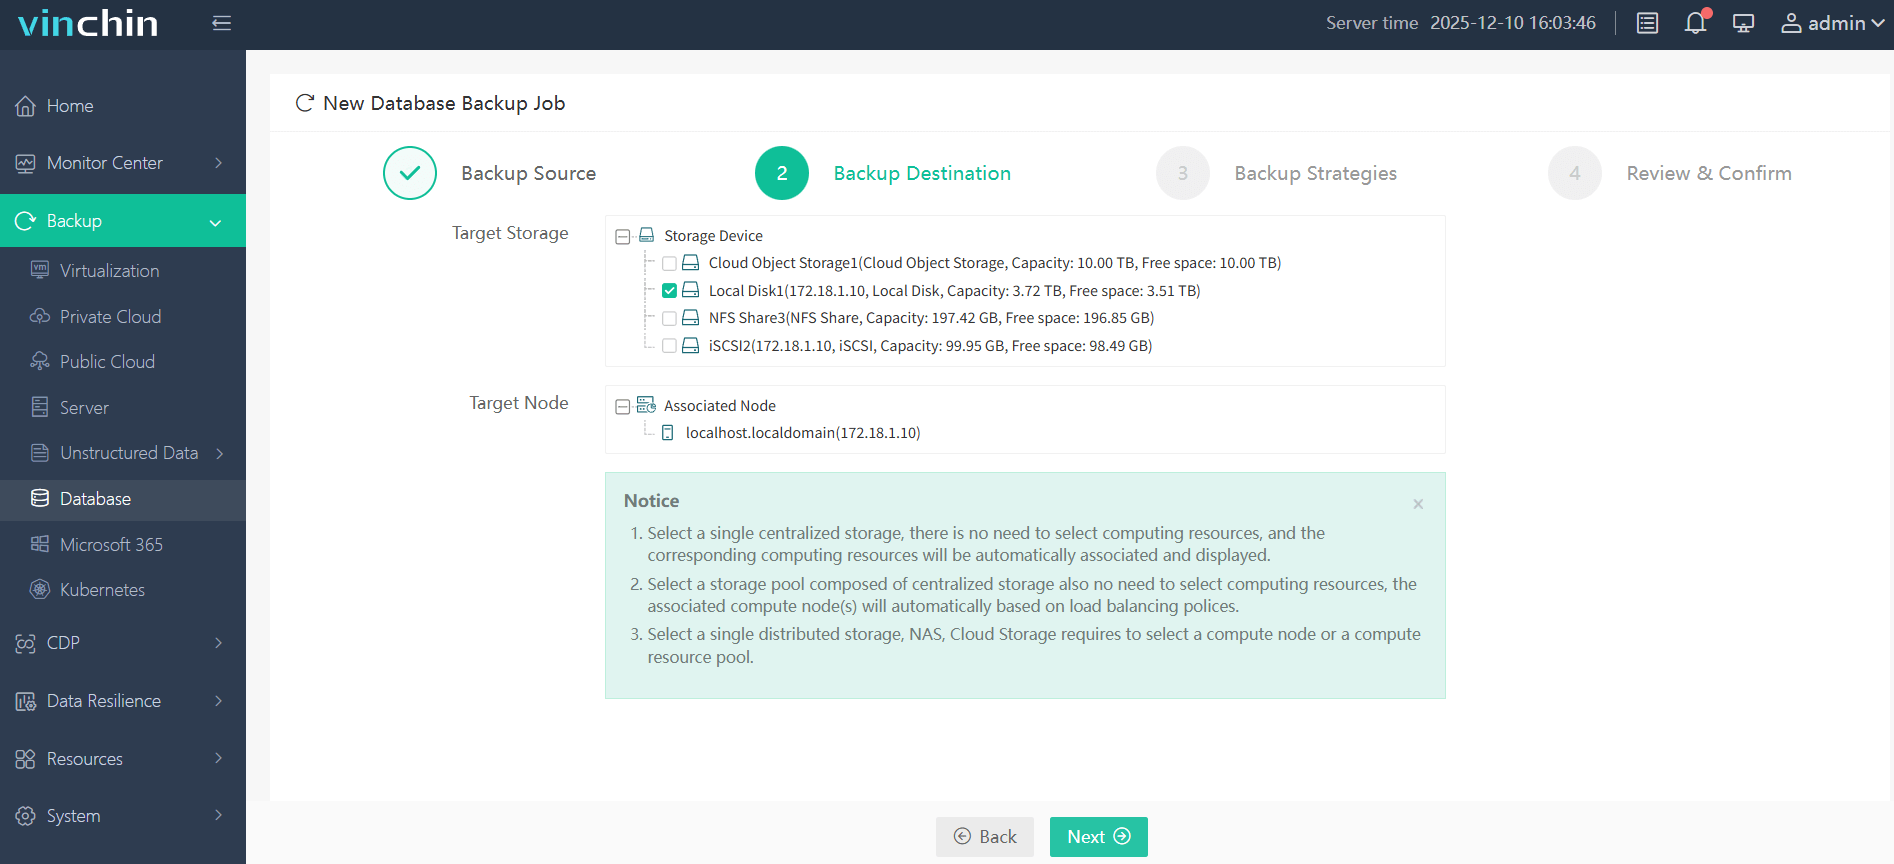
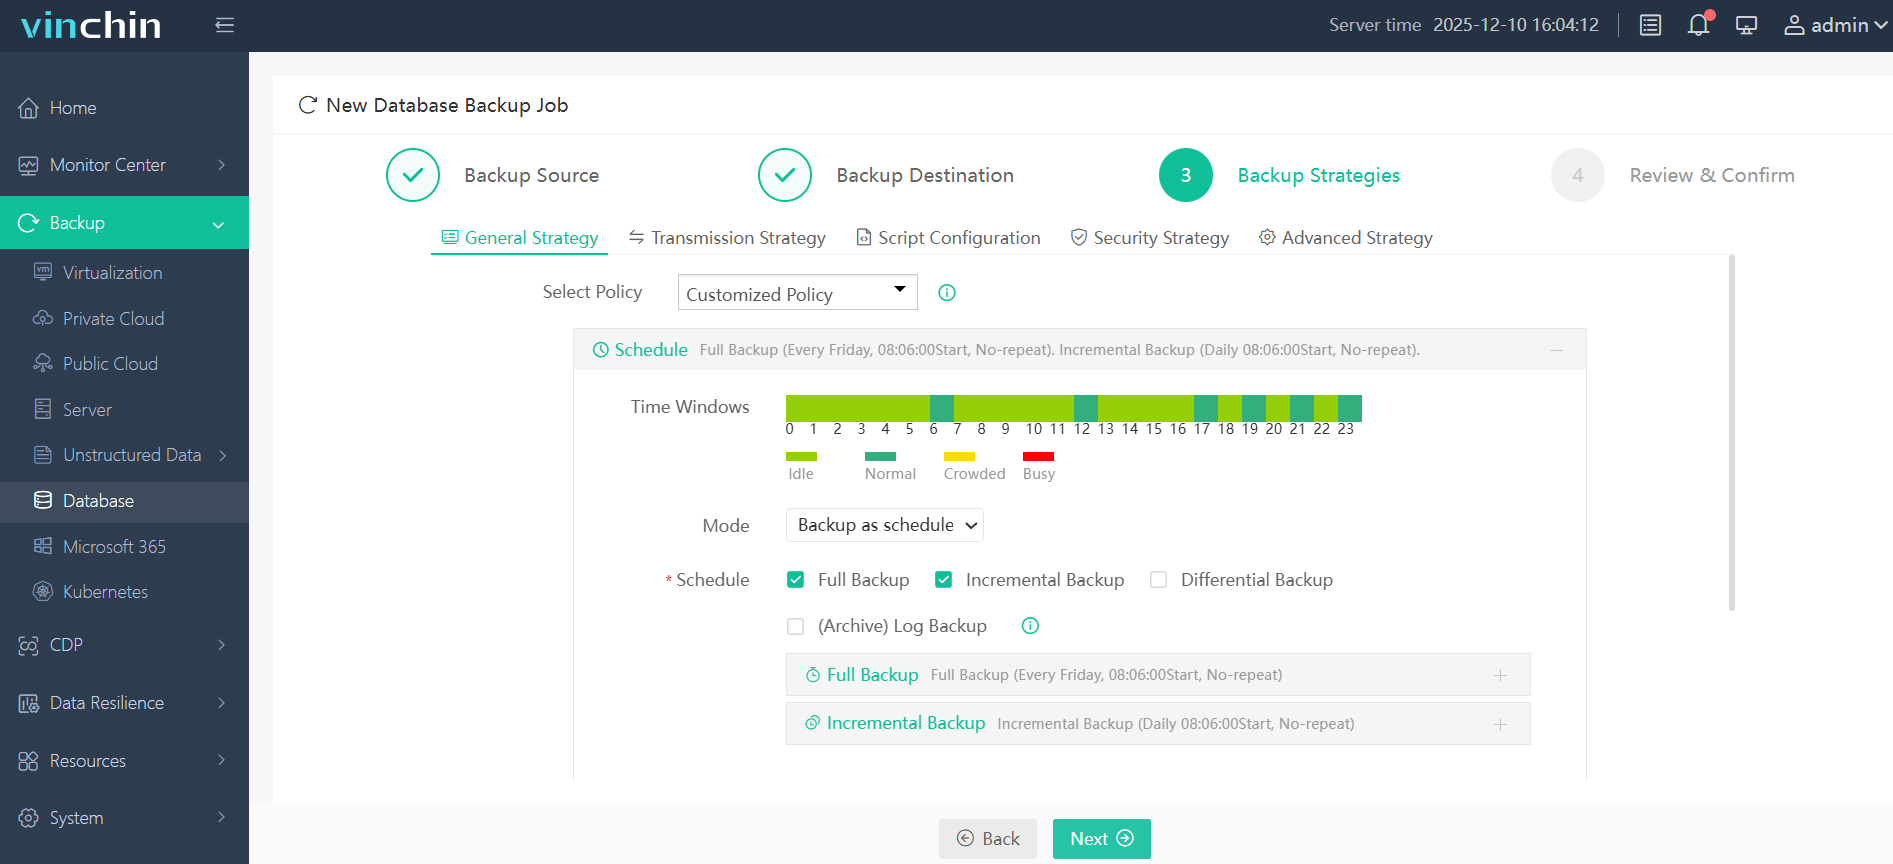
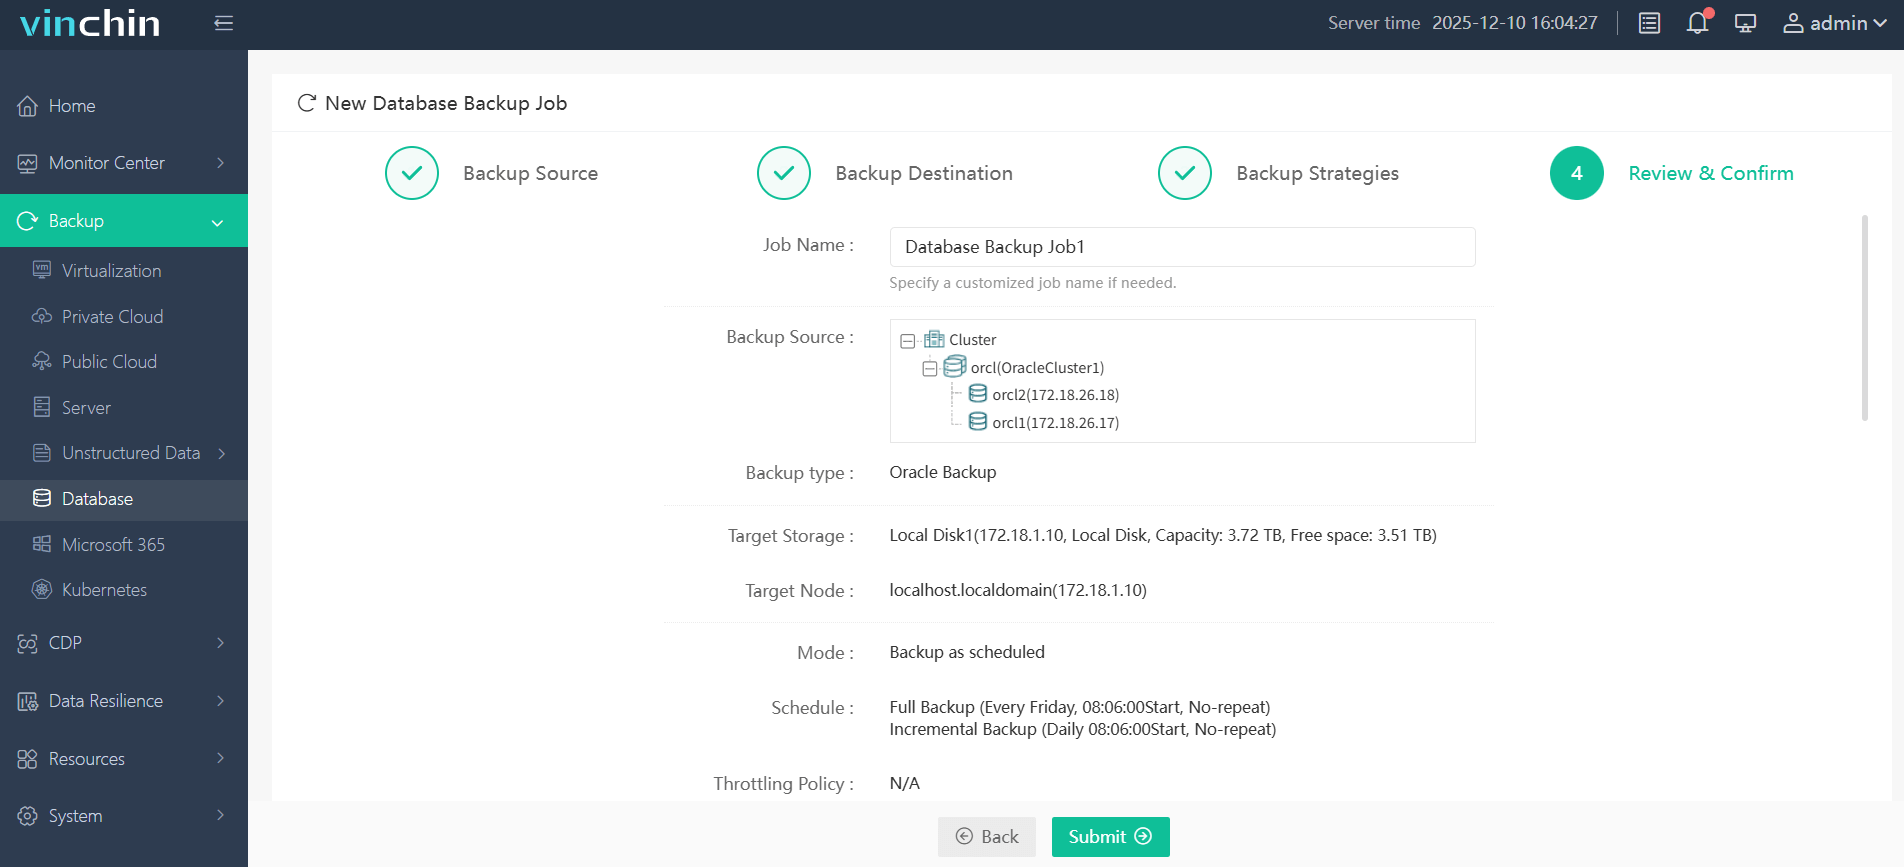
Here's how to backup an Oracle database with Vinchin:
1. Select the target Oracle database and specific tablespaces you want to protect in the Vinchin console.
2. Choose a target storage device to store your backup data. The system will automatically associate the appropriate compute node with the selected storage.
3. Define your backup schedule, including the frequency of full backups and incremental backups, and any additional policies.
4. Double-check all configured parameters. If everything is correct, submit the job to activate your Oracle database backup task.
Earning thousands of customers and good ratings, Vinchin Backup & Recovery now offers a fully-featured 60-day free trial. Click the button below to experience streamlined Oracle database backup.
Creating Oracle Database FAQs
Q1: How can I check the current status of my Oracle database?
Log in to the database via sqlplus / as SYSDBA, then run the query SELECT status FROM v$instance to view the real-time running status of the Oracle instance.
Q2: How do I drop an existing Oracle database?
First connect to the database as SYSDBA, start the database to the MOUNT state, and then execute the DROP DATABASE command to delete the database completely.
Q3: How can I enable archive logging on my database?
Connect as SYSDBA, execute ALTER DATABASE ARCHIVELOG to enable archive mode, then restart the database with SHUTDOWN and STARTUP for the configuration to take effect.
Conclusion
This post goes into detail about the 4 different ways using CREATE DATABASE Statement, DBCA, the existing database template, and Oracle SQL Developer to establish an Oracle database.
This is just the first step, and the subsequent database protection weighs heavily against further data security. Use Vinchin Backup & Recovery for overall convenient and instant recovery to protect your database completely.


