-
Why Restore MySQL Database from SQL File?
-
How to Restore MySQL Database Using Command Line?
-
How to Restore MySQL Database Using phpMyAdmin?
-
How to Restore MySQL Database Using MySQL Workbench?
-
Backup MySQL databases with Vinchin Backup & Recovery
-
MySQL restore database from sql file FAQs
-
Conclusion
Restoring a MySQL database from an SQL file is a core skill for any operations administrator. Whether you are recovering from failure, migrating data between servers, or testing changes in a safe environment, knowing how to restore your database quickly and safely is essential. In this guide, we will walk through the most common and reliable methods to restore a MySQL database from an SQL file. We’ll start with beginner steps and move toward advanced techniques.
Why Restore MySQL Database from SQL File?
Restoring from an SQL file offers speed and reliability when you need to recover lost data or migrate databases across systems. These files are portable—you can store them anywhere or edit them if needed before restoring. They work well with many tools and platforms because they use plain text commands understood by any compatible version of MySQL. When disaster strikes or you want to clone production data for testing without risk to live systems, restoring from an SQL file ensures you get an exact copy of both structure and content.
How to Restore MySQL Database Using Command Line?
The command line gives you direct control over restoring your database from an SQL file. It works well for small databases but also scales up for larger ones if used carefully.
Before starting:
Make sure you have access rights on the target server.
Confirm that your backup
.sqlfile is intact; consider checking its checksum if possible.If working with sensitive environments, avoid typing passwords directly in commands—use secure credential storage like
mysql_config_editor.
Step 1: If the target database does not exist yet, create it first:
Open your terminal and run:
mysql -u root -p
After entering your password at the prompt:
CREATE DATABASE your_database_name;
Replace your_database_name with what you need.
Step 2: Exit by typing exit.
Step 3: To restore the contents of your .sql file into this new (or existing) database:
mysql -u root -p your_database_name < /path/to/yourfile.sql
You’ll be prompted again for credentials unless using stored authentication details.
If your .sql dump includes statements like CREATE DATABASE, omit specifying the name:
mysql -u root -p < /path/to/yourfile.sql
For very large files or slow networks:
Consider using
pv(pipe viewer) to monitor progress:
pv /path/to/yourfile.sql | mysql -u root -p your_database_name
Adjust max_allowed_packet in both client/server configs if import fails due to packet size errors.
Always check results after import by logging into MySQL and running:
USE your_database_name;
SHOW TABLES;
This confirms that tables were restored as expected.
How to Restore MySQL Database Using phpMyAdmin?
phpMyAdmin provides a web-based interface ideal for those who prefer graphical tools over command lines. It’s best suited for small-to-medium databases due to browser upload limits.
Before starting:
Ensure phpMyAdmin access on your server.
Have the
.sqlbackup ready on local storage.
Step 1: Log in via browser; select or create the target database using Databases > Create.
Step 2: If tables already exist inside this database that might conflict with incoming data:
Select all tables using Check all, then click Drop, confirming deletion when prompted by clicking Yes.
Step 3: Click on the Import tab at page top.
Step 4: Under File to import, click Browse...; select your .sql backup locally.
Step 5: Unless special requirements apply (like different character sets), leave defaults unchanged—ensure format remains set as SQL.
Step 6: Click Go at bottom right; wait until completion message appears indicating success—or review error messages if something goes wrong.
If upload fails due to size limits (often around 2MB–128MB depending on PHP settings), try splitting large files into smaller chunks outside phpMyAdmin or switch methods entirely (see below).
How to Restore MySQL Database Using MySQL Workbench?
MySQL Workbench offers another graphical option available across Windows, macOS, Linux platforms—a good choice when you want more control than phpMyAdmin but less complexity than pure command-line work.
Before starting:
Ensure Workbench is installed locally; confirm connection credentials are correct; verify network connectivity if restoring remotely.
Step 1: Launch Workbench; connect using saved profile under home screen’s list of connections.
Step 2: In left-side panel (Navigator) under Management, click on Data Import/Restore link/button.
Step 3: In main window’s center pane under “Import Options,” choose radio button labeled Import from Self-Contained File, then use ellipsis (…) button beside path field to browse/select desired .sql dump file locally accessible by Workbench client machine—not just server!
Step 4: For “Default Target Schema,” pick destination schema/database name via dropdown menu—or right-click connection tree above/beside panel area > choose “Create Schema” if needed beforehand so it appears here now too!
Step 5: Review additional options such as which objects/tables/views/triggers should be included/excluded during import process according project needs—but defaults usually suffice unless partial restores required!
Step 6: Click big blue button labeled Start Import!
Monitor progress bar/log output below main window area until finished successfully—or review error messages/warnings shown inline there otherwise before retrying/fixing issues found during attempt(s).
Once done: verify imported objects/data via schema explorer tree/table preview panels within same session/workspace immediately afterward!
Backup MySQL databases with Vinchin Backup & Recovery
Vinchin Backup & Recovery delivers powerful functionality to protect your databases in both virtual machines and physical servers. By cooperating well with VM-level backups, dual insurance is given to the users of virtual environments for their key business data and information systems. Vinchin Backup & Recovery supports protection of Oracle DB, MySQL, SQL Server, PostgreSQL, Postgres Pro, and MariaDB installed on both physical and virtual machines with powerful database backup and restore features. It also provides full backup, differential backup, incremental backup and transaction log backup strategies for you to set your own backup plan on demand.
Vinchin Backup & Recovery supports efficient hot backup of MySQL, SQL Server and Oracle without affecting the normal operation of databases.
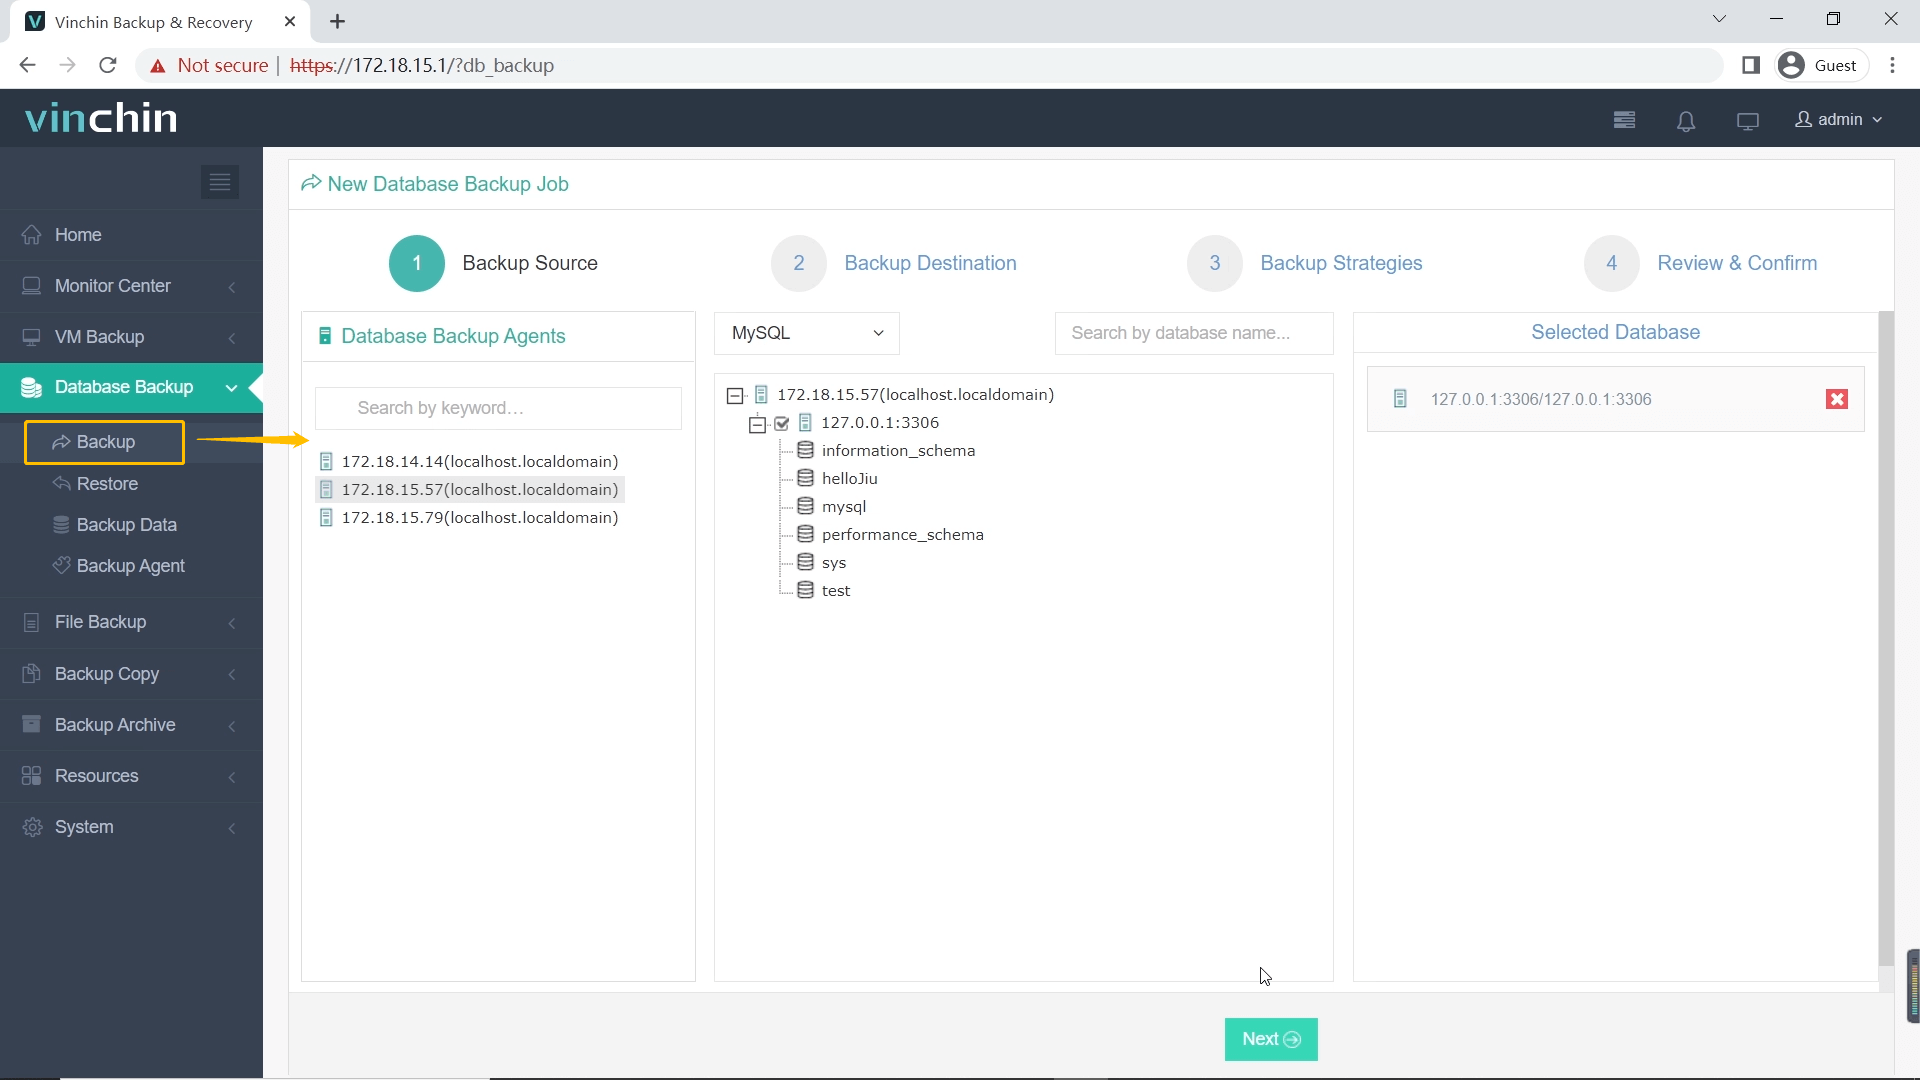
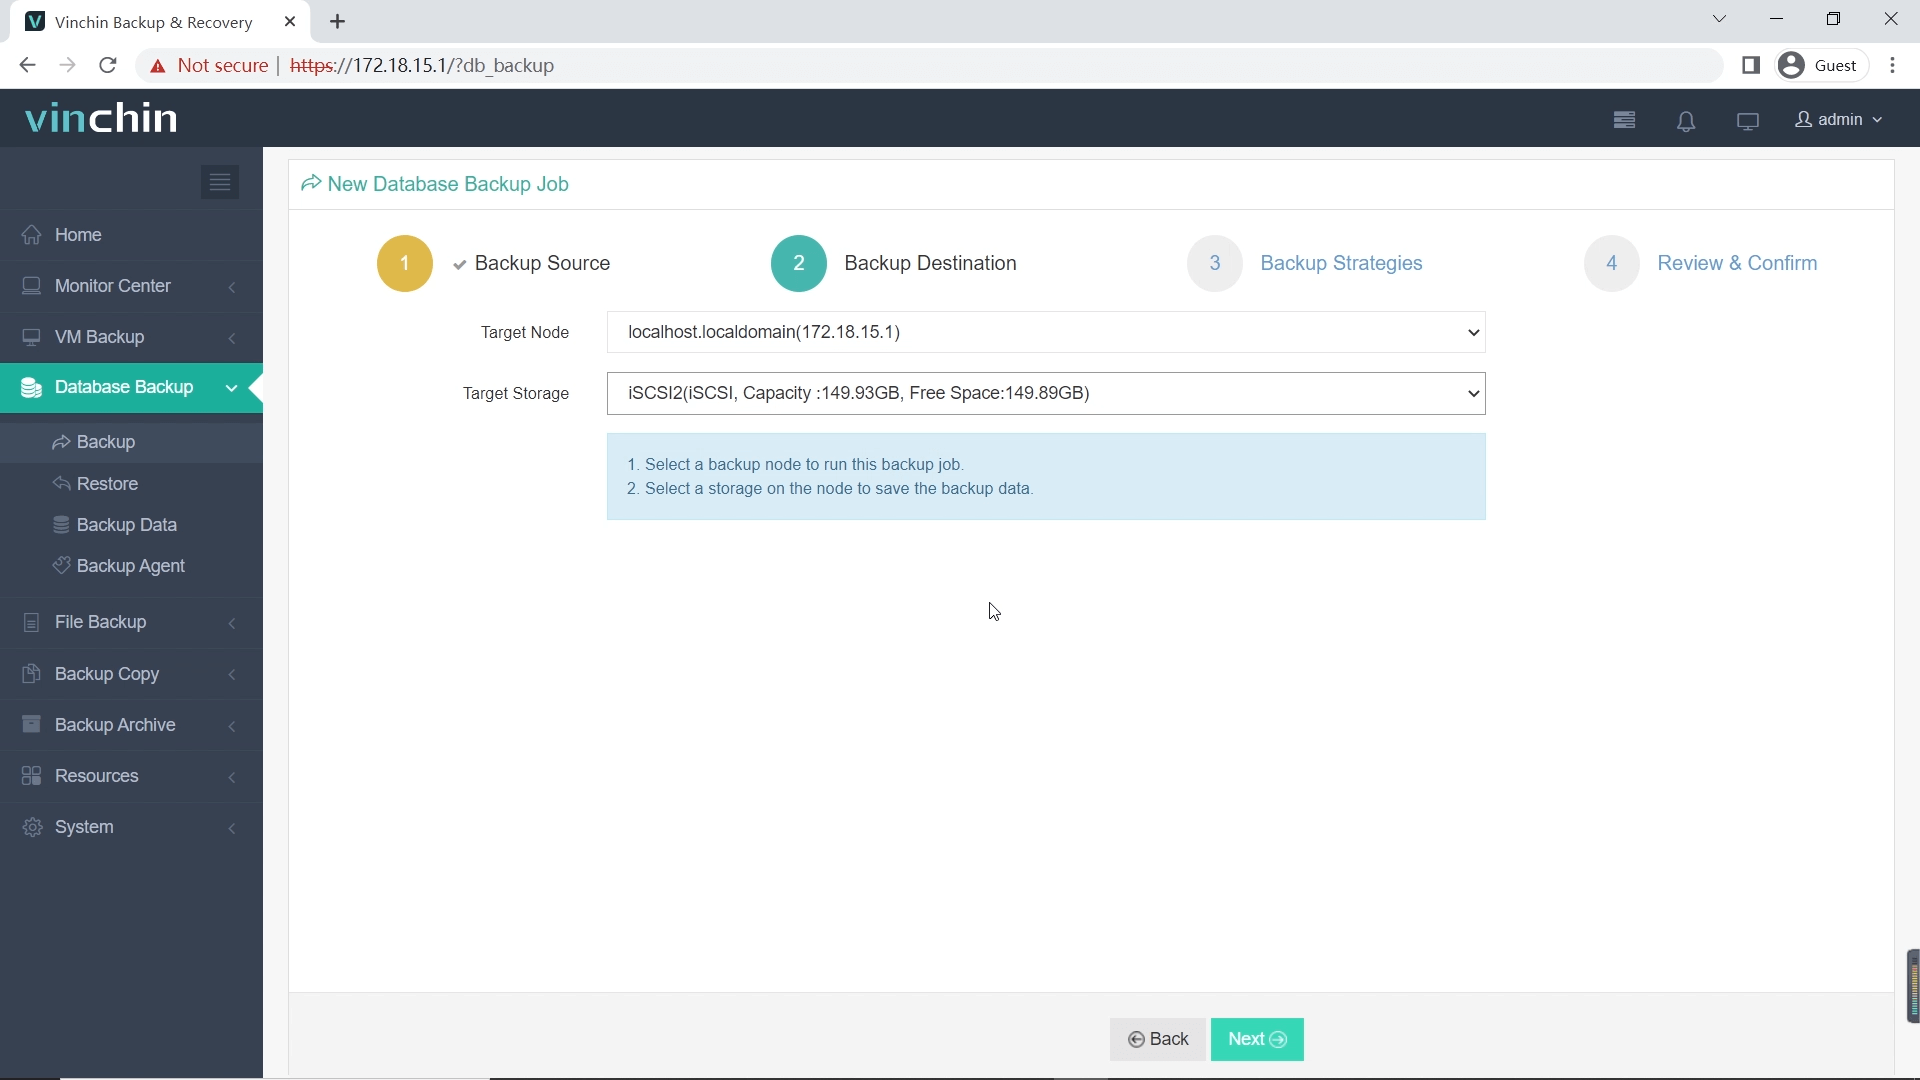
Vinchin Backup & Recovery's operation is very simple, just a few simple steps.
1.Select the backup object.

2.Select backup destination.

3.Configure backup strategies.

4.Review and submit the job.

You can start to use this powerful system with a 60-day full-featured free trial. Just click the button to get the installation package. You can click here to learn more about how to backup MySQL with Vinchin Backup & Recovery.
MySQL restore database from sql file FAQs
Q1: Can I restore my .sql backup onto cloud-managed services like AWS RDS?
A1: Yes—export local .sql first then use RDS’s own query console/import tool following their documentation guidelines step-by-step per platform specifics required there accordingly always double-checking compatibility/version support upfront beforehand ideally too.
Q2: How do I estimate how long my restoration will take?
A2: Divide total .sql size by average disk write speed plus some overhead—for example: restoring a 10GB dump at ~50MB/s takes about three minutes plus parsing/indexing time depending hardware load/concurrency factors involved additionally sometimes.
Q3: What should I do if my restored application shows garbled characters?
A3: Check both export/import character sets match exactly (utf8mb4, etc.)—if not re-import specifying correct encoding flag explicitly each time necessary until resolved fully confirmed visually afterwards finally!
Conclusion
Restoring a MySQL database from an SQL file is vital knowledge for every administrator—from basic imports through advanced troubleshooting steps covered here today together thoroughly now hopefully confidently going forward always prepared regardless scenario faced next professionally speaking overall ultimately still! For robust protection beyond manual processes alone consider Vinchin’s automated solutions designed specifically keeping enterprise continuity foremost priority always ongoingly maintained securely everywhere alike worldwide daily.
Share on:


