-
What Is Proxmox Virtual Environment?
-
Why Run macOS on Proxmox?
-
How to Install macOS on Proxmox Using OpenCore Bootloader?
-
Optimizing macOS VM Performance
-
How to Back Up Your VM with Vinchin Backup & Recovery?
-
FAQs About Running macOS on Proxmox
-
Conclusion
Running macOS on Proxmox is a powerful way to test Apple’s operating system without buying Mac hardware. Whether you want to develop apps or explore macOS features in your lab environment, this guide walks you through every step—from basic concepts to advanced setup and reliable backup.
What Is Proxmox Virtual Environment?
Proxmox Virtual Environment (Proxmox VE) is an open-source platform for managing virtual machines (VMs) and containers from a web-based interface. It supports many operating systems—including Linux distributions, Windows Server editions, BSD variants—and now even macOS with some extra work. With Proxmox VE you can run multiple VMs efficiently on one server using enterprise-grade tools that scale from home labs up to data centers.
Why Run macOS on Proxmox?
Why would anyone want to run macOS on Proxmox? Developers often need access to Xcode or Safari for testing without investing in Apple hardware. IT administrators may want centralized management of diverse OS environments—including macOS—for training or research purposes. Some users just enjoy exploring what’s possible with virtualization technology! However, remember that running macOS outside Apple hardware is not supported by Apple’s license; do this only for educational or testing purposes.
How to Install macOS on Proxmox Using OpenCore Bootloader?
The OpenCore bootloader is now the standard method for installing modern versions of macOS on Proxmox—supporting both Intel and AMD hosts as well as recent releases like Sonoma or Sequoia. Here’s how you get started:
Step 1: Prepare the Installer Images
You need two files—a macOS installer image and an OpenCore bootloader image—to proceed.
If you prefer simplicity:
Log into your Proxmox web UI.
Click your main node then click Shell.
Update packages if needed:
apt update && apt install curl -yRun:
/bin/bash -c "$(curl -fsSL https://install.osx-proxmox.com)"
Reboot if prompted.
After rebooting run:
osx-setup
Select your desired version of macOS from the menu (Sonoma/Ventura/Monterey).
For manual preparation:
Download the latest OpenCore ISO.
Download a compatible recovery image following Nicholas Sherlock’s guide.
Upload both files into your ISO storage via the web UI.
Step 2: Create Your macOS VM
From within the web UI:
1. Click Create VM.
2. Set a unique VM ID and Name such as "macos".
3. Under Operating System, select Other.
4. For CD/DVD, choose your OpenCore ISO file.
5. Set Machine type as q35, BIOS as OVMF (UEFI); check Add EFI Disk.
6. Choose SCSI Controller type as VirtIO SCSI.
7. For Hard Disk select type as VirtIO Block, size at least 64GB; set Cache mode to Write back (unsafe) (see warning below).
8. Assign at least four CPU cores plus 4096 MB RAM—more improves performance.
9. For Network Device pick type VMware vmxnet3.
10. Finish wizard but don’t start VM yet!
> Security Warning: Using cache=unsafe can risk data loss if your host crashes unexpectedly—use only during initial testing phases; switch later to cache=writethrough for production workloads.
Step 3: Attach the Installer Image
Go into your new VM’s Hardware tab:
Click Add > CD/DVD Drive
Select your prepared installer ISO file
Step 4: Edit Your VM Configuration
Open Shell again:
nano /etc/pve/qemu-server/VMID.conf
Replace VMID with your actual number.
Now add this line at the end (copy exactly including parentheses!) if using Intel CPUs:
args: -device isa-applesmc,osk="ourhardworkbythesewordsguardedpleasedontsteal(c)AppleComputerInc" \
-smbios type=2 \
-device usb-kbd,bus=ehci.0,port=2 \
-global nec-usb-xhci.msi=off \
-global ICH9-LPC.acpi-pci-hotplug-with-bridge-support=off \
-cpu host,vendor=GenuineIntel,+invtsc,+hypervisor,kvm=on,vmware-cpuid-freq=on
For AMD CPUs use:
args: -device isa-applesmc,osk="ourhardworkbythesewordsguardedpleasedontsteal(c)AppleComputerInc" \
-smbios type=2 \
-device usb-kbd,bus=ehci.0,port=2 \
-global nec-usb-xhci.msi=off \
-global ICH9-LPC.acpi-pci-hotplug-with-bridge-support=off \
-cpu Penryn,kvm=on,vendor=GenuineIntel,+invtsc,+hypervisor
If things don’t boot correctly double-check that osk string—typos here break Apple SMC emulation!
Find lines referencing OpenCore/macOS ISOs in config file; remove any media=cdrom, add cache=unsafe.
Step 5: Set Boot Order
In Options tab set Boot Order so that OpenCore ISO comes first before any disks or other devices.
Step 6: Start Installation
Start up the VM then open Console view:
At OpenCore menu select installer entry
In Disk Utility erase VirtIO Block Media using APFS + GUID Partition Map
Close Disk Utility then choose Install macOS option
Follow prompts—the VM may reboot several times; always pick installer/main disk when asked
If stuck at Apple logo check CPU settings/TSC compatibility—or review SMBIOS entries in config file!
Step 7: Make OpenCore Permanent
Once installation finishes:
1. Boot into newly installed system via Console
2. In Terminal run:
diskutil list
3. Identify which disks are EFI partitions belonging respectively to OpenCore ISO (diskXs1) versus main disk (diskYs1). Double-check IDs carefully!
4. Copy EFI partition contents over:
sudo dd if=/dev/diskXs1 of=/dev/diskYs1
5 Shut down VM completely; remove both ISOs from Hardware tab; set main disk first in Boot Order options
Misidentifying disks here could overwrite critical data—always confirm before proceeding!
Step 8: First Boot & Setup Wizard
Boot up again—you should see OpenCore menu followed by normal startup sequence into Setup Assistant wizard inside fresh copy of macOS! Complete initial user account creation/configuration steps as usual.
Congratulations—you’ve successfully deployed macos on proxmox!
Optimizing macOS VM Performance
After installation completes most admins want better speed or smoother graphics inside their new virtual Mac environment—but where do you start? Here are proven ways:
First consider CPU pinning—dedicate physical cores directly via Hardware > Processors > Affinity setting inside each VM profile page so heavy loads don’t compete across guests unnecessarily.
Next try enabling GPU acceleration by adding this line under args in config file:
-device virtio-vga-gl,max_outputs=1
This enables basic accelerated graphics output using virtio-gpu driver though full Metal support isn’t available yet under KVM/QEMU platforms.
For network latency issues try swapping out vmxnet3 adapter for virtio-net device instead—which sometimes delivers lower jitter especially under high load conditions (add via CLI).
Finally keep RAM allocation generous—at least 8GB recommended when running Xcode builds or multitasking heavily within guest OS!
How to Back Up Your VM with Vinchin Backup & Recovery?
To ensure ongoing protection for critical workloads such as macOS on Proxmox, organizations require robust backup solutions tailored for enterprise environments supporting diverse virtualization platforms—including VMware, Hyper-V, oVirt, OLVM, RHV, XCP-ng, XenServer, ZStack, and notably Proxmox itself (among others). Vinchin Backup & Recovery stands out as a professional solution designed specifically for these needs across more than fifteen mainstream hypervisors.
With Vinchin Backup & Recovery, users benefit from features such as forever-incremental backup strategies that minimize storage usage over time; advanced deduplication and compression technologies that optimize space efficiency; scheduled backups with flexible retention policies including GFS support; granular restore capabilities allowing precise recovery down to individual files or application items; and secure multi-threaded transmission ensuring fast yet reliable operations even at scale—all managed centrally through an intuitive browser-based console built for ease-of-use across global deployments.
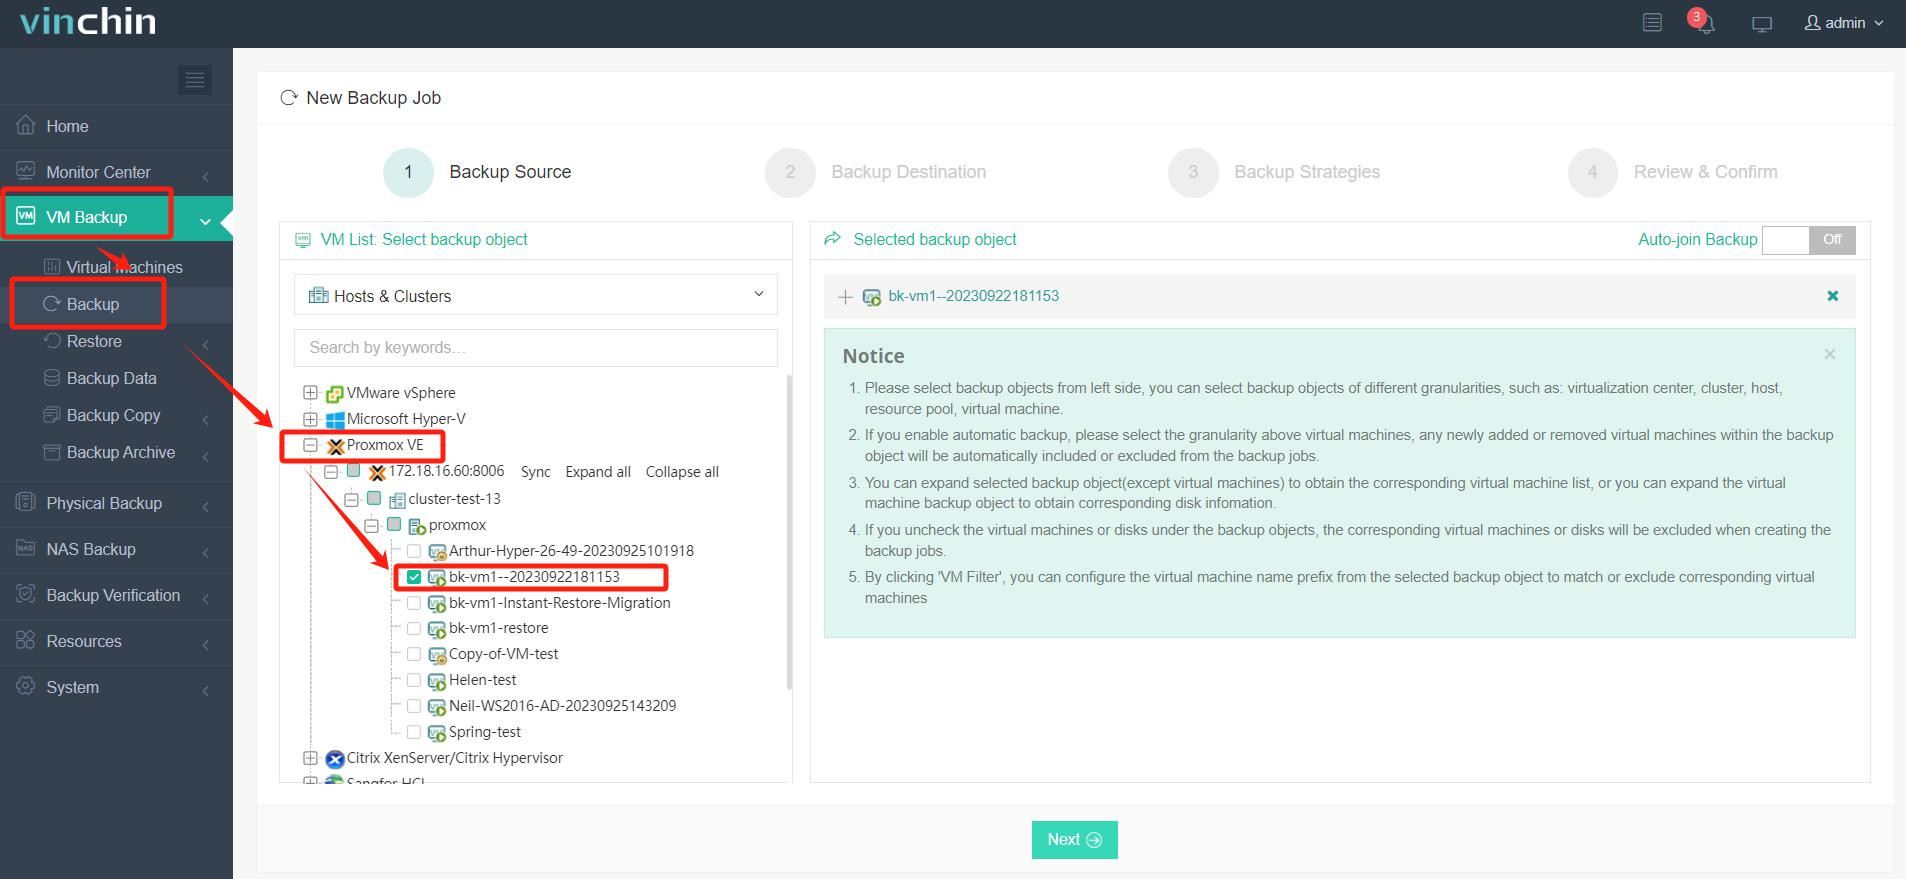
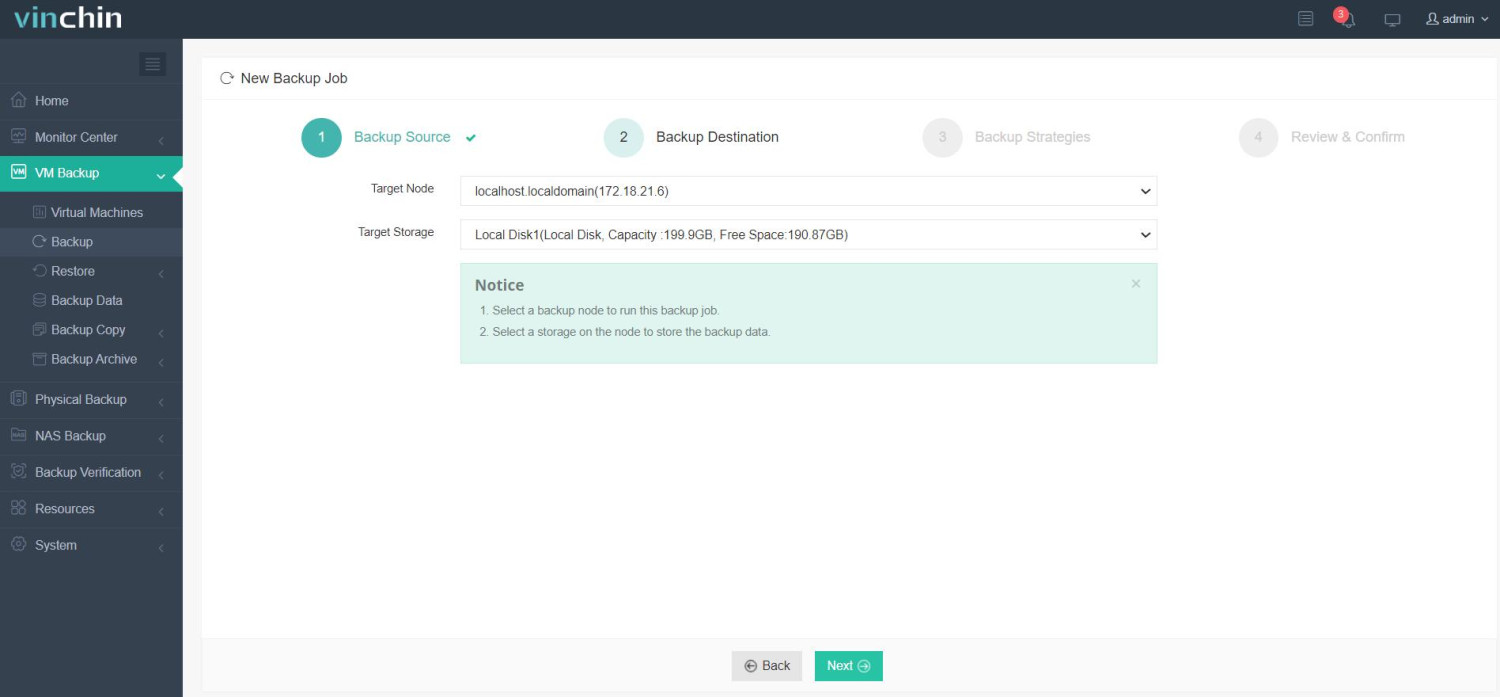
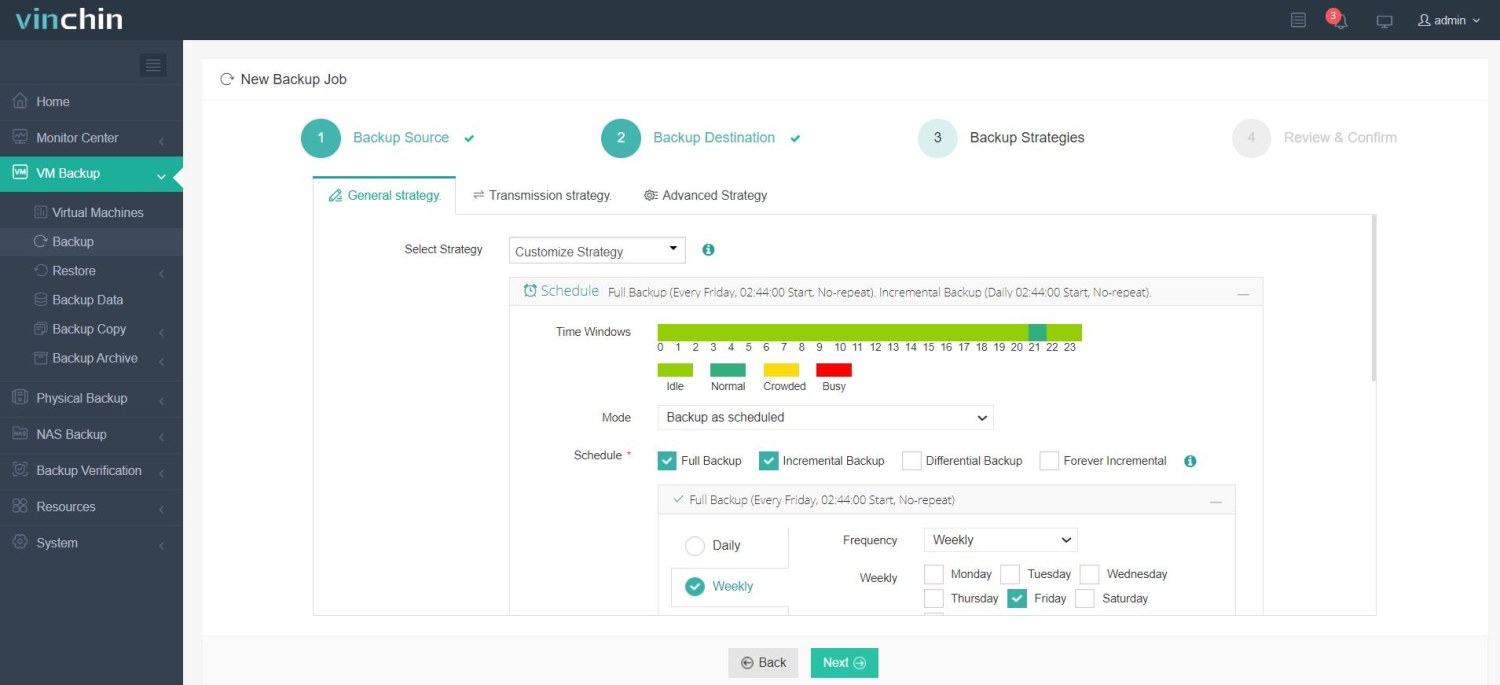
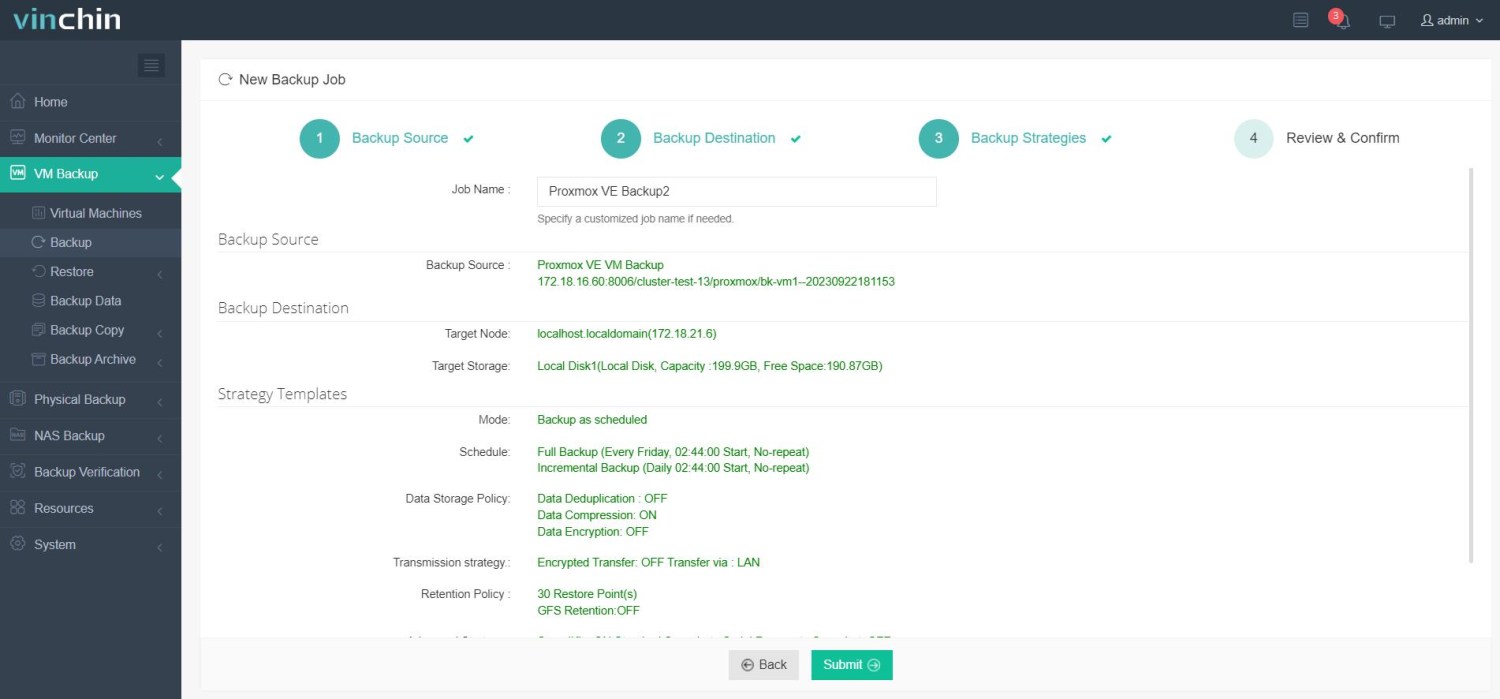
Backing up a Proxmox virtual machine with Vinchin Backup & Recovery involves just four straightforward steps thanks to its streamlined web interface:
Step 1: Select the Proxmox VM you wish to back up;

Step 2: Choose appropriate backup storage;

Step 3: Configure backup strategy according to business requirements;

Step 4: Submit the job.

Trusted worldwide by thousands of enterprises—with top industry ratings—Vinchin Backup & Recovery offers a fully functional free trial valid for sixty days so you can experience comprehensive data protection firsthand before making any commitment.
FAQs About Running macOS on Proxmox
Q1: Can I use GPU passthrough for better graphics performance?
A1: Yes—but only certain AMD GPUs are supported natively by recent versions of macOS; check official compatibility lists before purchasing hardware upgrades!
Q2: Why won’t my Apple ID sign-in work inside my new virtual Mac?
A2: iCloud/iMessage services require unique serial numbers configured properly within OpenCore settings otherwise authentication fails silently every time regardless credentials entered correctly elsewhere beforehand;
Q3: Is FileVault encryption safe/recommended under KVM-based setups?
A3: No—it may cause boot failures/conflicts during updates/recovery operations instead rely upon underlying hypervisor-level encryption mechanisms provided natively through host platform itself whenever possible instead;
Conclusion
Running macos on proxmox unlocks flexible testing environments without needing dedicated Apple gear—and optimizing performance ensures smooth daily operation long-term too! For reliable backups across all major virtualization stacks trust Vinchin’s enterprise-ready solutions designed specifically around real-world admin needs everywhere today.
Share on:


