As one of the most prominent and open-source software collaborations, Linux is the leading operating system on 3 types of servers including Linux File Server, Linux Web Server, and Linux Database Server with extensive distributions like Debian, openSUSE, Fedora Linux, Ubuntu, and hundreds of others.
Known for their scalability, high-end security, and flexibility, Linux servers are widely used among over 1 million organizations, which entail complete and reliable data protection against threats such as hardware failure, system downtime, or cyberattacks.
Backups are proven practices to avoid data loss in disasters. It is not only important but also necessary to know certain effective backup and recovery options for Linux servers. You can backup Linux files/folders and servers to multiple destinations in various ways. In this article, I'll give you 7 easy ways to protect Linux server data comprehensively.
Method 1: Backup Linux Server Using Rsync and Cronopete
Rsync is a Linux-based utility used to transfer and synchronize files and directories either locally or between hosts, using a remote shell or an rsync daemon.
Parameters:
| -verbose, -v | increase verbosity. |
|---|
| -stderr=e|a|c | change stderr output mode (default: errors). |
| -quiet, -q | suppress non-error messages. |
| -backup, -b | create backups (see --suffix & --backup-dir). |
| -backup-dir=DIR | create backups into a hierarchy based on DIR. |
| -suffix=SUFFIX | backup suffix (default ~ w/o --backup-dir). |
| -update, -u | exclude files that are newer on the receiver. |
| -checksum, -c | skip based on checksum. |
| -fake-super | store/restore privileged attrs using xattrs. |
| -exclude=PATTERN | rule out files matching PATTERN. |
| -exclude-from=FILE | read exclude patterns from FILE. |
| -include=PATTERN | include files matching PATTERN. |
| -include-from=FILE | read include patterns from FILE. |
For the whole option summary, visit Rsync website.
Backup Procudures:
1. Insert the backup medium and locate the drive letter with 'fdisk -l' command.
2. Open your terminal and run the following commands:
$ sudo rsync -aAXv / --exclude={"/dev/*","/proc/*","/sys/*","/tmp/*","/run/*","/mnt/*","/media/*","/lost+found"} /target_folderThis backs up the entire root directory except /dev, /proc, /sys, /tmp, /run, /mnt, /media, /lost+found directories and saves them in the target folder.
3. Backup a home directory with large MS Word files and mail folders:
rsync -aiz . bkhost:backup/user_name/
Recovery procedures:
Cronopete is a Linux clone of Time Machine and a backup tool for Mac. You can copy and restore all the user files on a separate hard disk, but it is not for the backup of the whole operating system.
1. Install Cronopete and type the following command from the terminal:
$ cronopete
2. Click Configure now on the welcome page.
3. Plug in the external HDD or USB and click Change disk.
4. Choose your USB disk and click Select. Repeat the step for other backup disks.
5. Click Format disk to format the disks for backups.
6. The tool immediately starts to back up the entire $HOME directory by default. You can define the backup objects from the Options section and specify the time interval between backups.
7. To restore the data, right-click the Cronopete icon on the menu and select Restore files. Next, choose the source files or folders from the backup USB and click Restore files on the top left.
Method 2: Backup Linux Server Using Bera
Bera is a backup system to easily backup all the important files, and folders, serves configuration, and restore them in the same server or move to another one. This tool can perform full backup and recovery, and migrate a complex server in 10m. It is also able to exclude domains, files, and folders, and uses SSH to secure transmission.
Parameters:
| backupOrigin | refers to local if the backup is on the server or SSH if it is from other locations. |
|---|
| backupLocalDir | local directory where the backup is located. |
| backupRemoteUser | connect to the backup server via SSH. |
| Backupremoteserver | remote SSH backup server. |
| backupRemotePort | SSH server port. |
| backupRemoteDir | remote backup directory. |
Backup Procedures:
Preparation:
• Linux server
• Rsync
• SSH
• Root access to both the source and target systems
1. Install the SO, config network, install packages, etc., to configure the server.
2. Download service configurations, files, folders, and others using Bera.
3. Upload the following files to the server and set permissions:
chmod +x bera-backup.sh
chmod +x bera-restore.sh
The config file of each script needs like _bera_restore_config_example and _bera_backup_config_example
4. Backup a Linux server in the designated folder:
./bera-backup.sh PATH_TO_CONFIG_FILE
Recovery Procedures:
Download the backup from the server and restore:
./bera-restore.sh PATH_TO_CONFIG_FILE
Method 3: Backup Linux Server Using Tar
Tar, short for tape archive, is to compress and archive multiple files and directories for easy storage distribution, known as a tarball. It creates backups using tar, gzip, and bzip.
Parameters:
| -c | create a new archive. |
|---|
| -v | offer verbose output. |
| -f | define the archive file to be used. |
| -t | make a list of the files in an archive. |
| -x | extract the backup. |
| -z | zip. |
Backup Procedures:
1. Create a tar backup.
# tar -cvf backup_name.tar /home/user
2. Create a tar.gz backup.
# tar -cvfz backup_name.tar.gz /home/user
3. Exclude the files.
# tar --exclude file.txt --exclude file.sh -cvfz backup_name.tar.gz
4. Extract content from a backup.
# tar -xvfz backup_name.tar.gz /backup/directory/file.txt
5. Archive all files in the server into a gzip format, exclude the backup created earlier, and create a new directory for backup. Make sure that the server is not in maintenance mode.
sudo tar –cvpzf backup_name.tar.gz –exclude=/home/server/backup.tar.gz –one-file-system
Recovery Procedures:
Restore the tar.gz backup.
# tar -xvpf /media/your_harddisk/backup.tar.gz
Method 4: Backup Linux Server Using Cpio
Cpio, copy in/out, is a file archiver utility to create and extract archives or copy files to another place.
Parameters:
| -O | read the standard input. |
|---|
| -i | extract files from the standard input. |
| -c | read or write the header information in ASCII character. |
| -d | create directories if needed. |
| -u | copy unconditionally so the new file won’t overwrite the older file. |
Backup Procedures:
1. Backup the files.
#ls file * /cpio -acvf >/root/backup.cpio
2. View the backup content.
#cpio -it </root/backup.cpio
#cpio -it -I /root/backup .cpio
Recovery Procedures:
Restore the backup files.
#cpio -icuvd </root/backup.cpio
Method 5: Backup Linux Server Using DD Command
DD (Disk to Disk) creates the backup of one partition to another.
Linux Server Backup
1. Create the backup.
#dd if=source_partition of=destination_partition
2. Create a duplicate partition with the existing partition without creating any backup file.
dd if=existing_source_partition of=destination_partition
Linux Server Recovery
Restore the backup partition to another empty partition.
#dd if=destination_partition of=another_empty_partition
Method 6: Backup Linux Server Using SCP and Timeshift
SCP (Secure Copy) copies data from one Unix/Linux system to another in the same machine, from the local machine to the remote machine and vice versa, or between different remote servers.
Parameters:
| -r | recursively. |
|---|
| -q | no progress indicator is shown. |
| -v | verbose mode. |
| -p | copy files with the specified port number. |
Backup Procedures:
Preparation:
• Have permission to copy files on the target system.
• Have either an account on the target machine or an authorized public key on it.
• Have read permission on the source machine and write permission on the target.
1. Copy the file from the local to a remote server.
#scp filename root@serverxxx.example.com:/root
2. Copy files from the remote to the local server.
#scp root@serverxxx.example.com:/root/backup*
3. Replicate a directory.
#scp –r directory root@serverxxx.example.com: /root
4. Use blowfish or arcfour encryption to improve performance.
#scp -c blowfish filename root@serverxxx.example.com.com:
5. Specify the port number.
#scp -p xxxx backup_file root@serverxxx.example.com:/tmp
Recovery Procedures:
Timeshift is a system restore tool pre-installed on some Linux distros and allows for point-in-time recovery.
1. Install Timeshift in the terminal.
On Ubuntu and derivatives:
sudo add-apt-repository -y ppa:teejee2008/timeshift
sudo apt-get update
sudo apt-get install timeshift
On Fedora, CentOS, and RHEL:
sudo dnf install timeshift
On Arch Linux and Manjaro:
yay -S timeshift
2. Open the Applications menu, search, and launch Timeshift. Enter the credentials and press Authenticate.
3. Set setting preferences on the Setup Wizard.
Choose a snapshot type between Rsync and Btrfs and click Next.
Specify a location for the Timeshift snapshots and click Next.
Choose a snapshot frequency depending on how often you change your system elements.
Select the snapshot levels and click Next.
Choose back up the home folder to the snapshot or not and click Next.
Click Finish.
4. Click Restore on the main window when the system is working and select the snapshot to restore.
Method 7: Backup Linux Server Vinchin Backup & Recovery
Vinchin Backup & Recovery is a professional backup software compatiable with over 15+ virtual machine platforms (such as VMware, Hyper-V, Xen, Oracle OLVM, etc.), 7 databases, NAS, Windows/Linux servers, and Kubernetes container. It provides speedy and effective backup and worry-free recovery options as follows with an extremely affordable and flexible pricing model.
It supports the following Linux platforms:
Automated backup scheduling
Fully automate backup tasks with flexible scheduling options and email notifications for abnormal events or job failures.
Multiple backup strategies
Support various backup modes, including Full, Differential, Incremental, and Forever Incremental backups to meet different data protection needs.
Intelligent optimization techniques
Improve storage efficiency with data deduplication and compression, significantly reducing backup size, while ensuring secure data transfer via SSL encryption.
Fast and secure server recovery
Enable rapid Linux server recovery using multi-threaded transfer technology and encrypted transmission for enhanced security and performance.
Built-in anti-ransomware protection
Protect backup data stored on the backup server from unauthorized access, modification, and potential ransomware attacks.
Offsite backup replication
Create and maintain offsite backup copies in remote locations to ensure business continuity and disaster recovery readiness.
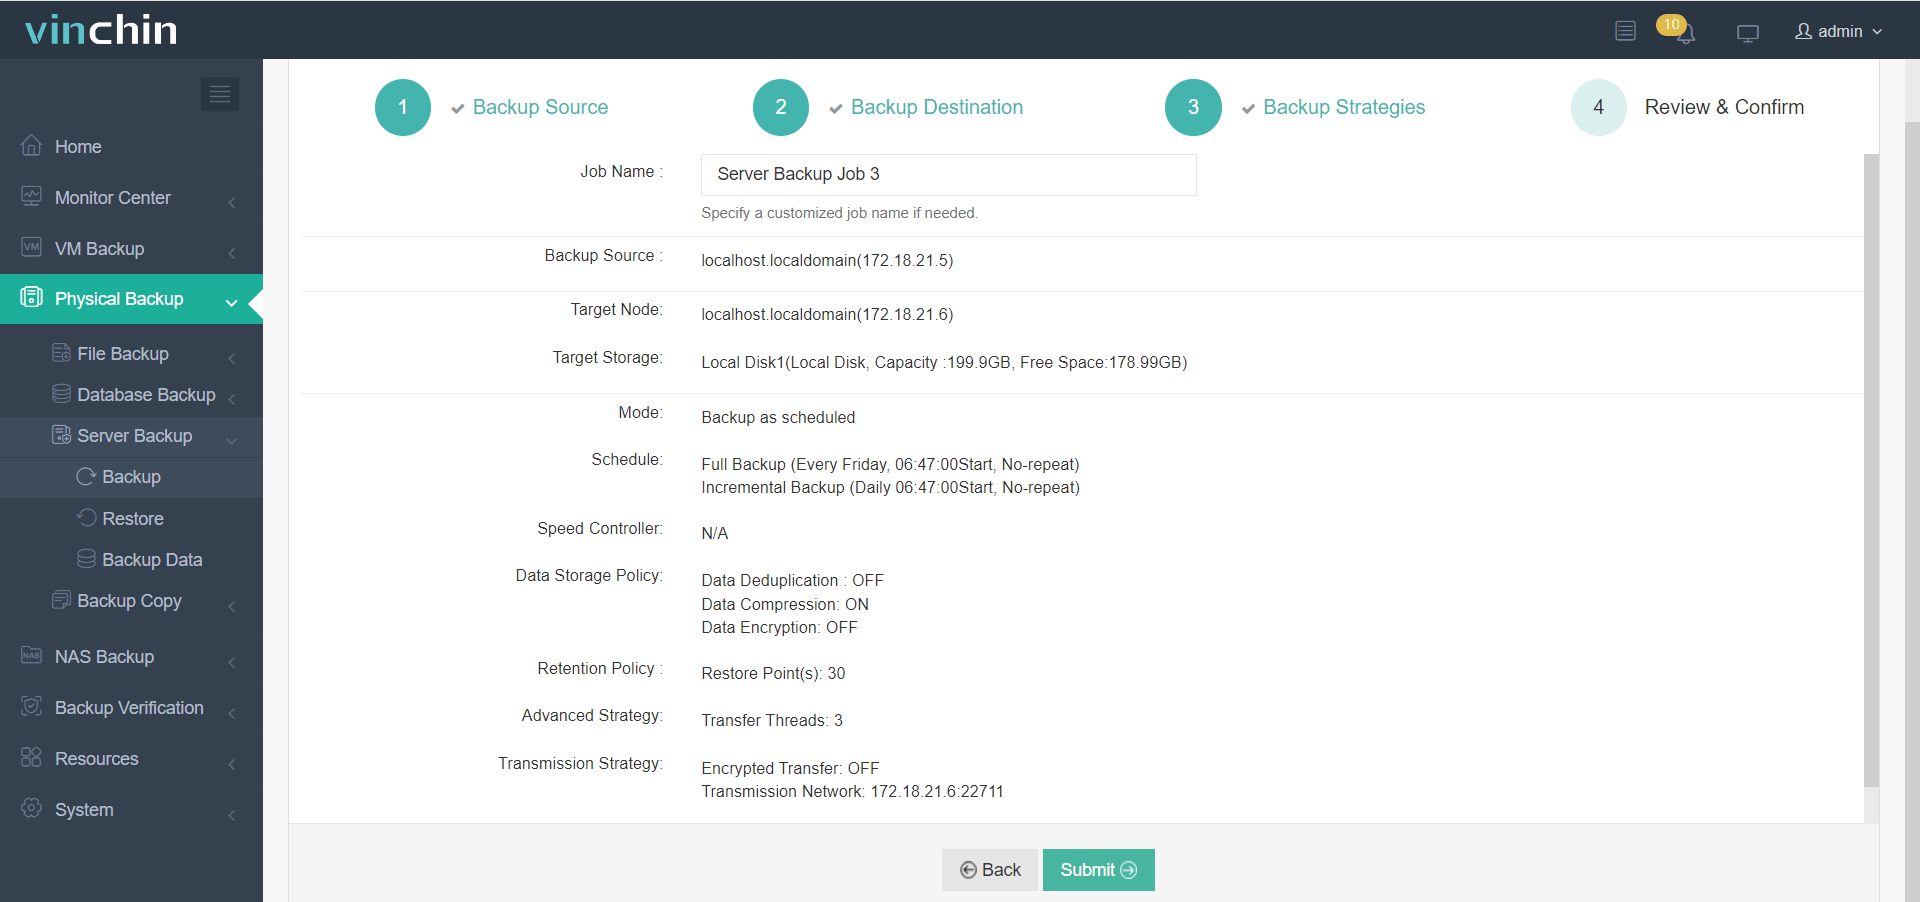
With an intuitive web interface, it's simpler than ever to backup a Linux Server:
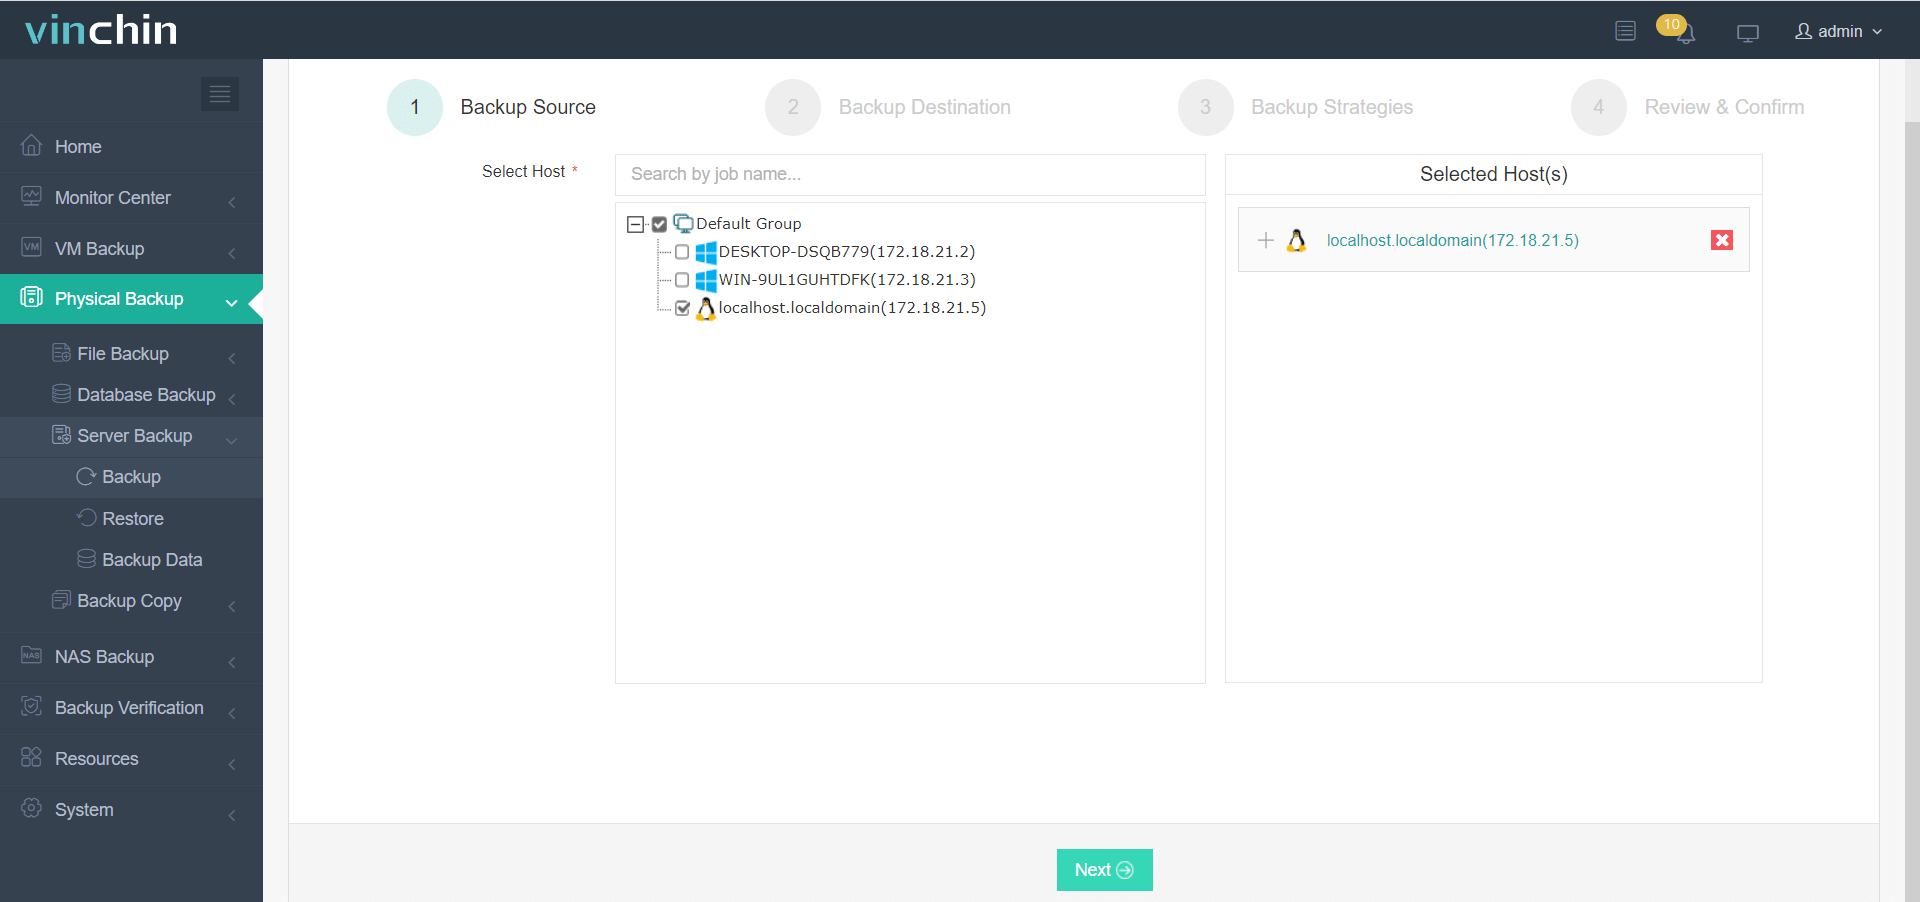
Go to Physical Backup > Server Backup > Backup and select a licensed Linux host.
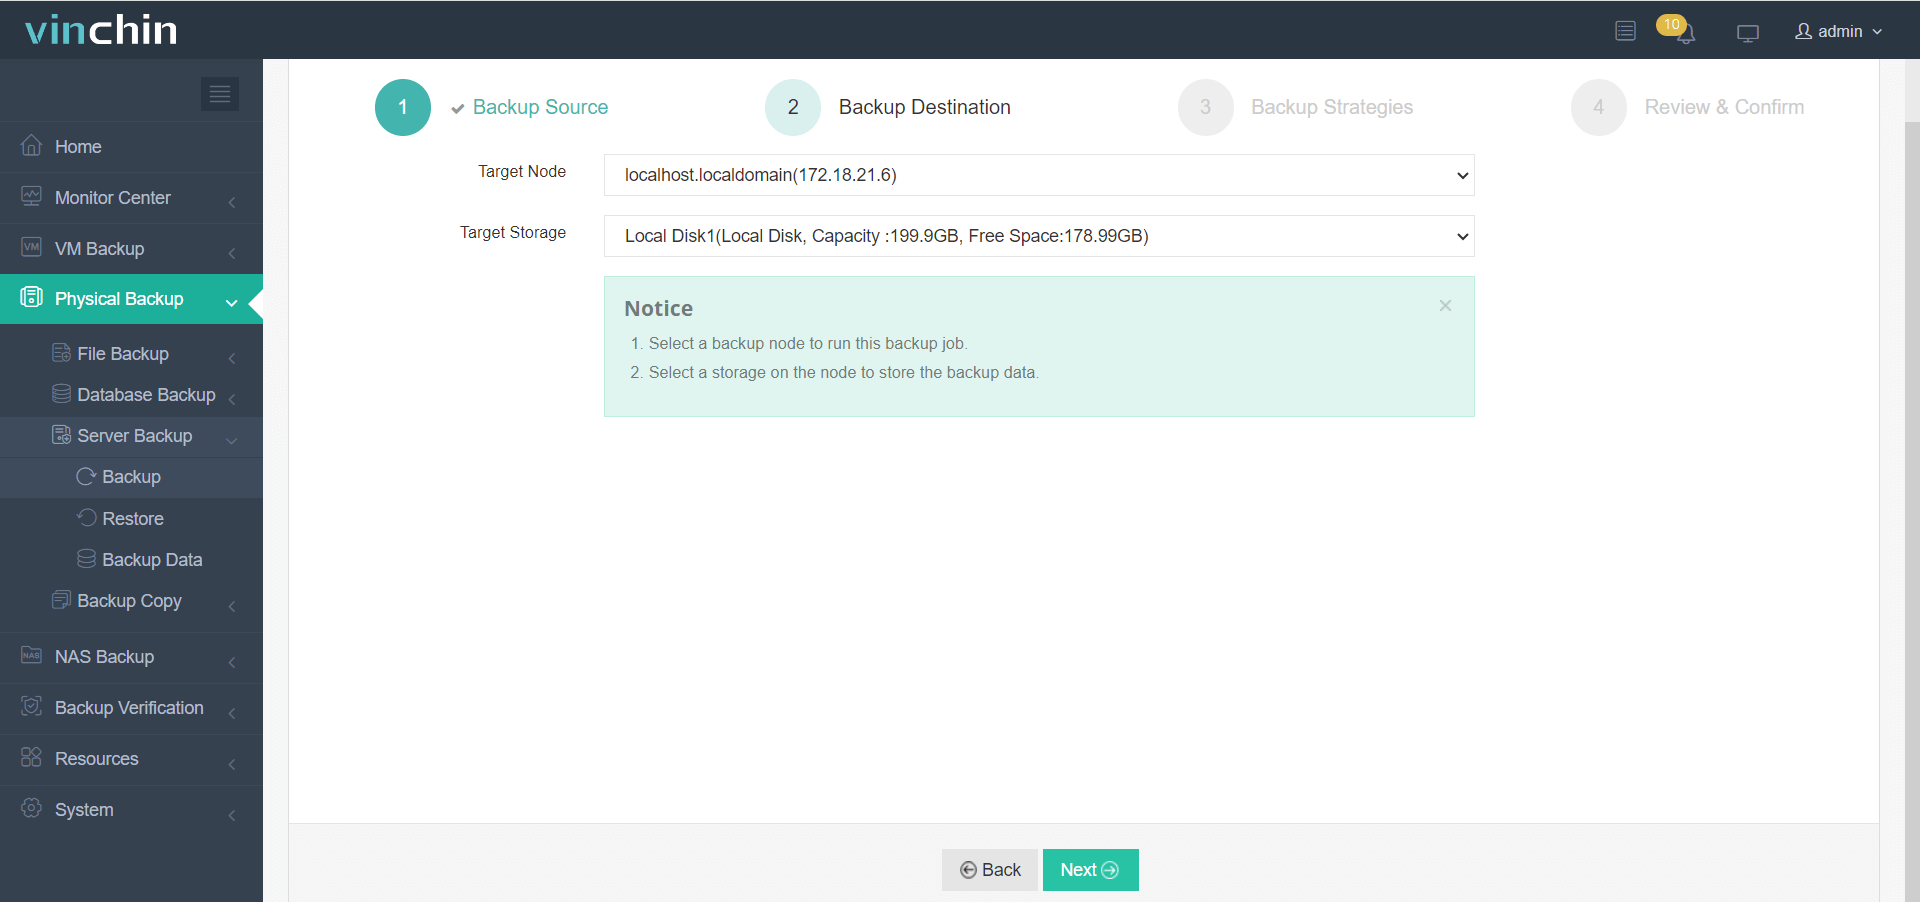
2. Choose a target node and storage from the drop-down.
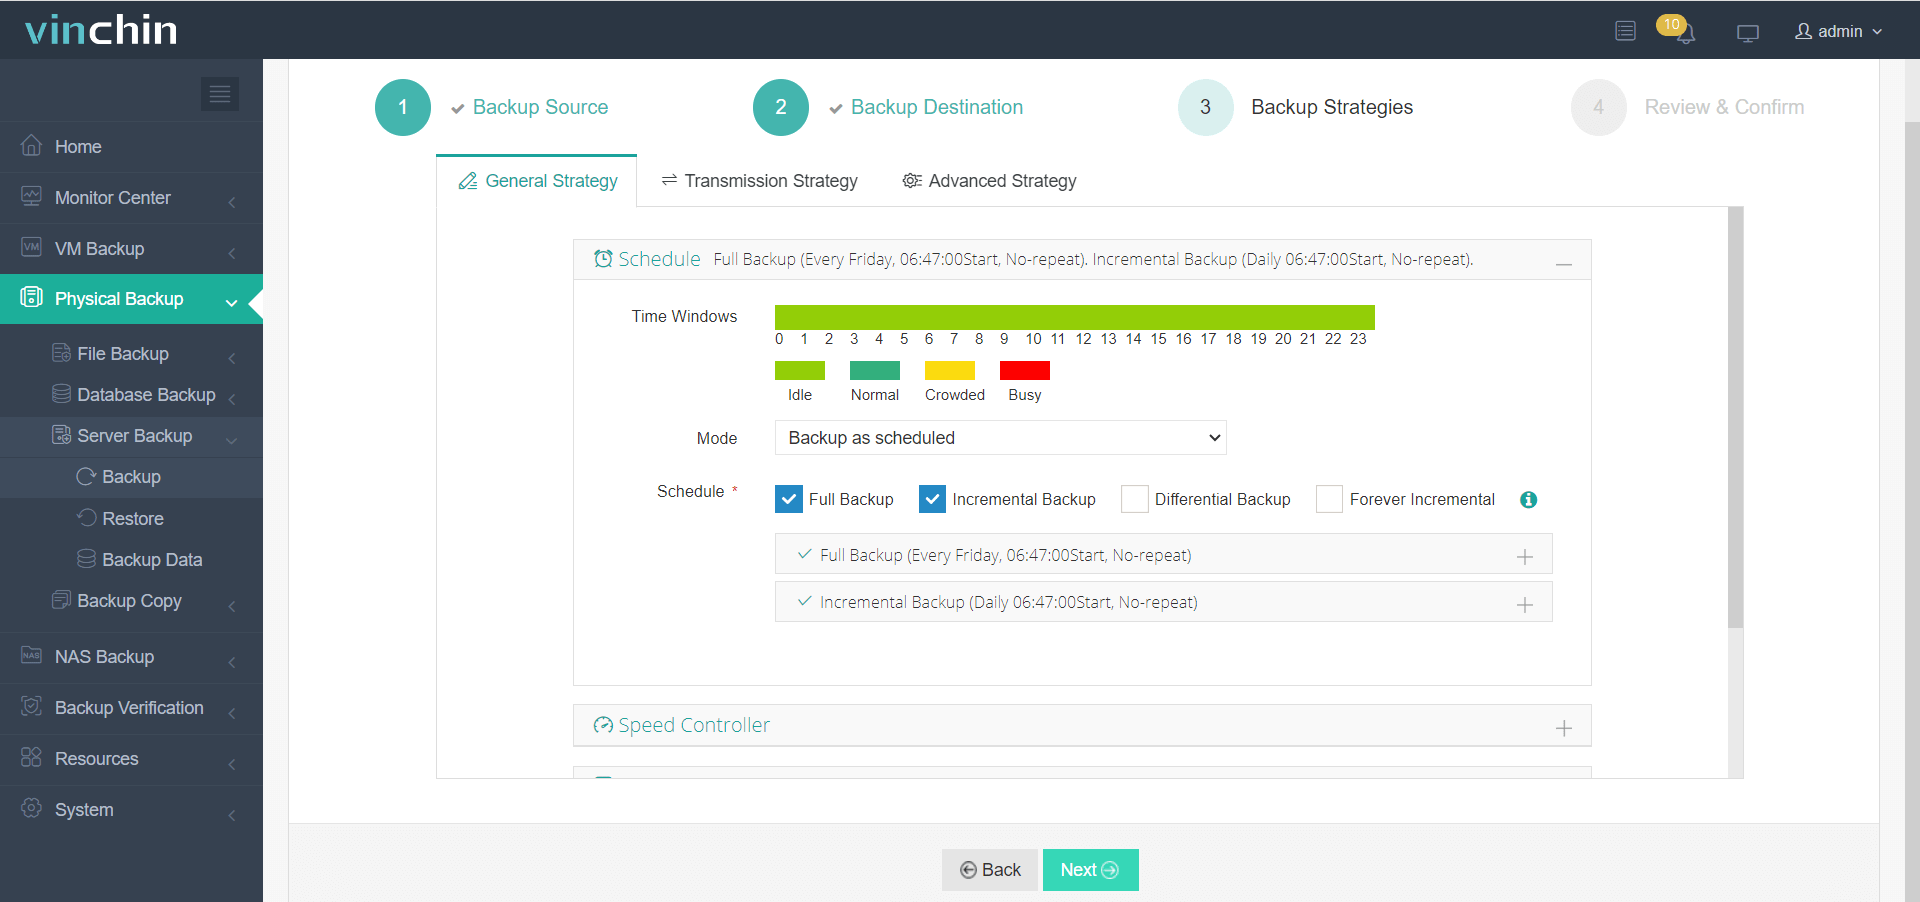
3. Configure backup strategies like schedules, backup types, data reduction and retention policies, encrypted transmission, and more.
4. Review and hit Submit. The job will run on schedule.
How to restore Linux Servers With Vinchin?
1. Go to Physical Backup>Server Backup>restore, and select the Linux host you backed up just now from the expanded list.
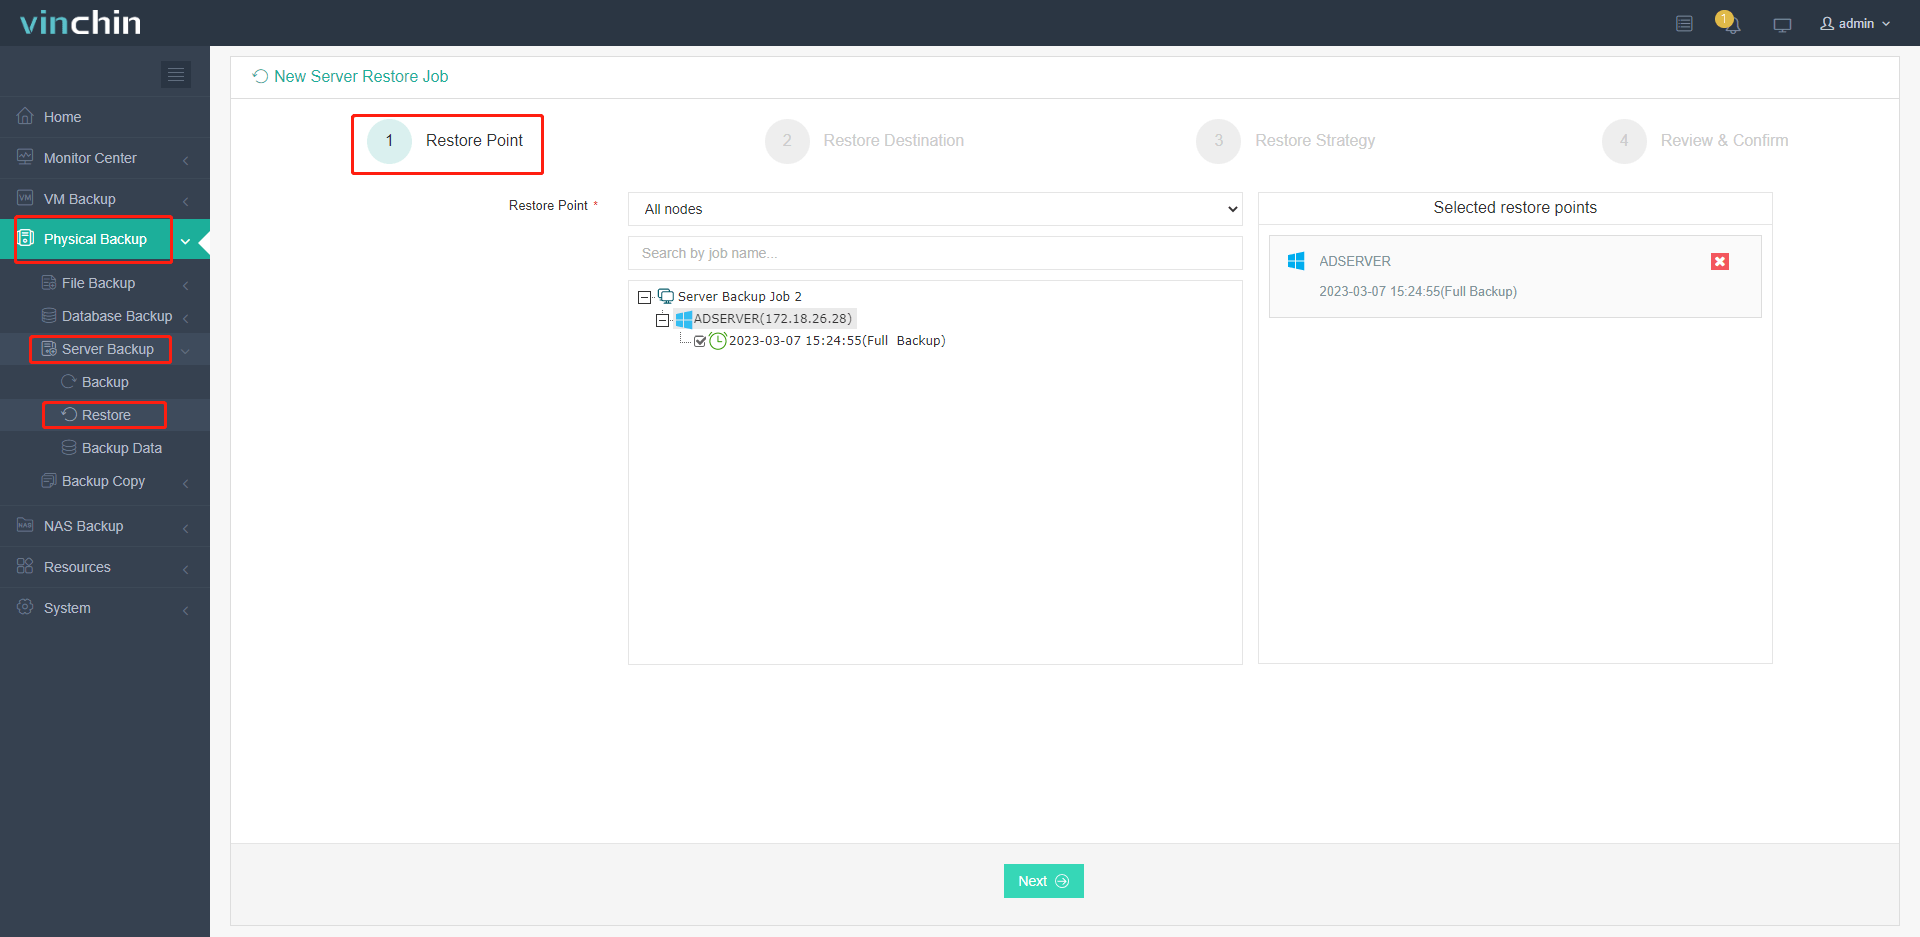
2. Then, select the target host as the restore destination and set the volumes as well.

3. Configure the restore strategy; either to run the task immediately or schedule it (daily/weekly/monthly).
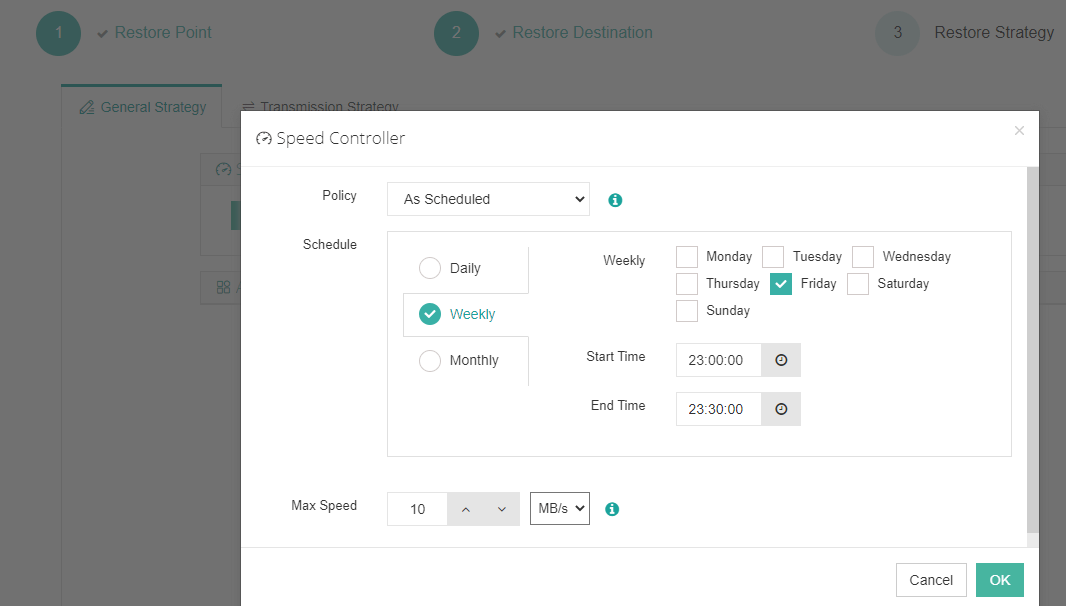
4. Finally, name the job, check all the details, and click Submit to initiate the recovery task.
Care for a test? Download the 60-day full-featured free trial of the new release Vinchin Backup & Recovery now to backup your Linux data.
Linux Server Backup FAQs
1. Can you backup running Linux server without downtime?
Yes. With Vinchin Backup & Recovery, you just need to create the backup jobs and then your Linux servers will be backed up no matter they are running or powered off.
2. Can you backup a Linux server remotely?
Yes. Vinchin Backup & Recovery supports backing up Linux servers in both local and branch offices via a centralized console.
3. How can you backup a virtual machine on Linux?
For the native KVM virtual machines, you can use their commands to backup them; for enterprise KVM virtual machines like OLVM, oVirt, Proxmox, RHV, etc., you can use Vinchin Backup & Recovery to perform agentless backup to easily backup them.
Wrap up
Sever backup and restore are extremely important for organizations in case of data loss accidents. I introduced 7 ways in this article to back up and recover Linux servers easily. Since command lines are too many to recite, and risks of backup disk corruption and storage getting damaged exist, server users can resort to a professional server backup solution with a management GUI, various backup options, and data recovery like Vinchin Backup & Recovery for complete data protection.